Go ahead and dig into that stash. You know the one. Those beautiful skeins of DK weight yarn you’ve been saving for "the right project." This is it.
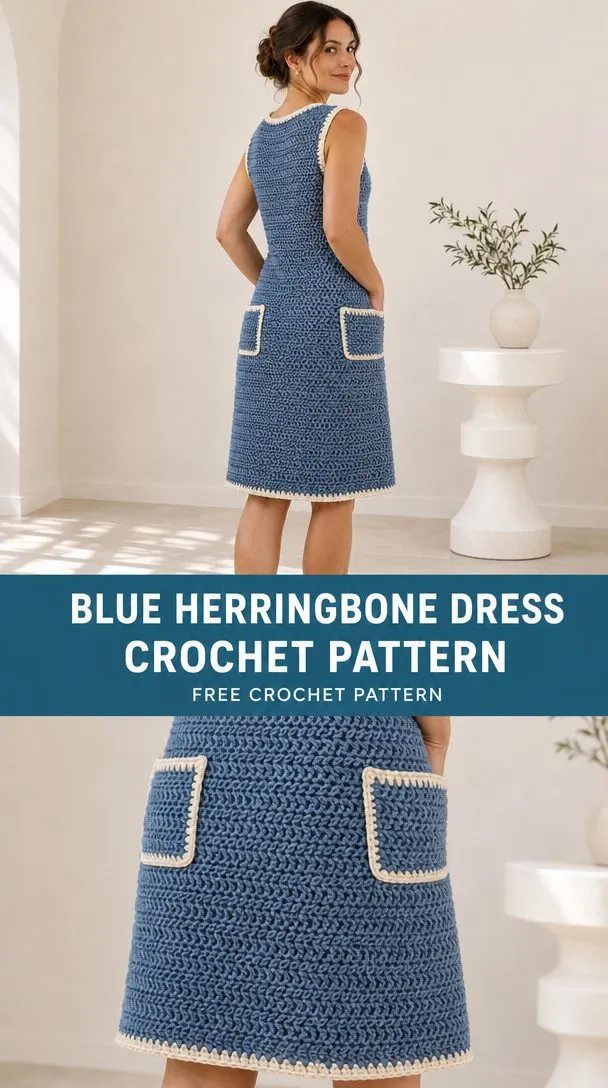
This Blue Herringbone Dress uses the herringbone half double crochet stitch to create a stunning textured fabric that drapes beautifully. The construction is straightforward: two flat panels worked from the bottom up, shaped armholes, separate shoulders, then seamed together. If you can work a half double crochet and follow row counts, you can absolutely make this dress.
The skill level sits solidly in the intermediate range. You’ll need to be comfortable with shaping, working the herringbone stitch consistently, and seaming panels together. But nothing here is fussy or overly complicated. Just steady, satisfying stitchwork that builds into something genuinely wearable and elegant.
About This Design
This fitted sleeveless dress features the herringbone half double crochet (hhdc) as its signature texture. The stitch creates a subtle diagonal weave that catches light beautifully and gives the fabric more drape than standard half double crochet. It’s the kind of stitch that looks complex but becomes rhythmic once you get the hang of it.
The worked example measures approximately 107.5 cm around the bust and hips with a total length of 92.5 cm from shoulder to hem. This includes a 5 cm ribbed hem band worked separately and sewn on. The design offers about 7.5 to 11.5 cm of positive ease, making it a relaxed but flattering fit for body measurements of 96 to 100 cm bust and hips no larger than 100 cm.
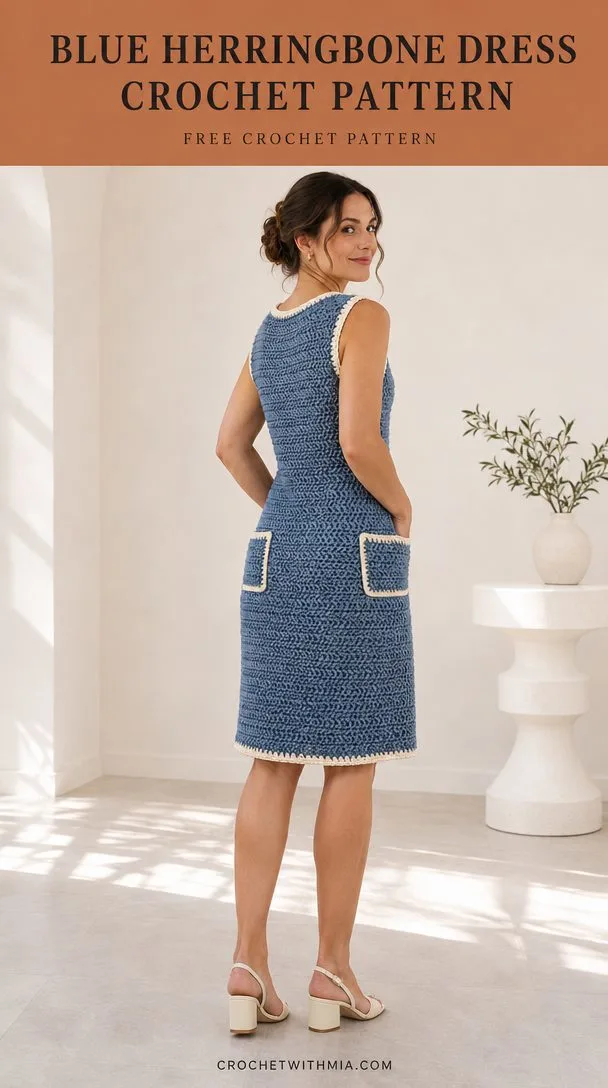
Two patch pockets with contrasting ivory trim add a charming vintage touch. The neckline and armholes also receive a simple single crochet border in ivory, tying the whole look together.
Materials and Tools
Before you begin, gather everything you need. A smoothly plied yarn will show off the herringbone texture best.
Yarn: DK weight smooth wool/cotton blend, 120 m per 50 g
- Dusty blue: 800 g (approximately 1920 m)
- Ivory: 50 g (reserved for pocket and neckline trim)
- Total: 850 g / 2040 m
Hooks:
- 4 mm for main fabric
- 3.5 mm for edgings and hem band
Notions:
- Tapestry needle
- Measuring tape
- 10 stitch markers
- Blocking mat and pins
The yarn quantities include approximately 15% allowance and are estimates rather than sample-measured usage. Always buy an extra skein if you tend to crochet loosely or plan to modify the length.
Gauge
Getting gauge right matters for garment fit. Take the time to swatch before committing to the full project.
16 pattern positions and 12 rows = 10 x 10 cm in herringbone half double crochet after washing.
Make a swatch 38 stitches wide (2 edge stitches plus 36 texture positions) and at least 20 rows deep. Wash your swatch, dry it flat, and measure the center 10 cm square.
If your width is off, change hook size. If your height differs but width is correct, work to the measurements in the schematic and record your actual row count. The pattern provides measurements at key checkpoints so you can adjust as needed.
Abbreviations and Special Stitches
Here are all the terms you’ll encounter:
- ch = chain
- sl st = slip stitch
- sc = single crochet
- hdc = half double crochet
- dc = double crochet
- st(s) = stitch(es)
- sp = space
- sk = skip
- rep = repeat
- RS/WS = right side/wrong side
- BLO = back loop only (inserting your hook under only the back loop of the stitch)
- yo = yarn over
Herringbone Half Double Crochet (hhdc)
This is the star stitch of the pattern. It creates a distinctive slanted texture.
To work hhdc: Yarn over, insert hook in next stitch, yarn over and draw through the stitch AND the first loop on hook in one motion. Yarn over and draw through one loop. Yarn over and draw through both remaining loops.
The key difference from regular hdc is pulling through the stitch and first loop together. This creates the signature herringbone lean. Practice on your gauge swatch until it feels natural.
Pattern Notes
Read through these before starting. They’ll save you confusion later.
- All measurements are after washing and drying flat
- Turn after every flat row
- Chain 1 for sc/hdc rows and chain 2 for dc rows do NOT count as stitches
- Work your first stitch into the first stitch, not into the turning chain
- Square brackets [ ] group a repeat
- Stitch counts in brackets at the end of each instruction show your total
- Right and left refer to the wearer’s perspective
- Do not crochet over abandoned neckline or armhole stitches
Construction Overview
The dress is built from two matching panels (front and back) worked from hem to shoulders. Here’s the sequence:
- Work the back lower panel from foundation to armhole
- Shape the back yoke and shoulders
- Repeat for the front panel with deeper neck shaping
- Work two hem bands separately
- Work two patch pockets
- Seam shoulders and sides
- Attach hem bands
- Add neck and armhole edgings
- Attach pockets
- Block and finish
Key Measurements
| Measurement | Worked Size |
|---|---|
| Body width, one panel | 53.75 cm / 86 positions |
| Upper yoke width | 46.25 cm / 74 positions |
| Armhole depth | 22.5 cm / 27 nominal rows |
| Shoulder width | 13.75 cm / 22 positions |
| Neck width | 18.75 cm / 30 positions |
| Total length | 92.5 cm including 5 cm hem band |
Instructions
Back Lower Panel
Foundation: Ch 88. Dc in 3rd ch from hook and in every remaining ch. [86 dc]
Body Rows 2-78: Work the herringbone hdc texture across all 86 positions. Ch 1 to turn at the end of each row. Continue until piece measures 65 cm from foundation. [86 positions]
Back Yoke
Row numbering restarts here.
Yoke Row 1: Sl st across first 6 positions. Ch 2, work next 74 stitches in established herringbone pattern. Leave final 6 stitches unworked. Turn. [74 positions]
Yoke Rows 2-24: Work even in pattern. [74 positions]
Yoke Row 25: Work first 22 positions only. Leave middle 30 and opposite 22 unworked. [22 positions]
Yoke Rows 26-27: Work shoulder even. Fasten off. [22 positions]
Other Shoulder Rows 25-27: Rejoin yarn at outer edge of opposite 22 positions. Work even. Fasten off. [22 positions]
Front Lower Panel
Foundation and Body Rows 2-78: Repeat the back lower panel exactly. [86 positions]
Front Yoke
The front neck is deeper than the back, so shaping begins earlier.
Yoke Row 1: Repeat back Yoke Row 1. [74 positions]
Yoke Rows 2-15: Work even. [74 positions]
Yoke Row 16: Work first 22 positions only. Leave middle 30 and opposite 22 unworked. [22 positions]
Yoke Rows 17-27: Work first shoulder even. Fasten off. [22 positions]
Other Shoulder Rows 16-27: Rejoin yarn at outer edge of final 22 positions. Work even. Fasten off. [22 positions]
Hem Band (Make Two)
Switch to 3.5 mm hook for the hem bands.
Band Row 1: Ch 11. Sc in 2nd ch from hook and in each remaining ch. [10 sc]
Band Row 2: Ch 1, turn. Sc BLO in each sc. [10 sc]
Repeat Band Row 2 until the strip measures 53.75 cm unstretched. Record your row count as B. Make the second strip with the same number of rows.
Each finished strip should be approximately 5 cm deep.
Patch Pockets (Make Two)
Pocket Row 1: Ch 23. Sc in 2nd ch from hook and in each remaining ch. [22 sc]
Pocket Rows 2-24: Ch 1, turn. Sc in every sc. [22 sc]
Block each pocket to 13 x 14 cm. Using ivory yarn, work one round of sc around all four edges, adding 3 sc at each corner to keep the border flat.
Position pockets on the back of the dress as shown in the reference image.
Assembly
Grab your tapestry needle and dusty blue yarn.
Seam Pass 1: Join matching shoulder stitches using mattress stitch. [2 seams x 22 positions each]
Seam Pass 2: Join each side seam below the stepped armholes. [2 seams x 78 body row ends each]
Seam Pass 3: Sew each hem strip to its matching lower panel edge, easing the B band rows across 86 body stitches. Join the band ends at the side seams. [2 strips]
Assembly Checkpoint
Before moving on, verify:
- Garment circumference is approximately 107.5 cm
- Total length is approximately 92.5 cm
- Shoulders align properly
- Both armholes measure 22.5 cm deep
Edgings and Details
Switch to 3.5 mm hook and ivory yarn for the trim.
Neckline Border
Neck Round 1: Working around the entire neckline opening, sc in each exposed stitch. Work 2 sc in each dc row end (or 1 sc per sc row end). Add extra sc at corners only if needed to keep the border flat. Record your total as N. [N sc]
Neck Round 2: Sc in every stitch. At a V-point (if applicable), work sc3tog once to maintain the shape. Sl st to first sc to join. Fasten off. [N sc]
Armhole Borders
Armhole Round 1: Sc in each stitch across the underarm step. Work 2 sc per dc row end along the sides. Record count as A. [A sc]
Armhole Round 2: Sc in each sc. Sl st to first sc to join. Fasten off. Repeat on second armhole. [A sc per opening]
Pocket Attachment
Sew the sides and lower edge of each pocket to the back panel, leaving the top open. Reinforce the upper corners with 4 backstitches each for durability.
Edging Checkpoint
- Borders lie flat without rippling or pulling
- Neckline passes comfortably over the head
- Pocket openings remain open
- If any edging feels too tight, frog and rework with a larger hook
Finishing
You’re in the home stretch.
Finishing Pass 1: Weave in all yarn tails. Thread each tail through at least 5 cm of matching stitches, reverse direction, and repeat. No loose ends should remain.
Finishing Pass 2: Wash the finished garment gently in cool water with mild detergent. Do not wring. Support the weight of the wet fabric, reshape on a towel, and dry flat to schematic measurements.
Shape the herringbone texture with your fingertips rather than pressing hard with an iron. The stitches should retain their dimensional quality.
Final Checkpoint
- Dried garment measures approximately 107.5 cm around the body
- Total length is approximately 92.5 cm
- Comfortable stride, arm movement, and neckline fit
Care Instructions
Follow your yarn label for specific guidance, but generally:
- Hand wash in cool water with mild detergent
- Do not wring or twist
- Support the garment’s weight when wet
- Reshape and dry flat away from direct heat
- Store folded to prevent stretching
Customization Tips
Want to adjust the fit? Here are some guidelines:
To change circumference by 15 cm: Add or remove 12 positions per panel. Recalculate shoulder widths while keeping the neckline centered. Always swatch the full texture first.
For a longer dress: Add more body rows before beginning the yoke shaping. Each additional 10 rows adds approximately 8.3 cm to the length.
For walking ease: Leave the lowest 12 cm of side seams open to create walking slits.
Why the Herringbone Stitch Works Here
The herringbone half double crochet was chosen for this design because it creates fabric with excellent drape. Unlike standard hdc, which can feel stiff, the herringbone version has a subtle bias that allows the dress to move with the body.
The stitch also creates visual interest without being overwhelming. The diagonal lines draw the eye and add texture, but the overall effect remains elegant rather than busy. It’s the kind of detail that makes people ask, "Did you make that?"
A Note on This Pattern
This is an AI-assisted draft pattern that has been reviewed for count arithmetic and section completeness. However, no physical crochet sample or fit test has been completed. The reference images represent a concept visualization, and your finished dress may vary in exact texture and drape.
Consider making a small test swatch of the herringbone stitch before committing to the full project. This will help you become comfortable with the technique and verify your gauge.
This Blue Herringbone Dress crochet pattern is the kind of project that feels like an accomplishment. It takes time and attention, but every row builds toward something genuinely beautiful and wearable. The herringbone texture, the vintage-inspired pockets, the clean ivory trim. It all comes together into a dress you’ll be proud to wear.
If you make this dress, save your progress photos. And when you’re done, share the finished piece on Instagram or Facebook. Seeing your makes is genuinely the best part.
Pin this Blue Herringbone Dress pattern to your crochet board so you can find it when you’re ready to cast on. And if you do make it, drop a comment below. Tell us about your yarn choice, any modifications you made, or just how satisfying that herringbone stitch felt once it clicked.