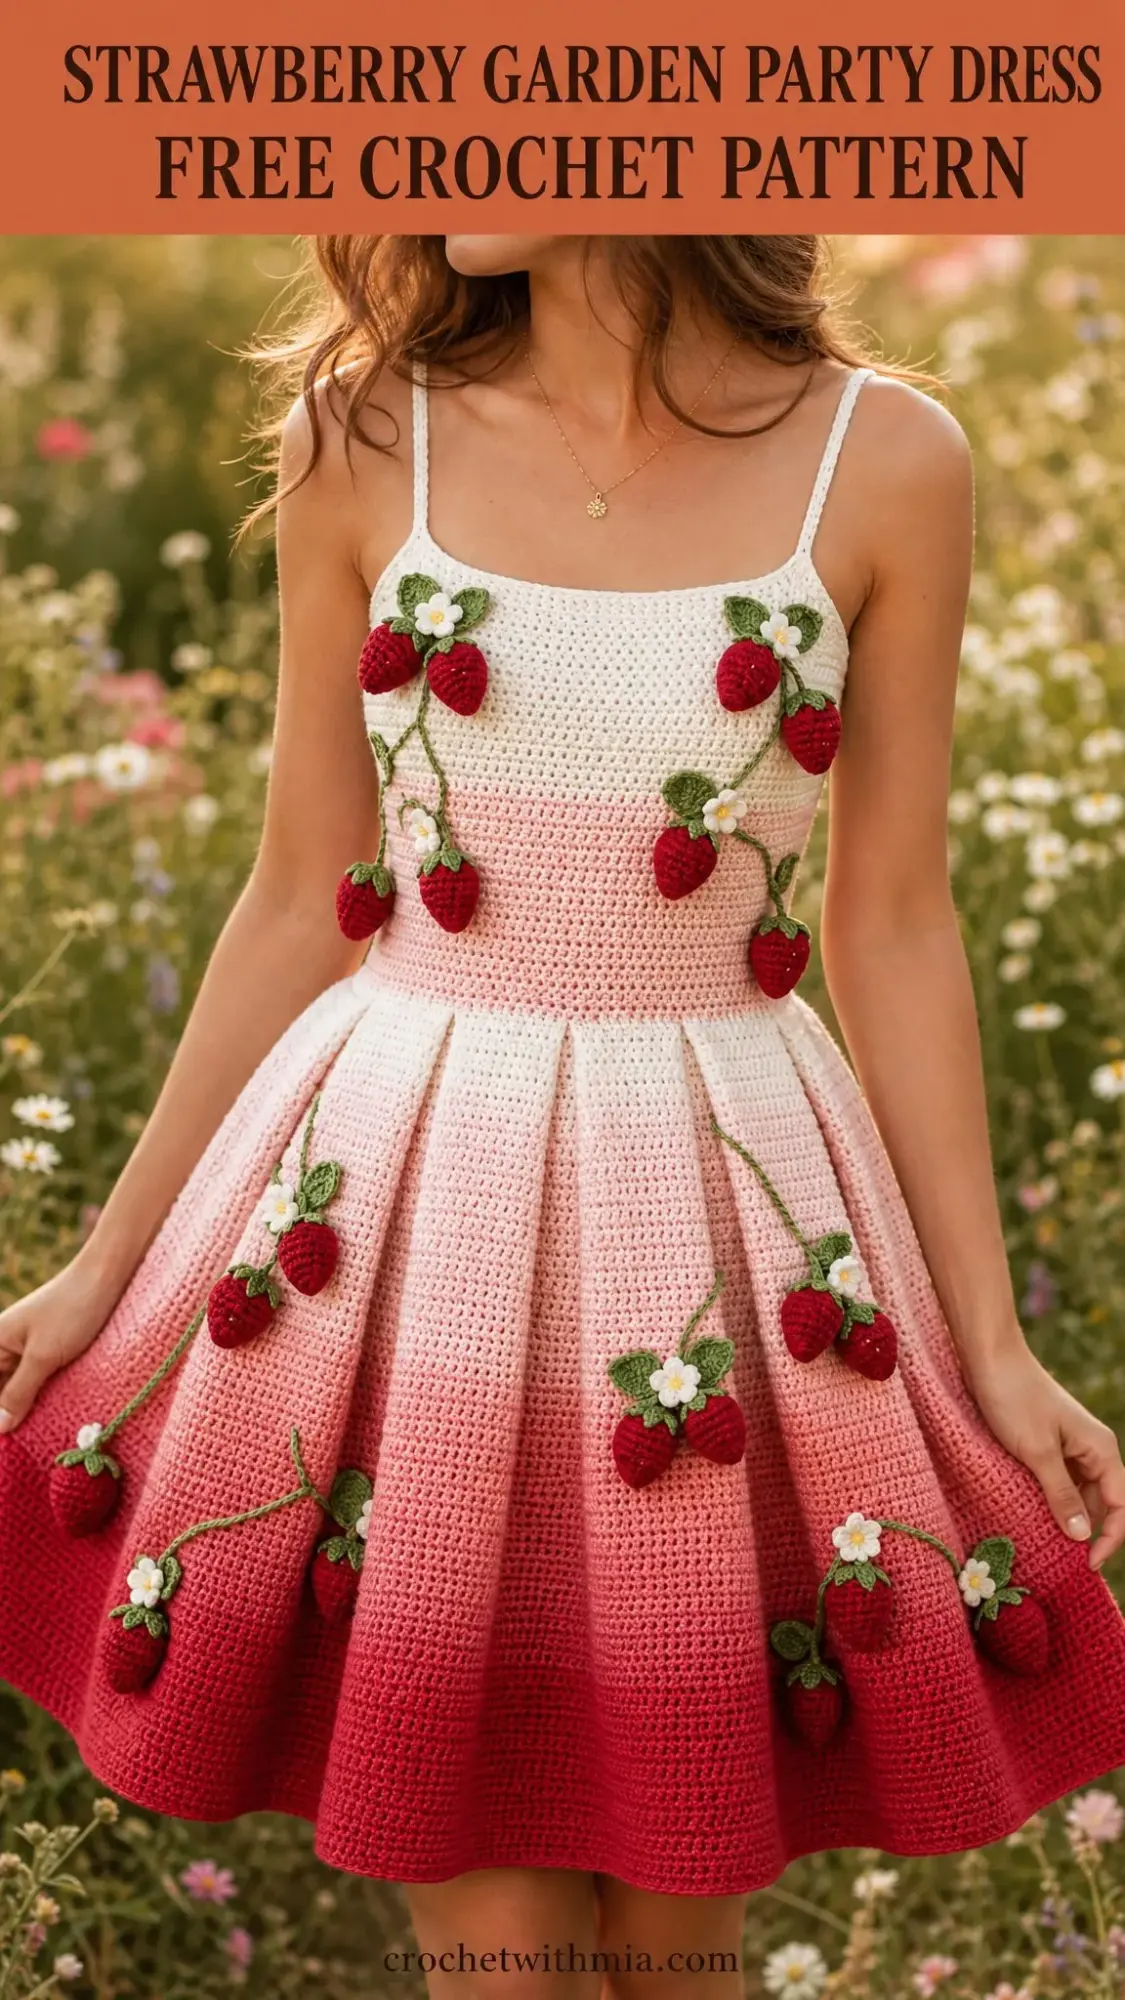
I’ve been hunting for the perfect statement dress pattern for months now, and this one stopped me in my tracks. The Strawberry Garden Party Dress combines everything I love about crochet garments: a flattering fitted bodice, a dreamy pleated skirt, and the most charming strawberry appliques trailing down like a garden in bloom.
Get the Ad-Free PDF Pattern
You can find the free pattern below, or you can purchase the ad-free printable PDF from my shop.
Get the Printable PDF →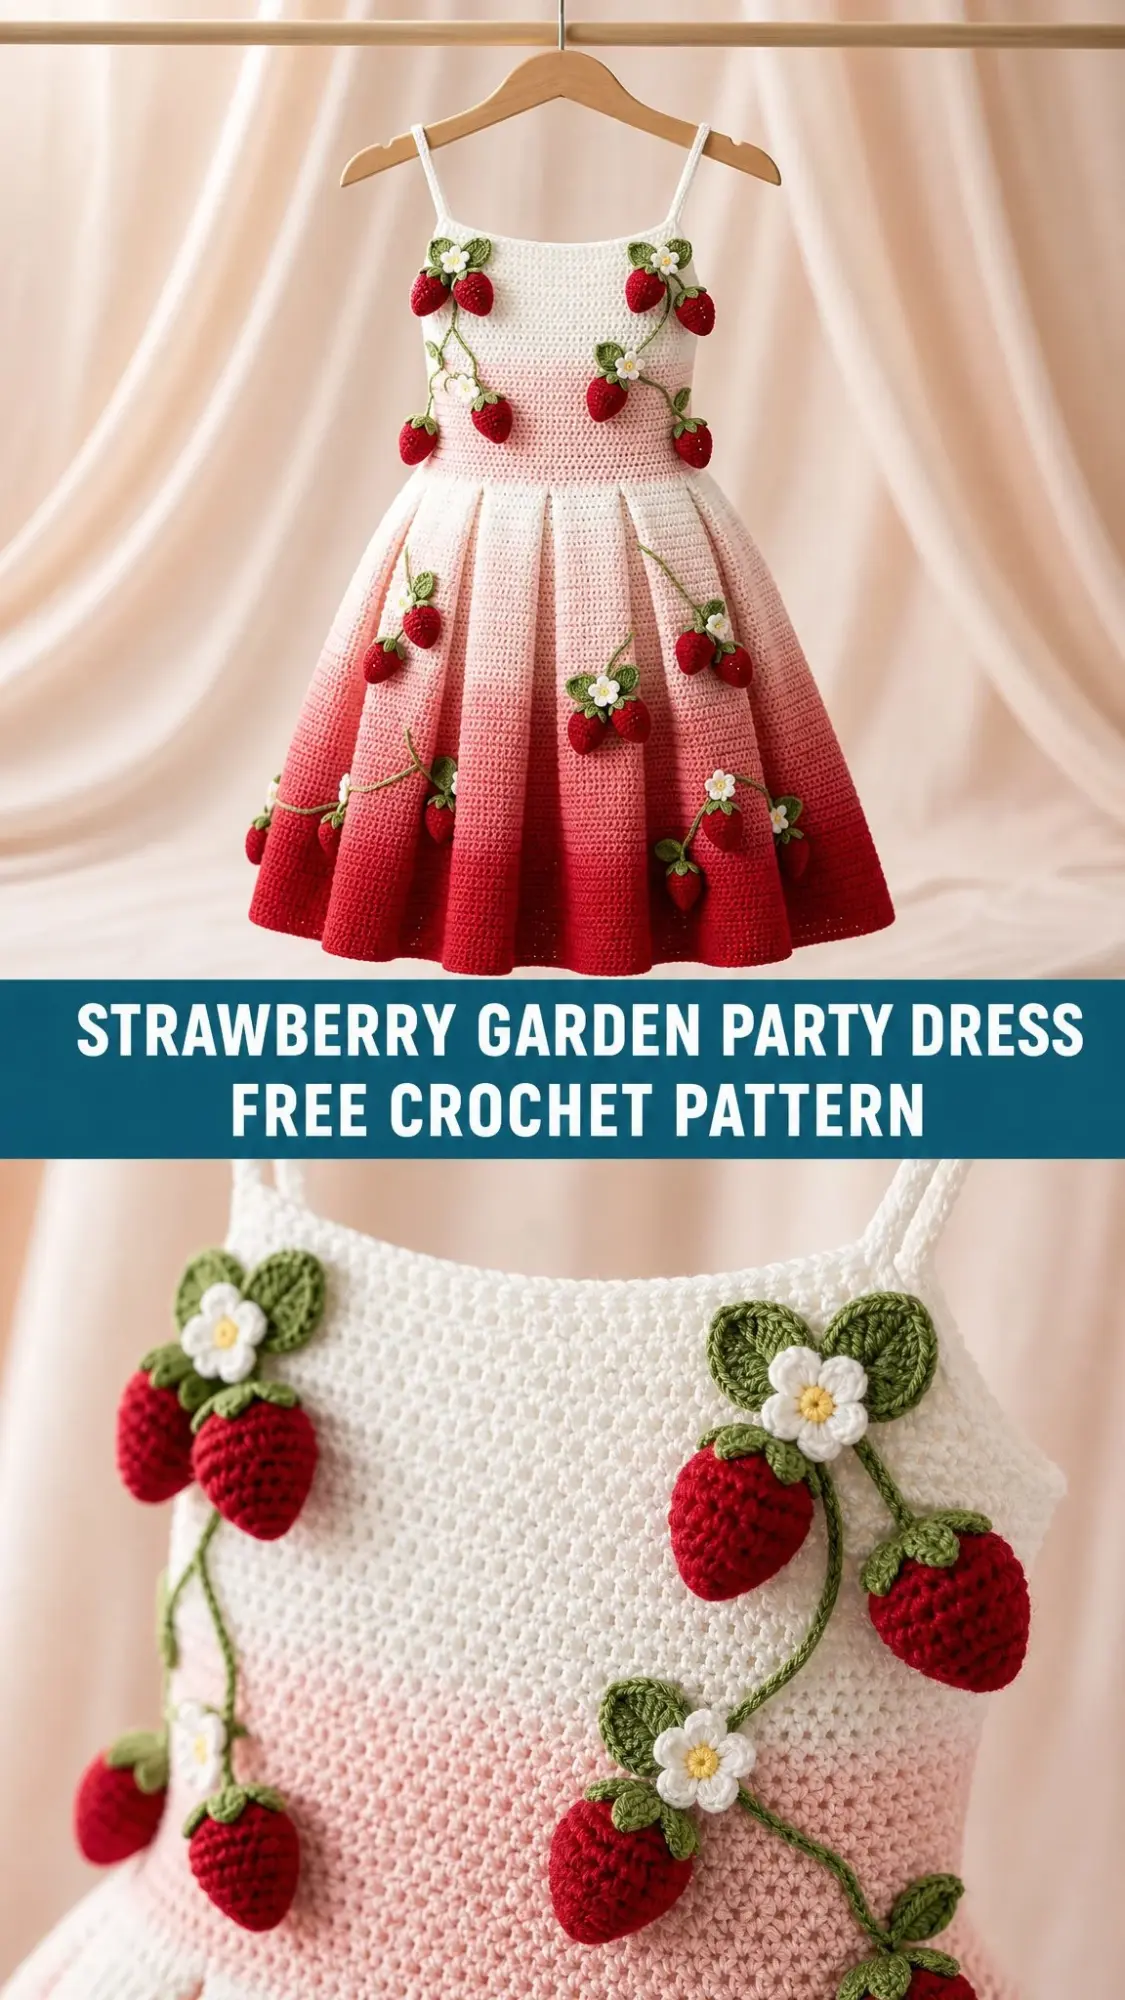
This is my favourite kind of project. The kind that looks incredibly impressive on display but breaks down into manageable techniques you probably already know. We’re talking single crochet for the structured bodice, double crochet for the flowing skirt, and sweet little motifs you can make while watching your favourite show.
If you’ve been wanting to try a crocheted dress but felt intimidated, this pattern walks you through every step. The construction is straightforward, the stitch counts are precise, and the ombre effect happens naturally as you change yarn colours. Let me show you exactly how to bring this stunning piece to life.
About This Strawberry Garden Party Dress Pattern
This intermediate-level crochet pattern creates a gorgeous sundress featuring a seamless tube bodice, a top-down pleated skirt, slim straps, trailing vines, strawberry appliques, and delicate blossoms. The finished dress fits an adult XS/S with a 34 inch bust, 34 inch waist, 15 inch skirt length, and 21 inch total length from the upper bodice edge.
The design uses joined rounds for the main body, flat rows for the straps, simple shaping throughout, surface crochet for the vines, and hand-sewn embellishments. You’ll work through applique creation, blocking techniques, and careful placement to achieve that professionally styled look.
Time estimate: 22 to 30 hours depending on your applique speed.
Intended ease: 0 to 1 inch positive ease at the bust for a fitted silhouette.
Materials You’ll Need
Getting your materials sorted before you start makes the entire process smoother. Here’s exactly what the pattern calls for.
Yarn
Use DK weight or light worsted cotton yarn, or a cotton-bamboo blend with crisp stitch definition. You’ll need approximately 1,550 to 1,850 yards total, broken down as follows:
Suggested yarn brands: Lion Brand Coboo, Paintbox Cotton DK, or Hobbii Rainbow Cotton 8/6. When substituting, match the gauge and choose yarn that blocks smoothly without stretching excessively.
Tools
Gauge
Gauge is mandatory for fit. Please don’t skip this step, especially for a garment.
Swatch in both single crochet (sc) and double crochet (dc). Wash or steam your swatch the same way you’ll finish the dress, then measure after drying.
Bodice gauge: 16 sc and 18 rows = 4 inches / 10 cm with 4.0 mm hook
Skirt gauge: 14 dc and 8 rows = 4 inches / 10 cm with 4.0 mm hook
If your gauge is off, adjust your hook size. Too many stitches per inch means you need a larger hook. Too few stitches means you need a smaller hook.
Abbreviations and Stitch Guide
Let me define every stitch abbreviation you’ll encounter. If you’re newer to pattern reading, bookmark this section.
| Abbreviation | Meaning |
|---|---|
| ch | chain |
| sl st | slip stitch |
| sc | single crochet (insert hook, yarn over, pull up loop, yarn over, pull through both loops) |
| hdc | half double crochet |
| dc | double crochet (yarn over, insert hook, pull up loop, yarn over, pull through 2 loops, yarn over, pull through remaining 2 loops) |
| inc | increase, meaning 2 stitches worked in the same stitch |
| sc2tog | single crochet 2 stitches together (a decrease) |
| RS/WS | right side / wrong side |
| st(s) | stitch or stitches |
| rnd | round |
UK crocheters note: US sc = UK dc, and US dc = UK tr.
Special Stitches
Invisible join: Cut your yarn and pull the tail through the final stitch. Thread your tapestry needle under both loops of the first stitch, then back down through the top of the final stitch. Tighten gently for a seamless finish.
Surface slip stitch vine: Hold your green yarn behind the fabric. Insert your hook from front to back and back to front at the next point, pull up a loop, then pull through the loop on your hook. Keep these stitches loose so your fabric doesn’t pucker.
Standing single crochet (sc): Place a slip knot on your hook, insert the hook in the indicated stitch, yarn over and pull up a loop, yarn over and pull through both loops.
Bodice Instructions
The bodice creates a dense, structured tube using single crochet worked in joined rounds. This gives you that smooth, fitted look that supports the weight of the skirt and appliques beautifully.
With cream yarn and your 4.0 mm hook, chain 136. Join with a slip stitch to the first chain, being careful not to twist. The chain count equals your working stitch count because the bodice is worked in joined rounds into each chain.
| Round | Instruction | Count/Checkpoint |
|---|---|---|
| 1 | Ch 1, sc in each ch around, join. | 136 sc |
| 2-10 | Ch 1, sc in each st around, join. | 136 sc each rnd; cream band approximately 2.25 in / 5.5 cm tall |
| 11 | Change to blush. Ch 1, sc around, join. | 136 sc |
| 12-18 | Ch 1, sc around, join. | 136 sc each rnd |
| 19 | Change to light berry. Ch 1, sc around, join. | 136 sc |
| 20-24 | Ch 1, sc around, join. | 136 sc each rnd; bodice approximately 5.3 in / 13.5 cm tall |
Bodice checkpoint: Your upper and lower circumference should measure about 34 inches / 86.5 cm. Depth after Round 24 should be about 5.3 inches / 13.5 cm before edging.
Optional Back Stability
For a wearable version you plan to actually wear out, sew 1/4 inch elastic inside the upper back between the strap points. For display styling only, omit the elastic.
Skirt Instructions
The skirt is where the magic happens. You’ll work downward from the bodice, using increase rounds strategically to create fullness for those gorgeous pressed pleats.
Join blush yarn at the lower bodice edge.
| Round | Instruction | Count |
|---|---|---|
| 1 | Ch 3 (counts as dc), dc in same st, 2 dc in each of next 2 sts, dc in next st; repeat from * around, join to top of ch-3. | 238 dc (34 repeats x 7) |
| 2-7 | Ch 3, dc in each st around, join. | 238 dc each rnd |
| 8 | Ch 3, dc in each st and inc once every 7 sts around; join. | 272 dc |
| 9-13 | Dc around. | 272 dc each rnd |
| 14 | Inc once every 8 sts around. | 306 dc |
| 15-19 | Dc around. | 306 dc each rnd |
| 20 | Inc once every 9 sts around. | 340 dc |
| 21-25 | Dc around. | 340 dc each rnd |
| 26 | Inc once every 10 sts around. | 374 dc |
| 27-30 | Change to red/berry as desired for ombre. Dc around. | 374 dc each rnd |
Skirt checkpoint: Length after Round 30 should be about 15 inches / 38 cm. Steam vertical pleats at every 14 skirt stitches, creating 17 pleats at the upper skirt that open fuller toward the hem.
Hem
Round 31: With berry, ch 1, work reverse sc around OR work (sc, ch 1, skip 1) around for a lighter hem. Join with invisible join. Count will remain 374 stitches for reverse sc, or 187 sc/ch spaces for the lighter hem.
Straps and Edging
The straps are simple flat pieces that you’ll sew to the bodice after fitting.
Mark your front strap positions 22 stitches in from each side seam. Mark your back strap positions 18 stitches in from each side seam. Try on or fit to a dress form before sewing.
| Piece | Instruction | Count/Measure |
|---|---|---|
| Straps, make 2 | With cream, ch 5. Row 1: sc in 2nd ch from hook and each ch across, turn. Rows 2-36: ch 1, sc across, turn. | 4 sc; about 15 in / 38 cm long |
| Attach | Sew straps to inside upper bodice at marked positions. | Keep flat, do not twist |
| Top edging | Join cream at back. Ch 1, sc evenly around upper edge, working 1 sc in each bodice st and 4 sc across each strap end. | 144 sc approx.; lies flat |
| Second edging | Sl st loosely around top edge and straps. | Do not tighten |
Square Neckline Tip
For that clean camisole shape, keep the upper front edge straight. If your edge ripples, go down a hook size for the edging. If it pulls inward, add 4 to 8 sc evenly across the front edge only.
Side Seam Marker
Keep a removable marker at each side seam through finishing. These reference points make vine and applique placement symmetrical.
Strawberries, Leaves, and Blossoms
Now for the fun part. These little appliques bring the whole dress to life.
Make 18 strawberries: 8 for the bodice, 8 for the skirt front and sides, 2 for back accents.
Make 8 blossoms and 30 to 36 leaves. Sew with matching thread or yarn tails.
Strawberry
With red, make a magic ring.
Leaf Cap
With green, join at berry top: (ch 4, sl st in 2nd ch and next 2 ch, sl st to berry top) 5 times. Fasten off.
Small Leaf
Ch 6. Sl st in 2nd ch, sc, hdc, dc, 3 hdc in last ch; rotate, dc, hdc, sc, sl st. Fasten off.
Blossom
With white, make a magic ring. (Ch 2, 2 hdc in ring, ch 2, sl st in ring) 5 times. Pull closed. Add a yellow French knot or tiny embroidered center.
Applique checkpoint: Strawberries should be about 1.1 to 1.3 inches / 2.8 to 3.3 cm tall. Blossoms should be about 0.8 inches / 2 cm across.
Vines and Placement
Use green surface slip stitch for vines after the dress is blocked and pleats are set. Pin all berries and blossoms first, then stitch the vines so every stem meets a motif neatly.
| Area | Placement Guide |
|---|---|
| Front bodice | Two mirrored vine trails from upper outer bodice toward center waist. Add 4 strawberries and 2 blossoms. |
| Back bodice | Two shorter trails from strap area toward side back. Add 2 strawberries and 1 blossom. |
| Skirt | Place motifs along alternating pleat valleys and ridges. Keep heavier berries near lower half so the skirt hangs smoothly. |
| Spacing | Leave 2 to 3 inches / 5 to 7.5 cm between large strawberry clusters. Keep vines loose and curved, not straight. |
Secure the back of every applique with several small stitches. Weave ends through the applique backing, not through large visible areas of the dress fabric.
Finishing, Blocking, and Care
Finishing Order
1. Weave all main garment ends on the wrong side.
2. Steam or wet-block the bodice flat without stretching.
3. Pin skirt pleats every 14 upper-skirt stitches. Steam lightly and let dry fully.
4. Attach straps, then work upper edging.
5. Pin vines, berries, leaves, and blossoms. Sew securely after confirming balance from front, side, and back.
Blocking
Use gentle steam for cotton blends. Do not press strawberries flat. Cup your hand around each applique while steaming nearby fabric. Let the dress dry on a form so the pleats set vertically.
Care Instructions
Hand wash in cool water with mild soap. Roll in a towel to remove moisture. Reshape on a form or flat surface and dry away from direct heat. Store folded with tissue under appliques, not hanging for long periods.
Troubleshooting Common Issues
| Issue | Fix |
|---|---|
| Bodice too loose | Match gauge first. For a smaller circumference, subtract stitches in multiples of 4 before starting. |
| Skirt ruffles too much | Block pleats deeper and reduce steam at hem. For less fullness, omit Round 26 increases. |
| Vines pucker fabric | Surface sl sts are too tight. Remove and restitch with a larger hook or looser tension. |
| Appliques sag | Use a smaller hook for motifs and sew through several anchor points. |
Size Customization
The bodice circumference is controlled by your starting chain. At 16 sc = 4 inches / 10 cm, multiply your desired finished bust measurement in inches by 4 stitches per inch, then round to a multiple of 4.
Example: 36 inch bust x 4 = 144 chains.
Skirt Round 1 uses the same 4-stitch repeat and remains balanced.
For length adjustments, add or remove skirt rounds before the final hem. At skirt gauge, 2 dc rounds add about 1 inch / 2.5 cm. Adjust straps by adding or removing rows before sewing.
Final Thoughts on the Strawberry Garden Party Dress Crochet Pattern
This dress is truly a showstopper. From the beautiful ombre colour gradient to the whimsical strawberry appliques cascading down the bodice and skirt, every detail comes together to create something special. The pleated skirt gives it that party-ready silhouette, while the fitted bodice keeps everything elegant and wearable.
Take your time with the applique placement. Step back often, look from different angles, and trust your eye. The vines should flow naturally, like a garden growing across the fabric. And don’t stress about making every strawberry identical. A little variation makes the whole piece feel organic and handmade in the best way.
Whether you’re making this for a summer event, a photoshoot, or simply because you fell in love with the design, I hope you enjoy every stitch. The finished piece is absolutely worth the hours you’ll put into it.
Thank you so much for choosing this pattern for your next project. I would absolutely love to see your finished Strawberry Garden Party Dress, so please share your photos on Instagram or Facebook. If you found this tutorial helpful, save it to your Pinterest boards so you can find it easily when you’re ready to cast on. And if you make this dress, drop a comment below. I can’t wait to see what you create!
Want a Quick & Easy Printable Version?
Get a clean, beautifully formatted PDF of this pattern — easy to follow step by step, ready to print or save on any device. No scrolling, no distractions, just the pattern.
Get the Printable PDF →