I pulled this design out of my "someday" folder last spring, and I’m so glad I finally gave it the attention it deserved. The Mint Cottage Garden Bow Purse started as a quick sketch during a rainy afternoon when I was dreaming about farmers markets and Sunday strolls. I wanted something that felt like a vintage treasure chest, soft and rounded, with just enough whimsy to make people stop and ask where I got it.
Get the Ad-Free PDF Pattern
You can find the free pattern below, or you can purchase the ad-free printable PDF from my shop.
Get the Printable PDF →
The bow came first in my imagination, then the little cluster of daisies tucked into its center. I kept thinking about my grandmother’s garden and the way she’d arrange wildflowers in mismatched vases on her kitchen windowsill. This purse captures that feeling for me. Every time I pick it up, I smile.
If you’ve been looking for a project that lets you practice texture stitches, appliqué work, and bag construction all in one satisfying make, this is your next adventure. Let me walk you through everything you need to bring this cottage-inspired beauty to life.
What Makes This Purse Special
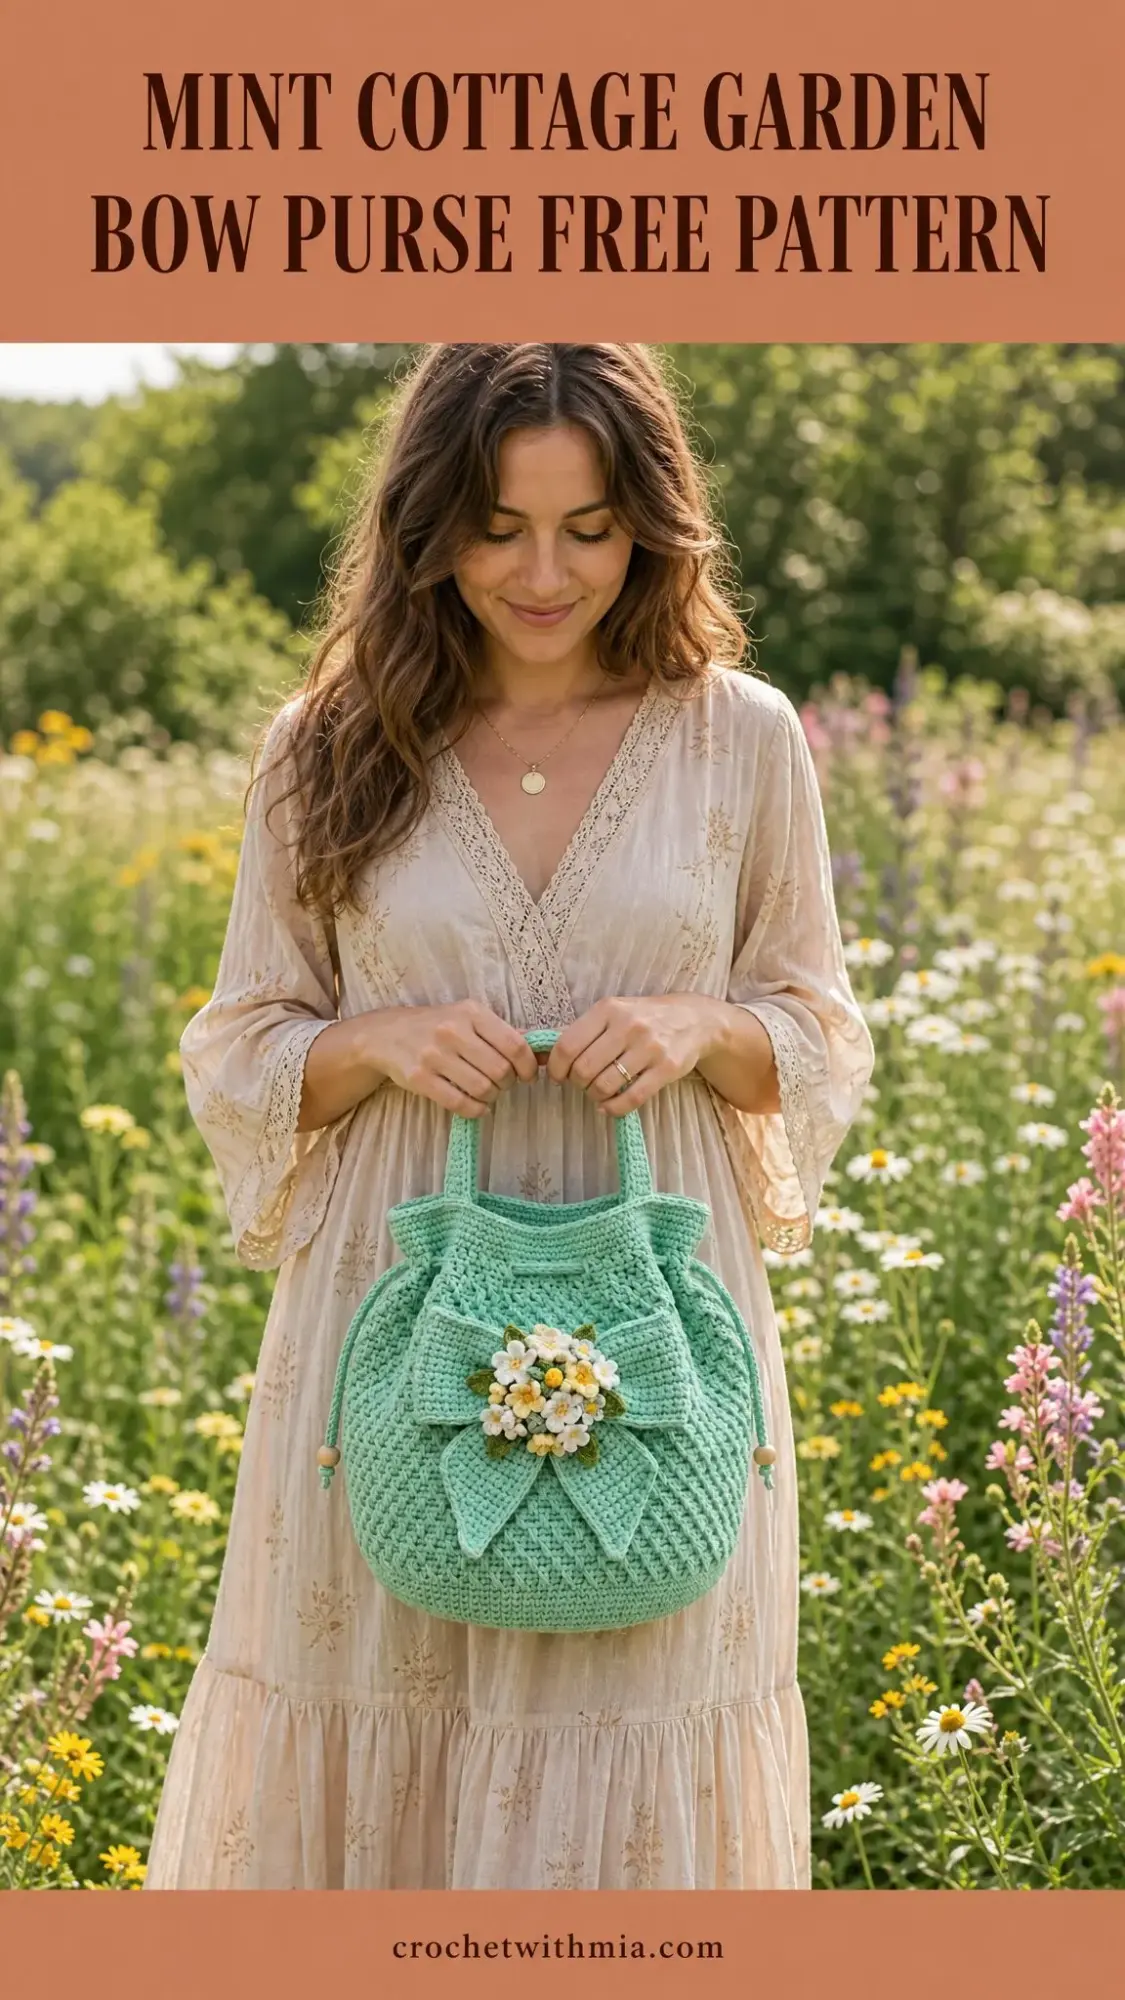
This isn’t your average crochet bag. The Mint Cottage Garden Bow Purse combines several techniques into one showstopper piece. You’ll work a flat circular base that transforms into a softly cinched bucket shape. The body features a gorgeous moss-lattice texture that creates visual interest without being fussy. And then there’s the front decoration: a handmade bow, tapered tails, nine daisy blossoms, yellow buds, and olive leaves arranged in a cheerful cluster.
The finished purse measures approximately 10.5 inches wide by 9.5 inches tall by 4 inches deep (27 x 24 x 10 cm), not including the handles. The handle drop is about 7 inches (18 cm), making it comfortable to carry on your shoulder or in the crook of your arm.
A smooth top band includes eyelets for a crocheted drawstring, and wooden beads finish the cord ends for that perfect cottage aesthetic. You can even add an optional fabric lining and snap closure for extra structure.
Skill Level and Time Commitment
This pattern is rated as adventurous intermediate. You’ll work joined rounds, simple shaping, texture rounds with chains used as stitches, small appliqués, and careful finishing. That said, confident beginners can absolutely succeed by counting each round carefully and using stitch markers.
Plan for about 8 to 10 hours of work from start to finish. I like to break projects like this into sessions: base and body over a few evenings, then handles and decorations when I’m ready to see it all come together.
Materials You’ll Need
Gather these supplies before you start:
Yarn:
Hook:
Notions:
Optional:
Yarn Suggestions
Choose a firm yarn that holds texture and handles weight well. Good choices include Lion Brand 24/7 Cotton, Paintbox Yarns Cotton Aran, or WeCrochet Dishie. You can substitute with any smooth worsted cotton that reaches gauge and creates a stable fabric. I’d avoid very soft acrylic for the handles unless you plan to line the bag.
Gauge
Getting gauge matters for this project. You want the bag to hold its shape and the eyelets to align properly.
Single crochet gauge: 16 sc and 18 rounds = 4 inches (10 cm) after light blocking
Moss-lattice gauge: 15 stitch positions and 16 rounds = 4 inches (10 cm)
Checkpoint: After Round 9, your base circumference should be 90 stitches and measure about 7 to 7.5 inches (18 to 19 cm) across. After Round 44, the bag body should be about 9.25 to 9.75 inches (23.5 to 25 cm) tall before cinching.
Abbreviations and Stitch Guide
Here are all the abbreviations used in this pattern. I’m using US crochet terms throughout.
| Abbreviation | Meaning |
|---|---|
| ch | chain |
| dc | double crochet |
| hdc | half double crochet |
| inc | 2 sc in indicated stitch |
| MR | magic ring |
| rep | repeat |
| rnd | round |
| RS | right side |
| sc | single crochet |
| sc2tog | single crochet 2 together (a decrease) |
| sk | skip |
| sl st | slip stitch |
| sp | space |
| st/sts | stitch/stitches |
| WS | wrong side |
UK terminology note: US sc = UK dc; US hdc = UK htr; US dc = UK tr.
Special Stitches
Moss-lattice round: This creates the beautiful texture on the bag body. Work over an even number of stitch positions. Round A: sc in next st, ch 1, sk next st; rep from around. For texture rounds: sl st into first ch-1 sp, ch 1, sc in next ch-1 sp, ch 1; rep from around. Each sc plus ch-1 space equals 2 stitch positions.
Puff flower center: Yarn over, insert hook in stitch, pull up a loop to hdc height; repeat 2 more times in the same stitch, yarn over and pull through all loops on hook, ch 1 to close.
Daisy petal: In the indicated stitch or ring space: sl st, ch 2, 3 hdc, ch 2, sl st. Keep petals relaxed so the flowers cup slightly rather than curling tightly.
Invisible fastening: Cut yarn, pull tail through final stitch, thread tail on needle, insert under both loops of the first stitch, then back down through the final stitch. Weave tail on the wrong side.
Notes Before You Begin
The ch 1 at the start of sc rounds does not count as a stitch. Join each joined round with a sl st to the first stitch unless told otherwise. In moss-lattice rounds, each ch-1 space counts as one stitch position. Use a marker at the first stitch and another marker at the center front after the body is complete.
Left-handed crocheters: You may follow the same counts. Your rounds travel in the opposite direction, so place the front decoration after the purse is complete rather than relying on the join position.
Purse Body Pattern
With mint, make a magic ring. Work joined rounds unless noted.
| Rnd | Instruction | Count |
|---|---|---|
| 1 | 10 sc in MR, join. | 10 sc |
| 2 | Ch 1, inc in each st around. | 20 sc |
| 3 | Ch 1, sc in next st, inc in next st; rep from around. | 30 sc |
| 4 | Ch 1, sc in next 2 sts, inc in next st; rep from around. | 40 sc |
| 5 | Ch 1, sc in next 3 sts, inc in next st; rep from around. | 50 sc |
| 6 | Ch 1, sc in next 4 sts, inc in next st; rep from around. | 60 sc |
| 7 | Ch 1, sc in next 5 sts, inc in next st; rep from around. | 70 sc |
| 8 | Ch 1, sc in next 6 sts, inc in next st; rep from around. | 80 sc |
| 9 | Ch 1, sc in next 7 sts, inc in next st; rep from around. | 90 sc |
| 10 | Ch 1, sc in back loop only of each st. This turns the base upward. | 90 sc |
| 11 | Ch 1, sc in each st around. | 90 sc |
| 12 | Ch 1, sc in next st, ch 1, sk next st; rep from around. | 45 sc + 45 ch-sps |
| 13-35 | Sl st into first ch-sp, ch 1, sc in next ch-sp, ch 1; rep from around. | 45 sc + 45 ch-sps each rnd |
| 36 | Ch 1, sc in each sc and each ch-sp around. | 90 sc |
| 37-40 | Ch 1, sc in each st around. | 90 sc each rnd |
| 41 | Ch 3, dc in next 5 sts, ch 2, sk 2 sts, dc in next 8 sts; rep from 7 times, ch 2, sk 2 sts, dc in last 2 sts, join to top of ch-3. | 72 dc + 18 chs |
| 42 | Ch 1, sc in each dc and 2 sc in each ch-2 sp. | 90 sc |
| 43-44 | Ch 1, sc in each st around. Fasten off after Rnd 44. | 90 sc each rnd |
Checkpoint: Top edge remains 90 sts. Eyelets should form 9 evenly spaced openings. Steam lightly from the wrong side, keeping the top edge round and the base flat.
Handles, Drawstring, and Bow
Shoulder Handles (make 2)
With mint, ch 6.
Row 1: Sc in 2nd ch from hook and across. (5 sc)
Rows 2-62: Ch 1, turn, sc in each st. (5 sc)
Fasten off, leaving a long sewing tail. Each handle measures about 15 inches (38 cm) before attachment. Sew one handle to the front inside top band and one to the back, placing ends about 3.5 inches (9 cm) apart.
Drawstring Cord
With mint, ch 150. Sl st in the back bump of the 2nd ch from hook and each ch across. Fasten off. Weave through the 9 eyelets, entering and exiting at one side. Add a wooden bead to each end and knot securely.
If desired, make a second shorter decorative side tie by chaining 45 and slip stitching back for the opposite side.
Front Bow Panel
With mint, ch 31.
Row 1: Sc in 2nd ch from hook and across. (30 sc)
Rows 2-16: Ch 1, turn, sc in each st. (30 sc)
Fasten off. Pinch the center and wrap with the center band below.
Bow Center Band
With mint, ch 9.
Row 1: Sc in 2nd ch from hook and across. (8 sc)
Rows 2-8: Ch 1, turn, sc in each st. (8 sc)
Wrap around the cinched bow center and sew ends together on the back.
Bow Tails (make 2)
| Row | Instruction | Count |
|---|---|---|
| 1 | Ch 13, sc in 2nd ch from hook and across. | 12 sc |
| 2 | Ch 1, turn, sc across. | 12 sc |
| 3 | Ch 1, turn, sc2tog, sc 8, sc2tog. | 10 sc |
| 4 | Ch 1, turn, sc across. | 10 sc |
| 5 | Ch 1, turn, sc2tog, sc 6, sc2tog. | 8 sc |
| 6 | Ch 1, turn, sc across. | 8 sc |
| 7 | Ch 1, turn, sc2tog, sc 4, sc2tog. | 6 sc |
| 8 | Ch 1, turn, sc across. Fasten off. | 6 sc |
Sew tails behind the bow so they angle downward. The point is softly squared, matching the cottage style rather than a sharp ribbon point.
Flowers, Leaves, and Front Panel
Daisy Blossoms (make 9)
With yellow, MR, work 5 puff centers into ring, join, fasten off. Join white or cream in any space between puffs. Work one daisy petal in each space around. Fasten off, leaving a sewing tail.
Make 5 white and 4 cream blossoms for a natural cluster.
Small Yellow Buds (make 5)
With yellow, MR, 6 sc in ring, join, fasten off. Pull the ring tight and weave tail through the back to make a small raised dot.
Leaves (make 8)
With olive, ch 9. Sl st in 2nd ch, sc in next ch, hdc in next 2 ch, dc in next 2 ch, hdc in next ch, 3 sc in last ch. Working along the other side of chain: hdc, dc in next 2, hdc in next 2, sc, sl st. Fasten off.
Front Pocket Panel
With mint, ch 31.
Row 1: Sc in 2nd ch from hook and across. (30 sc)
Rows 2-12: Ch 1, turn, sc in each st. (30 sc)
Fasten off. Center on front of purse at Rnds 21-32 and sew only the sides and bottom edge, leaving the top open. Sew bow over the pocket so the center sits at the panel midpoint.
Flower Placement
Arrange leaves first in a loose oval over the bow center. Sew 9 daisies and 5 buds over the leaves, mixing white, cream, and yellow. Keep the cluster about 3.5 inches (9 cm) wide so it fills the bow without hiding the tails.
Assembly and Finishing
1. Weave in all ends on the wrong side, leaving sewing tails only where pieces will be attached.
2. Block the purse body over a bowl or soft towel form so the base stays flat and the sides round upward.
3. Mark center front. Place pocket panel first, then tails, bow, leaves, flowers, and buds.
4. Sew handles to the inside top band with a box-and-X stitch pattern for strength.
5. Thread drawstring and add beads.
6. Optional: sew in a fabric lining and snap to protect the crochet fabric when carrying small items.
Blocking Tips
Steam gently from 2 to 3 inches (5 to 8 cm) away. Do not press the texture flat. Shape the body with your hands while warm, then let it cool completely before sewing on flowers.
Care Instructions
Spot clean with cool water and mild soap. Lay flat to dry over a towel form. If using cotton, reshape while damp. Remove heavy items before storing so the handles do not stretch.
Size Customization
Want a wider purse? Continue base increases in the same pattern until the final stitch count is a multiple of 2 and 10. The moss-lattice needs an even number, and the eyelet round is easiest over multiples of 10. Add or remove body rounds before the eyelet band to change height. Adjust handle rows for your preferred drop.
Troubleshooting Common Issues
| Issue | Fix |
|---|---|
| Base ripples | Your increases are loose or hook is too large. Go down 0.25-0.5 mm or block flatter. |
| Base cups early | Add one plain sc round after Rnd 6, or relax tension before continuing. |
| Texture slants | Move the start marker each round and join into the first sc/ch-sp accurately. |
| Top opening too loose | Work Rnds 42-44 with a smaller hook or add a lining/snap. |
| Handle stretches | Use cotton, sew a hidden ribbon to the back of each handle, or shorten by 4-6 rows. |
Quick Reference Chart
| Section | Count / Measure |
|---|---|
| Base final | 90 sc after Rnd 9 |
| Body texture | 45 sc + 45 ch-sp per texture round |
| Eyelets | 9 openings |
| 30 sc x 12 rows | |
| Bow | 30 sc x 16 rows |
| Flowers | 9 daisies + 5 buds + 8 leaves |
You Did It!
Thank you so much for choosing this Mint Cottage Garden Bow Purse crochet pattern for your next project. I hope you love making it as much as I loved designing it. There’s something deeply satisfying about watching all those separate pieces come together into one beautiful, functional bag.
If you make this purse, I would absolutely love to see it! Tag me on Instagram or share a photo in my Facebook group. Seeing your creations truly makes my day.
Don’t forget to save this pattern to your Pinterest boards so you can find it whenever you’re ready to start. And if you have any questions or just want to share your progress, drop a comment below. I’m always happy to help, and I love hearing from fellow crocheters. Happy hooking!
Want a Quick & Easy Printable Version?
Get a clean, beautifully formatted PDF of this pattern — easy to follow step by step, ready to print or save on any device. No scrolling, no distractions, just the pattern.
Get the Printable PDF →