
Last summer, my best friend called me in a mild panic. She had a beach vacation coming up and wanted something unique to wear that wasn’t from the same fast fashion shop as everyone else. "Something cute, something me, something nobody else will have." I promised to help.
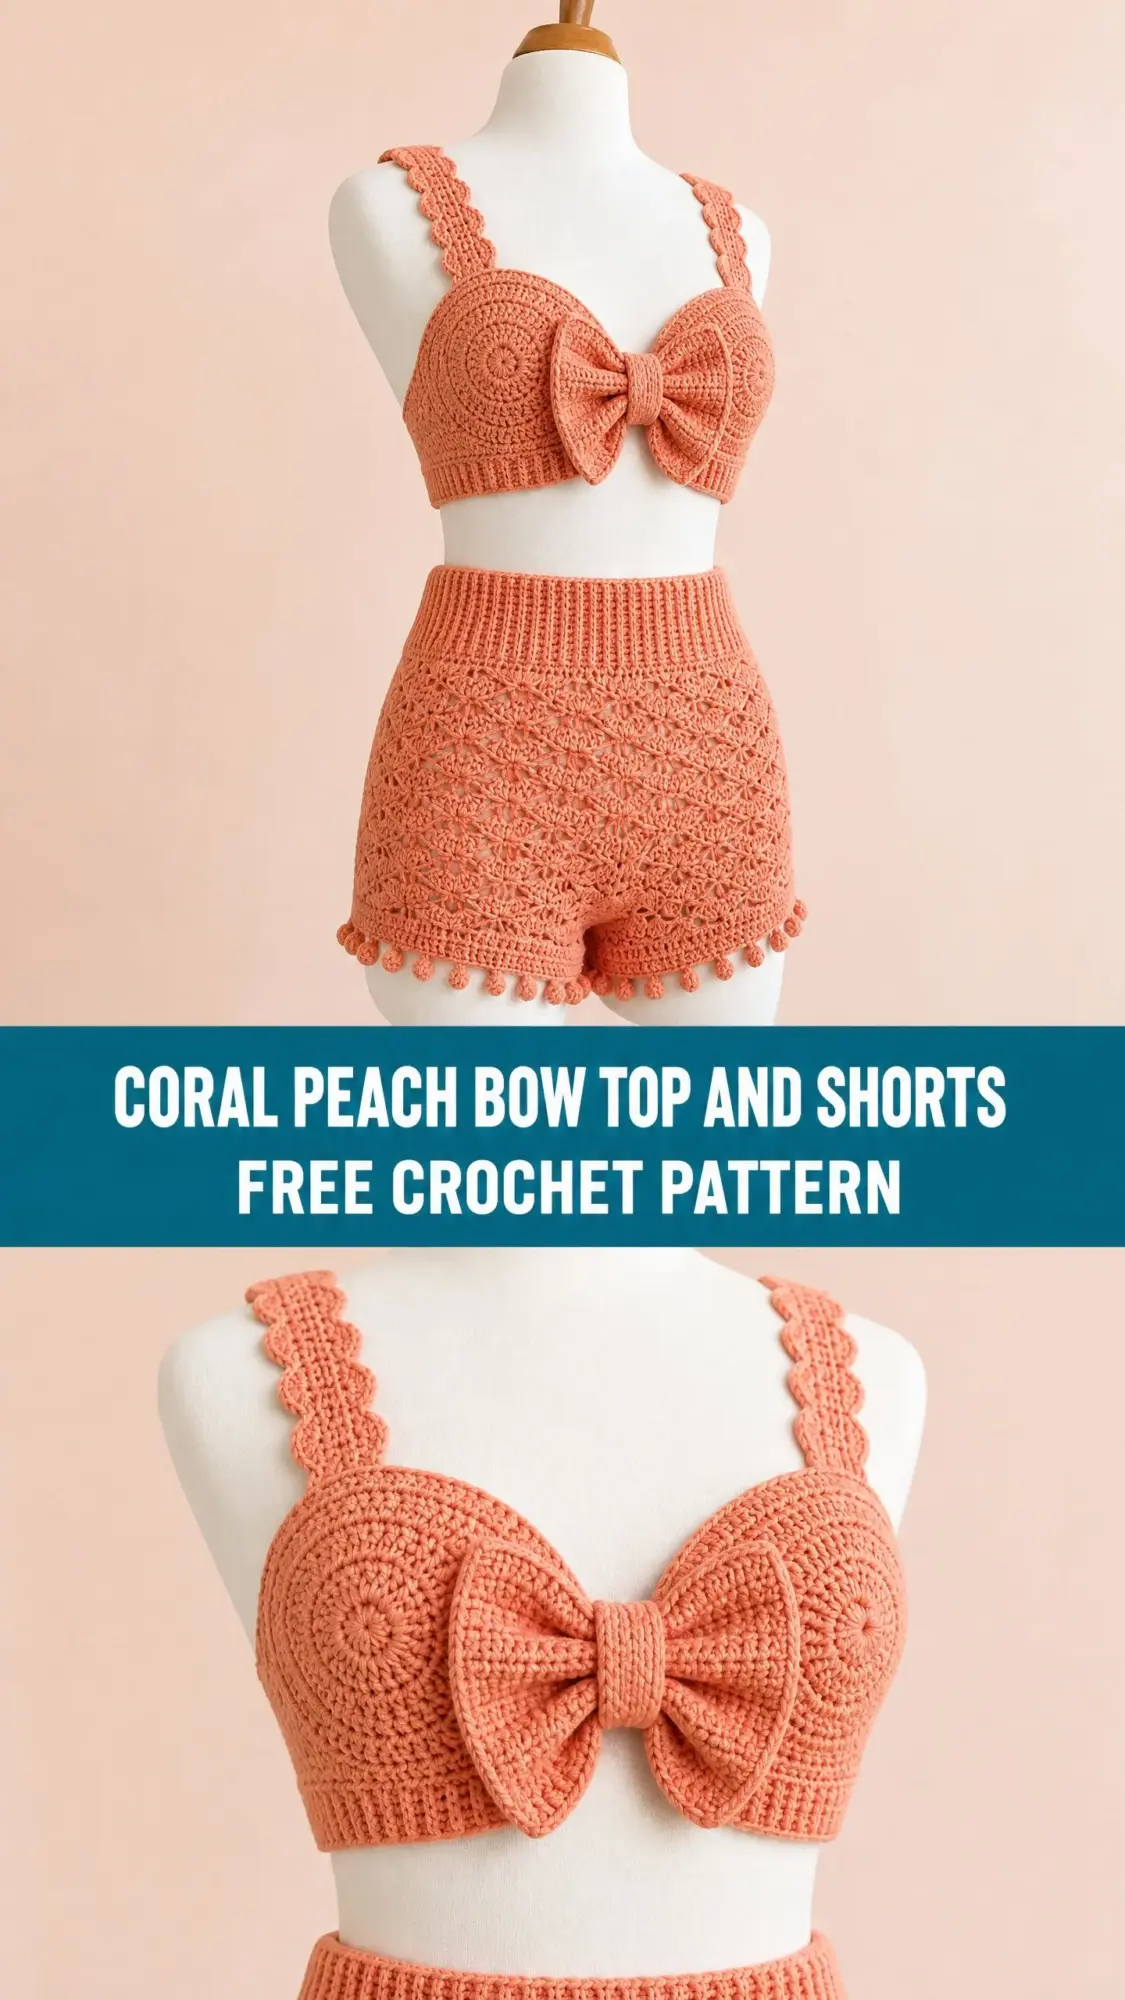
Two weeks and a lot of coral yarn later, I handed her a matching crochet set that made her genuinely squeal. The bow at the center of the bralette sealed the deal. She wore it over a simple tank on the boardwalk and got stopped three times by strangers asking where she bought it.
That moment stuck with me. There’s real joy in making something beautiful, wearable, and completely one of a kind. This coral peach bow top and shorts crochet pattern is the result of that project, refined and written out so you can make your own show-stopping summer set.
What You’re Making
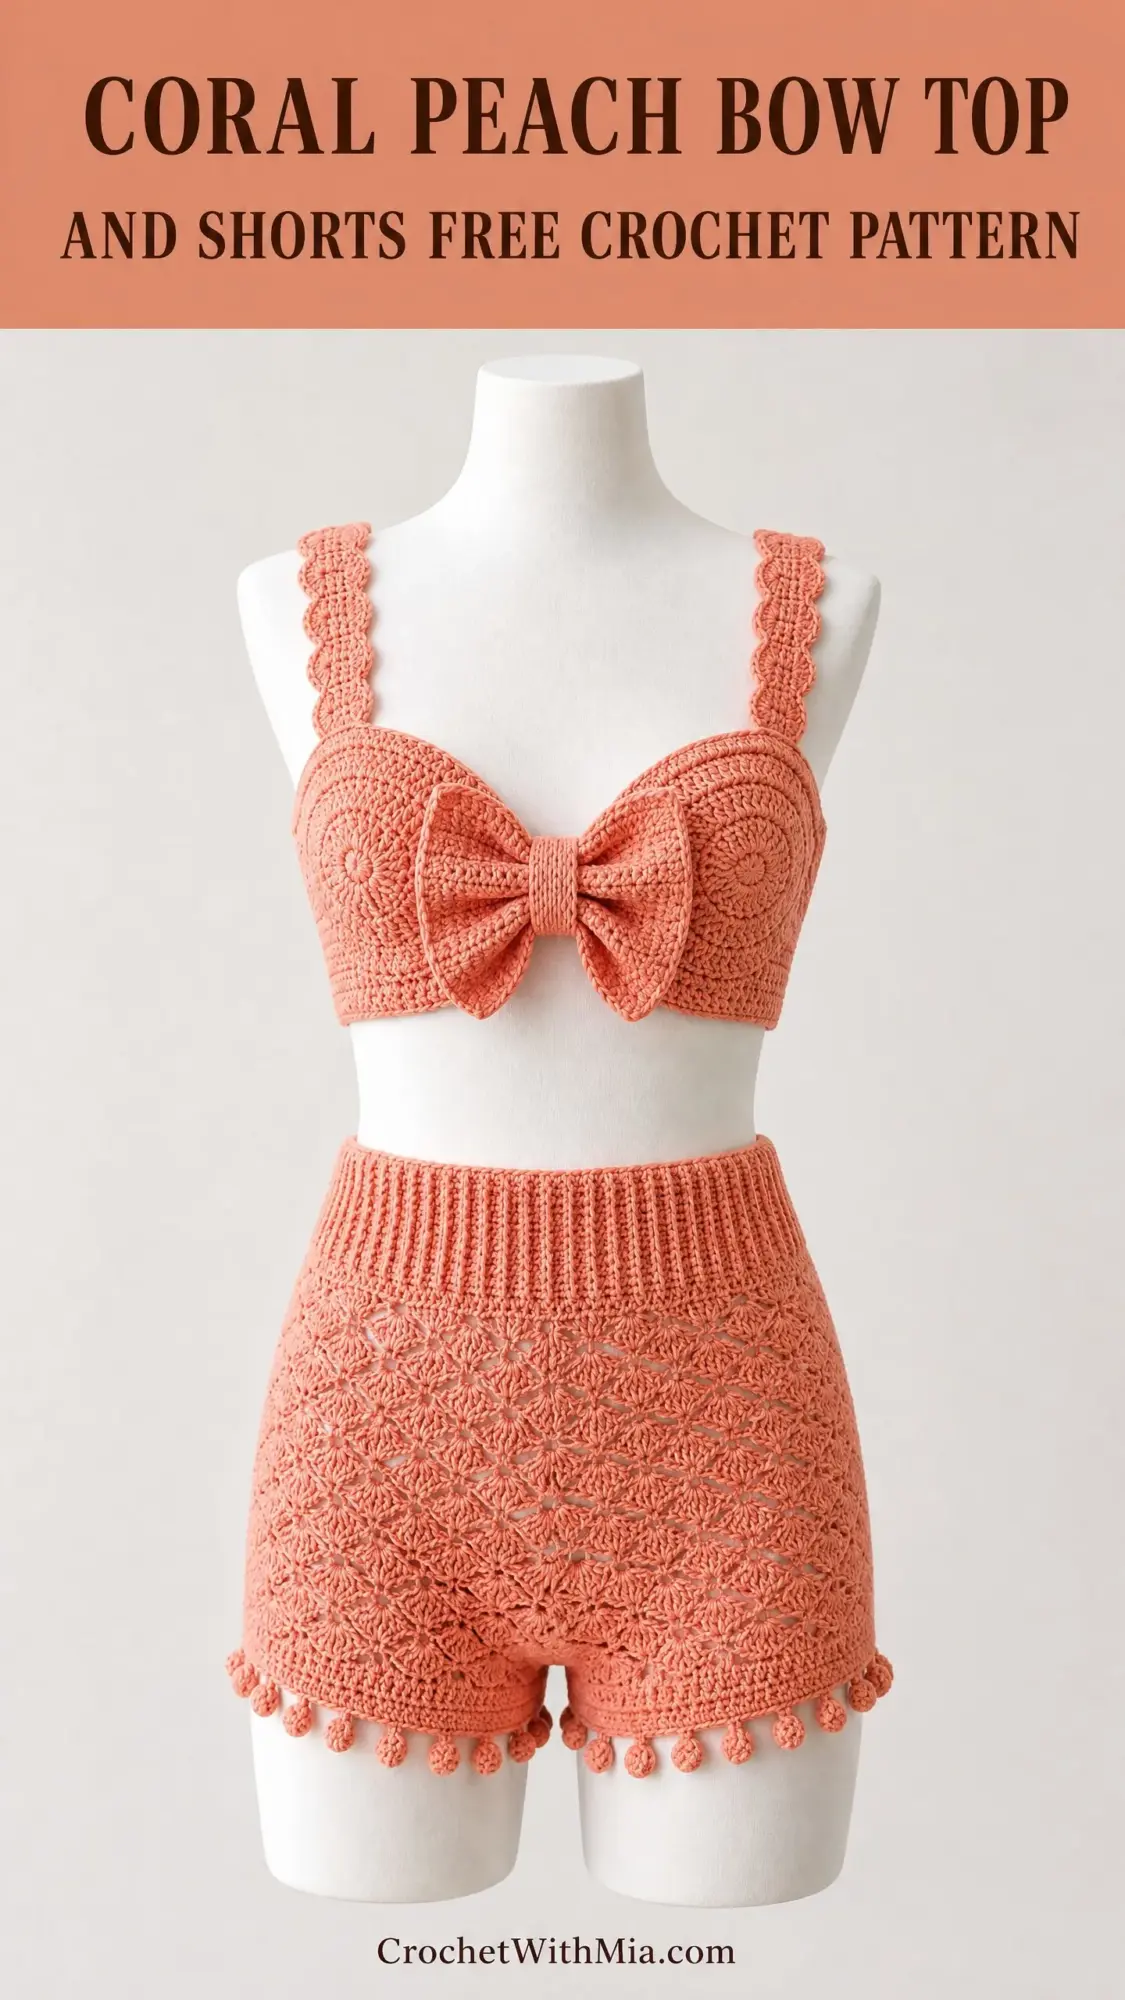
This pattern creates a coordinating two-piece set. The top is a structured bralette with circular cup panels, a wide under-bust band, scalloped straps, and a statement bow at the center front. The shorts are high-waisted with a stretchy ribbed waistband, a lacy shell stitch body, and playful pom-pom trim along each leg opening.
Both pieces are worked flat in sections and then seamed together. The bow is made separately and attached at the end. Everything is crocheted in a single warm coral-peach color throughout, giving the set a cohesive, polished look.
This pattern is written for size Small/Medium (US dress size 4-10), with customization notes for adjusting fit.
Skill Level
I’d call this an intermediate project. You should be comfortable working in the round, working flat panels and seaming them together, reading stitch counts, working a ribbed waistband in back loop only stitches, and attaching decorative elements like the bow and pom-poms.
Don’t let that intimidate you if you’re an ambitious beginner. The stitches themselves are straightforward. The challenge comes from keeping track of multiple pieces and assembling them neatly.
Time Estimate
Plan for approximately 18 to 24 hours of total crochet time for both pieces. The top takes roughly 8 to 10 hours. The shorts take roughly 10 to 14 hours, depending on how quickly you get into the rhythm of the shell pattern repeat.
Finished Measurements
Top:
Shorts:
Materials You’ll Need
Yarn: Approximately 900 yards / 823 meters of worsted weight (Category 4) yarn in a coral-peach color. A cotton-acrylic blend or 100% cotton works best for structure, breathability, and stitch definition.
Recommended Yarn Options:
1. Lion Brand 24/7 Cotton in Peach or Salmon. This is 100% mercerized cotton with beautiful stitch definition and a subtle sheen. You’ll need approximately 5 skeins.
2. Paintbox Yarns Simply DK held doubled (choose Coral or Salmon). You’ll need approximately 14 balls.
3. WeCrochet Comfy Worsted (75% pima cotton, 25% acrylic) in Peach. Excellent drape with enough structure for the shell pattern. You’ll need approximately 5 skeins.
Hooks:
Notions:
Gauge (Please Swatch!)
With US G-6 / 4.0 mm hook and worsted weight yarn:
Shell pattern gauge (shorts body):
Ribbing gauge (with F-5 / 3.75 mm hook, working BLO):
Gauge matters a lot here. The cups, waistband, and hip circumference all depend on it. Take time to swatch and block before you begin.
Abbreviations
Let me walk you through every abbreviation you’ll see. If you’re newer to patterns, bookmark this section.
Special Stitches and Techniques
Shell Stitch: Work 5 dc (double crochet) all into the same stitch or space. This creates a fan shape that gives the shorts body its beautiful lacy texture.
Scallop Edging: Work (sc, hdc, dc, hdc, sc) all into the same stitch or space. Skip 1 stitch between each scallop group. This creates the pretty wavy edge on the straps and band.
BLO Ribbing: Working half double crochet through the back loop only on every row creates stretchy ribbing with horizontal ridges. This is what makes the waistband so comfortable and flattering.
Pom-Pom: Wrap yarn approximately 40 times around a 1 in / 2.5 cm wide piece of cardboard. Slide the wrapped yarn off. Cut a separate 12 in / 30.5 cm strand and tie it tightly around the center of the bundle. Cut all the loops at both ends. Trim into a round sphere shape. The tie tails are used to sew the pom-pom to the garment.
Important Pattern Notes Before You Begin
1. The bralette is a fashion top, not a swimsuit. If worn as swimwear, line the cups with swimwear fabric.
2. The cups are worked as flat circles. They naturally curve into a cup shape when the outer edge is eased into the band. Don’t force it.
3. The shorts are worked in two flat panels (front and back) that are seamed at the sides and crotch. The waistband is worked separately and sewn on.
4. All pieces are worked with RS facing unless noted. Turn at the end of each flat row.
5. Stitch counts appear in parentheses at the end of each row or round: (XX sts).
6. When seaming, use mattress stitch or whipstitch through both loops. The RS of the seam faces inward so seams stay invisible.
7. Block both finished pieces before wearing or attaching the bow. Wet blocking works best for cotton yarns.
Bralette Top Instructions
Section 1: Cup Panels (Make 2)
Each cup is worked as a flat circle using the G-6 hook, beginning in a magic ring.
Round 1: MR, work 6 sc into ring. Pull ring closed. Do not join. Place marker and move it up each round. (6 sc)
Round 2: Work 2 sc in each st around. (12 sc)
Round 3: (Sc in next st, 2 sc in next st) rep around. (18 sc)
Round 4: (Sc in next 2 sts, 2 sc in next st) rep around. (24 sc)
Round 5: (Sc in next 3 sts, 2 sc in next st) rep around. (30 sc)
Round 6: (Sc in next 4 sts, 2 sc in next st) rep around. (36 sc)
Round 7: (Sc in next 5 sts, 2 sc in next st) rep around. (42 sc)
Round 8: (Sc in next 6 sts, 2 sc in next st) rep around. (48 sc)
Round 9: (Sc in next 7 sts, 2 sc in next st) rep around. (54 sc)
Round 10: (Sc in next 8 sts, 2 sc in next st) rep around. (60 sc)
Round 11: (Sc in next 9 sts, 2 sc in next st) rep around. (66 sc)
Round 12: Sc in each st around, no increases. (66 sc)
Round 13: Sc in each st around. (66 sc)
Each circle should measure approximately 5.5 in / 14 cm in diameter. Fasten off and leave a 24 in / 61 cm tail for seaming.
Checkpoint: Each cup panel should be a flat circle. Lay it flat. It should not curl up at the edges or ruffle. If it ruffles, you have too many increases per round. Re-swatch with a smaller hook. If it curls up into a bowl shape prematurely, add one more plain round before proceeding.
Section 2: Cup Bottom Edge Shaping
After working both cup circles, fold each circle in half so the flat edge forms the bottom of the cup. Mark the bottom semicircle (30 stitches) with a stitch marker on each end. You will work only along this bottom straight edge for the band attachment.
Using G-6 hook, join yarn at one marked end stitch on the bottom edge of the cup circle.
Row 1 (WS): Ch 1, sc across the 30 bottom-edge stitches of the cup, working through the existing sc of round 13. Turn. (30 sc)
Row 2 (RS): Ch 1, sc2tog, sc to last 2 sts, sc2tog. Turn. (28 sc)
Row 3: Ch 1, sc2tog, sc to last 2 sts, sc2tog. Turn. (26 sc)
Row 4: Ch 1, sc2tog, sc to last 2 sts, sc2tog. Turn. (24 sc)
Row 5: Ch 1, sc in each st across. Turn. (24 sc)
Fasten off. This creates a slightly angled lower edge that gives the cup a more natural shape.
Section 3: Center Front Seam
Hold both cup panels with RS facing each other. Align the center vertical edge of each cup (the edge at the original fold point). Using tapestry needle and the long yarn tail, whipstitch the two cup inner edges together through approximately 8 to 10 stitches to join the cups at center front. This seam runs vertically from the lower band edge up about 1.5 in / 4 cm. Do not seam the full height or the cups will have no separation.
Turn RS out. The center seam now faces front. This is where the bow will be attached.
Section 4: Under-Bust Band
The band is worked as a flat strip that wraps around the lower edge of both joined cups.
With G-6 hook, join yarn to the far left bottom corner of the left cup lower edge (Row 5 of the bottom shaping).
Row 1 (RS): Ch 1, sc across the bottom of the left cup (24 sts), then sc across the bottom of the right cup (24 sts). Turn. (48 sc)
Row 2: Ch 1, sc in each st across. Turn. (48 sc)
Row 3: Ch 1, sc in each st across. Turn. (48 sc)
Row 4: Ch 1, sc across all 48 sts. At end of row, ch 40 for the right side band extension. Turn. (48 sc worked, plus 40 ch added)
Row 5: Sc in 2nd ch from hook, sc across 39 remaining ch sts, sc across the 48 cup stitches, ch 40 for the left side band extension. Turn. (39 + 48 = 87 sc worked, plus 40 ch added)
Row 6: Sc in 2nd ch from hook, sc across 39 remaining ch sts, sc across 87 sts. Turn. (39 + 87 = 126 sc)
Row 7: Ch 1, sc in each st across. Turn. (126 sc)
Row 8: Ch 1, sc in each st across. Turn. (126 sc)
The band now wraps fully around the torso. 126 stitches at your gauge equals approximately 31.5 in / 80 cm of band circumference (unstretched), stretching to about 34 in / 86 cm.
Band Bottom Edging:
Turn the band so you are working along the bottom long edge.
Row 1: Ch 1, work scallop edging along the entire bottom edge of the band, working (sc, hdc, dc, hdc, sc) all into same stitch every 5 stitches, skipping 1 stitch between each scallop. Rep across. Sl st to join if working in the round, or fasten off and seam ends of band together.
To close the band: fold the right and left ends of the band together at center back. Whipstitch or sl st the short ends together to form the full band ring. Weave in ends.
Checkpoint: The joined cup + band unit should now look like a structured bralette. The band should measure approximately 1.5 in / 4 cm deep. The cups sit on top of the band and face forward. The center seam between cups is approximately 1 to 1.5 in / 2.5 to 4 cm long.
Section 5: Straps (Make 2)
Each strap is worked as a flat strip with scallop edging on both long edges.
With G-6 hook, ch 8.
Row 1: Sc in 2nd ch from hook and in each ch across. Turn. (7 sc)
Row 2: Ch 1, sc in each st across. Turn. (7 sc)
Repeat Row 2 until the strap measures 10 in / 25.5 cm total. Do not fasten off.
Scallop Edging on Straps:
Turn to work along the long edge of the strap. Work scallop edging along the full length of one long edge: (sc, hdc, dc, hdc, sc) in same st, skip 1 st, rep across. At the corner, work 3 sc to turn. Scallop across the opposite long edge in the same manner. Sl st to join at starting corner. Fasten off.
Repeat for second strap.
Attachment: Pin each strap to the top edge of the cup, approximately 1.5 in / 4 cm in from each outer edge of each cup. The straps angle slightly inward toward center back. Sew securely using tapestry needle and yarn. The back ends of the straps can be tied or sewn at center back per the wearer’s preference, or attached to the band back edge.
Section 6: Bow
The bow is made in two halves, assembled, and sewn on.
Bow Half (Make 2):
With G-6 hook, ch 15.
Row 1: Sc in 2nd ch from hook and in each ch across. Turn. (14 sc)
Rows 2-12: Ch 1, sc in each st across. Turn. (14 sc each row)
Each half is a rectangle approximately 3.5 in / 9 cm wide by 2.75 in / 7 cm tall. Fasten off leaving a 12 in / 30.5 cm tail.
Assemble Bow:
Place the two rectangles side by side horizontally with their short ends touching at center. Using yarn, gather both together tightly at the center by wrapping yarn around the joined center point 8-10 times very firmly. Tie off but do not cut tails yet.
Bow Knot (Center Wrap):
With G-6 hook, ch 8.
Row 1: Sc in 2nd ch from hook and in each ch across. Turn. (7 sc)
Rows 2-5: Ch 1, sc in each st across. Turn. (7 sc each row)
Fasten off leaving a 12 in / 30.5 cm tail.
Wrap this small rectangle around the gathered center of the bow. Sew the short ends together at the back of the bow to hold the knot in place.
Attach Bow:
Center the bow over the center front seam of the bralette, at the level of the under-bust band and lower cup edge junction. Sew the bow knot back to the bralette using the yarn tail and tapestry needle. Make sure the bow lies flat and the knot faces forward.
Shorts Instructions
Section 1: Ribbed Waistband
The waistband is worked as a long flat ribbed strip, then joined into a ring and sewn to the shorts body.
With F-5 / 3.75 mm hook, ch 19.
Row 1: Hdc in 3rd ch from hook and in each ch across. Turn. (17 hdc)
Row 2: Ch 2 (does not count as st), hdc BLO in each st across. Turn. (17 hdc)
Repeat Row 2 until the strip measures 30 in / 76 cm in length (approximately 105 rows).
Fold the strip and sl st the short ends together to form a ring. The ring is approximately 30 in / 76 cm in circumference (unstretched), which will stretch to 32-34 in / 81-86 cm.
Fasten off and weave in ends. Set aside.
Checkpoint: The waistband ring should be a stretchy, ribbed tube approximately 17 hdc wide (which equals approximately 4 in / 10 cm in height) and 30 in / 76 cm in circumference. It should have significant horizontal stretch.
Section 2: Shorts Front Panel
The front panel is worked flat from the waist down to the leg opening.
With G-6 hook, ch 74.
Row 1: Sc in 2nd ch from hook and in each ch across. Turn. (73 sc)
Row 2: Ch 1, sc in each st across. Turn. (73 sc)
Row 3 (Shell Row A, RS): Ch 1, sc in first st, (sk 2 sts, 5 dc in next st, sk 2 sts, sc in next st) 12 times. Turn. (73 sts)
Row 4 (Shell Row B, WS): Ch 3 (counts as dc), 2 dc in first sc, (sc in center/3rd dc of next shell, sk 2, 5 dc in next sc, sk 2) 11 times, sc in center dc of last shell, 3 dc in last sc. Turn. (73 sts)
Row 5: Rep Shell Row A. (73 sts)
Row 6: Rep Shell Row B. (73 sts)
Row 7: Rep Shell Row A. (73 sts)
Row 8: Rep Shell Row B. (73 sts)
Row 9: Rep Shell Row A. (73 sts)
Row 10: Rep Shell Row B. (73 sts)
Row 11: Rep Shell Row A. (73 sts)
Row 12: Rep Shell Row B. (73 sts)
Row 13: Rep Shell Row A. (73 sts)
Row 14: Rep Shell Row B. (73 sts)
You have completed 14 shell rows (Rows 3-14) for the front panel body. At this point the panel measures approximately 8 in / 20.5 cm from the starting chain. The waistband will add another 4 in / 10 cm.
Fasten off.
Section 3: Shorts Back Panel
The back panel is worked identically to the front panel with one exception: the rise shaping is slightly deeper to accommodate seat shaping. To achieve this, work 2 additional plain sc rows at the top before beginning the shell pattern.
With G-6 hook, ch 74.
Row 1: Sc in 2nd ch from hook and in each ch across. Turn. (73 sc)
Row 2: Ch 1, sc in each st across. Turn. (73 sc)
Row 3: Ch 1, sc in each st across. Turn. (73 sc)
Row 4: Ch 1, sc in each st across. Turn. (73 sc)
Row 5 (Shell Row A, RS): Ch 1, sc in first st, (sk 2 sts, 5 dc in next st, sk 2 sts, sc in next st) 12 times. Turn. (73 sts)
Row 6 (Shell Row B): Ch 3 (counts as dc), 2 dc in first sc, (sc in 3rd dc of next shell, sk 2, 5 dc in next sc, sk 2) 11 times, sc in 3rd dc of last shell, 3 dc in last sc. Turn. (73 sts)
Continue alternating Shell Row A and Shell Row B for 14 total shell rows (through Row 18). Fasten off.
Section 4: Assembling the Shorts
Crotch Seam: Hold front and back panels with RS facing each other. Align the bottom edges. Using tapestry needle and yarn, whipstitch or mattress stitch along the center bottom curve to create the crotch seam, working approximately 8-10 inches along the center bottom of each panel.
Side Seams: With panels still RS together, seam each side from the waist edge down to the leg opening. Leave approximately 2 in / 5 cm open at each leg for the leg openings.
Turn RS out.
Attach Waistband: Pin the ribbed waistband ring to the top edge of the joined shorts body, stretching the waistband slightly to match the shorts circumference. The ribbing runs vertically (horizontal ridges face outward). Whipstitch the waistband to the shorts body along the entire top edge.
Section 5: Pom-Pom Trim
Make approximately 24-30 pom-poms (12-15 per leg opening) using the pom-pom technique described in Special Stitches.
Space pom-poms evenly around each leg opening, approximately 1 in / 2.5 cm apart. Sew each pom-pom securely to the leg edge using the tie tails.
Finishing
Weave in all remaining ends. Wet block both pieces by soaking in cool water, gently squeezing out excess moisture, and laying flat to dry. Pin to measurements if needed.
Attach the bow to the bralette after blocking is complete.
Tips for Success
Take your time with the shell pattern. The first few rows might feel awkward, but once you establish the rhythm, it moves quickly. Count your shells at the end of each row to catch mistakes early.
Don’t skip blocking. Cotton yarn especially benefits from blocking. It evens out your stitches and helps the garment drape properly.
Try it on as you go. Before seaming the shorts, hold the panels up to your body to check the length. Add or subtract shell rows if needed.
The bow is optional but magical. It really makes the set. If you’re short on time, you can always add it later.
Wrapping Up Your Coral Peach Bow Top and Shorts Crochet Pattern
This set is such a satisfying make. You end up with two coordinating pieces that look like they came from a boutique, but you made them with your own hands. The shell lace on the shorts, the structured cups on the top, the playful pom-pom trim, and that adorable bow all come together into something truly special.
Thank you so much for choosing this pattern. I hope you love making it as much as I loved designing it. If you have any questions along the way, don’t hesitate to reach out.
If you’re planning to make this set, save this pattern to your Pinterest boards so you can find it easily when you’re ready to start. And please, leave a comment below when you finish yours. I would absolutely love to see your coral peach creations come to life!