
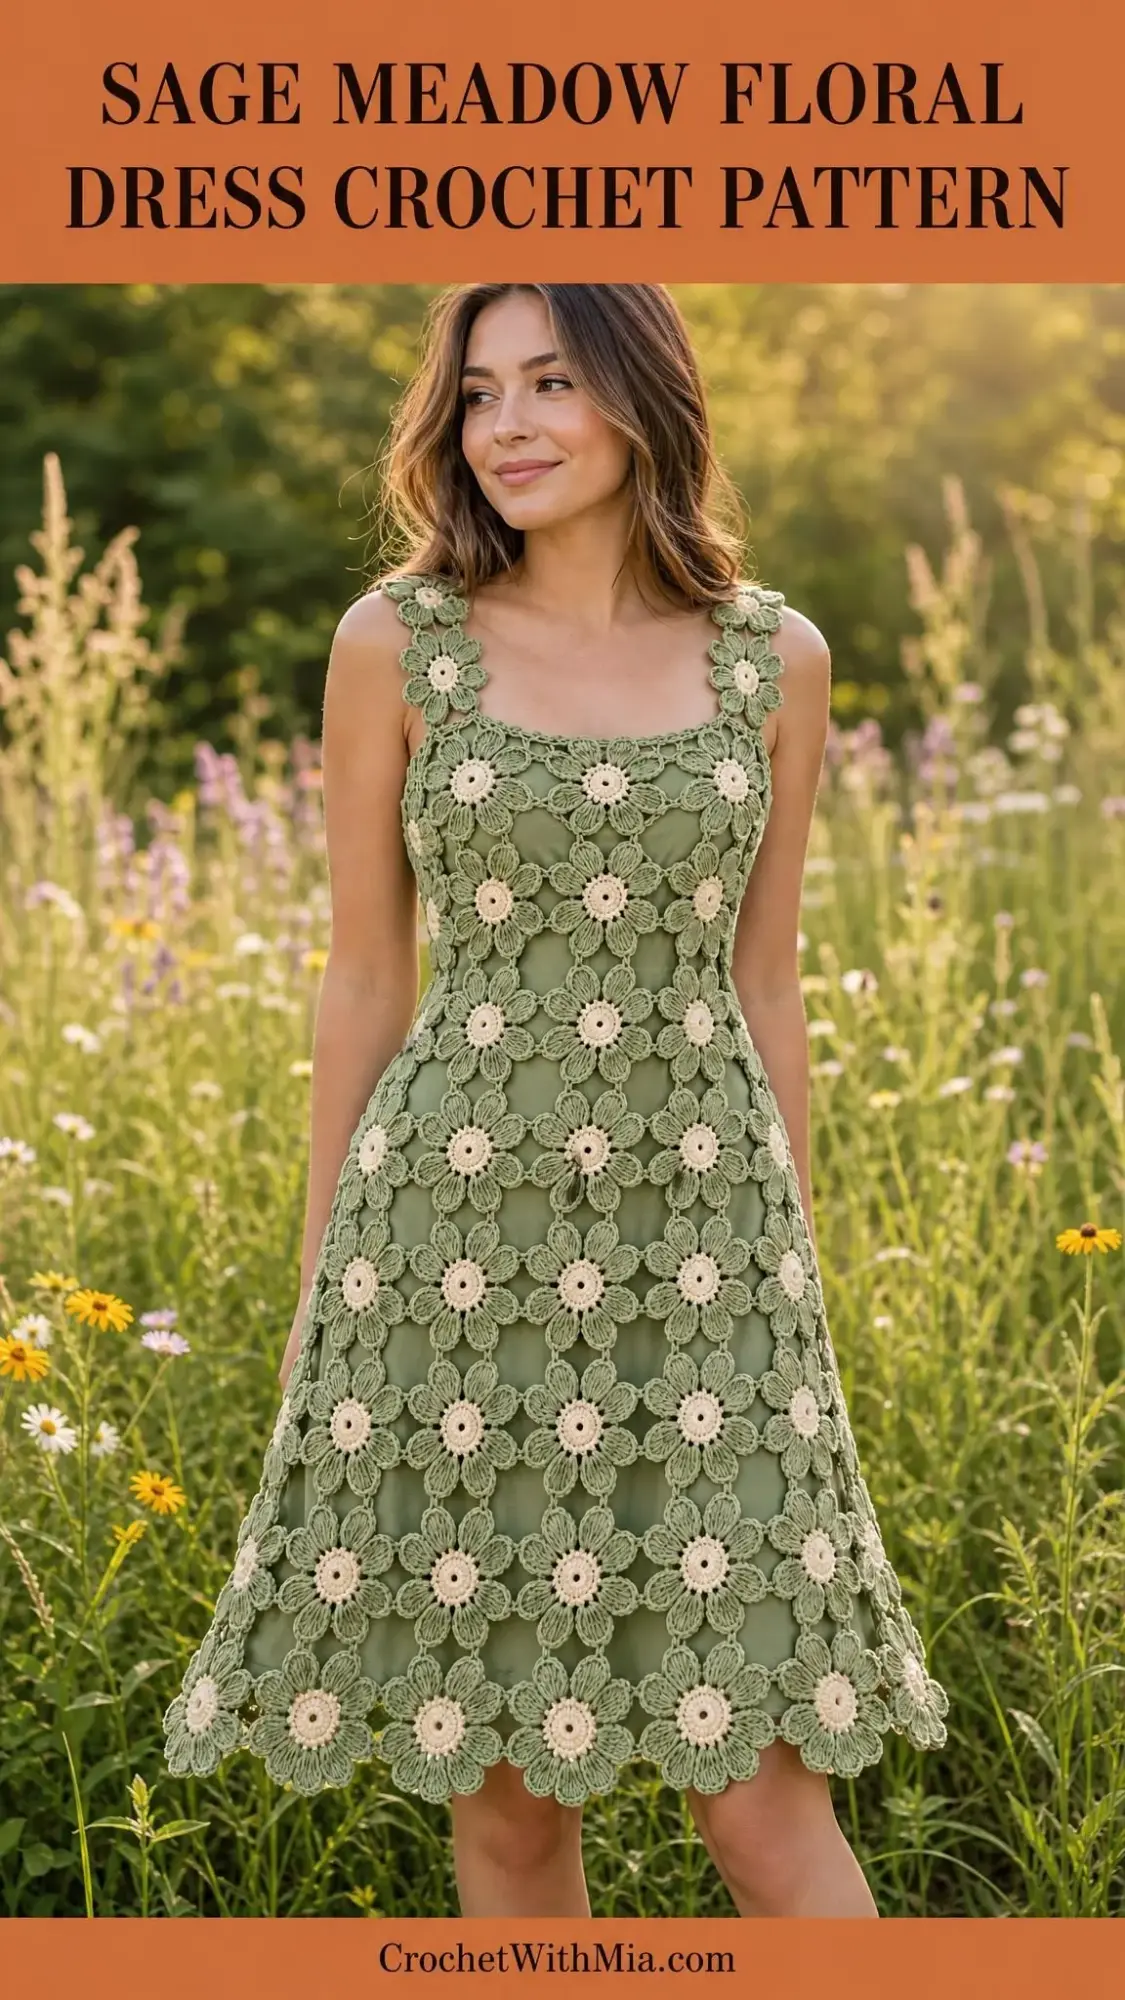
This design brings together delicate eight-petal flowers, a flattering A-line silhouette, and that perfect sage green shade that works for so many occasions. Built from individual flower motifs joined into horizontal bands, the Sage Meadow Floral Dress creates stunning visual impact while using straightforward construction methods.
Get the Ad-Free PDF Pattern
Scroll down for the full pattern, or get the ad-free printable PDF from the shop.
Get the Printable PDF →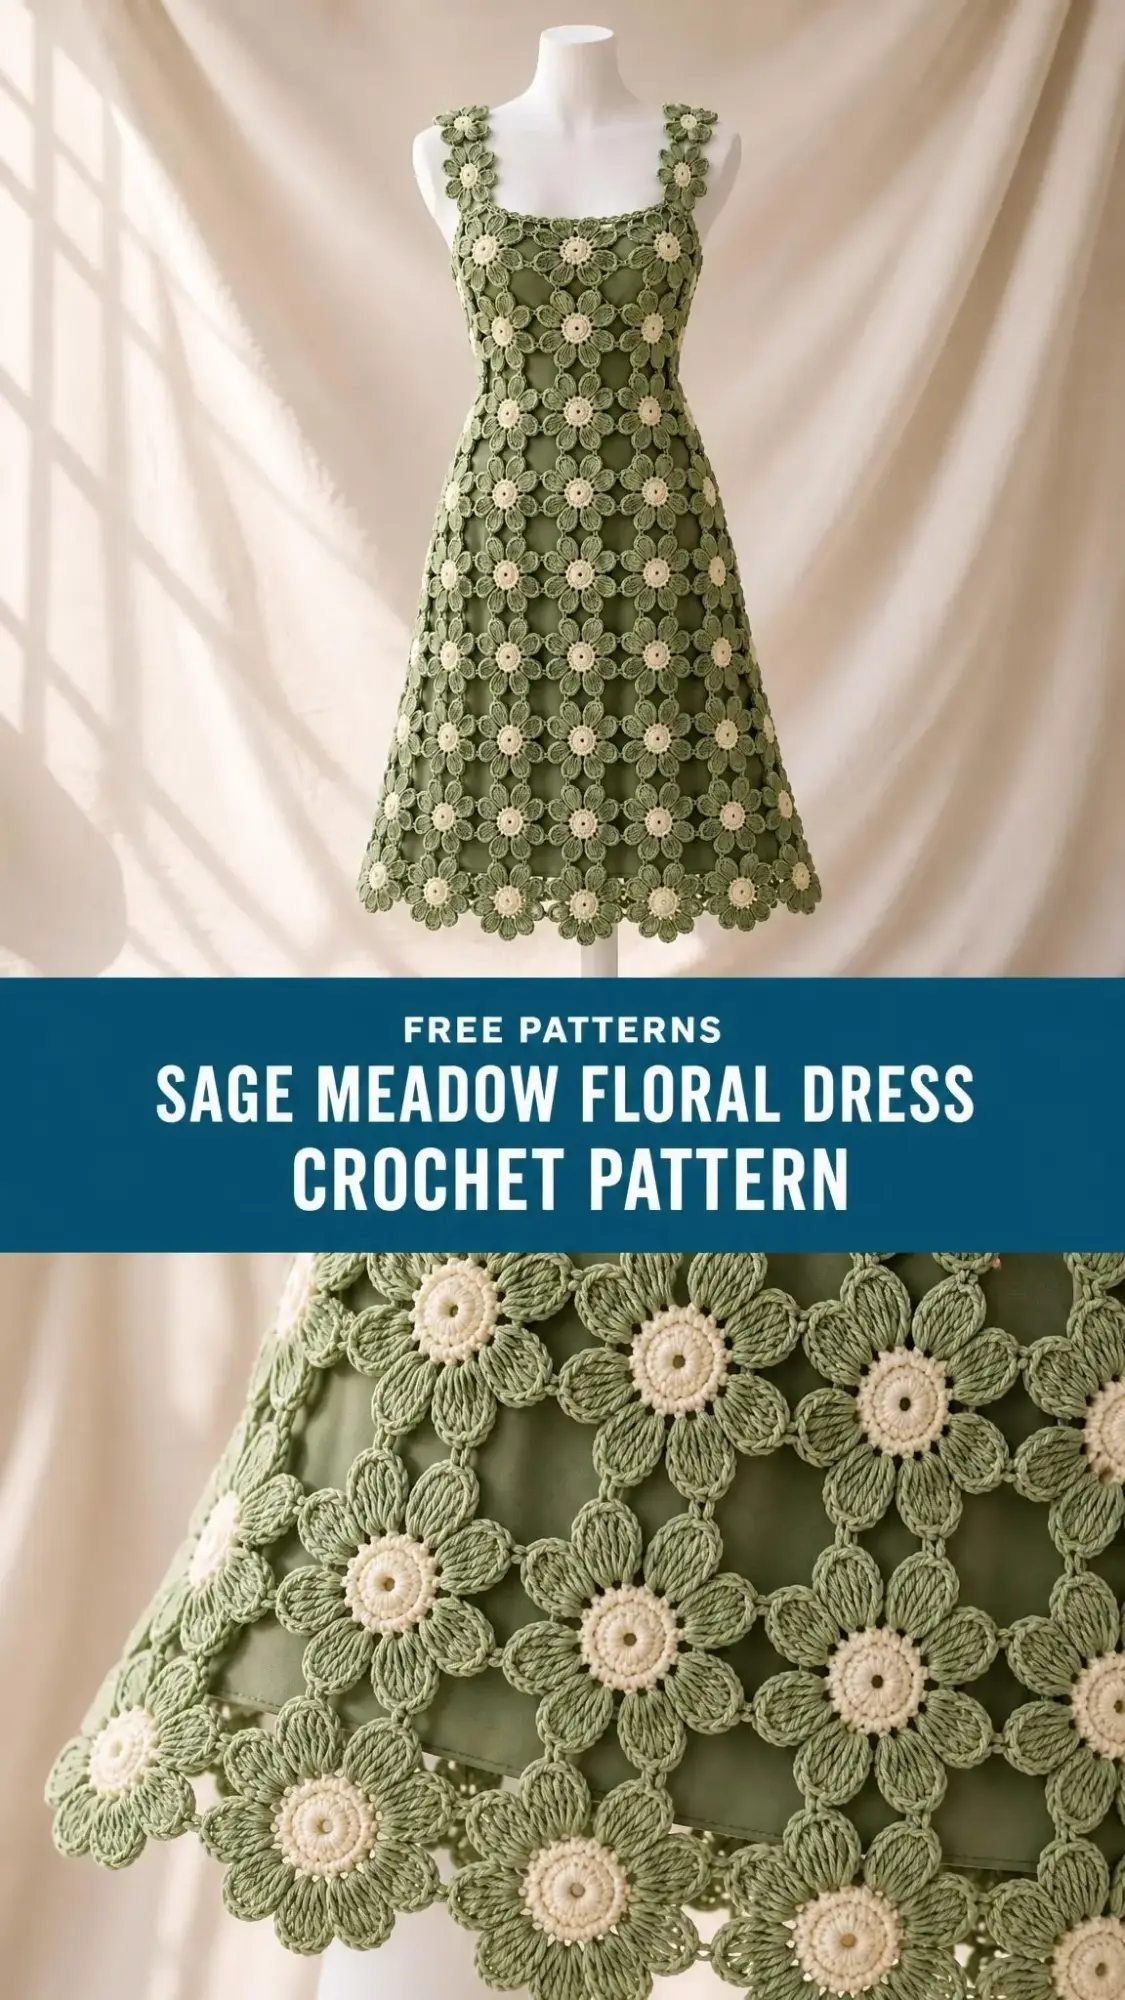
The pattern spans a finished bust of about 96 cm and waist of 88 cm, with an overall length of approximately 83 cm from shoulder to hem. It’s intended for a 90-92 cm bust measurement and pairs with an independently fitted opaque slip underneath. The clever band-by-band assembly means you can try on as you go and adjust the fit before committing to final joins.
Whether you’re planning a garden party outfit, a special summer event piece, or simply want a show-stopping project to sink your hooks into, this floral lattice dress delivers. Let’s walk through everything you need to bring this beautiful garment to life.
Why This Floral Dress Design Works
The genius of this pattern lies in its modular construction. Rather than working the entire dress in one piece and hoping for the best, you’ll create 160 individual flowers first. These get assembled into nine horizontal bands, which then connect vertically to form the body. This approach gives you complete control over fit at every stage.
Waist shaping happens naturally through the bridge lengths between flowers. Band 3 uses shorter chains (ch-2 instead of ch-4) to pull in at the waist, creating that lovely fitted silhouette without any complicated decreases. The remaining bands use ch-4 bridges, allowing the skirt to maintain a comfortable 96 cm circumference through the hips and hem.
The cream-centered flowers against sage green petals create a fresh, botanical aesthetic. Each flower measures just 5 cm across, making them quick to complete individually while building toward something truly impressive when joined together.
Materials You’ll Need
Gathering your supplies before starting ensures smooth sailing throughout this project. Here’s your complete shopping list pulled directly from the pattern:
Yarn:
- Color A (sage green): 450 g / 1350 m total
- Color B (cream): 100 g / 300 m total
- Yarn weight: Smooth sport cotton, approximately 150 m per 50 g
Tools:
- Crochet hook: 3.0 mm (adjust if needed for gauge)
- Tapestry needle
- 32 stitch markers
- Measuring tape
- Pins for blocking
Additional Supplies:
- Matching opaque slip (worn underneath)
- 40 cm side zipper
- Matching sewing thread and needle
- 6 mm stay tape for structural support
Important note: The yarn amounts include a planning allowance and are estimates. Purchase all yarn from one dye lot to ensure color consistency across all 160 flowers. The crochet portion alone is openwork, so the slip provides both coverage and structure.
Understanding Gauge
Getting gauge right on this project matters more than usual. Here’s why: a 1 mm error across 16 flowers changes your total circumference by 1.6 cm. That adds up quickly when you’re working with fitted garments.
Target gauge: One finished flower measures 5 cm across the outer petal tips using a 3.0 mm hook.
Connector measurements:
- A ch-4 horizontal bridge adds approximately 1 cm
- A ch-8 vertical connector adds approximately 2 cm
- Four flowers in one bust band, including four connector allowances, span 24 cm
How to check your gauge:
Make four flowers and join them in a 2 x 2 swatch. Wash and pin flat without stretching the petals. Measure only when completely dry. If your flower diameter differs by more than 2 mm from the 5 cm target, change your hook size. Only adjust connector chain counts after your motif size is correct.
Before making all 160 flowers, pin two completed bands over your intended slip. This fit check saves hours of potential rework later.
Abbreviations and Special Stitches
This pattern uses US crochet terminology throughout. Here’s every abbreviation you’ll encounter:
- ch = chain
- sl st = slip stitch
- sc = single crochet (insert hook, yarn over, pull through, yarn over, pull through both loops)
- hdc = half double crochet (yarn over, insert hook, yarn over, pull through, yarn over, pull through all three loops)
- dc = double crochet (yarn over, insert hook, yarn over, pull through, yarn over, pull through two loops twice)
- tr = treble crochet (yarn over twice, insert hook, yarn over, pull through, yarn over, pull through two loops three times)
- st(s) = stitch(es)
- sp = space
- RS/WS = right side/wrong side
- rep = repeat
- inc = increase
- dec = decrease
Note: Stitch counts exclude joining slip stitches unless specifically stated.
Special Stitch: The Petal
The petal forms the signature element of each flower. In one ch-3 loop, work the following sequence: (sc, hdc, 3 dc, hdc, sc), then slip stitch into the next anchoring single crochet.
The middle of the three double crochets forms the petal tip, which becomes your joining point for bridges. Each flower contains eight petals, and each petal contains seven stitches.
Special Technique: The Bridge
Bridges connect flowers to each other. To make a bridge: join Color A with a slip stitch to one petal tip, chain the specified number, slip stitch to the opposite tip on the adjacent flower, then fasten off.
For a zero-chain bridge, simply whipstitch the tips together instead. Use north/south and east/west petal tips for main structural joins. Diagonal tips carry the stabilizing mesh that prevents the lattice from distorting.
Pattern Notes Before You Begin
Read through these notes completely before picking up your hook. They’ll save confusion later.
Brackets enclose repeats. Work the bracketed instructions the stated number of times.
Joining rounds: Always join to the first counted stitch of the round.
Right side facing: Keep the RS facing you for all motif work.
Color changes: Change colors on the final yarn-over of the last stitch, then fasten off the unused color.
Measurements: All measurements refer to washed, dry, blocked fabric. For reference, 1 inch equals 2.54 cm.
Petal orientation: Before joining any flowers, mark one petal as "north." Number the eight petals clockwise: N, NE, E, SE, S, SW, W, NW. This compass system keeps your joins consistent throughout construction.
Construction direction: Start at Band 1 (upper chest) and work toward the hem. Leave the left side open through the first six bands to accommodate the zipper.
Band counts: Every band contains 16 flowers. The gradual flare of the skirt comes from progressively longer bridges, not from adding more flowers.
Construction Overview
The build process follows this sequence:
- Make and block all 160 flowers
- Assemble flowers into nine horizontal bands
- Connect bands vertically into front/back panels
- Add shoulder straps
- Close side seam below zipper opening
- Stabilize neckline and install slip and closure
Band specifications:
| Band | Horizontal Chain | Approximate Circumference |
|---|---|---|
| 1 | 4 | 96 cm |
| 2 | 4 | 96 cm |
| 3 | 2 | 88 cm (waist) |
| 4 | 4 | 96 cm |
| 5 | 4 | 96 cm |
| 6 | 4 | 96 cm |
| 7 | 4 | 96 cm |
| 8 | 4 | 96 cm |
| 9 | 4 | 96 cm |
Flower totals:
- Body bands: 144 flowers (9 bands x 16 flowers)
- Upper finish/straps: 16 flowers
- Grand total: 160 flowers
- Vertical joins between body bands: 128 bridges
Step-by-Step Instructions
Part A: Make All Flowers
You’ll create 160 identical flowers before any assembly begins. This batch approach ensures consistency and lets you settle into a rhythm.
Round 1 (Color B, cream): Make an adjustable ring. Ch 1, work 8 sc into the ring. Tighten the ring and sl st to the first sc. [8 sc]
Round 2 (Color B, cream): Ch 1, work 2 sc in each st around. Sl st to the first sc, then fasten off. [16 sc]
Round 3 (Color A, sage green): Join in any stitch. [Sc in next st, ch 3, skip next st] 8 times. Sl st to the first sc. [8 sc, 8 ch-3 loops]
Round 4 (Color A, sage green): Work one petal in each ch-3 loop as defined in the special stitches section. Fasten off after completing the eighth petal. [8 petals; 56 petal stitches total]
Checkpoint: All 160 flowers should have eight petals and measure 5 cm across the tips. Set aside 16 flowers for the upper finish/straps.
Part B: Build Each Horizontal Band
For each band, arrange 16 flowers with their centers in a straight line. Bridge the East tip of one flower to the West tip of its neighbor using the specified chain count.
Important: Make only 15 bridges per band now. Reserve the 16th closing bridge until fitting to allow for adjustments.
Band 1: Bridge E to W tips using ch 4. [16 flowers, 15 bridges; target closed circumference 96 cm]
Band 2: Bridge E to W tips using ch 4. [16 flowers, 15 bridges; target closed circumference 96 cm]
Band 3: Bridge E to W tips using ch 2. [16 flowers, 15 bridges; target closed circumference 88 cm]
Band 4: Bridge E to W tips using ch 4. [16 flowers, 15 bridges; target closed circumference 96 cm]
Band 5: Bridge E to W tips using ch 4. [16 flowers, 15 bridges; target closed circumference 96 cm]
Band 6: Bridge E to W tips using ch 4. [16 flowers, 15 bridges; target closed circumference 96 cm]
Band 7: Bridge E to W tips using ch 4. [16 flowers, 15 bridges; target closed circumference 96 cm]
Band 8: Bridge E to W tips using ch 4. [16 flowers, 15 bridges; target closed circumference 96 cm]
Band 9: Bridge E to W tips using ch 4. [16 flowers, 15 bridges; target closed circumference 96 cm]
Part C: Join Bands from Chest to Hem
Now you’ll connect your horizontal bands vertically, working from the top down.
Join Row 1: Place Band 2 below Band 1, aligning all 16 columns. Connect every South tip of Band 1 to the corresponding North tip of Band 2 using ch 8. [16 vertical bridges]
Join Row 2: Place Band 3 below Band 2, aligning all 16 columns. Connect every South tip of Band 2 to the corresponding North tip of Band 3 using ch 8. [16 vertical bridges]
Join Row 3: Place Band 4 below Band 3, aligning all 16 columns. Connect S to N tips using ch 8. [16 vertical bridges]
Join Row 4: Place Band 5 below Band 4, aligning all 16 columns. Connect S to N tips using ch 8. [16 vertical bridges]
Join Row 5: Place Band 6 below Band 5, aligning all 16 columns. Connect S to N tips using ch 8. [16 vertical bridges]
Join Row 6: Place Band 7 below Band 6, aligning all 16 columns. Connect S to N tips using ch 8. [16 vertical bridges]
Join Row 7: Place Band 8 below Band 7, aligning all 16 columns. Connect S to N tips using ch 8. [16 vertical bridges]
Join Row 8: Place Band 9 below Band 8, aligning all 16 columns. Connect S to N tips using ch 8. [16 vertical bridges]
Mesh Stabilization
This step prevents the lattice from distorting during wear. At each space between four flowers, create diagonal bridges:
- Bridge the SE tip of the upper-left flower to the NW tip of the lower-right flower using ch 10.
- Bridge the SW tip of the upper-right flower to the NE tip of the lower-left flower using ch 5, then sl st into the fifth chain of the first bridge, ch 5, and join.
If any intersection pulls or distorts, increase both halves of the diagonal equally until the flat gauge is maintained. Each complete four-flower cell gets 2 diagonal bridges.
Part D: Upper Finish and Straps
Upper Row 1: Using the 16 reserved flowers, make two straps. Each strap forms a rectangle 2 flowers wide by 4 flowers long. Join side tips with ch 0 (whipstitch) and end tips with ch 4. [8 flowers per strap; 16 total]
Upper Row 2: Pin each strap between the outer two flowers of the front upper edge and the corresponding back edge. Sew every touching petal tip securely. [2 straps, approximately 10 x 23 cm each]
Neckline options:
- For a square neckline, leave the center four flowers of both front and back upper bands level.
- For an empire version, position the narrowest band (Band 3) immediately below the bust and lengthen the shoulder paths only if needed.
Fitting check: Try the pinned garment over your slip before final attachment. The neckline should sit flat and the shoulders should bear the garment weight without stretching. Use the side opening for dressing. Do not force the openwork over the hips.
Assembly Instructions
Body Seam and Closure
Materials needed: Color A (sage green), 3.0 mm hook, tapestry needle, zipper, sewing thread, stay tape.
Join Round 1: Close each body band from Band 7 through Band 9 using that band’s scheduled bridge count (ch 4 for all three). [3 closing bridges]
Join Row 2: Connect the seam-adjacent diagonal mesh below the opening using the same crossed-bridge method described in mesh stabilization. [One mesh cell per joined band interval]
Sewing Pass 3: Hand-sew stay tape along both edges of the upper side opening, then sew the zipper to the tape without catching the teeth in your stitches. [2 supported zipper edges]
Checkpoint: Closed bust should measure approximately 96 cm. Total shoulder-to-hem length should be approximately 83 cm. The zipper should open smoothly with no twisted joins.
Slip and Shoulder Support
Materials needed: Color A (sage green), 3.0 mm hook available for adjustments, matching sewing thread, opaque fitted slip.
Sewing Pass 1: Attach stay tape underneath the straps using small catch stitches. [2 supported shoulder paths]
Sewing Pass 2: Tack the crochet layer to the slip at shoulders and both underarms, leaving the skirt layers independent for natural movement. [4 anchor points]
Checkpoint: The slip should allow comfortable movement and cover all openwork areas intended to be opaque.
Edgings and Details
Neckline and Armholes
Round 1: Using Color A, sc once in each exposed petal stitch. Work one sc into each chain of each exposed bridge. Do not work across the zipper opening. Record the resulting stitch count (E) separately for each opening. [E sc]
Round 2: Sl st loosely in every sc, then fasten off. [E sl st]
Checkpoint: Both armholes should lie flat with matching stitch counts on corresponding edges. The hem retains the natural eight-petal flower scalloped outline.
Hem Finishing
Finishing Pass 1: Secure every bottom-band bridge end using your tapestry needle. Keep the lower petals unattached to maintain the decorative scalloped edge. [16 hem flowers]
Checkpoint: The flower scallops should hang evenly without curling.
Final Finishing
Weaving Ends and Blocking
Finishing Pass 1: Weave every yarn end through at least 3 cm of dense stitching, working in two directions for security. [0 unsecured ends remaining]
Blocking Pass 2: Dampen the dress and lay flat according to the band measurements, supporting the full garment weight. Allow to dry completely before lifting. [16 flowers per band]
Final Checkpoint: Length should measure approximately 83 cm. Chest circumference should measure 96 cm. Each flower should measure approximately 5 cm. Hang only briefly for your final fit check.
Care Instructions
Proper care keeps this dress looking beautiful for years:
- Washing: Hand wash in cool water with mild detergent. Support the wet dress with both hands when lifting.
- Drying: Roll gently in towels to remove excess water, then dry completely flat. Never wring, tumble dry, or hang while wet.
- Storage: Store folded, not hanging.
- Safety: Secure all closures before storage. Keep any ties or open loops away from machinery, flames, and young children.
- Wearing: Always wear with the opaque slip. If making a floor-length version, shorten the hem if it creates a trip hazard.
Size Adjustments
This pattern provides one reference size. To adjust the circumference:
- Use an even number of motifs (N)
- Calculate: N x (5 cm + connector length in cm)
- Split the motif count equally between front and back
- Each additional band adds approximately 7 cm of length and requires N more flowers
For example, to add 6 cm to the bust, you would add one flower to the front and one to the back (18 flowers per band instead of 16), then recalculate your total flower count.
Tips for Success
Batch your flowers. Making all 160 flowers before assembly lets you establish consistent tension and catch any gauge drift early.
Use your markers generously. Mark the north petal on every single flower before joining. This small step prevents hours of frustration untangling misaligned motifs.
Try on frequently. The modular construction allows fitting at every stage. Take advantage of this by pinning sections over your slip before making permanent joins.
Trust the slip. This openwork design relies on the underlying slip for opacity and some structural support. Choose a well-fitted slip in a coordinating color.
Don’t skip the stay tape. Those little strips of stabilizer tape prevent shoulder stretch and keep your zipper edges crisp. They’re invisible in the finished garment but make a huge difference in wearability.
Thank you so much for choosing this pattern for your next project. The Sage Meadow Floral Dress takes time and attention, but the result is a truly wearable piece of art. If you make this dress, please share your photos on Instagram or Facebook. Seeing your finished projects is always a highlight.
Save this pattern to your Pinterest boards so you can find it when you’re ready to start, and drop a comment below if you have questions or want to share your progress. Happy crocheting!
Want a Quick & Easy Printable Version?
Get a clean, beautifully formatted PDF of this pattern — easy to follow step by step, ready to print or save on any device. No scrolling, no distractions, just the pattern.
Get the Printable PDF →