
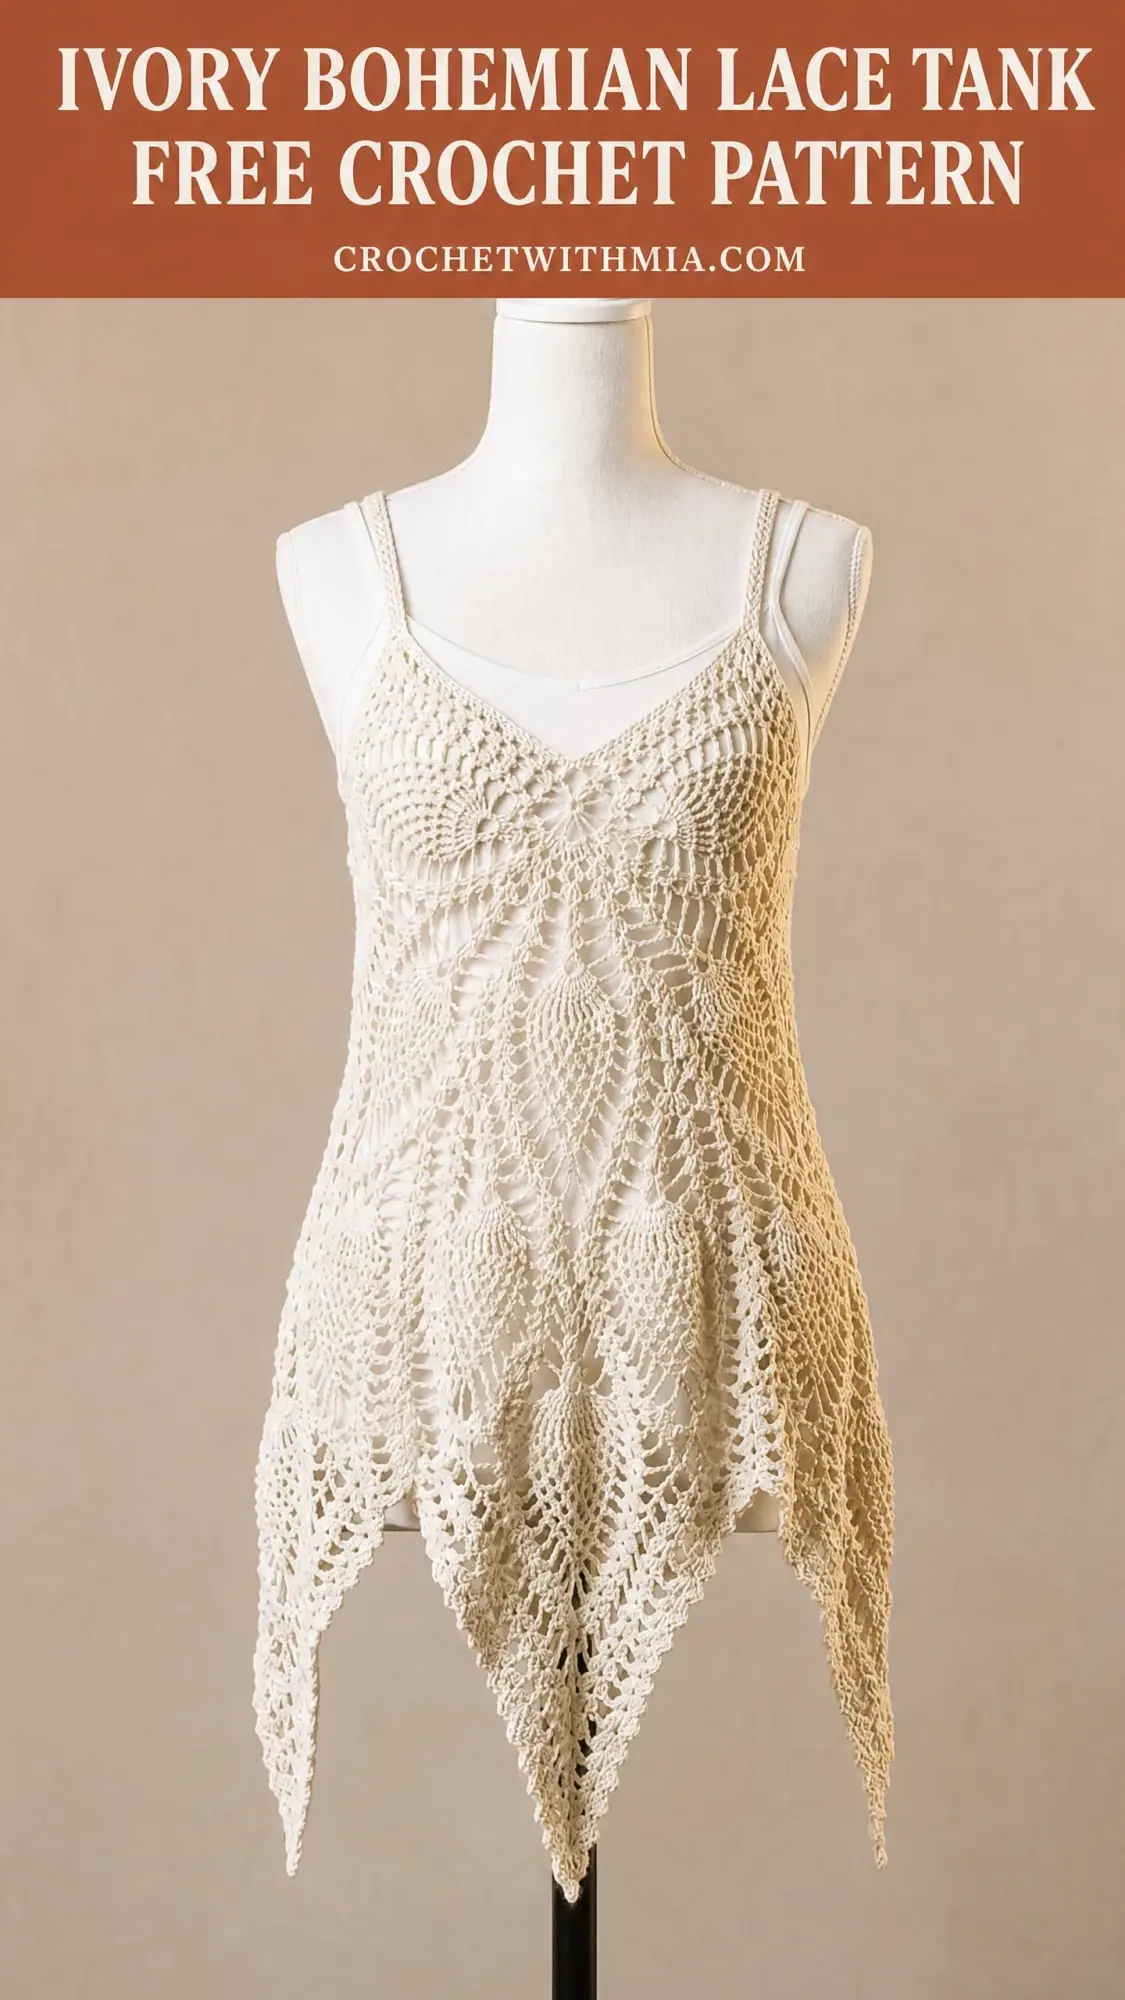
This is THE pattern you tackle when you want to level up your crochet game and walk away with something absolutely stunning. I am talking showstopper territory here. This ivory bohemian lace tank features gorgeous pineapple motifs, a flattering fitted bodice, and that dreamy handkerchief hem that moves like poetry when you walk.
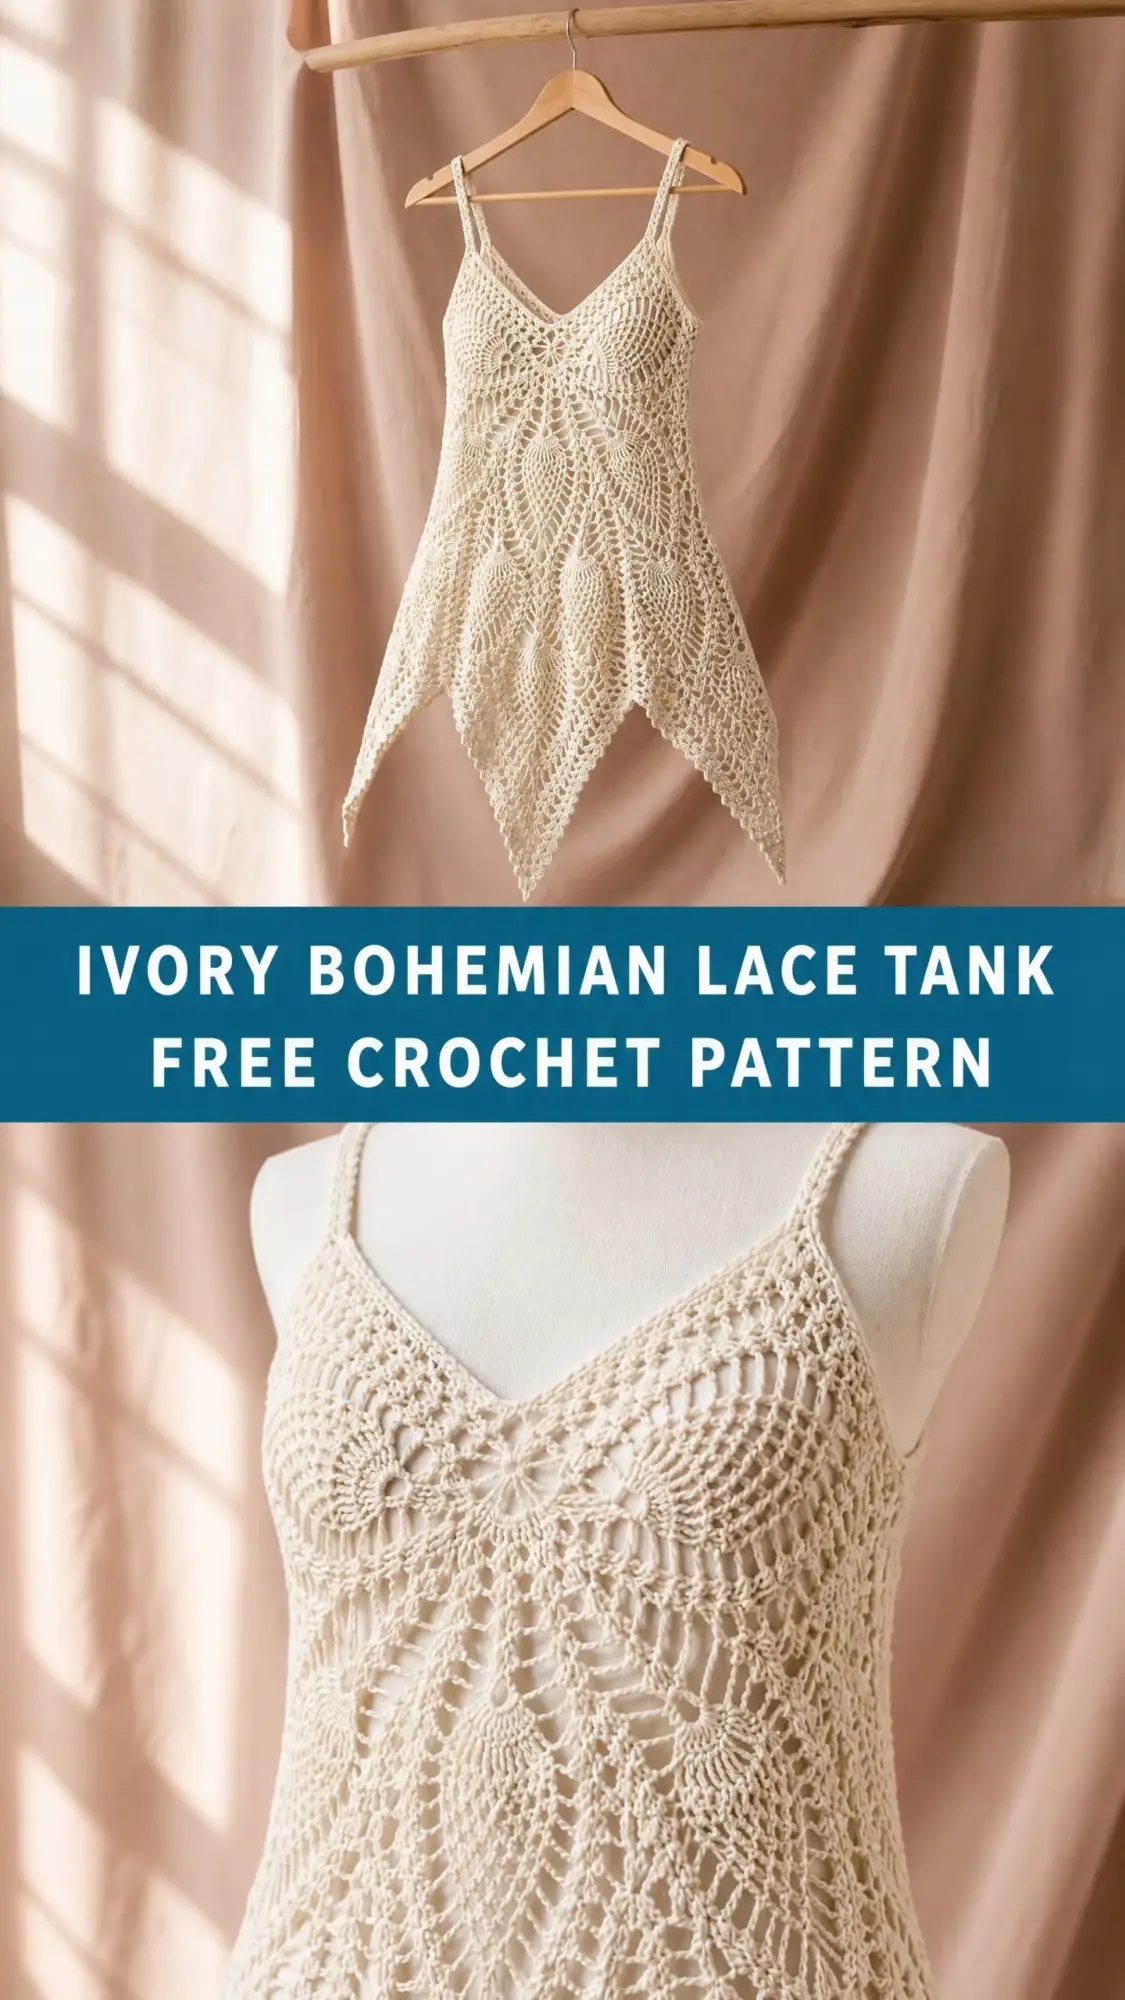
Yes, this is an advanced project. Yes, it takes time. But hear me out. Every single hour you put into this piece shows in the finished garment. The delicate lace construction, the way those pointed hem tips cascade downward, the fitted silhouette that actually flatters your figure. This is wearable art.
If you have been crocheting for a while and you are ready for something that pushes your skills while rewarding you with a truly unique piece for your wardrobe, you are in exactly the right place. Let me walk you through everything you need to know.
About This Bohemian Lace Tank Crochet Pattern
This tank is worked using a combination of top-down and modular construction. You will create the bodice front and back as separate flat panels, join them at the sides, then work the skirt section in the round. The magic happens in those pineapple motifs that radiate outward and downward, creating the signature pointed handkerchief hem.
The bodice features a flattering V-neckline that forms naturally from the construction method. Small decorative pineapple fans frame the bust area before transitioning into the larger skirt motifs. Thin spaghetti straps are crocheted separately and attached during finishing.
The finished garment is open lace throughout. This means you will want to wear it over a slip or camisole, or line the bodice cups with stretch knit fabric. I have included instructions for both options.
Skill Level: Advanced
This pattern requires confident execution of pineapple stitch motifs, working increases within lace patterns, precise joining of flat panels into the round, and reading lace construction logic. I recommend completing at least two lace projects before attempting this garment.
Time Estimate: Approximately 40 to 55 hours for an experienced crocheter working at a moderate pace.
Finished Measurements
These measurements reflect the garment lying flat with moderate blocking. The lace fabric has inherent stretch.
Materials Needed
Yarn: 800 to 950 yards (730 to 870 meters) of size 10 crochet thread or fingering-weight cotton yarn in natural ecru or ivory
Hook: US steel size 7 (1.65 mm) for thread, or US B-1 (2.25 mm) for light fingering cotton. Adjust to meet gauge.
Notions:
Yarn Suggestions
Option 1: DMC Traditions Crochet Thread, Size 10, Ecru
A classic mercerized cotton thread with excellent stitch definition, ideal for showing pineapple lace detail. Approximately 350 yards per ball. Purchase 3 balls.
Option 2: Paintbox Yarns Cotton DK
Used on a tighter hook than standard, this gives a softer drape with a slightly more rustic bohemian feel. Approximately 273 yards per ball. Purchase 4 balls. Use US B-1 (2.25 mm) hook.
Option 3: Drops Safran Fingering Cotton, color 17 (off-white)
A smooth, tightly spun mercerized cotton that blocks beautifully and holds the pointed hem tips crisp. Approximately 175 yards per ball. Purchase 6 balls.
Substitution note: Choose 100 percent cotton or cotton-blend thread or yarn with smooth twist, minimal halo, and firm plying. Avoid fuzzy or stretchy fibers, which will obscure the lace stitch definition. Mercerized cotton is strongly preferred.
Gauge
Using chosen yarn and hook:
Gauge is critical for fit. Adjust hook size as needed. Swatch one pineapple motif, block it, and measure before beginning the full garment. I know swatching feels tedious, but with a fitted garment like this, skipping the swatch can mean hours of work that does not fit properly.
Abbreviations
Special Stitches
Pineapple Fan
This is a fan of 9 double crochets worked into a single chain space, forming the base "shell" of each pineapple motif.
Step 1: Work 9 dc into the designated ch-sp or stitch.
Step 2: The 9 dc sit side by side and form a curved fan shape.
Step 3: In subsequent rows, each dc of the fan becomes its own stitch worked with either sc, ch, or dc2tog to close the pineapple as it tapers upward.
Step 4: The pineapple tapers by working sc into successive dc of the fan on each row until only a single sc remains at the tip.
Pineapple Decrease Row Sequence
This is the sequence you will use repeatedly throughout the skirt section. For a 9-dc fan:
Row A: ch 1, sc in first dc of fan, [ch 1, sk 1 dc, sc in next dc] across the fan, ending sc in last dc of fan. This produces 5 sc separated by 4 ch-1 sps.
Row B: sl st to first ch-1 sp, ch 1, sc in same sp, [ch 1, sc in next ch-1 sp] across, ending sc in last ch-1 sp. Count: 4 sc separated by 3 ch-1 sps.
Row C: sl st to first ch-1 sp, ch 1, sc in same sp, [ch 1, sc in next ch-1 sp] to last sp, sc in last ch-1 sp. Count: 3 sc separated by 2 ch-1 sps.
Row D: sl st to first ch-1 sp, ch 1, sc in same sp, ch 1, sc in next ch-1 sp. Count: 2 sc, 1 ch-1 sp.
Row E: sl st to ch-1 sp, sc in sp. Count: 1 sc. Pineapple tip complete.
Foundation V-Stitch
Work (dc, ch 1, dc) in the same stitch or chain space. This counts as 2 dc with 1 ch-1 sp between them.
Joining Picot
Ch 3, sl st in base of ch-3. This creates a small decorative loop at each hem point.
Pattern Notes Before You Begin
1. The bodice front and back are worked separately as flat panels from the top neckline edge down to the underarm, then joined and worked in the round for the skirt.
2. The pineapple motif repeat is a multiple of 12 stitches plus 3. The garment uses 8 full pineapple motifs around the skirt circumference in the sample size.
3. Turning chains: ch 3 at the beginning of a dc row counts as the first dc throughout. ch 1 at the beginning of an sc row does not count as a stitch.
4. All measurements given are after blocking. Blocking is essential for this garment and will add approximately 10 to 15 percent to the overall dimensions.
5. The garment shown is worn over a slip or lined bodice. The crochet fabric is fully open lace and is not opaque.
6. Place stitch markers at the side seam join points and at each motif repeat boundary. Trust me, this saves confusion later.
7. For a smooth V-neck, the bodice front is worked with a center chain space at the neckline that naturally forms the V shape as the rows widen.
Step by Step Instructions
Bodice Front Panel
The front bodice is worked flat, beginning at the center front V-neck point and widening outward with increases on each row to shape the bust. The panel ends at the underarm level.
Foundation: Ch 3. Sl st to first ch to form a small ring (this is the base of the V-neck point).
Row 1 (RS): Ch 3 (counts as dc), work 4 dc into ring, ch 1, work 5 dc into ring. Turn. (10 dc, 1 ch-1 sp)
Row 2 (WS): Ch 3, dc in next 4 dc, (dc, ch 1, dc) in ch-1 sp, dc in next 4 dc, dc in top of t-ch. Turn. (12 dc, 1 ch-1 sp)
Row 3: Ch 3, dc in next 5 dc, (dc, ch 1, dc) in ch-1 sp, dc in next 5 dc, dc in top of t-ch. Turn. (14 dc, 1 ch-1 sp)
Row 4: Ch 3, dc in next 6 dc, (dc, ch 1, dc) in ch-1 sp, dc in next 6 dc, dc in top of t-ch. Turn. (16 dc, 1 ch-1 sp)
Row 5: Ch 3, dc in next 2 dc, ch 1, sk 1 dc, dc in next 3 dc, (dc, ch 1, dc) in ch-1 sp, dc in next 3 dc, ch 1, sk 1 dc, dc in next 2 dc, dc in top of t-ch. Turn. (14 dc, 3 ch-1 sps)
Row 6: Ch 3, dc in next dc, ch 1, dc in ch-1 sp, ch 1, sk 1 dc, dc in next 3 dc, (dc, ch 1, dc) in center ch-1 sp, dc in next 3 dc, ch 1, sk 1 dc, dc in ch-1 sp, ch 1, dc in next dc, dc in top of t-ch. Turn. (14 dc, 5 ch-1 sps)
Row 7: Ch 3, dc in ch-1 sp, ch 1, dc in next ch-1 sp, ch 1, sk 1 dc, dc in next 2 dc, (dc, ch 1, dc) in center ch-1 sp, dc in next 2 dc, ch 1, sk 1 dc, dc in ch-1 sp, ch 1, dc in ch-1 sp, dc in top of t-ch. Turn. (12 dc, 5 ch-1 sps)
Row 8: Ch 3, ch 1, sk first dc, dc in ch-1 sp, ch 1, dc in next ch-1 sp, ch 1, sk 1 dc, dc in next dc, (dc, ch 1, dc) in center ch-1 sp, dc in next dc, ch 1, sk 1 dc, dc in ch-1 sp, ch 1, dc in ch-1 sp, ch 1, dc in top of t-ch. Turn. (12 dc, 7 ch-1 sps)
This completes the V-neck and center bodice shaping. You now begin the bust cup section.
Bust Widening Section (Rows 9-16)
Row 9: Ch 3, work 1 dc in each dc and 1 dc in each ch-sp across row, placing (dc, ch 1, dc) in center ch-1 sp. Turn. (22 dc, 1 ch-1 sp)
Row 10: Ch 3, dc in next 3 dc, ch 2, sk 2 dc, dc in next 3 dc, (dc, ch 1, dc) in ch-1 sp, dc in next 3 dc, ch 2, sk 2 dc, dc in next 3 dc, dc in top of t-ch. Turn. (18 dc, 2 ch-2 sps, 1 ch-1 sp)
Row 11: Ch 3, dc in next 2 dc, ch 2, work 5 dc in ch-2 sp (first pineapple fan), ch 2, dc in next 2 dc, (dc, ch 1, dc) in center ch-1 sp, dc in next 2 dc, ch 2, work 5 dc in ch-2 sp (second pineapple fan), ch 2, dc in next 2 dc, dc in top of t-ch. Turn. (16 dc + 10 fan dc = 26 dc total, 4 ch-2 sps, 1 ch-1 sp)
The small 5-dc fans at rows 11-13 form decorative bust cups and are not full pineapple motifs. They taper as follows:
Row 12: Ch 3, dc in next dc, ch 2, sc in first dc of fan, [ch 1, sk 1, sc in next dc] twice, ch 2, dc in next dc, (dc, ch 1, dc) in center sp, dc in next dc, ch 2, sc in first dc of fan, [ch 1, sk 1, sc in next dc] twice, ch 2, dc in next dc, dc in top of t-ch. Turn. (8 dc, 3 sc per fan x 2 fans, 8 ch-sps, 1 ch-1 sp)
Row 13: Ch 3, ch 1, dc in ch-2 sp, sc in ch-1 sp, ch 1, sc in ch-1 sp, dc in ch-2 sp, ch 1, (dc, ch 1, dc) in center sp, ch 1, dc in ch-2 sp, sc in ch-1 sp, ch 1, sc in ch-1 sp, dc in ch-2 sp, ch 1, dc in top of t-ch. Turn. (8 dc, 4 sc, 9 ch-1 sps)
Row 14: Ch 3, dc in each st and ch-1 sp across, placing (dc, ch 1, dc) in center ch-1 sp. Turn. (26 dc, 1 ch-1 sp)
Row 15: Ch 3, dc in next 5 dc, ch 2, sk 2, dc in next 3 dc, (dc, ch 1, dc) in center sp, dc in next 3 dc, ch 2, sk 2, dc in next 5 dc, dc in top of t-ch. Turn. (22 dc, 2 ch-2 sps, 1 ch-1 sp)
Row 16: Ch 3, dc in next 4 dc, ch 2, work 9 dc in ch-2 sp, ch 2, dc in next 3 dc, (dc, ch 1, dc) in center sp, dc in next 3 dc, ch 2, work 9 dc in ch-2 sp, ch 2, dc in next 4 dc, dc in top of t-ch. Turn. (24 dc + 18 fan dc = 42 dc, 4 ch-2 sps, 1 ch-1 sp)
This row sets up the two large pineapple motifs framing the bust.
Bodice Front Pineapple Section (Rows 17-22)
Row 17: Ch 3, dc across to first ch-2 sp, ch 2, work Pineapple Decrease Row A on 9-dc fan (produces 5 sc, 4 ch-1 sps), ch 2, dc to center sp, (dc, ch 1, dc) in center sp, dc to next ch-2 sp, ch 2, work Pineapple Decrease Row A on second fan, ch 2, dc to end, dc in top of t-ch. Turn.
Row 18: Work Row B of Pineapple Decrease on each fan (4 sc, 3 ch-1 sps per fan), maintaining mesh and center V-stitch. Turn.
Row 19: Work Row C (3 sc, 2 ch-1 sps per fan). Turn.
Row 20: Work Row D (2 sc, 1 ch-1 sp per fan). Turn.
Row 21: Work Row E (1 sc at tip of each fan). Pineapple tips complete. Turn.
Row 22: Ch 3, dc across all sts, filling ch-sps with dc. Do not increase or decrease. Turn. (34 dc)
CHECKPOINT: After Row 22 of the bodice front, your panel should measure approximately 6 inches (15 cm) tall from the V-neck point and approximately 8.5 inches (21.5 cm) wide across the bottom edge.
Bodice Back Panel
The back panel is worked flat and is a simple dc mesh rectangle that matches the height and width of the front panel. The back is lower cut than the front, with a wider, more open neckline.
Foundation: Ch 39.
Row 1: Dc in 4th ch from hook, dc in each ch across. Turn. (37 dc)
Rows 2-10: Ch 3, dc in each dc across, dc in top of t-ch. Turn. (37 dc)
After Row 10 the back panel should measure approximately 6 inches (15 cm) tall.
Row 11 (Side Decrease for Armhole Shaping): Ch 1, sl st across first 4 sts, ch 3, dc to last 4 sts, leave last 4 sts unworked. Turn. (29 dc)
This armhole shaping removes 4 sts from each side. The bodice back panel now has 29 dc and is ready for joining.
Joining the Bodice
Place front and back bodice panels with RS facing each other. Align the bottom edges. Using sc, join the left side seam by working sc through both thicknesses along the side edges of the panels for 6 rows, approximately 1.5 inches (4 cm). Fasten off. Repeat for right side seam.
Turn right side out. The top edges form the armhole openings and necklines.
Work a single row of sc around each armhole opening. Approximately 28 sc around each armhole.
Skirt Section (Worked in the Round)
After joining the bodice, you will work the skirt downward from the joined bottom edge. The skirt uses 8 full pineapple motifs arranged evenly around the circumference.
Transition Round: Join yarn at left side seam. Ch 1. Work sc evenly around the bottom of the joined bodice, placing 2 sc into each dc row end at the sides and 1 sc per dc along the front and back bottom edges, decreasing evenly to reach exactly 96 sc. Join with sl st to first sc. (96 sc)
Round 1: Ch 4 (counts as dc plus ch 1), sk 1 sc, [dc in next sc, ch 1, sk 1 sc] around. Join with sl st to 3rd ch of beg ch-4. (48 dc, 48 ch-1 sps)
Round 2: Sl st into first ch-1 sp, ch 3, dc in same sp, ch 2, [2 dc in next ch-1 sp, ch 2] around. Join with sl st to top of beg ch-3. (96 dc, 48 ch-2 sps)
Round 3: Sl st into ch-2 sp, ch 3, dc in same sp, ch 2, [2 dc in next ch-2 sp, ch 2] around. Join. (96 dc, 48 ch-2 sps)
Round 4 (Pineapple Fan Placement): Sl st into ch-2 sp, ch 3, [dc in same ch-2 sp] 8 times (9 dc fan in first sp), ch 3, sk next ch-2 sp, dc in next ch-2 sp, ch 3, sk next ch-2 sp, work 9 dc in next ch-2 sp; repeat from around, ending ch 3, sk, dc in sp, ch 3. Join with sl st to top of beg ch-3. (8 fans of 9 dc each = 72 dc; 8 single dc; 16 ch-3 sps)
Round 5 (Pineapple Row A): Sl st to first dc of fan, ch 1, sc in first dc, [ch 1, sk 1, sc in next dc] 4 times (5 sc with 4 ch-1 sps), ch 3, dc in single dc, ch 3, sc in first dc of next fan, [ch 1, sk 1, sc in next dc] 4 times; rep from around, ending ch 3, dc in single dc, ch 3. Join with sl st to first sc. (40 sc; 8 single dc; 16 ch-3 sps; 32 ch-1 sps)
Round 6 (Pineapple Row B): Sl st to first ch-1 sp, ch 1, sc in sp, [ch 1, sc in next ch-1 sp] 3 times (4 sc, 3 ch-1 sps per pineapple), ch 3, dc in single dc, ch 3, sl st to first ch-1 sp of next pineapple, sc in sp, [ch 1, sc in next ch-1 sp] 3 times; rep from around. Join. (32 sc; 8 single dc; 16 ch-3 sps; 24 ch-1 sps)
Round 7 (Pineapple Row C): Sl st to first ch-1 sp, ch 1, sc in sp, [ch 1, sc in next ch-1 sp] twice (3 sc, 2 ch-1 sps per pineapple), ch 3, dc in single dc, ch 3, sl st to first ch-1 sp of next pineapple, sc in sp, [ch 1, sc in next ch-1 sp] twice; rep from around. Join. (24 sc; 8 single dc; 16 ch-3 sps; 16 ch-1 sps)
Round 8 (Pineapple Row D): Sl st to first ch-1 sp, ch 1, sc in sp, ch 1, sc in next ch-1 sp (2 sc, 1 ch-1 sp per pineapple), ch 3, dc in single dc, ch 3, sl st to first ch-1 sp of next pineapple, sc in sp, ch 1, sc in next ch-1 sp; rep from around. Join. (16 sc; 8 single dc; 16 ch-3 sps; 8 ch-1 sps)
Round 9 (Pineapple Row E / Tip): Sl st to ch-1 sp, ch 1, sc in sp (1 sc per pineapple = tip complete), ch 3, dc in single dc, ch 3, sl st to ch-1 sp of next pineapple, sc in sp; rep from around. Join. (8 sc tips; 8 single dc; 16 ch-3 sps)
CHECKPOINT: After Round 9, the first tier of pineapples is complete and the skirt should measure approximately 5 inches (12.7 cm) below the bodice join.
Second Tier Transition
Round 10 (Bridge / Fan Increase): At each pineapple tip and single dc connector, you will now work a larger fan to begin the second, wider tier of pineapples.
Sl st to single dc from previous round, ch 3, [dc in same st] 4 times (5 dc), ch 5, sc in pineapple tip sc, ch 5, dc in next single dc, [dc in same st] 4 times (5 dc), ch 3, sl st in same dc, rep from around. Join.
Round 11 (New Fan Foundations): At each position between previous pineapple tips, work 9 dc into the ch-5 loop space. ch 3, dc in dc, ch 3, 9 dc in ch-5 sp; rep from around. Join. (8 fans x 9 dc = 72 dc; 8 single dc; 16 ch-3 sps)
Rounds 12-17: Repeat Pineapple Decrease Rows A through E on each new 9-dc fan while maintaining the single dc connectors with ch-3 bridges as established. Stitch counts mirror Rounds 5-9 above.
CHECKPOINT: After Round 17, the second tier of pineapples is complete. The skirt should measure approximately 11 inches (28 cm) below the bodice join.
Third Tier (Hem Pineapples with Pointed Tips)
Round 18 (Final Bridge Round): At each second-tier pineapple tip, work ch 7. At each single dc connector, work (dc, ch 3, dc) in dc.
Round 19 (Final Fan): Work 11 dc into each ch-7 arch. ch 5, dc in dc, ch 3, dc in dc, ch 5, 11 dc in next arch; rep from around. Join. (8 fans x 11 dc = 88 fan dc; 16 bridge dc; 16 ch-5 sps; 8 ch-3 sps)
Rounds 20-25: Work Pineapple Decrease sequence on 11-dc fans:
Round 20 (Row A for 11-dc fan): sc in first dc, [ch 1, sk 1, sc in next dc] 5 times. (6 sc, 5 ch-1 sps per fan)
Round 21 (Row B): sl st to first ch-1 sp, sc in sp, [ch 1, sc in next sp] 4 times. (5 sc, 4 ch-1 sps per fan)
Round 22 (Row C): sl st to first ch-1 sp, sc, [ch 1, sc] 3 times. (4 sc, 3 ch-1 sps per fan)
Round 23 (Row D): sl st to sp, sc, [ch 1, sc] twice. (3 sc, 2 ch-1 sps per fan)
Round 24 (Row E): sl st to sp, sc, ch 1, sc. (2 sc, 1 ch-1 sp per fan)
Round 25 (Row F): sl st to sp, sc. (1 sc tip per fan)
Each pineapple tip sc from Round 25 becomes the longest point of the handkerchief hem.
Round 26 (Hem Edging): Ch 5, sl st in tip sc, ch 5, sl st in next ch-sp, ch 3, sl st in base of ch-3 (picot made), ch 5, sl st in next connector dc; rep from around. Join and fasten off.
CHECKPOINT: After Round 26, the skirt should measure approximately 15 to 16 inches (38 to 41 cm) from the bodice join to the longest tip.
Straps (Make 2)
Foundation: Ch 85 (or length needed for approximately 11 inches / 28 cm after blocking).
Row 1: Sc in 2nd ch from hook and in each ch across. Do not turn. Work sc back along the other side of the foundation chain, working 1 sc per ch. Join ends with sl st to form a doubled cord. (Approximately 168 sc total)
Fasten off, leaving a 12-inch (30 cm) tail for sewing.
Fold each strap so the two sc rows are aligned. Sew each strap securely to the inside front and inside back of the bodice at the shoulder position, spacing straps approximately 3 inches (7.6 cm) apart at the front and 3.5 inches (9 cm) apart at the back. Sew through the bodice fabric at least 4 times in each attachment point for security.
Size Customization Tips
For a smaller bust (30-32 inches / 76-81 cm): Work Rows 1-8 of the bodice front as written, then work the bust widening section adding one fewer increase row. Work the skirt transition round to 84 sts instead of 96. Use 7 pineapple motifs.
For a larger bust (36-38 inches / 91-97 cm): Work two additional plain dc rows between Rows 14 and 15 of the bodice front before placing the large pineapple fans. Work the skirt transition round to 108 sts. Use 9 pineapple motifs.
For additional length: Add a fourth tier of pineapples between the third tier and the hem edging round, following the same bridge and fan sequence.
Finishing and Blocking
Blocking is absolutely essential for this garment. Soak your finished tank in lukewarm water with a small amount of wool wash or gentle detergent for 15 to 20 minutes. Gently squeeze out excess water without wringing. Roll in a clean towel to remove more moisture.
Pin the garment to your blocking board, stretching gently to open up all the lace motifs. Pay special attention to the pointed hem tips. Pin each one individually to create those crisp, dramatic points.
Allow to dry completely before removing pins. This can take 24 to 48 hours depending on humidity.
Optional Bodice Lining
For additional coverage, cut two triangular pieces of nude or ivory stretch knit fabric to match the bodice cup shapes. Hand sew these to the inside of the bodice front using small whip stitches along all edges. This creates a more wearable everyday garment while preserving the lace detail on the outside.
Caring for Your Finished Tank
Hand wash in cool water with gentle detergent. Do not wring or twist. Lay flat to dry on a clean towel