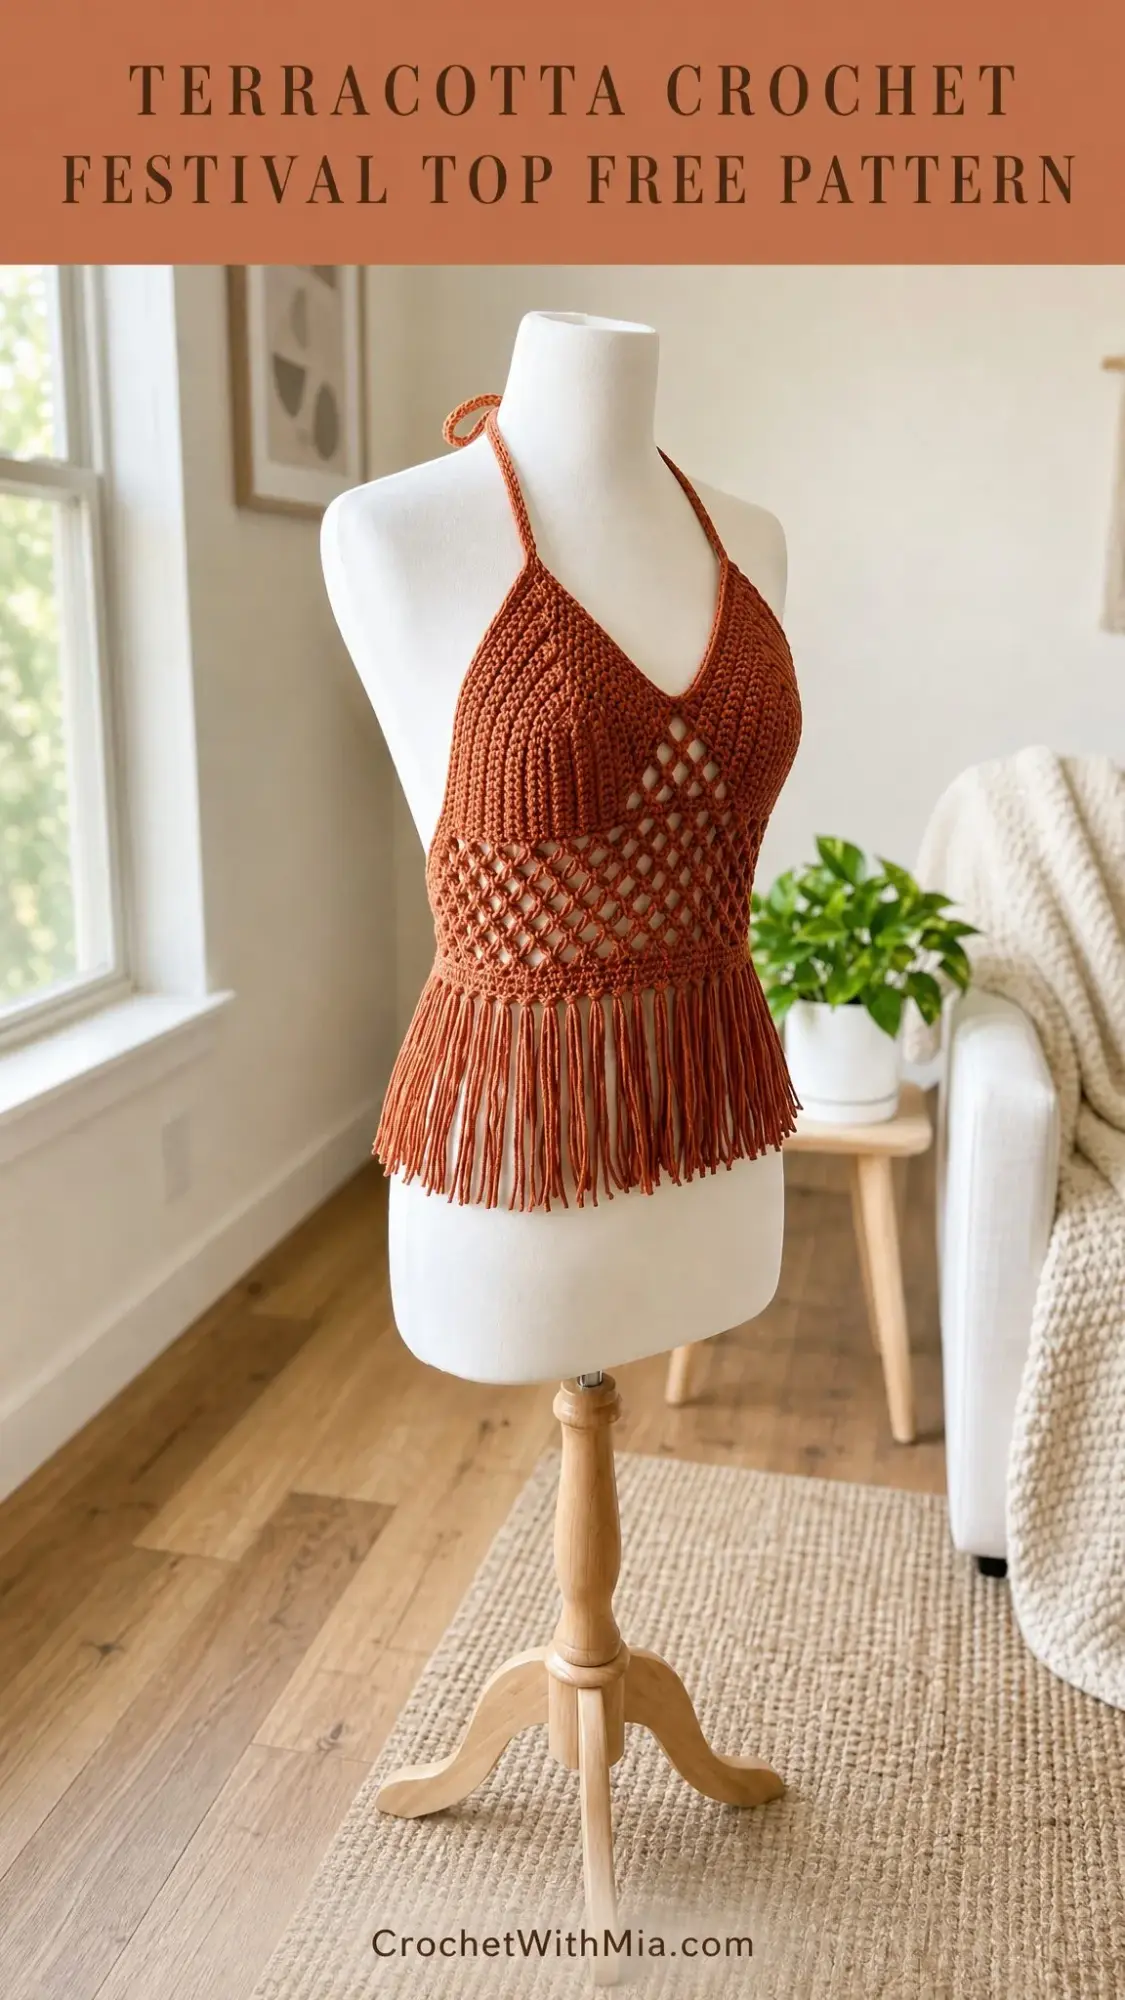
This breezy halter bralette features sculpted cups, open diamond mesh through the midsection, and swinging fringe at the hem. It uses only single crochet and chain stitches. The adjustable ties make it fit a range of sizes, and the whole project works up in about 6 to 9 hours.
Get the Ad-Free PDF Pattern
You can find the free pattern below, or you can purchase the ad-free printable PDF from my shop.
Get the Printable PDF →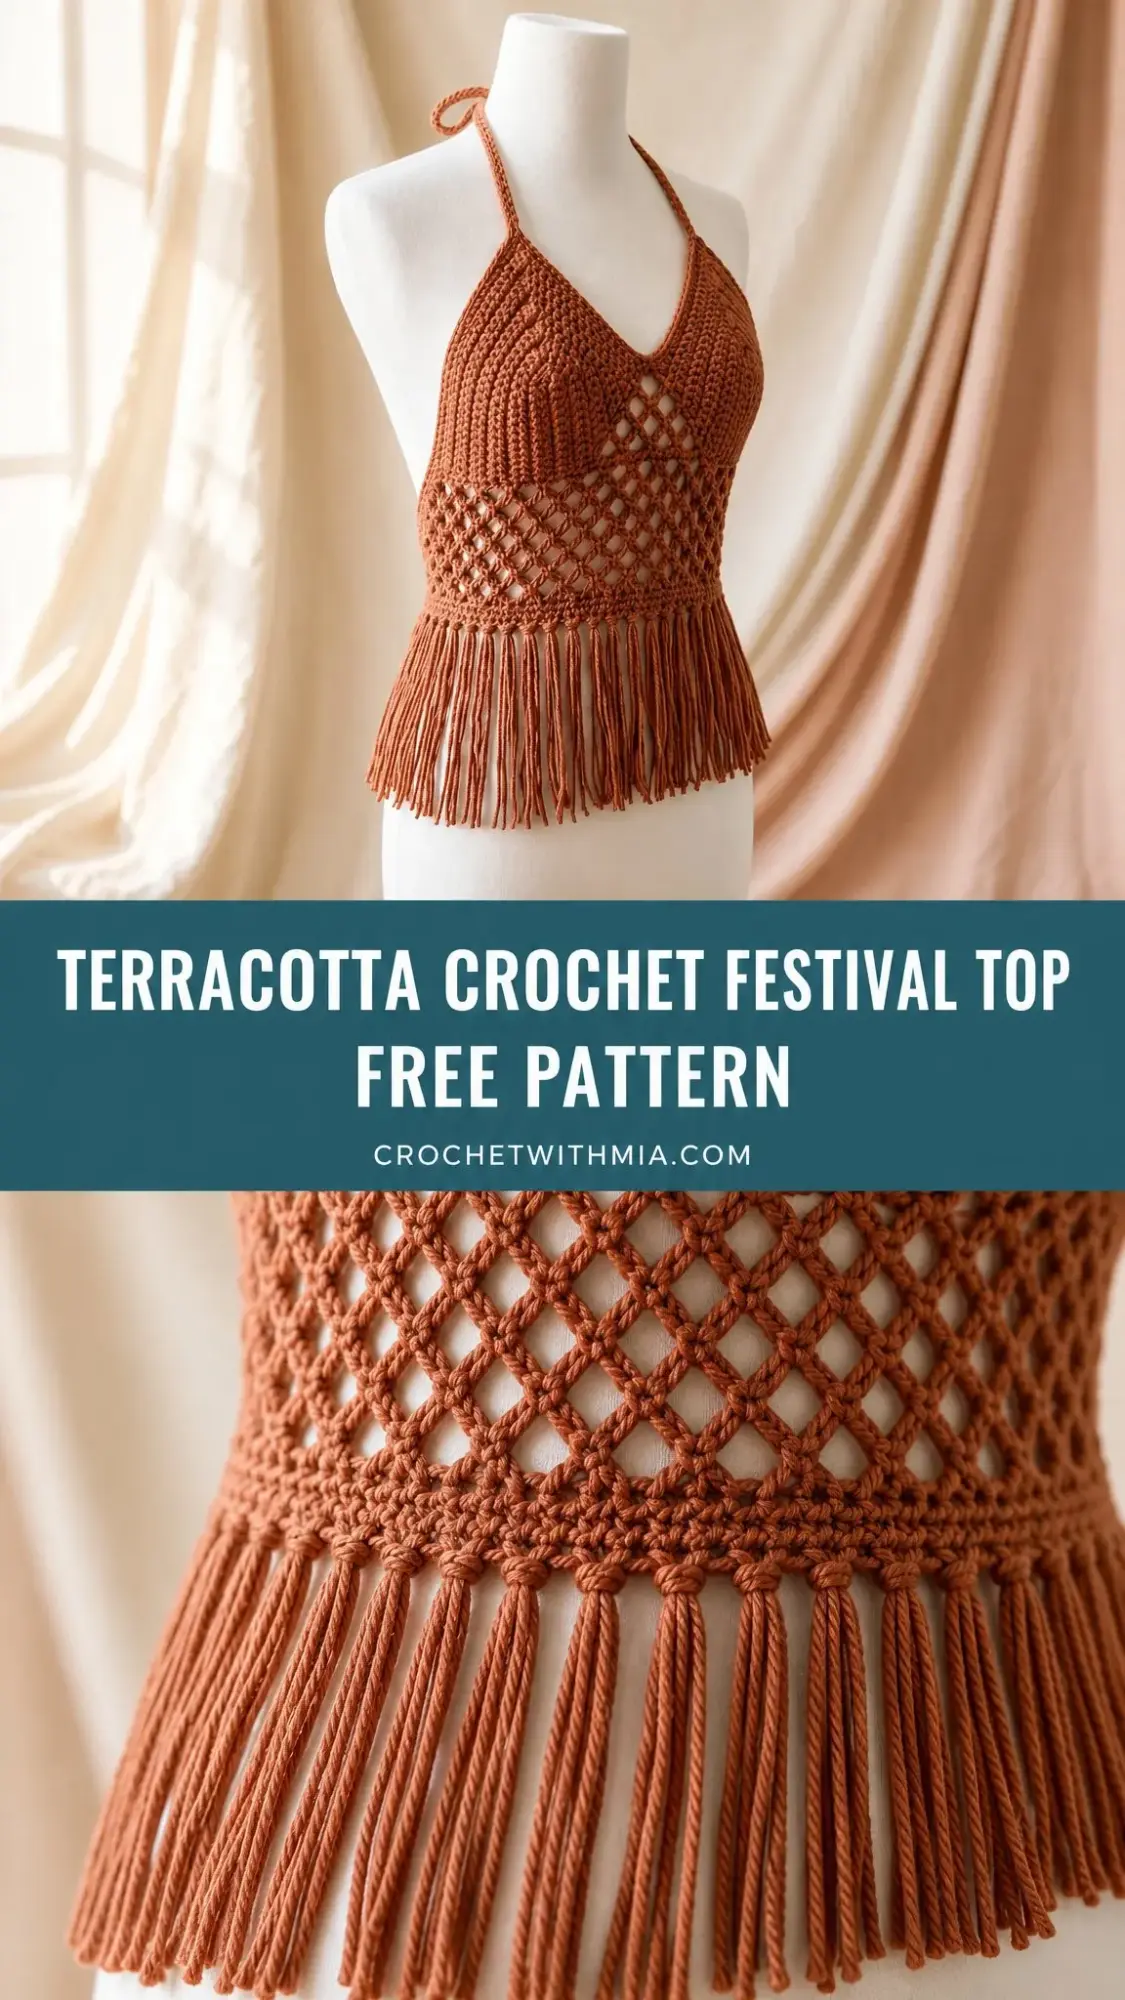
Why You’ll Love This Festival Top
The Terracotta Crochet Festival Top is one of those projects that looks far more complex than it actually is. The diamond mesh section creates beautiful negative space, but it’s really just chain loops anchored with single crochet. The cups are worked flat with simple increases at the center point. If you can chain, single crochet, and count stitches, you can absolutely make this top.
I designed this pattern to be adjustable. The neck ties and back ties let you customize the fit for your body without needing to grade the pattern into multiple sizes. Whether you’re a 30 inch underbust or a 36 inch underbust, the same instructions work. You just tie it to fit.
The fringe adds that perfect festival vibe. It moves when you move. It catches the light. And it’s ridiculously satisfying to attach at the end.
Skill Level
This pattern is rated intermediate. You should be comfortable with shaping, working into both sides of a foundation chain, reading repeat instructions, counting chain spaces, seaming cups to a band, and blocking fringe neatly.
If you’ve made a few scarves and blankets and want to try your first garment, this is a great choice. The construction is straightforward, and I’ll walk you through every step.
Materials You’ll Need
Before you start, gather these supplies:
Yarn: DK weight or light worsted cotton or cotton blend yarn. You’ll need 250 to 320 yards (229 to 293 meters). One solid terracotta shade is used throughout with no color changes.
Hook: US G/6 (4.0 mm) crochet hook, or the size needed to match gauge.
Notions: Tapestry needle, stitch markers, scissors, measuring tape, pins, blocking mat or towel.
Yarn Suggestions
Any of these would work beautifully:
Substitution note: Choose a plant fiber DK yarn with good stitch definition. Very stretchy acrylics may grow at the ties and fringe over time. Very stiff cotton may need a larger hook to achieve gauge.
Finished Measurements
This is one adjustable adult size.
The front panel sits close to the body with light negative ease. Choose your tie length so the top feels secure but doesn’t pull the cups flat.
Gauge
18 single crochet stitches by 20 rows equals 4 inches (10 cm) after blocking with US G/6 (4.0 mm) hook.
Please swatch and match gauge before starting. All the garment measurements in this pattern are built from this gauge. If your swatch is too small, try a larger hook. If it’s too large, try a smaller hook.
Abbreviations
Here are all the abbreviations used in this pattern:
Special Stitches
Corded tie: Chain to the stated length, then slip stitch in the back bump of each chain back toward the fabric. This creates a rounder, sturdier tie than a plain chain.
Cup point increase: Work 3 single crochet stitches in the marked center stitch at the top of the cup. The center stitch remains the middle sc of those 3 sc.
Diamond mesh: Chain loops are anchored with single crochet stitches. Keep your chain loops even and relaxed. Tight chains will make the body pull inward.
Cup Instructions (Make 2)
Each cup is worked from a vertical foundation chain, up one side, around the top point, and down the opposite side. The chain 1 to turn does not count as a stitch.
Row 1: Chain 19. Single crochet in the second chain from hook and in the next 16 chains, work 3 sc in the last chain. Rotate your work to continue along the unused loops of the foundation chain. Single crochet in the next 17 chains. Place a marker in the center stitch of your 3 sc group at the top point. (37 sc)
Row 2: Chain 1, turn. Single crochet to the marked center stitch, work 3 sc in the marked stitch, move your marker to the center of these 3 sc, single crochet to the end. (39 sc)
Row 3: Repeat Row 2. (41 sc)
Row 4: Repeat Row 2. (43 sc)
Row 5: Repeat Row 2. (45 sc)
Row 6: Repeat Row 2. (47 sc)
Row 7: Repeat Row 2. (49 sc)
Row 8: Repeat Row 2. (51 sc)
Row 9: Repeat Row 2. (53 sc)
Row 10: Repeat Row 2. Fasten off, leaving a 12 inch (30 cm) tail for seaming. (55 sc)
Cup Checkpoint
Your finished cup should measure about 5.75 inches (14.5 cm) from the lower inside edge to the point, and about 6.25 inches (16 cm) across the lower curve after blocking.
For more coverage: Add 2 rows per cup size increase. Each added row increases your final row by 2 sc and adds about 0.4 inches (1 cm) to coverage.
For less coverage: Stop after Row 8 for a smaller cup, ending with 51 sc.
Cup 2 and Cup Edging
Make Cup 2 exactly as Cup 1. If you want to use the working yarn to add a neat edge, don’t fasten off after Row 10. Otherwise, join yarn at either lower outside corner.
Cup edging: With the right side facing, single crochet evenly around the outside curve of each cup, placing 2 sc in the top point. Keep the lower edge smooth rather than tight. Fasten off.
Diamond Mesh Body
Work the front body panel flat. Chain 1 to turn does not count as a stitch. Keep all your mesh chains relaxed and the same length throughout.
Row 1: Chain 78. Single crochet in the second chain from hook and across. (77 sc)
Rows 2 through 4: Chain 1, turn. Single crochet in each sc across. (77 sc each row)
Row 5: Chain 1, turn. Single crochet in the first sc. Chain 5, skip 3 sc, single crochet in the next sc. Repeat from to across. (20 sc + 19 chain 5 spaces)
Row 6: Chain 1, turn. Single crochet in the first sc. Work 3 sc in the next chain 5 space, single crochet in the next sc. Repeat from to across. (77 sc)
Row 7: Repeat Row 5. (20 sc + 19 chain 5 spaces)
Row 8: Repeat Row 6. (77 sc)
Rows 9 through 11: Chain 1, turn. Single crochet in each sc across. Fasten off after Row 11. (77 sc each row)
Body Checkpoint
Your top edge should be about 17 inches (43 cm) wide. The solid upper band is about 0.8 inches (2 cm) tall. The mesh section is about 1.6 inches (4 cm) tall. The lower solid band is about 0.6 inches (1.5 cm) tall.
Assembly
Pin the cups to the upper solid band with right sides facing out. Center the two cups over the top edge with the inside cup corners touching or overlapping by 0.25 inches (6 mm). Leave about 2 inches (5 cm) at each side of the front panel before the cup begins.
Sew through the cup lower edge and band top edge using whipstitch or mattress stitch. Take your time here. Good seaming makes the finished top look professional.
Straps and Ties
Neck Ties
Join yarn at the top point of one cup. Chain 70 for a 20 to 22 inch (51 to 56 cm) tie, then slip stitch back through the back bump of each chain. Slip stitch into the cup point and fasten off.
Repeat for the other cup.
Back Ties
Join yarn to one upper side corner of the body band. Chain 85 for a 25 to 27 inch (63.5 to 68.5 cm) tie, then slip stitch back through the back bump of each chain. Fasten off.
Repeat at the opposite upper side corner.
Fringe
Cut 40 strands of yarn, each 12 inches (30.5 cm) long.
With the right side facing, attach 2 strands as one fringe group into every fourth stitch along the lower edge, including the corner stitches. You’ll have 20 fringe groups total.
To attach each group: Fold the strands in half, pull the loop through the edge stitch, pass the ends through the loop, and tighten gently.
Fringe math: The lower edge has 77 sc. Groups at stitches 1 and 77, then every 4th stitch between them gives you 20 groups.
Trim length: Steam or wet block first, then trim fringe to about 5.5 inches (14 cm) from knot to end.
Fit Customization Tips
Adjusting the Cups
Adjusting the Body Panel
Troubleshooting Common Issues
Cups curl inward: Block flatter, loosen your center point increases, or add one edging round.
Mesh pulls tight: Use a larger hook only for the mesh rows, or consciously relax your chain 5 loops.
Band ruffles: Check your gauge and make sure Row 8 returns to 77 sc, not extra stitches.
Fringe looks uneven: Block first, comb gently with your fingers, then trim in one straight line.
Top feels loose: Shorten the back ties or add a second side tie at each lower corner.
Finishing Your Festival Top
Weave in all ends on the wrong side, splitting yarn plies for a smooth, secure finish.
Wet block the cups and body flat to the measurements given. Pin the mesh open so the diamonds dry evenly and keep their shape.
Steam the fringe lightly if your yarn allows it. Do not press acrylic directly with a hot iron.
Try on your finished top over a fitted layer first and adjust tie lengths before trimming any tails.
Care Instructions
Hand wash or machine wash on gentle in cool water according to your yarn label. Lay flat to dry. Store folded with the fringe straightened to prevent tangling.
Left Handed Crocheters
Work the same instructions. Your cup shaping will mirror naturally. Place markers at the cup points so the increase line remains centered.
Notes Before You Begin
This pattern is designed to help you create a similar crochet project, but individual results may vary depending on your yarn, tension, hook size, and finishing technique. You may need to make small adjustments on your side to achieve the closest possible result to the finished project shown.
The cups use dense single crochet fabric for support. The body uses open chain loop mesh for the diamond effect and movement. This contrast is intentional and creates the beautiful layered look of the finished top.
Security tip: Tie ends should be sturdy. Tug each tie lightly before wearing and reinforce any join that feels loose.
Style Your Finished Top
Your finished Terracotta Crochet Festival Top deserves a sunny photo! Style it over a bandeau, swimsuit, fitted tank, or linen dress, and let the fringe move naturally. This top is perfect for music festivals, beach days, summer concerts, or anywhere you want to show off your crochet skills.
Thank you so much for making this pattern with me! I hope you love wearing your finished festival top as much as I loved designing it. If you make one, I would absolutely love to see it. Share your photos on Instagram or Facebook and tag me so I can admire your work.
Save this pattern to your Pinterest boards so you can find it easily when you’re ready to start. And if you have any questions or want to share how yours turned out, drop a comment below. I read every single one and love hearing from you!
Want a Quick & Easy Printable Version?
Get a clean, beautifully formatted PDF of this pattern — easy to follow step by step, ready to print or save on any device. No scrolling, no distractions, just the pattern.
Get the Printable PDF →