I call this one the Autumn Rust Purse, and it has been sitting in my design notebook for longer than I care to admit. The original sketch was just a quick doodle during a rainy afternoon when I was dreaming about structured bags with that satisfying bobble texture. You know the kind that looks fancy but actually comes together in a weekend?
Get the Ad-Free PDF Pattern
You can find the free pattern below, or you can purchase the ad-free printable PDF from my shop.
Get the Printable PDF →
Well, I finally pulled that sketch out, worked through the math, and turned it into a real pattern. The finished bag reminds me of something you would find in a boutique window. Rich terracotta bobbles, creamy trim, antique brass hardware. It feels special to carry.
This pattern is dedicated to everyone who has ever wanted to make a proper handbag but felt intimidated by the construction. The assembly is simpler than it looks, I promise.
About This Bobble Stitch Handbag Pattern
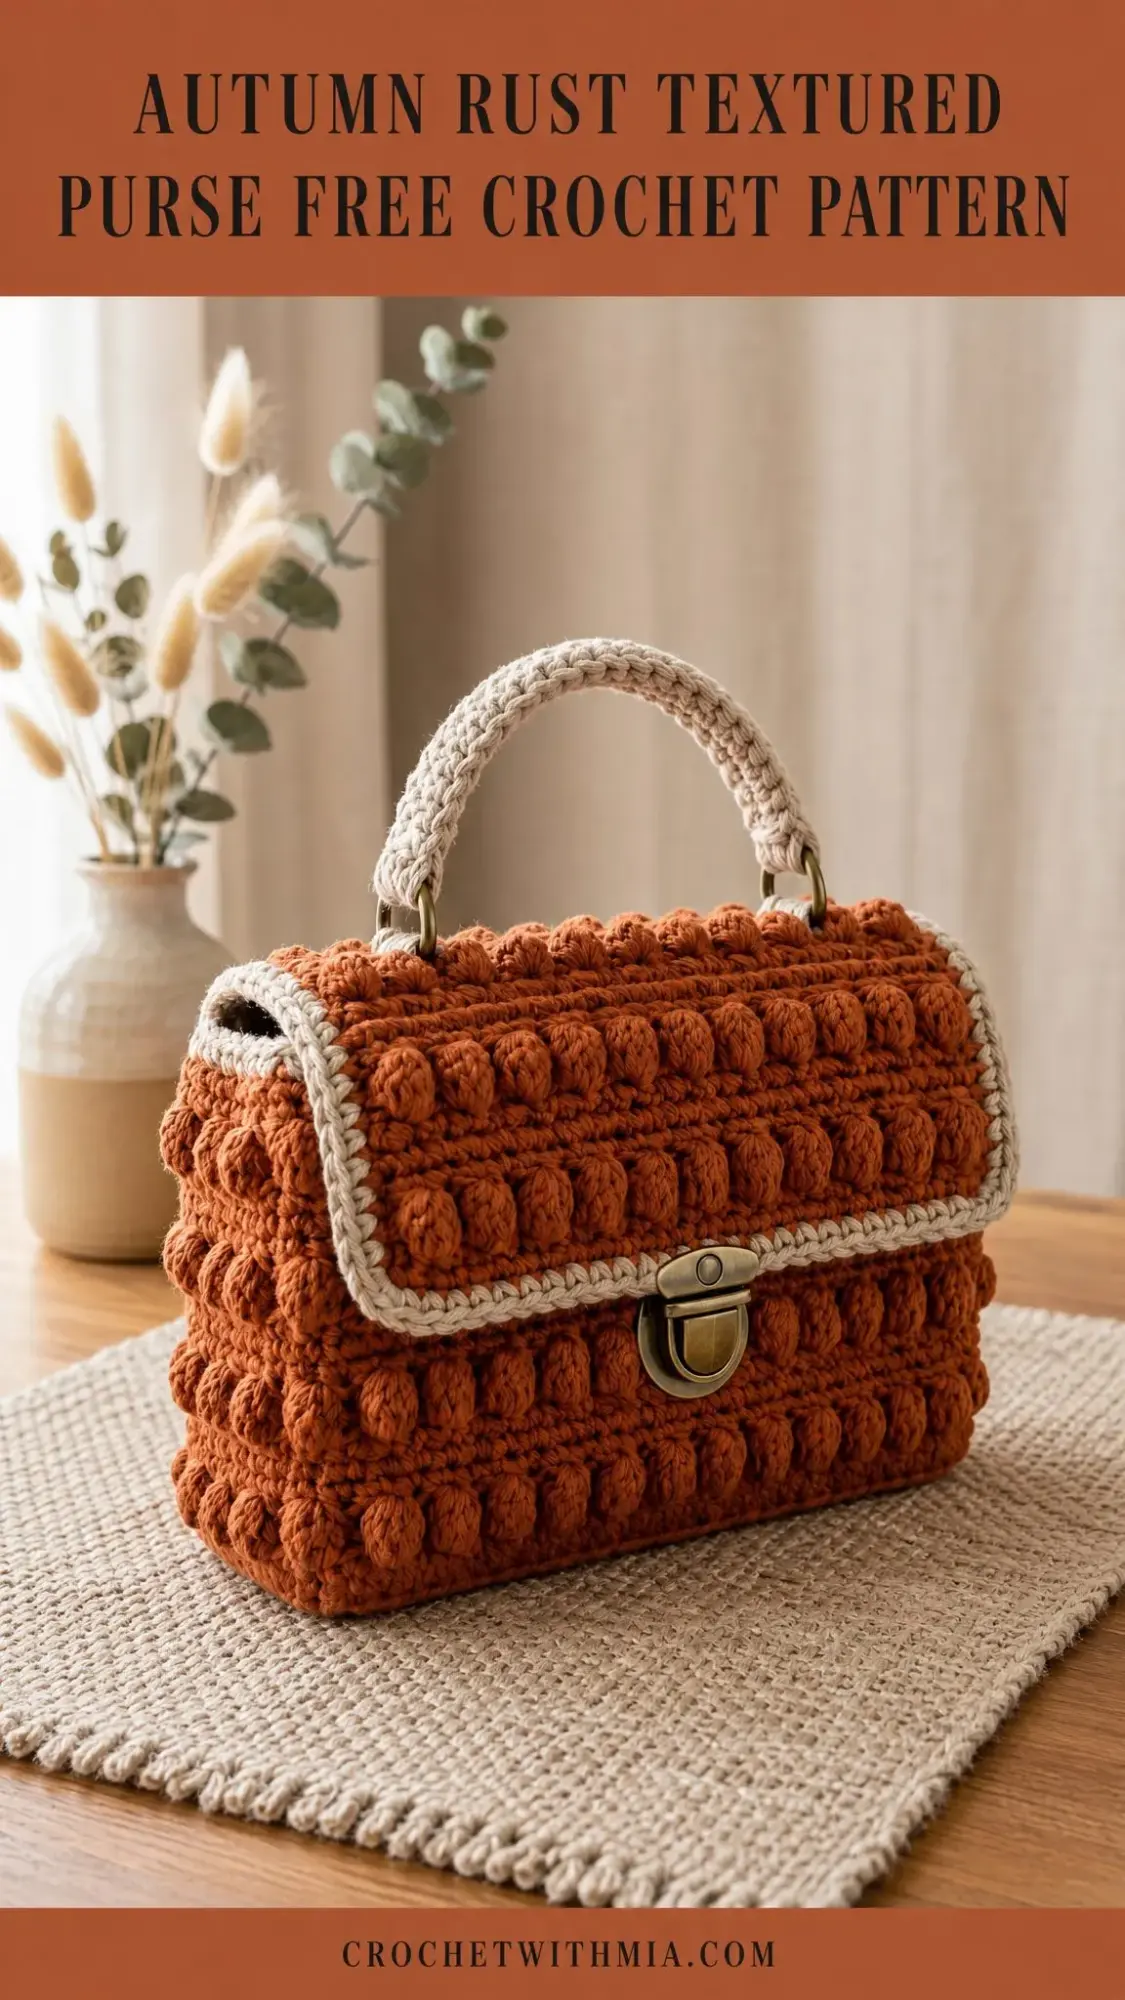
This structured crochet purse features a plush bobble texture on the main body, a contrasting cream trim, a curved crocheted handle, antique brass D-rings, and a centered push-lock clasp. The bag is made from two flat textured panels, one long gusset strip, and a fold-over flap. Everything comes together with firm seaming and single crochet (sc) edging.
The finished measurements are approximately 8.25 inches wide by 5.9 inches tall by 3 inches deep (21 x 15 x 7.5 cm), excluding the handle. The handle rise adds about 4 inches (10 cm), and the flap depth is roughly 2.75 to 3 inches (7 to 7.5 cm).
Skill level: Intermediate. You will work bobble texture, count repeated motifs, join panels to a gusset, shape a neat flap edge, and install hardware. The crochet itself is approachable. The polished finish depends on careful counting and tidy assembly.
Time estimate: 6 to 8 relaxing hours, plus blocking and hardware installation.
Materials You Will Need
Yarn: Worsted weight cotton, category 4. Use a firm cotton or cotton blend that holds stitch definition.
| Color | Amount | Role |
|---|---|---|
| Main body (terracotta/rust) | Approx. 235 yd / 215 m | Panels, gusset, flap |
| Trim/handle (warm beige) | Approx. 55 yd / 50 m | Edging, handle, optional seam accent |
Yarn suggestions: Lily Sugar’n Cream Solids, Paintbox Yarns Cotton Aran, or Lion Brand 24/7 Cotton are good choices. Choose a smooth worsted cotton that gives a dense fabric. If substituting, match gauge and choose a yarn that is not overly soft or stretchy.
Tools and notions:
Gauge
Textured pattern gauge: 15.5 stitches and 8 rows = 4 inches / 10 cm, lightly blocked, in alternating single crochet and bobble rows.
Before starting, swatch in the bobble pattern. The purse needs a firm fabric. If your fabric is floppy, go down a hook size. If your panel is more than 0.5 inches (1.25 cm) off after Row 12, adjust your hook size before continuing.
Checkpoint gauge: Your front panel after Row 12 should measure about 8.25 inches (21 cm) wide and 5.9 to 6 inches (15 cm) tall.
Abbreviations (US Terms)
| Abbreviation | Meaning |
|---|---|
| ch | chain |
| sc | single crochet |
| sl st | slip stitch |
| st(s) | stitch(es) |
| RS / WS | right side / wrong side |
| yo | yarn over |
| rep | repeat |
| B5 | 5-double-crochet bobble |
UK note: US sc = UK dc.
Special Stitches
B5 (5-dc Bobble)
This stitch creates those plush bumps that give the bag its texture. Here is how to work it:
In the indicated stitch: yarn over (yo), insert hook, yo and pull up a loop, yo and pull through 2 loops. Repeat this partial double crochet step 4 more times in the same stitch until you have 6 loops on your hook. Yarn over and pull through all 6 loops.
Do not chain to close unless instructed. The next sc locks the bobble forward.
If you have never worked bobbles before, do not worry. They look complicated but they are just five unfinished double crochets joined together at the top. Once you get the rhythm, they work up quickly.
Standing SC Join
Make a slip knot on the hook, insert hook in the indicated space or stitch, yo and pull up a loop, yo and pull through both loops. This gives a clean start for edging without any bulky join.
Mattress Seam for Panels
Hold pieces with wrong sides touching. Use your yarn needle to catch the outer bars of matching edge stitches, moving back and forth evenly. Pull snug every few stitches so the seam is firm but not puckered.
Pattern Notes
Front Panel Instructions
With main color, ch 33.
| Row | Instruction | Count |
|---|---|---|
| 1 | Sc in 2nd ch from hook and in each ch across. Ch 1, turn. | 32 sc |
| 2 | Sc in each st across. Ch 1, turn. | 32 sc |
| 3 | Sc in first st, [B5 in next st, sc in next 2 sts] 10 times, sc in last st. Ch 1, turn. | 10 bobbles, 32 sts |
| 4 | Sc in each st across. Ch 1, turn. | 32 sc |
| 5 | Repeat Row 3. | 10 bobbles, 32 sts |
| 6 | Repeat Row 4. | 32 sc |
| 7 | Repeat Row 3. | 10 bobbles, 32 sts |
| 8 | Repeat Row 4. | 32 sc |
| 9 | Repeat Row 3. | 10 bobbles, 32 sts |
| 10 | Repeat Row 4. | 32 sc |
| 11 | Repeat Row 3. | 10 bobbles, 32 sts |
| 12 | Sc in each st across. Fasten off, leaving a long seaming tail. | 32 sc |
Panel checkpoint: You should have 5 bobble rows with 10 bobbles on each row. Your panel should measure about 8.25 inches (21 cm) wide and 5.9 to 6 inches (15 cm) tall.
Back Panel with Flap Instructions
Work Rows 1 through 12 exactly as for the Front Panel, but do not fasten off. Continue for the flap:
| Row | Instruction | Count |
|---|---|---|
| 13 | Sc in each st across. Ch 1, turn. | 32 sc |
| 14 | Repeat Front Panel Row 3. Ch 1, turn. | 10 bobbles, 32 sts |
| 15 | Sc in each st across. Ch 1, turn. | 32 sc |
| 16 | Repeat Front Panel Row 3. Ch 1, turn. | 10 bobbles, 32 sts |
| 17-19 | Sc in each st across. Ch 1, turn after Rows 17 and 18. | 32 sc each row |
| 20 | Sc in each st across. Fasten off. | 32 sc |
Mark the fold line between Rows 12 and 13. The flap folds forward over the top opening.
Gusset Strip Instructions
The gusset is the strip that creates the depth and sides of your purse. It wraps around the entire perimeter of the front and back panels.
With main color, ch 13.
| Rows | Instruction | Count |
|---|---|---|
| 1 | Sc in 2nd ch from hook and in each ch across. Ch 1, turn. | 12 sc |
| 2 | Sc in each st across. Ch 1, turn. | 12 sc |
| 3 | Sc in first st, [B5 in next st, sc in next 2 sts] 3 times, sc in last 2 sts. Ch 1, turn. | 3 bobbles, 12 sts |
| 4 | Sc in each st across. Ch 1, turn. | 12 sc |
| 5-40 | Repeat Rows 3-4 eighteen more times. | 12 sts each row |
| 41 | Sc in each st across. Fasten off, leaving a long tail. | 12 sc |
Place markers after Row 12 and Row 29. Rows 1 through 12 form one side, Rows 13 through 29 form the base, and Rows 30 through 41 form the second side.
Gusset checkpoint: Your strip should be about 3 inches (7.5 cm) wide and about 20.5 inches (52 cm) long before seaming.
Cream Trim Edging
Use your trim color for all edging. This is what gives the bag that polished, professional look.
Work 1 round of sc around the front panel, placing 3 sc in each corner. Join with sl st. Repeat around the back/flap piece, working carefully around the flap corners.
For the visible flap lip, work a second decorative sc round across the lower flap edge only, placing 3 sc in each lower corner.
Keep edging smooth: Skip an edge space if it begins to ruffle. Add one extra sc in a side space if it pulls inward. Trust your eyes here.
Assembly
Step 1: Join front to gusset. With WS together, align the gusset markers to the front panel: side edge, bottom edge, side edge. Seam evenly through the cream edging or just inside it. Keep the bobbles facing out.
Step 2: Join back to gusset. Repeat for the back panel, keeping the flap unattached above the opening. The fold line sits along the back top edge.
Step 3: Square the base. Steam lightly or wet block to settle the rectangular shape. For extra structure, cut plastic canvas slightly smaller than the base and slip it inside before lining.
Handle Instructions
With trim color, ch 31.
| Row | Instruction | Count |
|---|---|---|
| 1 | Sc in 2nd ch from hook and in each ch across. Ch 1, turn. | 30 sc |
| 2-5 | Sc in each st across. Ch 1, turn after Rows 2-4. | 30 sc each row |
| Finish | Fold long edges toward WS and seam into a padded tube. Fasten off, leaving tails. | Approx. 9.5-10 in / 24-25 cm |
Thread each handle end through a D-ring and fold back about 0.75 inches (2 cm). Sew securely through several layers of crochet. Attach D-rings to the top side edges of the purse with sturdy stitches through the upper seam area.
Installing the Clasp
Center the push-lock clasp on the flap and front panel. Mark the placement with the flap closed, then sew or screw in the hardware according to the clasp style.
Reinforce the wrong side with a small felt, fabric, or plastic canvas patch if needed. This prevents the hardware from pulling through the crochet fabric over time.
Size Customization Tips
To change width: Add or subtract stitches in multiples of 3, then add 2 edge stitches. The bobble row formula is: sc 1, [B5, sc 2] across, sc 1.
To change height: Add or remove a sc row and bobble row pair.
To change depth: Adjust the gusset foundation chain. The 3 inch (7.5 cm) depth uses 12 stitches at gauge.
When changing size, remeasure the side-plus-base-plus-side path and make the gusset strip the same length. Keep the handle proportional and attach it close to the side seams for balance.
Finishing and Blocking
Weave in all ends. Wet block or steam block lightly over a towel, shaping the corners by hand. Let dry flat.
Do not over-steam cotton, as too much heat can flatten the bobble texture. Add a fabric lining after blocking if desired.
Care Instructions
Spot clean with mild soap and cool water. Press out moisture in a towel and reshape. Lay flat to dry. Remove heavy items before storing so the handle and flap keep their shape.
Troubleshooting Common Issues
| Issue | Fix |
|---|---|
| Bobbles sink inward | Make sure bobble rows are worked on the RS and push each bobble forward before the next stitch |
| Panel is too wide | Use a smaller hook or firmer tension. Match the panel checkpoint before making the second panel |
| Flap pulls up | Add one extra sc row before installing clasp, or move clasp hardware slightly lower |
| Edges ruffle | Work fewer sc along raw side edges or block gently |
| Bag feels soft | Use a tighter hook, add lining, or add a plastic canvas base insert |
Final Thoughts on This Crochet Purse Pattern
This Autumn Rust Textured Purse pattern has been such a joy to finally share. Every time I pick mine up, I still feel a little proud of how professional it looks. The bobble texture adds so much visual interest, and that cream trim elevates the whole design.
Take your time with the assembly. That is where the magic happens. A well-seamed bag will last for years and turn heads everywhere you go.
Thank you so much for choosing this pattern. I hope it brings you hours of happy crocheting and a gorgeous finished bag you will be proud to carry.
If you loved making this purse, save this pattern to your Pinterest boards so you can find it easily later. And please, leave a comment below if you give it a try. I would absolutely love to see your finished bags and hear which colors you chose!
Want a Quick & Easy Printable Version?
Get a clean, beautifully formatted PDF of this pattern — easy to follow step by step, ready to print or save on any device. No scrolling, no distractions, just the pattern.
Get the Printable PDF →