
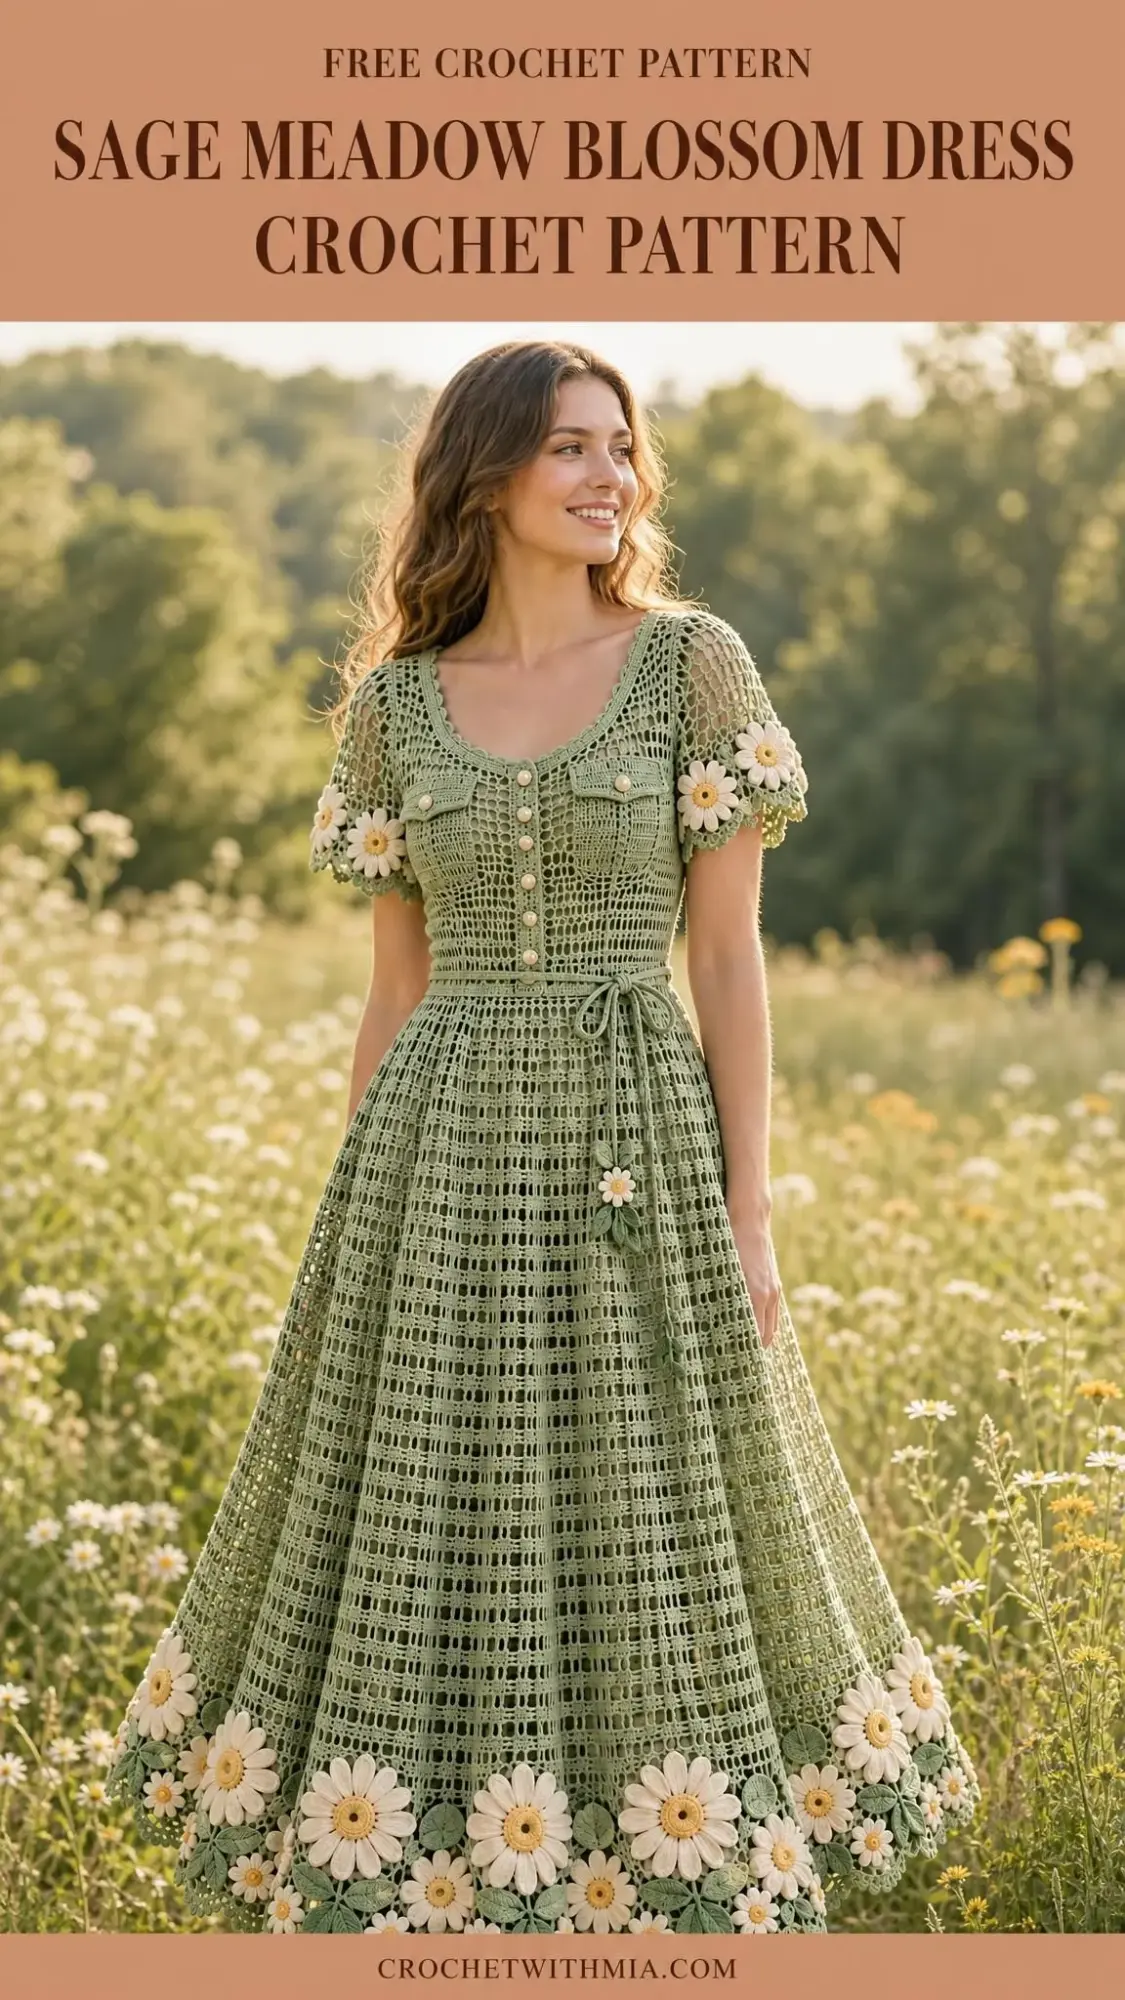
If you’ve been searching for a statement crochet garment that combines vintage charm with modern elegance, this is the one worth bookmarking. The Sage Meadow Blossom Dress stands out from typical filet crochet projects with its A-line silhouette, delicate daisy appliqués, and that gorgeous sage green color that flatters nearly everyone.
Get the Ad-Free PDF Pattern
Scroll down for the full pattern, or get the ad-free printable PDF from the shop.
Get the Printable PDF →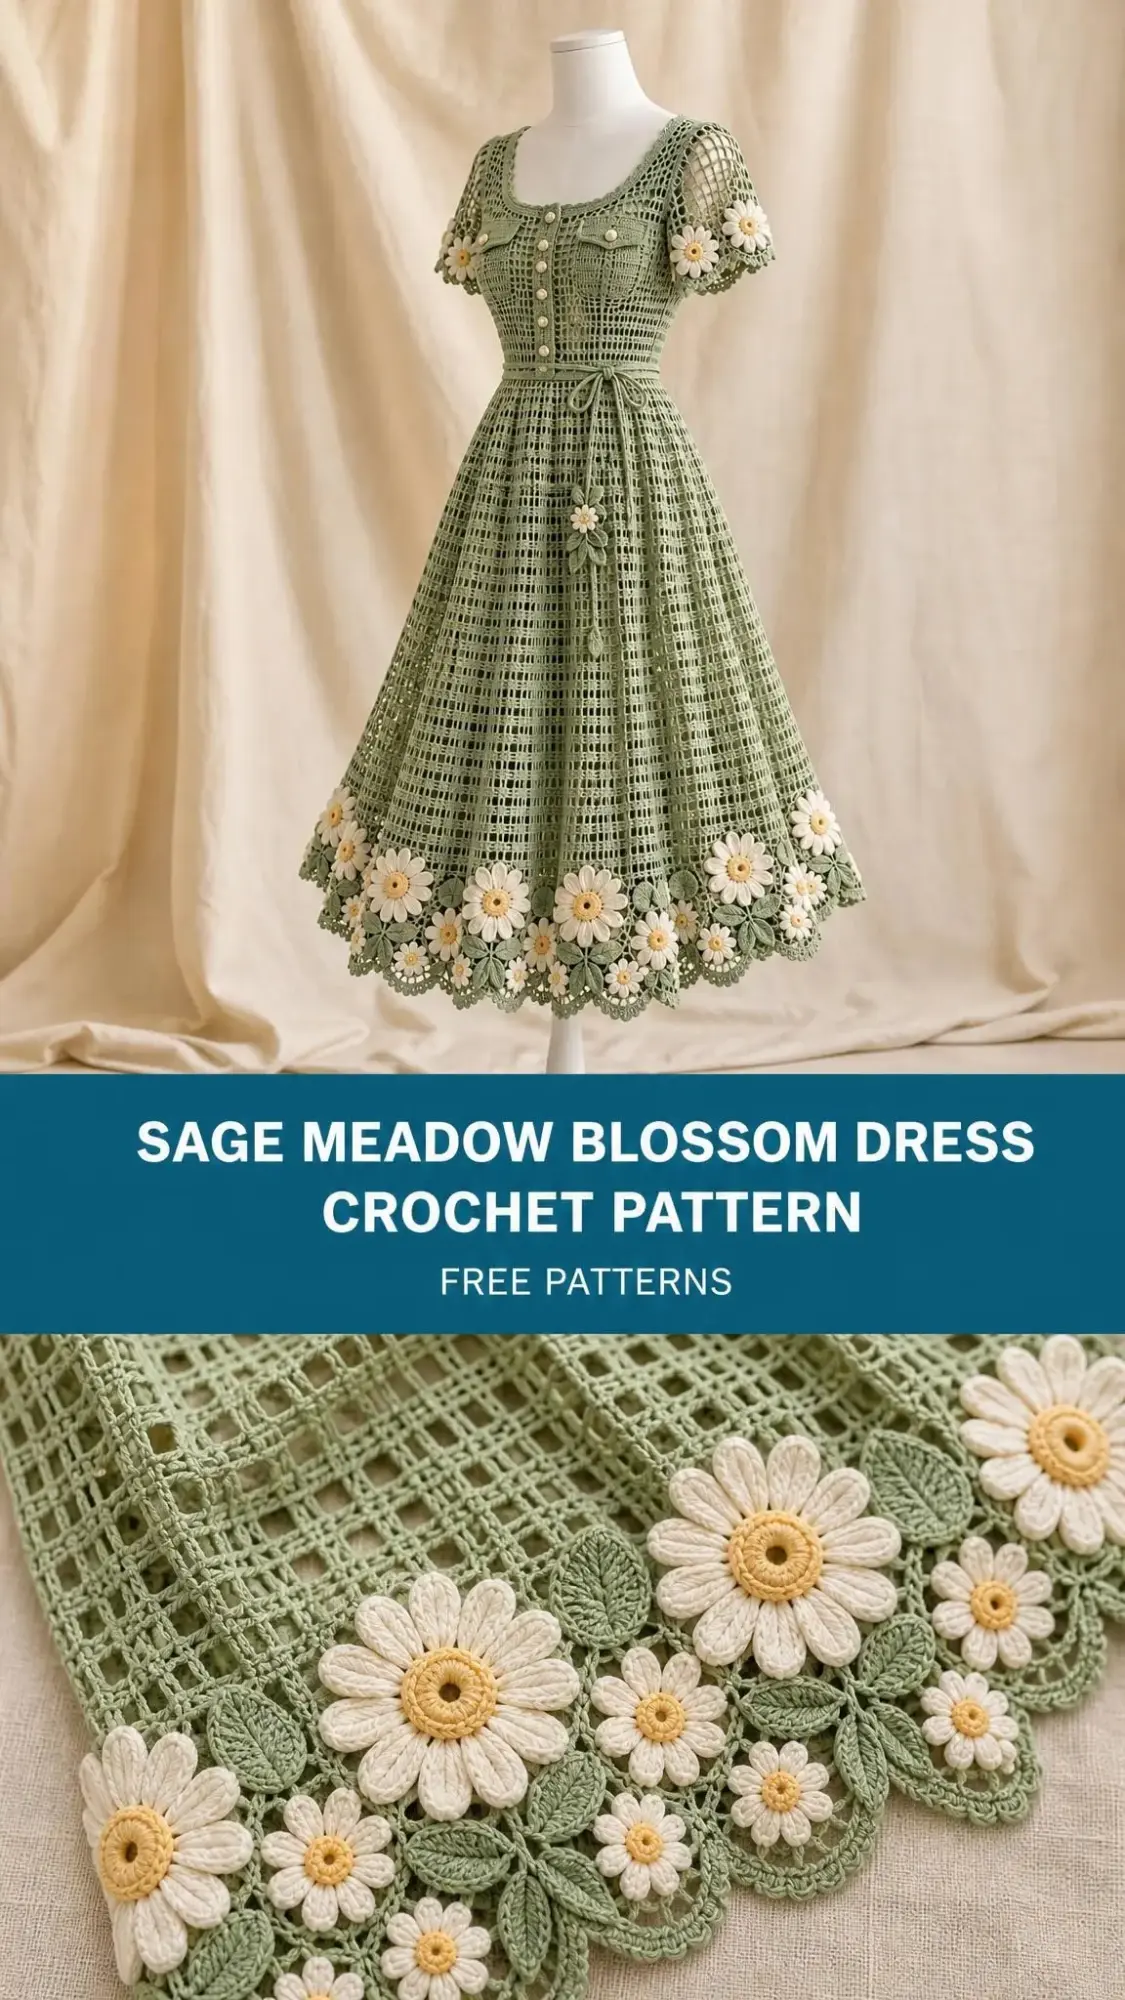
This intermediate to advanced pattern creates a mid-calf length dress with a fitted bodice, scoop neckline, short sleeves, and a flowing six-panel skirt. The construction is thoughtful and methodical. You’ll work flat panels for the bodice and skirt, join them at the waist, and add separately made sleeves. The cream daisies and sage leaves around the hem transform it from a simple filet dress into something truly special.
Whether you’re planning a garden party outfit, a summer wedding guest dress, or simply want to challenge yourself with a beautiful wearable project, this pattern delivers. Let’s walk through everything you need to bring this design to life.
Why This Dress Design Works So Well
The genius of this pattern lies in its construction approach. Rather than working in the round and dealing with complicated shaping, you’ll create flat panels that get assembled. This makes the filet crochet much more manageable and allows you to check your gauge and measurements as you go.
The filet crochet technique (a mesh-like fabric created by alternating double crochet stitches and chain spaces) gives the dress its characteristic openwork appearance. It’s lightweight, breathable, and drapes beautifully. The pattern uses a simple filet cell structure: chain 1 followed by double crochet, spanning one skipped foundation chain or the previous chain-1 space.
The six-panel A-line skirt creates natural movement and flattering shape without any complicated decreasing or increasing at odd intervals. Each panel widens gradually from 20 cm at the waist to 40 cm at the hem, giving you that beautiful flare.
Materials You’ll Need
Yarn:
- Main color (sage green): Smooth sport-weight cotton, approximately 300 m per 100 g. Allow 848 g (2544 m).
- Accent colors (cream and muted yellow): Allow 250 g (750 m) total, split evenly between the two colors.
The pattern specifies sport-weight cotton for good reason. Cotton holds its shape in openwork, blocks beautifully, and provides the drape you need for a garment this size. Use yarns of equal thickness across all colors.
Hooks:
- 3.5 mm hook for the main fabric
- 3.0 mm hook for firm borders and the belt
Adjust your hook size to meet the blocked gauge. This is critical for fit.
Notions:
- Tapestry needle
- Removable stitch markers
- Tape measure
- Scissors
- Blocking mats and rust-resistant pins
- Sewing needle and matching thread
- 40 cm dress zipper
- 1 m of 10 mm cotton tape for waist stabilization
- Optional: 6 mm sew-on pearls for flower centers (omit if small parts are unsuitable)
Important: This openwork dress requires a separate opaque slip for wearing underneath.
Gauge: Don’t Skip This Step
Blocked main-stitch gauge: 5 filet cells and 10 rows = 10 x 10 cm
One repeat measures approximately 2.00 cm wide. Measure away from edges for accuracy.
Border gauge: 20 single crochet (sc) and 24 sc rows = 10 cm
To make your gauge swatch, use the stitch recipe from the pattern with N = 10 and work at least 20 rows. Wet-block the swatch, dry flat for 24 hours, then hang for 12 hours to check for cotton growth. Cotton can stretch when hung, so this step is essential before committing to the full project.
If your gauge doesn’t match, change your hook size or yarn. Do not proceed until gauge is correct. This governs every count in the pattern.
Finished Measurements
- Finished bust: approximately 100 cm
- Intended body bust: 90-94 cm (with 6-10 cm ease)
- Untied waist: 100 cm (cinched to 80-90 cm with belt)
- Skirt length: 68 cm
- Bodice shoulder-to-waist: 40 cm
- Sleeve length: 18 cm
Before you begin, compare these measurements to a well-fitting garment in your wardrobe. This is a single-size pattern, so adjustments for larger sizes require a new swatch and recalculated repeats.
Abbreviations and Special Stitches
- ch = chain
- sc = single crochet (insert hook, yarn over, pull through, yarn over, pull through both loops)
- hdc = half double crochet
- dc = double crochet (yarn over, insert hook, pull through, yarn over, pull through 2 loops, yarn over, pull through remaining 2 loops)
- tr = treble crochet
- sl st = slip stitch
- st(s) = stitch(es)
- sp = space
- RS/WS = right side/wrong side
- BLO = back loop only
- rep = repeat
N represents the number of horizontal motif repeats in a piece.
Understanding the Filet Cell
A filet cell = ch 1 followed by dc, spanning one skipped foundation chain or the previous ch-1 space. A row with N cells contains N+1 dc and N ch-1 spaces. The beginning ch 3 counts as the first dc.
Foundation Row (not counted as a pattern row)
Ch 2N+2; sc in second ch and across, giving 2N+1 sc.
Row 1
Ch 4, turn (counts as dc + ch 1); skip first sc and next sc, dc in next sc; [ch 1, skip 1 sc, dc in next sc] N-1 times. Count: N cells, N+1 dc.
Row 2 and All Plain Rows
Ch 4, turn (dc + ch 1); dc in next dc; [ch 1, dc in next dc] to end, working last dc into third chain of beginning ch-4. Count: N cells, N+1 dc.
Increasing One Cell at Row End
After the final dc, ch 1 and dc again in that same final stitch. Count: N+1 cells. On the next row, treat the added cell as a normal cell.
Construction Overview
The dress comes together in this order:
- Make and block both bodice panels, then work neckline shoulders
- Make six skirt panels
- Make two sleeve rectangles (if included)
- Join shoulders and sleeves
- Close side seams around the zipper opening
- Join skirt panels
- Distribute skirt fullness evenly into the bodice waist
- Add belt, borders, and decoration last
Back Bodice Instructions
With main color and 3.5 mm hook, start the foundation with N = 25. Work upward from waist.
Row 1: Work foundation row. Count: 25 filet cells.
Rows 2-37: Work the next plain recipe row. Count: 25 filet cells each row.
After Row 37, mark the central 9 repeats as the back neck opening. Work the outer 8 repeats at each side separately, restarting at the outer edge or neck edge as required by row direction. Leave the marked center unworked.
Rows 38-40, each shoulder: Continue the recipe over the outer 8 repeats only. Count: 8 filet cells per shoulder.
Front Bodice Instructions
Begin as back with N = 25. Work the following rows as one panel. Any decorative button placket is applied later and does not open.
Rows 1-32: Work foundation row, then plain recipe rows. Count: 25 filet cells each row.
After Row 32, leave center 5 repeats unworked and work each side separately.
Rows 33-34, each shoulder: Continue next recipe row over this shoulder only. Count: 10 filet cells per shoulder.
Row 35, each shoulder: Omit one complete neck-edge repeat, rejoin yarn and work remaining motifs. Count: 9 filet cells per shoulder.
Row 36, each shoulder: Continue next recipe row. Count: 9 filet cells per shoulder.
Row 37, each shoulder: Omit one complete neck-edge repeat, rejoin yarn and work remaining motifs. Count: 8 filet cells per shoulder.
Rows 38-40, each shoulder: Continue next recipe row. Count: 8 filet cells per shoulder.
Skirt Panels: Make Six
Work from waist downward. Start with N = 10. Each panel widens from 20 cm to 40 cm.
Row 1: Work foundation row. Count: 10 cells; 11 dc.
Rows 2-3: Work plain filet row. Count: 10 cells; 11 dc.
Row 4: Work recipe row, adding one cell at its end. Count: 11 cells; 12 dc.
Rows 5-7: Work plain filet row. Count: 11 cells; 12 dc.
Continue this pattern, adding one cell every fourth row (Rows 8, 12, 16, 20, 24, 28, 32, 36, and 40) until you reach 20 cells.
Rows 41-68: Work plain filet rows. Count: 20 cells; 21 dc.
Checkpoint: Block all six panels to 68 cm length. Top should measure 20 cm; lower edge should measure 40 cm.
Sleeves: Make Two
Use main color, 3.5 mm hook, and N = 20. Work from shoulder edge to cuff.
Sleeve Rows 1-18: Work foundation row, then continue with plain recipe rows. Count: 20 filet cells each row.
Checkpoint: Each rectangle should measure 40 cm wide and approximately 18 cm long before border. Both sleeves must match.
For a puff sleeve effect, gather the upper edge slightly while attaching. For a bell sleeve, leave the lower edge loose and add the scalloped border.
Waist Tie Belt
Belt Row 1: With 3.0 mm hook and belt color, ch 8; sc in second chain and next 6 chains. Count: 7 sc.
Belt Row 2 and every following row: Ch 1, turn, sc BLO in each stitch. Count: 7 sc per row.
Continue until the belt measures 160 cm. Record your row total since row gauge varies with hook and yarn.
Checkpoint: Belt should measure 160 x approximately 3.5 cm. Do not stretch while measuring.
Assembly Instructions
Join 1: Shoulders
Mattress-stitch corresponding outer shoulder edges, aligning 8 complete motifs on each seam.
Join 2: Sleeves
Mark 20 cm down each side of front and back. Match sleeve midpoint to shoulder seam, then sew its 40 cm upper edge around this opening. For puff styling, ease 2 cm at the sleeve midpoint.
Join 3: Sides
Sew from waist to armhole on the right side. On the left, leave the bodice portion of the 40 cm zipper opening and continue that opening into the skirt below waist as needed. Close sleeve underarms if present.
Join 4: Skirt
Align equal row ends and mattress-stitch six panels into a ring, retaining the left-side zipper gap.
Join 5: Waist
Quarter-mark both bodice and skirt. Run two gathering threads through skirt foundation loops and draw to 100 cm, matching quarter marks. Sew to bodice waist. Sew stabilizing cotton tape inside the waist without stretching.
Join 6: Closure
Hand-baste then backstitch zipper tapes to the inside of the left opening. Keep teeth clear of crochet loops and secure top and lower stops.
Checkpoint: Shoulders should be level, waist 100 cm before belt, armholes approximately 40 cm perimeter, zipper opens without catching.
Edgings and Decorative Details
Neckline Border
Neck Round 1: Join at back neck; sc evenly around, approximately 2 sc per dc-row end and 1 sc per stitch. At square inside corners, work sc2tog (single crochet two together: pull up a loop in each of 2 stitches, yarn over and draw through all 3 loops). Join with sl st.
Neck Round 2: Ch 1, sc in each sc, join. Work sc2tog at any remaining inner step to smooth the curve.
Hem Border
Hem Round 1: Sc evenly along lower edge without drawing it in. Work one sc per dc and one per chain. Do not count seam loops twice.
Hem Round 2: Starting at any sc, [skip 2 sc, 5 dc in next sc, skip 2 sc, sl st in next sc] around. Work any residual 0-5 sc as sl sts beside the seam.
Armhole/Cuff Border
Round 1: Sc evenly around each opening, using about 2 sc per row end; join.
Round 2: Sc in each sc for a plain edge, or use the hem scallop pattern for a decorative sleeve edge.
Daisy Appliqués: Make 30
Daisy Round 1: In golden center color, 8 sc into magic ring; join. Count: 8 sc.
Daisy Round 2: 2 sc in each sc; join. Count: 16 sc.
Daisy Round 3: Join petal color, [ch 6, sc in second ch, hdc in next ch, dc in next 2 ch, hdc in last ch, sl st in next center sc] 16 times. Count: 16 narrow petals.
Make 24 daisies for the skirt hem and 3 per sleeve (or 6 at waist for a sleeveless version). Space skirt flowers approximately 10 cm apart along the 240 cm hem.
Leaves: Make 24
Leaf Row 1: Ch 9; sc in second ch, hdc in next, dc in next 4, hdc in next, 3 sc in last; rotate and work opposite side: hdc, 4 dc, hdc, sc; join. Count: 17 stitches.
Sew each leaf behind a hem flower, attaching at its base and midpoint. Keep appliqués above the walking edge to prevent catching while moving.
Finishing Your Dress
Weave each yarn end through at least 5 cm of solid stitches, reverse direction twice, and trim only after the first wash.
Soak according to yarn label, lift supported, press between towels, and lay flat to finished measurements. Shape each scallop and flower gently.
After fully dry, hang for 12 hours, remeasure length, and check the zipper, belt, and decoration.
Final measurements to verify:
- Bust approximately 100 cm
- Bodice 40 cm
- Skirt 68 cm plus border
- Sleeves 18 cm plus any scallop depth
Cotton can grow during wear, so shorten only after the hanging check. Store folded rather than suspended from shoulders.
Care Instructions
Follow your yarn care label. For cotton, cool gentle hand washing and flat drying work well. Test colors first. Support the full wet garment and avoid wringing. Remove detachable trim before washing.
A few safety notes: openwork catches easily on jewelry and furniture, so wear with care. Use an opaque slip underneath for coverage. If you’ve added pearls or buttons, secure them firmly and check regularly, as small detached parts present a choking hazard around children and pets.
You’re Ready to Create Something Beautiful
This Sage Meadow Blossom Dress pattern brings together classic filet crochet technique with charming floral details for a garment that’s truly wearable art. The construction is straightforward once you understand the panel system, and watching those daisy appliqués come together at the end is incredibly satisfying.
Take your time with gauge, trust the process, and don’t be afraid to block aggressively. Cotton rewards patience.
Save this pattern to your Pinterest boards so you can find it when you’re ready to start, and please leave a comment below if you make one. Seeing your finished projects is always the best part.
Want a Quick & Easy Printable Version?
Get a clean, beautifully formatted PDF of this pattern — easy to follow step by step, ready to print or save on any device. No scrolling, no distractions, just the pattern.
Get the Printable PDF →