
I’ve been searching for the perfect winter headscarf pattern for ages, and this one stopped me in my tracks. The combination of delicate lace motifs, dimensional pine sprigs, and those gorgeous little cranberry berries creates something truly special. This is my absolute favourite kind of project: one that looks incredibly impressive but breaks down into manageable pieces you can work on bit by bit.
Get the Ad-Free PDF Pattern
You can find the free pattern below, or you can purchase the ad-free printable PDF from my shop.
Get the Printable PDF →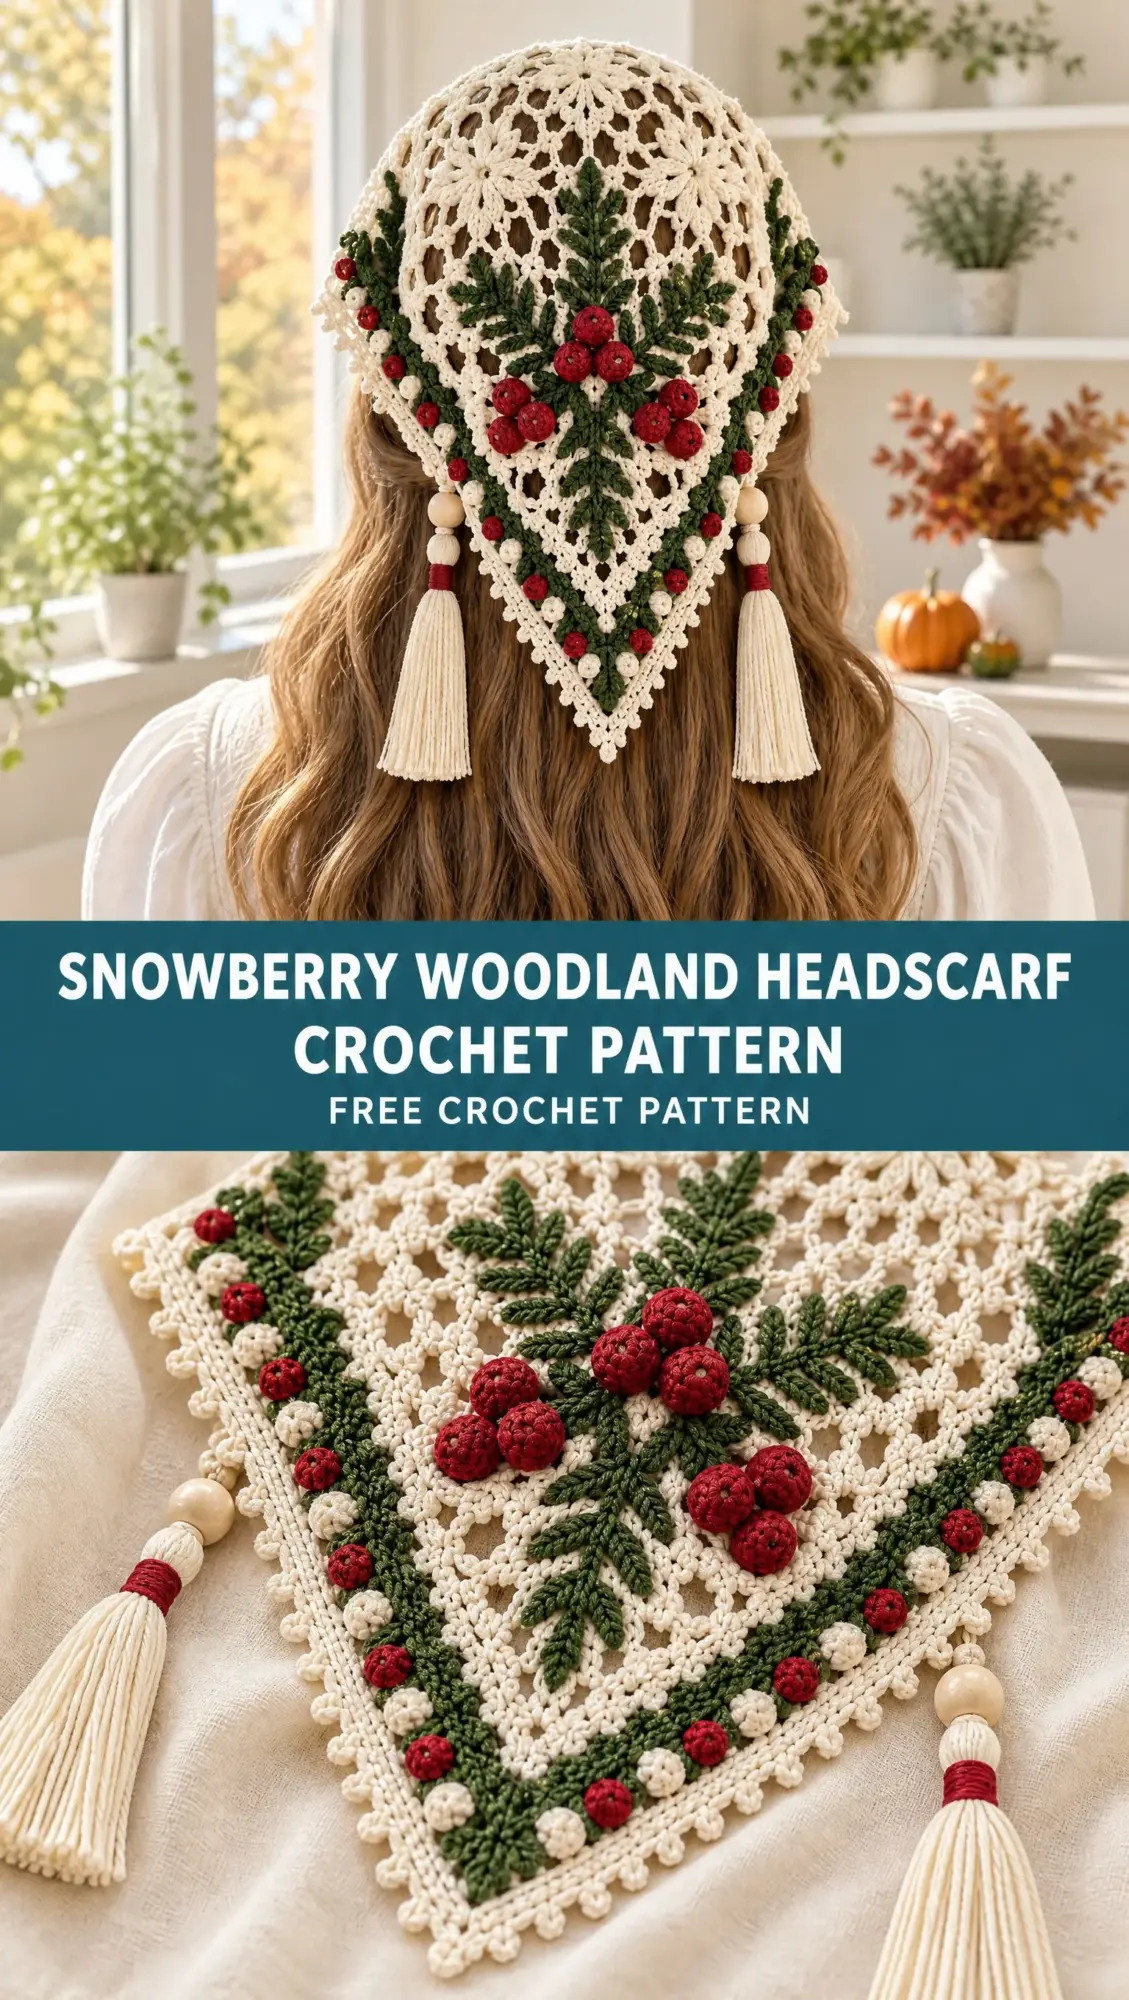
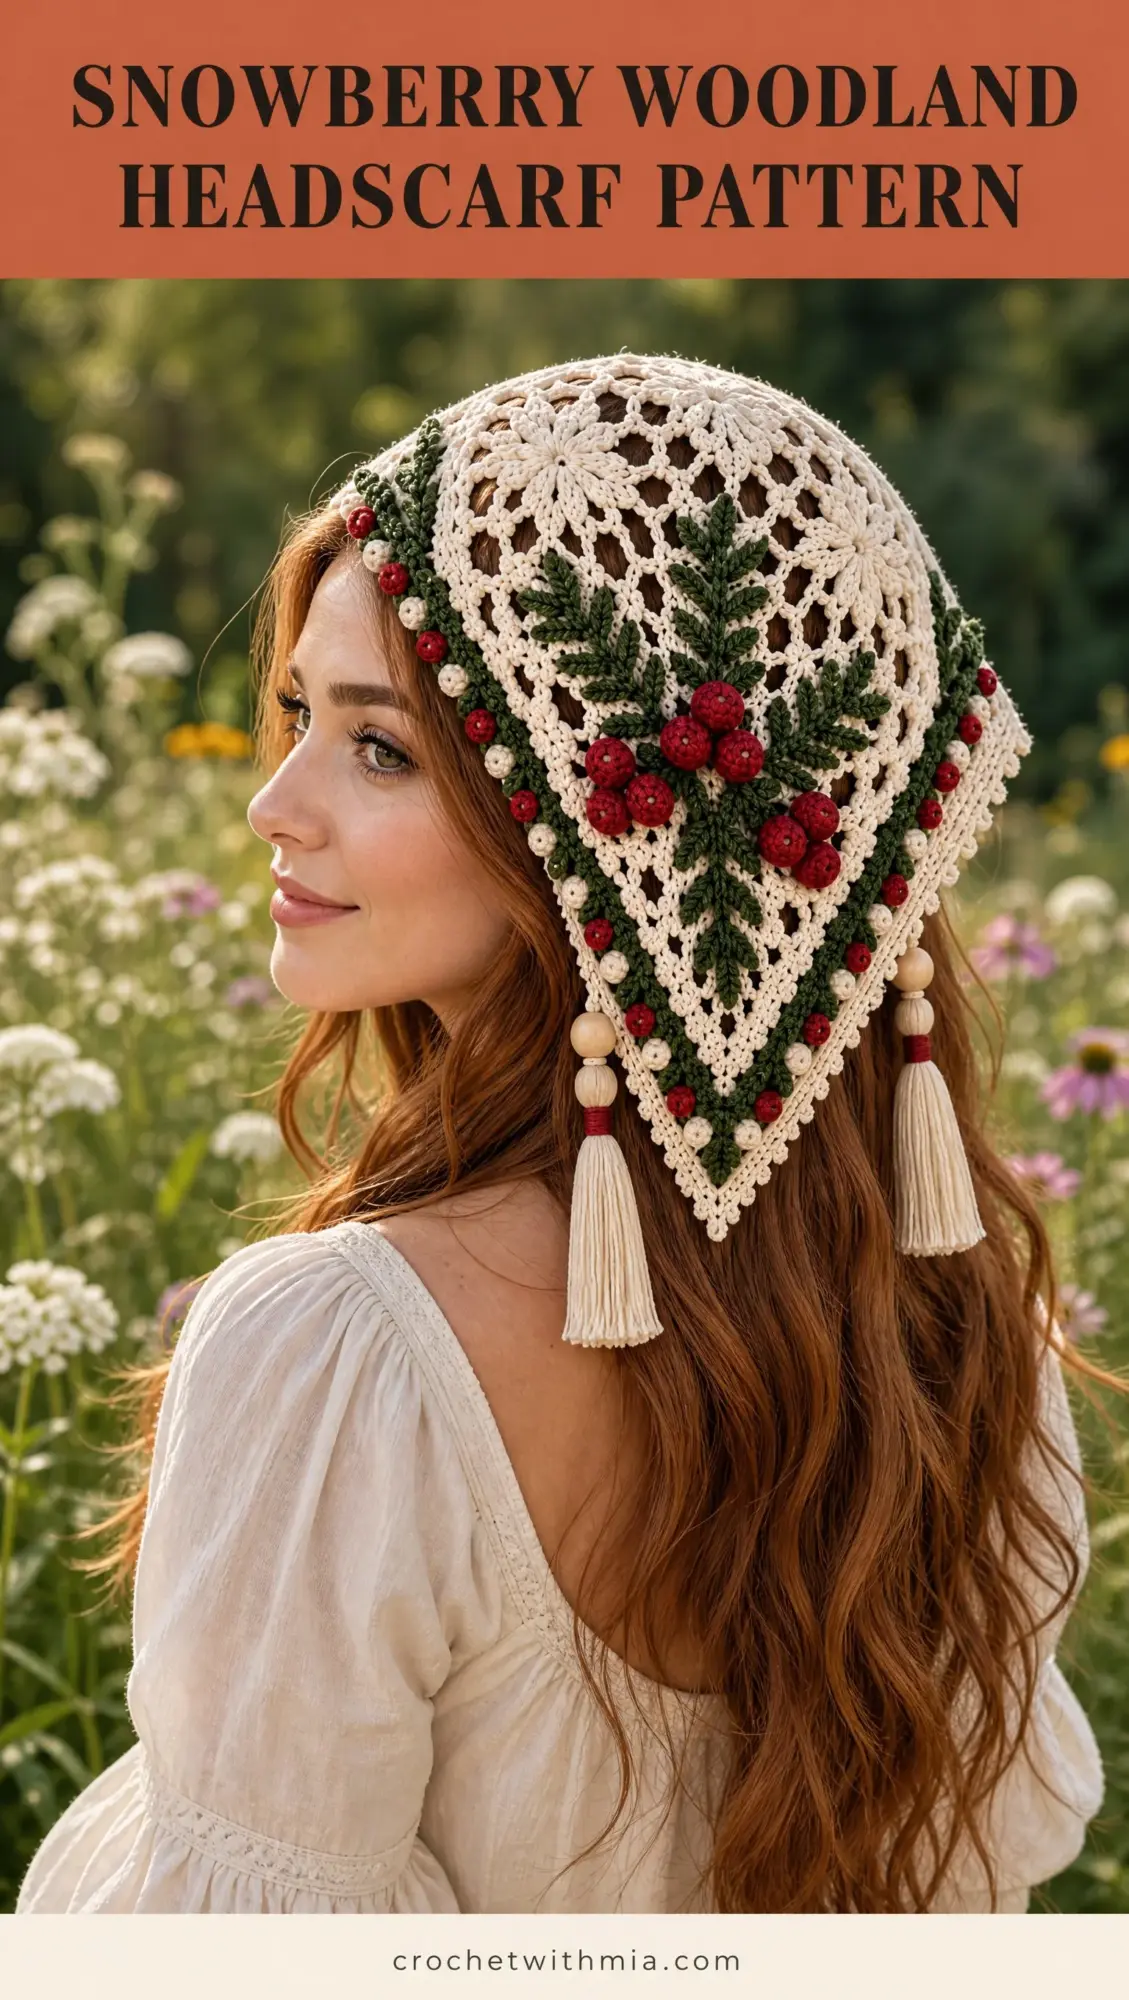
The Snowberry Woodland Headscarf is a triangular lace kerchief that sits beautifully over the crown of your head, with the point draping down your back. It features ivory six-point flower motifs joined together, three-dimensional pine sprigs with rolled berries, a green leaf garland border, and the most charming tassels with wooden beads. Perfect for holiday gatherings, winter walks, or anytime you want to feel like you stepped out of a woodland fairytale.
If you’re an adventurous intermediate crocheter looking for your next showstopper project, you’re in the right place. Let me walk you through everything you need to know to bring this beauty to life.
About This Crochet Pattern
This headscarf is built from 21 individual lace motifs that you’ll join into a triangle shape. Don’t let that number intimidate you. Each motif works up quickly once you get the rhythm, and the construction method means you can carry a few motifs in your bag and work on them anywhere.
The finished piece measures approximately 22 to 23 inches across the wingspan and 16 to 17 inches in depth after blocking. It fits an adult head, resting over the crown with the decorative side ornaments hanging near your ears and neck.
Skill level: Adventurous Intermediate. You should be comfortable with basic stitches, working in the round, and joining motifs. The pattern includes some special stitches, but I’ll explain each one thoroughly.
Materials You’ll Need
Gathering your supplies before you start makes the whole process smoother. Here’s your complete shopping list:
Yarn:
Yarn weight: Sport weight or light DK, which falls into Category 2 or 3. A smooth cotton or cotton-bamboo blend works beautifully here. You want clear stitch definition, so avoid fuzzy yarns that might obscure the pretty lace openings.
Hook: 3.0 mm, also known as a D/3 hook. You might also want a 2.5 mm hook on hand for working the berries and picots if you prefer a firmer texture.
Notions:
Optional: A small amount of fiberfill or scrap yarn for very plump berries, and fabric-safe starch if you want a crisper lace finish.
Gauge Information
Getting your gauge right matters here because you want the lace to drape softly rather than standing stiff or pooling loosely.
Gauge: One blocked motif should measure approximately 3.5 inches point to point.
I strongly recommend making one test motif before diving into all 21. Block it, measure it, and adjust your hook size if needed. This small investment of time saves headaches later.
Abbreviations and Special Stitches
Let me break down every stitch you’ll use in this pattern. Even if you’re familiar with these, a quick refresher never hurts.
Standard Abbreviations:
Special Stitches:
Picot: Chain 3, then slip stitch into the first chain you made. This creates a tiny decorative bump along your edge.
Small Bobble: Yarn over, insert your hook into the indicated stitch, yarn over and pull up a loop, yarn over and pull through 2 loops. Repeat this 3 more times in the same stitch, so you have 5 loops on your hook. Yarn over and pull through all 5 loops. Chain 1 firmly to close and secure the bobble.
Leaf: Chain 6. Now work back along that chain like this: slip stitch in the 2nd chain from hook, single crochet in the next chain, half double crochet in the next, double crochet in the next, then work 5 double crochets all in the last chain. This creates the tip of your leaf. Rotate to work along the opposite side of your foundation chain: double crochet in the next chain, half double crochet in the next, single crochet in the next, slip stitch in the last. Slip stitch at the base. You’ve made one pointed leaf.
Rolled Berry: Make an adjustable ring. Round 1: Work 6 single crochets into the ring. Round 2: Work 2 single crochets in each stitch around, giving you 12 stitches. Round 3: Single crochet in each stitch around, still 12 stitches. Round 4: Single crochet two together around the entire round, leaving you with 6 stitches. Lightly stuff if desired, fasten off with an 8-inch tail, weave that tail through the front loops and cinch closed. Use the tail to tack the berry tightly to your fabric so it looks slightly rolled and dimensional.
The Six-Point Floral Lace Motif
You’ll make 21 of these motifs in ivory. They form the foundation of your entire headscarf, so take your time learning this pattern. After the first few, your hands will remember the movements.
Step 1 – Center Ring: Chain 6, then join with a slip stitch to the first chain to form a ring.
Step 2 – Round 1, Six Spokes: Chain 1. Work the following sequence 6 times: single crochet in the ring, chain 5. Join with a slip stitch to the first single crochet. You now have six chain-5 loops radiating from your center.
Step 3 – Round 2, Flower Petals: Slip stitch into the first chain-5 loop. In each loop, work this sequence: single crochet, half double crochet, 3 double crochets, half double crochet, single crochet. Repeat in all six loops, then join with a slip stitch to the first single crochet. You’ve formed six rounded petals.
Step 4 – Round 3, Open Lace Anchors: Slip stitch to the top of the first petal. Now work this pattern around: chain 5, single crochet in the small valley between this petal and the next, chain 5, single crochet in the top center double crochet of the next petal. Repeat from the beginning around the entire motif. Join with a slip stitch. You now have 12 chain-5 arches.
Step 5 – Round 4, Joining Round: In the next chain-5 arch, work single crochet, chain 3, single crochet. Chain 2. In the next chain-5 arch, work single crochet, chain 5, single crochet. Chain 2. Repeat this pattern around the entire motif. Join. The six chain-5 arches become your main joining points, while the six chain-3 arches keep the edge airy and open.
Step 6 – Fasten and Shape: Fasten off. Gently stretch each of the six main points with your fingers before blocking. This helps the motif lie flat and shows off the lace pattern.
Join-As-You-Go Method
For motifs 2 through 21, you can join them as you work Round 4. Work the round as written until you reach an arch that will touch a completed neighbor. Replace the middle chain of that chain-5 arch with a slip stitch into the corresponding chain-5 arch of the neighboring motif. So you’ll chain 2, slip stitch into the neighbor’s arch, then chain 2 to complete your arch.
Where three motifs meet at a corner, join into the existing shared joining point. Keep your joins loose enough to preserve the drape of the fabric.
Motif Layout
Arrange your motifs as a downward-pointing triangle. The top row sits across the crown of your head, and each following row has one fewer motif, centered below the row above.
Assembly order: Join the six motifs of Row A side by side first. Then join Row B beneath Row A, connecting each Row B motif to the two motifs above it where their corners meet. Continue with Rows C through F the same way.
Before adding the border, place the triangle over the back of your head. The top edge should span from just above one ear to just above the other without stretching.
Stabilizing the Triangle
With the right side facing you and your ivory yarn, work one light foundation round around the entire triangle. This transforms the separate motif arches into one continuous edge and gives you even placement points for the decorative garland.
Foundation Edging: Join ivory at the upper left corner. Work single crochet evenly around, placing 2 single crochets in each larger chain-5 corner arch, 1 single crochet in each small arch or valley, and 3 single crochets in the lower tip. Along the top edge, keep the stitches slightly relaxed so the crown can curve naturally. Join with a slip stitch.
Curved Crown Shaping: Work a second row across the top edge only. Chain 1, single crochet in the first stitch, then single crochet across while skipping approximately every 10th to 12th stitch about 4 times evenly across. Do not skip stitches at the first or last 1.5 inches. Fasten off. This subtle reduction cups the scarf over your head instead of leaving the top edge ruler-straight.
Fit Check: If the top edge feels too tight, undo the shaping row and skip fewer stitches. If it flares away from your head, skip 1 or 2 additional stitches evenly across the center third.
Central Pine Sprig Arrangement
Make three separate pine sprigs in green: one long center sprig and two shorter side sprigs. These are crocheted as narrow stems with individual leaves, then sewn to the lace. Keeping them separate preserves the airy lace beneath and matches the raised embroidered look of the design.
Long Center Sprig
Stem: Chain 35. Slip stitch in the 2nd chain from hook and in each chain across. Fasten off, leaving a long sewing tail. Your finished stem should be about 6.5 to 7 inches long.
Leaves: Make 12 to 14 leaves using the Leaf stitch described earlier. For the bottom four leaves, make them slightly larger by using chain 7 instead of chain 6 and adding one extra double crochet near the tip.
Attach Leaves: Lay your stem vertically down the center of the scarf with its tip ending about 2 inches above the lower point. Sew leaf pairs alternately on both sides of the stem at a slight upward angle. Space pairs about 3/8 to 1/2 inch apart. Add one leaf at the very top as a spear tip.
Two Side Sprigs
Stem: For each sprig, chain 25, then slip stitch back across. Fasten off with a sewing tail.
Leaves: Make 8 to 10 standard leaves per sprig.
Placement: Angle one sprig up and to the left, and one up and to the right from the lower-middle area. The three sprigs should form a loose evergreen fan. Keep each branch distinct and avoid overlapping every leaf.
Cranberry Berries
Make 9 rolled berries in cranberry: 3 for the central cluster and 3 for each side cluster.
For a more natural look, make 2 or 3 berries slightly smaller by using only 8 stitches in Round 2 instead of 12.
Sew the central three berries where the three sprigs visually converge. Sew each side cluster near the base of a side sprig. Tack each berry at two or three points so it cannot twist or flip over during wear.
Pine-Green Leaf Garland Along the Lower Triangle
The green garland follows the two sloping sides and the lower point, not the top crown edge. Work directly onto the ivory stabilizing round.
Green Base Row: Join green at the upper left corner. Chain 1, single crochet in the same stitch. Single crochet evenly down the left slope, place 3 single crochets in the tip, then single crochet evenly up the right slope. Fasten off at the upper right corner.
Garland Repeat: Rejoin green at the upper left. Slip stitch in the next 2 stitches, make one Leaf (chain 6 and work the leaf back to the base), then slip stitch in the next 2 stitches. Repeat this pattern down the side. At the point, make one slightly longer leaf using chain 7, centered over the tip. Continue the repeat up the opposite side, angling leaves outward from the triangle. Fasten off.
Tidy the Leaves: Steam lightly or damp-block the leaves so they lie flat and follow the edge rather than curling inward.
Alternating Snowberry Bobbles
Work the bobbles into the small spaces between the green leaves so the edge alternates ivory and cranberry berries in a charming pattern.
Ivory Bobbles: Using ivory, join yarn in the first open gap between two leaves. Work one Small Bobble, then slip stitch into the garland base to anchor. Move to every other gap and repeat along both sides.
Cranberry Bobbles: Using cranberry, fill the remaining gaps with Small Bobbles. Keep the sequence alternating white, red, white, red all the way around.
Secure: From the wrong side, weave short tails into the green base row, not through the open lace, so no tails show from the front.
Ivory Double-Row Border and Picots
Border Row 1: Join ivory at the upper left corner and work around the lower triangle over and behind the green garland. Single crochet in each available base stitch, catching the garland neatly at intervals so it stays attached. Work 3 single crochets in the point. Fasten off at the upper right.
Border Row 2: Rejoin ivory. Chain 1, single crochet in the first stitch and in each stitch around. At the lower tip, work single crochet, chain 1, single crochet in the center stitch to keep a sharp point.
Picot Finish: Single crochet in the next 3 stitches, then work a Picot. Repeat this pattern around the lower triangle. Adjust the final spacing by working 2 or 4 single crochets before the last picot if necessary. Fasten off and weave in your ends.
Side Beads, Ties, and Tassels
Each upper side corner gets a short decorative cord with wooden beads and a full ivory tassel bound in cranberry. These ornaments are decorative rather than structural. The scarf stays in place by its curved crown and optional hidden hair pins.
Side Cords (Make 2)
Cord: With ivory, chain 22. Starting in the 2nd chain from hook, slip stitch back across for a firm cord. Leave an 8-inch tail at both ends.
Attach: Sew one end securely to an upper side corner of the scarf, just beneath the crown shaping row.
Beads: Thread 3 to 4 wooden beads onto the free end. Knot beneath the final bead, or pass the yarn back through the last bead and secure.
Ivory Tassels (Make 2)
Wrap: Wrap ivory yarn 55 to 65 times around a 5-inch piece of sturdy cardboard.
Tie Top: Slide a 14-inch strand under the wraps at the top and tie very tightly with a square knot. Remove from the cardboard.
Cut: Cut all the loops at the bottom. Comb through with your fingers and trim the tassel to about 4.5 inches.
Cranberry Neck: About 3/4 inch below the top, wrap cranberry yarn tightly 12 to 15 times around the tassel. Knot on the back and bury the ends under the wrap.
Join to Cord: Use the top tie strands to secure the tassel immediately below the lowest wooden bead. Weave the tie strands down into the tassel body and trim.
Optional Small Green Bow
The bow echoes the woodland styling of the reference design. You can place it above one or both tassel connections, or make one centered at the back if you prefer.
Bow Strip: With green, chain 26. Row 1: Single crochet in the 2nd chain from hook and across. Row 2: Chain 1, turn, single crochet across. Fasten off, leaving a long tail.
Shape: Overlap the strip ends by about 1/2 inch and sew them together to form a loop. Pinch the center into pleats.
Center Wrap: Wrap green yarn around the pinched center 8 to 10 times. Knot on the back.
Attach: Sew the bow at the top of a tassel cord, keeping the bow small enough that the beads remain visible.
Final Blocking and Finishing
Weave Ends: Weave all ends at least 1 inch in two directions. Avoid dragging dark yarn through ivory lace where it may show through.
Wet Block: Soak your scarf in cool water with a drop of wool wash or mild soap. Press out the water gently in a towel. Do not wring.
Pin Shape: Pin the top edge into a shallow curve. Pin each lower side straight but not stretched, then pin the point. Open every floral motif evenly. Shape leaves and picots with your fingertips.
Dry Fully: Allow everything to dry completely before removing pins. Re-fluff the tassels and trim any uneven strands.
Wear: Center the triangle on the back of your head so the top row of motifs curves over the crown. Let the point fall over your hair. If needed, secure discreetly with two small hair pins slipped through the top ivory edge behind your ears.
Sizing Adjustments
Smaller adult or teen: Use a 2.75 mm hook or make a 5-4-3-2-1 layout with 15 motifs. Expect about 19 to 20 inches wingspan.
Larger adult or fuller coverage: Use a 3.25 to 3.5 mm hook or make a 7-6-5-4-3-2-1 layout with 28 motifs. Keep embellishments proportionally centered.
Longer back point without extra width: Add 1 or 2 graduated mesh rows along the bottom two sides before the garland, increasing only at the tip.
More secure fit: Crochet two hidden ivory tie cords from the upper corners and knot them under your hair. Keep decorative tassel cords separate.
Troubleshooting Common Issues
Motifs cup or ruffle: Check your Round 4 chain tension. If cupping, loosen the chains or increase hook size for Round 4 only. If ruffling, tighten chains or reduce each large arch from chain 5 to chain 4.
Triangle twists: Block motifs before assembly or join on a flat surface. Make sure all motifs face right side up.
Top edge slips backward: Work the crown shaping row with one or two extra evenly spaced decreases, or add hidden hair pins.
Green garland pulls the edge tight: Redo the green base row with a larger hook or add an occasional chain 1 between single crochet groups.
Berries flop: Use a smaller hook for berries, stuff lightly, and tack each berry at multiple points.
Tassels look thin: Increase wraps to 75 to 85 or use two strands held together for the wrapping stage.
Care Instructions
Hand wash your headscarf in cool water. Support the scarf when wet so the bead and tassel weight does not stretch the lace. Roll in a towel to remove excess water, reshape, and dry flat. Do not machine dry. If the tassels kink, lightly mist them and comb straight with your fingers.
Project Checklist
Keep track of your progress with this handy checklist:
Thank you so much for choosing this pattern for your next project. I hope you love making this Snowberry Woodland Headscarf as much as I loved putting together this tutorial. If you create one, I would absolutely love to see it! Share your photos on Instagram or Facebook and tag me so I can admire your work.
If this pattern caught your eye, go ahead and pin it to your Pinterest boards so you can find it easily when you’re ready to cast on. And please drop a comment below if you make one. I love hearing how projects turn out and seeing the color combinations you choose!
Want a Quick & Easy Printable Version?
Get a clean, beautifully formatted PDF of this pattern — easy to follow step by step, ready to print or save on any device. No scrolling, no distractions, just the pattern.
Get the Printable PDF →