I don’t know about you, but I love a good market tote. There’s something about carrying a beautiful handmade bag that makes even a trip to the grocery store feel a little more special.
Get the Ad-Free PDF Pattern
You can find the free pattern below, or you can purchase the ad-free printable PDF from my shop.
Get the Printable PDF →
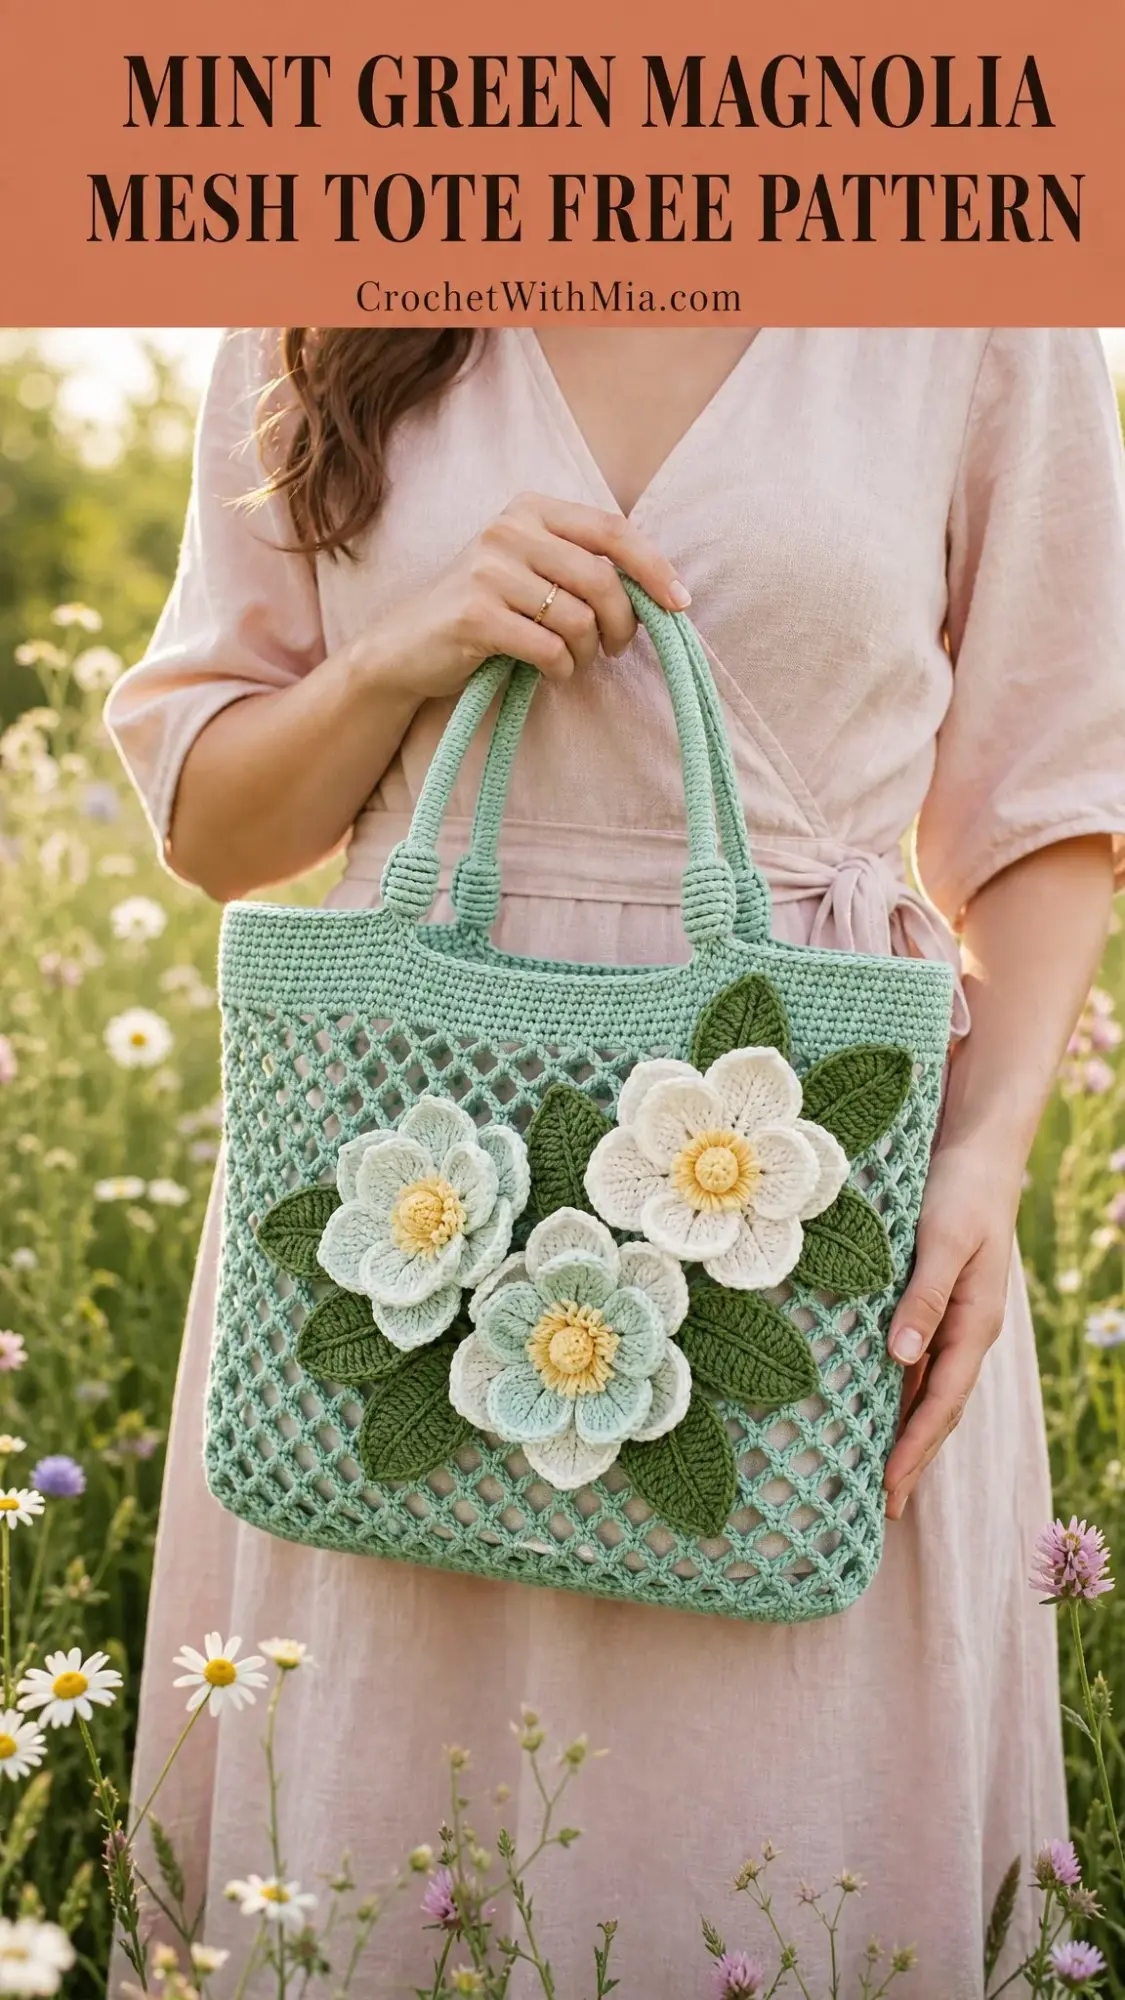
This mint green beauty has been living rent free in my head since I first sketched it out. The airy mesh body keeps it lightweight, the structured bands give it shape, and those layered magnolia flowers? Pure springtime joy.
If you’ve been looking for a bag pattern that looks impressive but uses straightforward stitches, this one’s for you. The mesh section is just chains and single crochets on repeat. The real magic happens in the finishing, and I’ll walk you through every step.
About This Mint Green Magnolia Mesh Tote Pattern
This structured cotton market tote features an airy lattice texture that’s both practical and pretty. The mesh body lets you see what’s inside while the solid bands at the top and bottom keep everything secure. The sculpted handles are padded with cotton rope for comfort, and the layered magnolia appliques give it that garden party charm.
Skill level: Intermediate. The stitches themselves are simple, but this pattern requires tidy seaming, careful applique placement, and some finishing finesse. If you’re comfortable with basic crochet and willing to take your time with assembly, you’ll do great.
Finished size: 11.25 inches wide x 9 inches tall x 3 inches deep (28.5 x 23 x 7.5 cm)
Time to complete: 10 to 14 hours
Materials You’ll Need
Before you start, gather everything so you’re not hunting for supplies mid-project.
Yarn (worsted weight cotton, approximately 820 yards / 750 meters total):
Hooks:
Notions:
Yarn suggestions: Lion Brand 24/7 Cotton gives crisp stitch definition and firm structure. Paintbox Yarns Cotton Aran offers smooth texture with lots of color options. Knit Picks Dishie is sturdy and washable for everyday use.
Substitution note: Choose a firm worsted cotton or cotton blend that meets gauge. Soft acrylic can stretch in the mesh sections, so if you substitute, consider sizing down your hook or adding a lining.
Gauge
Getting gauge matters here because it affects the final bag dimensions and how well your pieces fit together.
Abbreviations and Stitch Guide
Let me define every stitch before we begin. If you’re new to any of these, read through the definitions first.
UK crocheters: This pattern uses US terms. US sc = UK dc. US dc = UK tr.
Special Stitches
Mesh Row: This is the heart of the lattice pattern. Working over 45 foundation stitches: sc in first st, then repeat [ch 5, sk 3, sc in next st] 11 times. Each mesh row has 12 sc anchors and 11 ch-5 spaces.
Covered Handle Strip: Work a narrow sc strip, fold it around cotton rope, and seam the long edge closed. This creates the rounded padded handles.
Magnolia Petal: Ch 7. Working into back bumps: sc in 2nd ch, hdc, dc in next 2 ch, hdc, sc. Ch 1, rotate to work down the unused loops: sc, hdc, dc in next 2 loops, hdc, sc, sl st to base. One petal made.
Leaf: Ch 11. Sc in 2nd ch, hdc, dc in next 6 ch, hdc, 3 sc in last ch. Continue along other side: hdc, dc in next 6 loops, hdc, sc, sl st to first sc.
Left-handed note: Follow the same stitch counts. Your mesh slants and applique layout will mirror naturally. Pin flowers before sewing so the cluster balances on your tote front.
Bag Panels (Make 2)
Use main color and 4.0 mm hook. Chain 46. Work flat, turning after each row. Ch 1 does not count as a stitch. Make one plain back panel and one front panel for applique placement.
Rows 1-5: Sc in 2nd ch from hook for Row 1, then sc across each row. (45 sc)
Rows 6-23: Work Mesh Row. Keep 12 sc anchors and 11 ch-5 spaces each row. (11 ch-5 sps)
Row 24: Ch 1, sc in first anchor, [3 sc in next ch-5 sp, sc in next anchor] 11 times. (45 sc)
Rows 25-29: Sc across. Fasten off after Row 29. (45 sc)
Panel checkpoint: Each panel should measure about 11.25 inches / 28.5 cm wide and 9 inches / 23 cm tall after light blocking. The mesh section measures about 6.5 inches / 16.5 cm tall between the lower and upper solid bands.
Top Edging
With RS facing, join main color at top right corner of each panel. Work 1 round of sc evenly around each panel: 45 sc across top, 29 sc down side, 45 sc across bottom, 29 sc up side. Join with sl st. (148 sc) Fasten off.
Gusset and Bag Assembly
Gusset
Use main color and 4.0 mm hook. Ch 13.
Row 1: Sc in 2nd ch from hook and each ch across. (12 sc)
Rows 2-132: Ch 1, turn, sc across. (12 sc)
Edging: Work 1 sc in each row end along both long sides and 12 sc across each short end. Do not add extra corner stitches. (288 sc around)
Gusset checkpoint: Strip should measure about 3 inches / 7.5 cm wide and 29.25 inches / 74 cm long. It wraps one side, the bottom, and the second side of the bag.
Join Panels to Gusset
Mark the center bottom 45 rows of the gusset. This joins to the bottom edge of each panel.
With WS together, whipstitch or slip stitch through matching edge stitches: side 29 sts, bottom 45 sts, side 29 sts.
Repeat with second panel. Leave the top open. Weave in ends securely.
Upper Rim
Join main color at a side seam. Work 1 round sc evenly around the opening: 45 sc across front, 12 sc across gusset end, 45 sc across back, 12 sc across gusset end. Join. Work 2 more rounds sc. (114 sc each round) Fasten off.
Handles (Make 2)
Padded Handle Strips
Row 1: Ch 61. Sc in 2nd ch from hook and each ch across. (60 sc)
Rows 2-5: Ch 1, turn, sc across. (60 sc)
Finish: Fold strip around 15 inch / 38 cm cotton rope. Seam long edge closed. (1 handle)
Attach Handles
On front top edge, mark handle points 11 stitches in from each side. Place handle ends over 5 stitches at each mark.
Sew each end to the inside of the top band using a boxed X stitch pattern. Repeat on back.
Wrap a 9 inch / 23 cm strand of main color around each handle base 10 to 12 times to create a neat gathered collar. Knot inside and weave in.
Handle checkpoint: Finished handle rise is about 5.5 inches / 14 cm above the rim. For longer shoulder-style handles, begin with ch 81 and keep the same 5-row width.
Magnolia Appliques
These layered flowers are what make this tote truly special. Take your time with them.
Large Flower (Make 1)
Center with yellow: Magic ring, 6 sc in ring. Rnd 2: 2 sc in each st. (12 sc) Fasten off.
Join ivory in any st. Make 6 Magnolia Petals, placing each petal base into every other center stitch with sl sts between petals.
For a fuller flower, work a second petal layer in pale mint behind the first layer, offset between front petals.
Small Flowers (Make 2)
Work the same center. Make 5 Magnolia Petals for each flower: one ivory with pale mint back layer, one pale mint with ivory back layer.
Add 6 to 8 small yellow straight stitches or bullion-style knots around the center for texture.
Leaves (Make 8)
Use deep green and 3.5 mm hook. Work Leaf special stitch.
Optional vein: Surface sl st or embroider a straight line down the center in a slightly lighter green.
Applique Placement
Arrange the large ivory flower on the upper right of the front panel, the pale flower lower center, and the second ivory/mint flower toward the left. Tuck leaves behind flowers before sewing. Keep the cluster centered over the mesh, with petals crossing into the upper solid band.
Finishing and Customization
Finishing Steps
Steam or wet block panels lightly before final applique sewing. Do not over-stretch the mesh.
Sew leaves first, then flowers, using small stitches through the back loops so the petals retain dimension.
Optional lining: Cut fabric 0.5 inch / 1.3 cm larger than the bag footprint, sew a simple boxed lining, turn under the top edge, and hand-stitch under the rim. Add a magnetic snap to the lining before sewing it into the tote.
Size Customization
Width: Add or subtract groups of 4 foundation stitches. Each group changes the panel by about 1 inch / 2.5 cm and keeps the mesh repeat even.
Height: Add or subtract mesh rows in pairs to maintain the lattice rhythm.
Depth: Change gusset width by working more or fewer starting chains. 4 stitches changes depth by about 1 inch / 2.5 cm.
If you change panel height or width, adjust gusset length to match: side height + bottom width + side height.
Care Instructions
Hand wash cool or machine wash gentle in a mesh laundry bag. Reshape while damp and dry flat. Avoid hanging the wet bag by the handles, which can stretch cotton.
Troubleshooting Common Issues
Mesh leans too much: Keep each sc anchor stacked over the previous row and block gently.
Bag feels floppy: Use a smaller hook, add lining, or work one extra rim round.
Gusset is too long: Ease the difference evenly along side seams. If more than 0.5 inch / 1.3 cm off, remove or add rows before sewing.
Flowers curl tightly: Block petals flat with pins and steam from above without pressing.
Handle ends pull: Sew through the rim and inside band several times in a boxed X pattern.
Make This Mint Green Magnolia Mesh Tote Your Own
This pattern gives you room to play. Try different flower colors for a bolder look, or skip the appliques entirely for a minimalist market bag. The mesh body works beautifully in any solid color, and you could even experiment with variegated cotton for a watercolor effect.
The structure comes from the cotton yarn and the solid bands, so as long as you maintain gauge, your tote will hold its shape. I love how this bag transitions from farmers market runs to summer picnics to casual everyday use.
Thank you so much for choosing this pattern! I hope you love making your mint green magnolia mesh tote as much as I loved designing it. If you make one, please share a photo on Instagram or Facebook. I’d absolutely love to see your version.
Save this pattern to your Pinterest boards so you can find it when you’re ready to start, and drop a comment below if you give it a try. Happy crocheting!
Want a Quick & Easy Printable Version?
Get a clean, beautifully formatted PDF of this pattern — easy to follow step by step, ready to print or save on any device. No scrolling, no distractions, just the pattern.
Get the Printable PDF →