
A lined occasion dress with a shaped bodice, eight flared skirt gores, and oversized daisy appliqués. This pattern uses double crochet (dc), simple increases, and a lattice texture stitch. One sample size fits bust 94 to 98 cm and waist 76 to 79 cm.
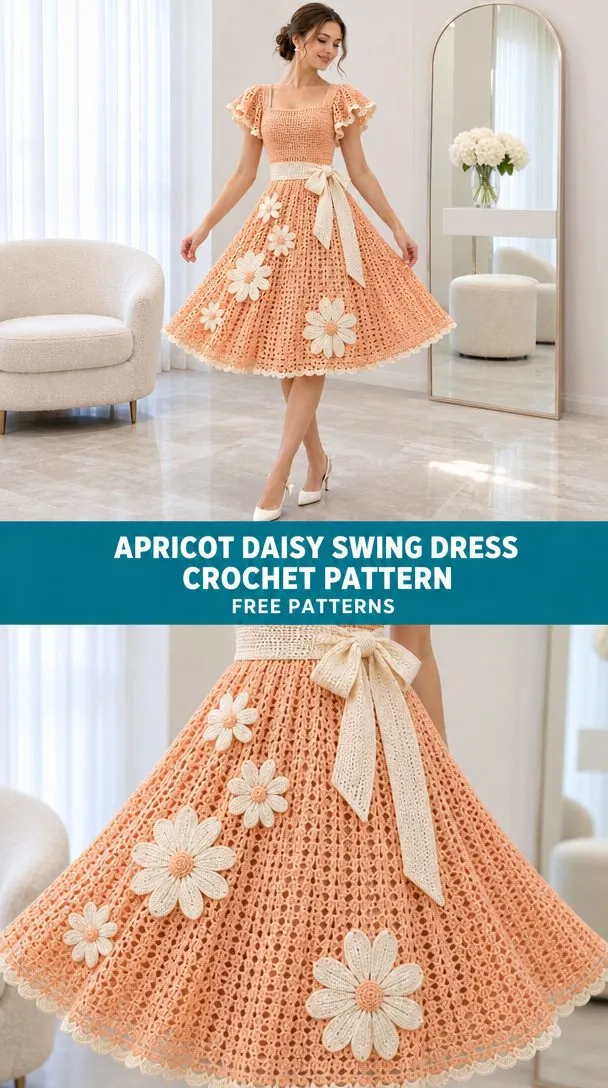
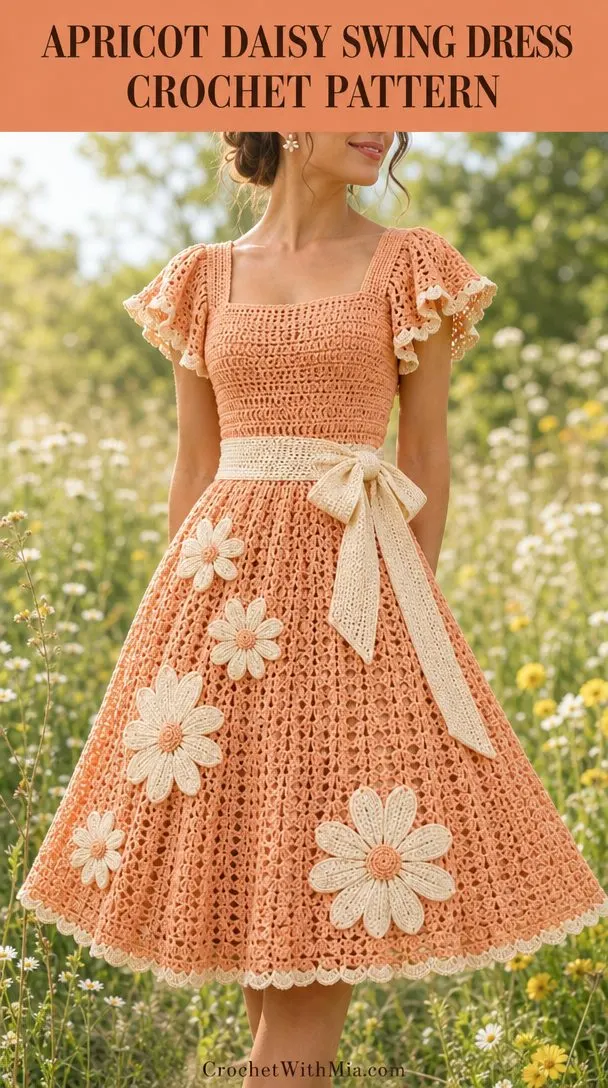
The design features a square neckline, flutter sleeves, a dense bodice, a broad ivory waist sash, and a knee-length mesh skirt scattered with flat ivory daisies. If you love feminine, vintage-inspired garments with modern construction details, this dress delivers.
Sport-weight cotton, a 3.5 mm hook, and row-by-row instructions make this an achievable project for confident intermediate crocheters ready to tackle garment construction.
Why This Dress Design Works
The Apricot Daisy Swing Dress balances structure and movement beautifully. The fitted bodice uses a lattice texture that creates visual interest without complicated stitch patterns, while the eight separate skirt gores flare gently from waist to hem. This gore construction gives the skirt its characteristic swing without adding bulk at the waistline.
The ivory waistband and daisy motifs break up the apricot base color and add that "special occasion" feel. Because the flowers are worked separately and sewn on after assembly, you have complete control over placement. The pattern suggests an asymmetrical arrangement down the skirt, but you can adjust to suit your style.
A hidden side zipper and full lining make this dress practical to wear, not just beautiful to look at. The lining provides coverage and helps the crochet fabric drape properly rather than clinging or stretching out of shape.
Skill Level
Intermediate to Advanced
This pattern requires confidence with garment shaping, seaming multiple pieces, and installing a zipper. The individual stitches and techniques are straightforward, but the project involves many components that must fit together precisely.
You should be comfortable with:
- Working from a stitch chart
- Increasing and decreasing while maintaining a texture pattern
- Blocking pieces to specific measurements
- Mattress stitch seaming
- Basic sewing skills for the lining and zipper
If you have made fitted garments before, you will find this pattern well within reach. If this is your first garment, consider practicing the bodice as a standalone top first.
Materials and Tools
| Item | Specification |
|---|---|
| Main yarn (A) | Apricot, sport-weight cotton, about 300 m per 100 g; 1100 g (3300 m) |
| Accent yarn (B) | Ivory, same yarn weight; 220 g (660 m) |
| Center yarn (C) | Ivory or contrasting cotton, 20 g (60 m) for embroidered centers |
| Hooks | 3.5 mm main; 3.0 mm for edging and motifs, or sizes to obtain gauge |
| Notions | Tapestry needle, scissors, stitch markers, measuring tape, blocking mats and rustproof pins |
| Additional materials | 35 cm closed-end dress zipper; 2 m opaque woven lining fabric, 140 cm wide; matching sewing thread |
The yarn amounts include an approximate 15% allowance. Weigh your washed swatch and scale by garment area before purchasing if you want to be precise. Fiber content and lace density affect usage. If using two accent colors, split yarn B evenly between them.
Gauge
Blocked target: 20 stitch positions x 12 dc-height rows = 10 x 10 cm with 3.5 mm hook.
One chain replacing one stitch counts as one position. Measure gauge across the chosen body texture, not across stretched holes.
How to Make Your Gauge Swatch
Chain (ch) 43.
Row 1: Double crochet (dc) in 3rd chain from hook and in each remaining chain. You will have 41 dc.
Work 23 more rows using the lattice texture described below. Wash and dry flat. Measure the center 20 positions and 12 rows without stretching. If either dimension differs from the target, change your hook size and make a new swatch.
For motifs: Aim for 5 to 6 cm across for small flowers; large layered flowers should measure 8 to 9 cm.
Abbreviations and Special Stitches
This pattern uses US crochet terminology.
- ch = chain
- sl st = slip stitch
- sc = single crochet (insert hook, yarn over, pull up loop, yarn over, draw through both loops)
- hdc = half double crochet
- dc = double crochet (yarn over, insert hook, pull up loop, yarn over, draw through 2 loops, yarn over, draw through remaining 2 loops)
- tr = treble crochet
- st(s) = stitch(es)
- sp = space
- RS/WS = right side/wrong side
- BLO = back loop only
- rep = repeat
- yo = yarn over
Special Stitches
dc2tog (double crochet two together): [Yarn over, insert hook in next stitch, yarn over and pull up loop, yarn over and draw through 2 loops] twice; yarn over and draw through all 3 loops on hook. This decrease consumes 2 positions and creates 1.
Increase: Work 2 dc in one stitch. This adds 1 position.
Picot: Chain 3, slip stitch into the first chain.
Bobble: [Yarn over, insert hook in same stitch, pull up loop, yarn over and draw through 2 loops] four times, then yarn over and draw through all 5 loops on hook. Count as 1 stitch.
Pattern Notes
Please read these notes before beginning. They will save you confusion later.
The photograph accompanying this pattern is an AI concept visualization. The written stitch instructions and measurements define this draft interpretation. Small lace motifs and proportions in the photograph are not a stitch-by-stitch record. Trust the written pattern.
Turning chains: Chain 2 and turn before every dc row; the turning chain never counts as a stitch. Chain 1 before sc rows; it does not count as a stitch either.
Working loops: Work through both loops unless the pattern specifies otherwise.
Counting positions: Count chains as positions when they replace a skipped stitch. Work one dc into each chain on the following solid row.
Shaped edges: Keep the first and last 3 positions solid at all shaped edges. Increases and decreases always use dc. Begin the texture pattern after these edge stitches, restarting the repeat from the first full unit on each row. Finish incomplete units with dc. Never change the required row count just to complete a texture motif.
Measurements: All measurements are in centimeters. Divide by 2.54 for inches. Dimensions are stated before seam take-up. Try on basted pieces over your intended lining before final assembly.
Sizing: This is a single sample size, not a graded size range. For a different size, recalculate panel widths from your washed swatch before starting.
Body Texture: Lattice
Use the 12-position by 8-row chart below between the solid edge stitches. Start with Chart Row 1 on Body Row 2. Repeat Chart Rows 1 through 8 upward, and repeat the 12-position columns across the width.
Chart key:
- x = dc in next position
- o = ch 1, skip next position
Adjacent o symbols form a chain of the corresponding length over that many skipped positions. On the next row, work into each individual chain. Every symbol consumes and creates exactly one position.
Chart (read each row in working direction):
| Row | Pattern |
|---|---|
| 8 | x o o x x o o x x o o x |
| 7 | x o o x x o o x x o o x |
| 6 | x o o x x o o x x o o x |
| 5 | x o o x x o o x x o o x |
| 4 | x o o x x o o x x o o x |
| 3 | x o o x x o o x x o o x |
| 2 | x o o x x o o x x o o x |
| 1 | x o o x x o o x x o o x |
Written: xooxxooxxoox (12 positions per repeat, all rows identical)
Construction Overview
| Checkpoint | Target |
|---|---|
| Body length | 55.0 cm skirt below waist |
| Working gauge | 2 stitch positions and 1.2 dc-height rows per cm |
| Coverage | Opaque lining / base layer is separate from the crochet |
| Motifs | 12 focal motifs; layout described in Section 8 |
| Bust | 101 cm finished |
| Waist | 81 cm finished |
| Skirt | 55.0 cm length, 8 gores, 200 cm hem circumference |
| Bodice | Approximately 33 cm |
Order of work: Make and block the swatch, work the body pieces, block each piece to its measurements, assemble, then add trim and motifs. Work flowers separately so their position can be checked before sewing.
Instructions
Bodice Front and Back (Make 2 Lower Panels)
With yarn A and 3.5 mm hook, ch 83.
Row 1: Dc in 3rd ch from hook and in each remaining ch. (81 dc)
Row 2: 2 dc in first st, work texture across to last st, 2 dc in last st. (83 positions)
Row 3: Work texture without shaping. (83 positions)
Row 4: 2 dc in first st, texture across to last st, 2 dc in last st. (85 positions)
Row 5: Work texture without shaping. (85 positions)
Row 6: 2 dc in first st, texture across to last st, 2 dc in last st. (87 positions)
Row 7: Work texture without shaping. (87 positions)
Row 8: 2 dc in first st, texture across to last st, 2 dc in last st. (89 positions)
Row 9: Work texture without shaping. (89 positions)
Row 10: 2 dc in first st, texture across to last st, 2 dc in last st. (91 positions)
Row 11: Work texture without shaping. (91 positions)
Row 12: 2 dc in first st, texture across to last st, 2 dc in last st. (93 positions)
Row 13: Work texture without shaping. (93 positions)
Row 14: 2 dc in first st, texture across to last st, 2 dc in last st. (95 positions)
Row 15: Work texture without shaping. (95 positions)
Row 16: 2 dc in first st, texture across to last st, 2 dc in last st. (97 positions)
Row 17: Work texture without shaping. (97 positions)
Row 18: 2 dc in first st, texture across to last st, 2 dc in last st. (99 positions)
Row 19: Work texture without shaping. (99 positions)
Row 20: 2 dc in first st, texture across to last st, 2 dc in last st. (101 positions)
Rows 21-24: Work texture without shaping. (101 positions each row)
Checkpoint: Each panel should measure 50.5 cm across at Row 24 and 20 cm high. The lower edge should measure 40.5 cm.
Front Armholes and Neckline
Row 25: Sl st across first 6 sts, ch 2, dc across next 89 sts, leaving last 6 unworked. (89 dc)
Row 26: Dc across. (89 dc) Mark first 24 sts and last 24 sts. The center 41 sts form the square neckline opening.
Rows 27-40: Work each outer 24-st shoulder section separately in dc, leaving the center 41 sts unworked. (24 dc per shoulder per row)
Back Armholes and Neckline
Row 25: Work as front. (89 dc)
Rows 26-36: Dc across. (89 dc per row)
Rows 37-40: Work first 24 sts for one shoulder and last 24 sts for the other shoulder separately, leaving center 41 unworked. (24 dc per shoulder per row)
Waistband
With yarn B and 3.5 mm hook, ch 162.
Row 1: Dc in 3rd ch from hook and across. (160 dc)
Rows 2-4: Dc BLO across. (160 dc per row)
Leave both short ends open for the zipper. The finished band measures 80 cm x 3.3 cm.
Skirt Gores (Make 8)
With yarn A and 3.5 mm hook, ch 22.
Row 1: Dc in 3rd ch from hook and across. (20 dc)
Rows 2-3: Texture across without shaping. (20 positions)
Row 4: 2 dc in first and last st; texture between. (22 positions)
Rows 5-7: Texture across without shaping. (22 positions)
Row 8: 2 dc in first and last st; texture between. (24 positions)
Rows 9-11: Texture across without shaping. (24 positions)
Row 12: 2 dc in first and last st; texture between. (26 positions)
Rows 13-15: Texture across without shaping. (26 positions)
Row 16: 2 dc in first and last st; texture between. (28 positions)
Rows 17-19: Texture across without shaping. (28 positions)
Row 20: 2 dc in first and last st; texture between. (30 positions)
Rows 21-23: Texture across without shaping. (30 positions)
Row 24: 2 dc in first and last st; texture between. (32 positions)
Rows 25-27: Texture across without shaping. (32 positions)
Row 28: 2 dc in first and last st; texture between. (34 positions)
Rows 29-31: Texture across without shaping. (34 positions)
Row 32: 2 dc in first and last st; texture between. (36 positions)
Rows 33-35: Texture across without shaping. (36 positions)
Row 36: 2 dc in first and last st; texture between. (38 positions)
Rows 37-39: Texture across without shaping. (38 positions)
Row 40: 2 dc in first and last st; texture between. (40 positions)
Rows 41-43: Texture across without shaping. (40 positions)
Row 44: 2 dc in first and last st; texture between. (42 positions)
Rows 45-47: Texture across without shaping. (42 positions)
Row 48: 2 dc in first and last st; texture between. (44 positions)
Rows 49-51: Texture across without shaping. (44 positions)
Row 52: 2 dc in first and last st; texture between. (46 positions)
Rows 53-55: Texture across without shaping. (46 positions)
Row 56: 2 dc in first and last st; texture between. (48 positions)
Rows 57-59: Texture across without shaping. (48 positions)
Row 60: 2 dc in first and last st; texture between. (50 positions)
Rows 61-66: Texture across without shaping. (50 positions each row)
Each gore measures: Top edge 10 cm, bottom edge 25 cm, length 55.0 cm. Eight top edges total 160 positions; eight bottom edges total 400 positions (200 cm hem circumference).
Sleeves (Make 2)
With yarn A and 3.5 mm hook, ch 74.
Row 1: Dc in 3rd ch from hook and across. (72 dc)
Rows 2-10: Work body texture without shaping. (72 positions per row)
Each sleeve is a rectangle measuring 36 cm wide x 8.3 cm tall. For puff or flutter versions, gather the upper edge to fit the measured armhole. For slim versions, ease only. Finish the lower edge as described in Edgings and Details.
Assembly
You will need: Yarn A (apricot), 3.5 mm hook for slip-stitch joins if desired, tapestry needle, markers, and matching sewing thread. Block all pieces before joining. Use mattress stitch through matching edge loops to keep seams flat.
Join 1: Seam each front shoulder to its matching back shoulder. (24 positions per seam)
Join 2: Seam the right bodice side from waist to armhole. (24 row pairs) Leave the left side open for the zipper. (24 row pairs unjoined)
Join 3: Join seven adjacent gore edges fully. Leave the final side seam open at its top 18 cm for the zipper. (7 full seams; 1 partial seam)
Join 4: Attach 160 gore-top positions to 160 waistband positions. (160 pairs)
Join 5: Attach the combined 162 bodice-waist positions to the waistband, easing one extra bodice stitch into each half. (160 attachment points)
Join 6: Sew sleeve short sides together, then pin the sleeve seam to the underarm and the sleeve midpoint to the shoulder. Ease or gather 72 upper positions evenly around each armhole. (2 sleeves)
Join 7: Baste and hand-sew the 35 cm zipper into the left opening across the lower bodice, waistband, and upper skirt. Shorten the remaining opening by seaming from either end to the zipper stops. (1 zipper)
Join 8: Cut opaque lining from the assembled garment with 1.5 cm seam allowance. Sew side seams and darts to fit, hem it 2 cm above the crochet hem, and hand-sew to the neckline, armholes, and zipper tape without stretching. (1 lining)
Checkpoint: Try on with your intended base layer. Seams must lie flat, both sides must hang level, and shoulders and waist must not pull. Reblock or adjust seam tension before applying motifs.
Edgings and Details
You will need: Yarn B (ivory) and C (center yarn), 3.0 mm hook, tapestry needle, and removable markers. Main-color motif layers use yarn A. Use embroidered centers rather than detachable beads.
Border
Border Row 1: With yarn B, sc evenly around each exposed edge. Work 1 sc per horizontal position, 2 sc per dc row-end, and 3 sc at each outer corner. Reduce your pickup rate if the edge ripples. Record your total for each edge.
Border Row 2: Sc in each base sc, adding a picot after every fourth sc. At corners, retain 3 sc in the corner stitch. Stitch count remains the same as Row 1, plus picots.
Cuffs
Cuff Row 1: For puff sleeves, work sc2tog around the lower edge of each sleeve. For other sleeve styles, sc in every position. (36 sc for puff cuff or 72 sc for straight cuff)
Cuff Row 2: Sc BLO around, join with sl st to first sc. (36 or 72 sc)
Daisy Flowers
Flower Round 1: With yarn B, make an adjustable ring, ch 1, work 8 sc into ring; join to first sc. (8 sc)
Flower Round 2: [Ch 3, sl st in next sc] around. (8 ch-3 loops)
Flower Round 3: [Sc, hdc, 3 dc, hdc, sc] in each loop; join. (8 petals; 56 stitches total)
Large Rear Flower Layer
Make a second flower in yarn A, changing each ch-3 loop to ch 5 and each petal to [sc, hdc, dc, 3 tr, dc, hdc, sc]. Sew the smaller ivory layer centered over the larger apricot layer. (2 layers per flower)
Embroidered Centers
With yarn C, work 7 French knots through both flower layers. Pass the needle through each knot base twice to secure. (12 embroidered centers total)
Motif Placement
Make 12 motifs total. Place 7 evenly around the hem, 2 on each sleeve cuff, and 1 at the waist.
Appliqué join: Pin placements while the garment is flat. Sew around every outer edge and through the center with matching yarn, avoiding stretch.
Checkpoint: Edges should lie flat and maintain the measured garment outline. Count all motifs, check placement for symmetry or deliberate asymmetry, and tug each embellishment gently to confirm secure stitching.
Finishing
You will need: Yarn A and B tails, tapestry needle, water, towels, blocking mats, and rustproof pins. No hook required unless correcting an edge.
Pass 1: Weave every tail through at least 5 cm of dense stitches, reverse direction once, then trim. (0 unsecured tails)
Pass 2: Soak gently, press out water in towels, and lay flat to target measurements. Pin motifs without stretching holes. (All pieces level)
Pass 3: Allow to dry completely, remove every pin, and inspect seams, closures, and lining. (0 pins remaining)
Checkpoint: Compare washed dimensions with the targets in the Construction Overview. Confirm comfortable movement and coverage. Record any adjustments you made for future reference.
Care and Safety
Follow your yarn label for specific care instructions. For cotton, hand wash gently in cool water with mild detergent. Rinse without wringing. Reshape and dry flat. Store folded, as hanging can stretch lace fabric over time.
Keep long ties away from machinery and open flames. These are adult garments. Inspect closures and embroidered details regularly. Detached buttons, beads, or other small parts are choking hazards. Do not use detachable embellishments on items accessible to young children.
Tips for Success
Block religiously. This cannot be overstated for fitted garments. Block your swatch, block each piece before assembly, and block again after seaming. Proper blocking makes the difference between a homemade-looking dress and a professional finish.
Make a muslin first if you are between sizes. The pattern provides one sample size. If your measurements fall outside the stated range, calculate your adjustments before you begin.
Work the flowers last. Keeping the motifs separate until assembly is complete lets you audition different placements. Pin them in place, try on the dress, and adjust before committing with needle and thread.
Take your time with the zipper. A well-installed zipper is invisible from the outside. Baste first, check the alignment, then hand-sew with small stitches. The extra time is worth it.
Who Will Love This Pattern
This dress is perfect for summer weddings, garden parties, graduation celebrations, or any event where you want to feel special. The fitted bodice flatters, the flared skirt moves beautifully, and those oversized daisies are guaranteed conversation starters.
If you enjoy garment construction and want a showstopper project, this crochet dress pattern delivers both challenge and reward. The techniques are traditional, the construction is logical, and the finished piece is genuinely wearable.
Thank you so much for choosing this pattern. If you make the Apricot Daisy Swing Dress, I would absolutely love to see it. Share your photos on Instagram or Facebook and tag us so we can celebrate your beautiful work.
Save this crochet dress pattern to your Pinterest boards so you can find it when you are ready to start. And if you do make it, please come back and leave a comment below. Hearing about your projects truly makes my day.