
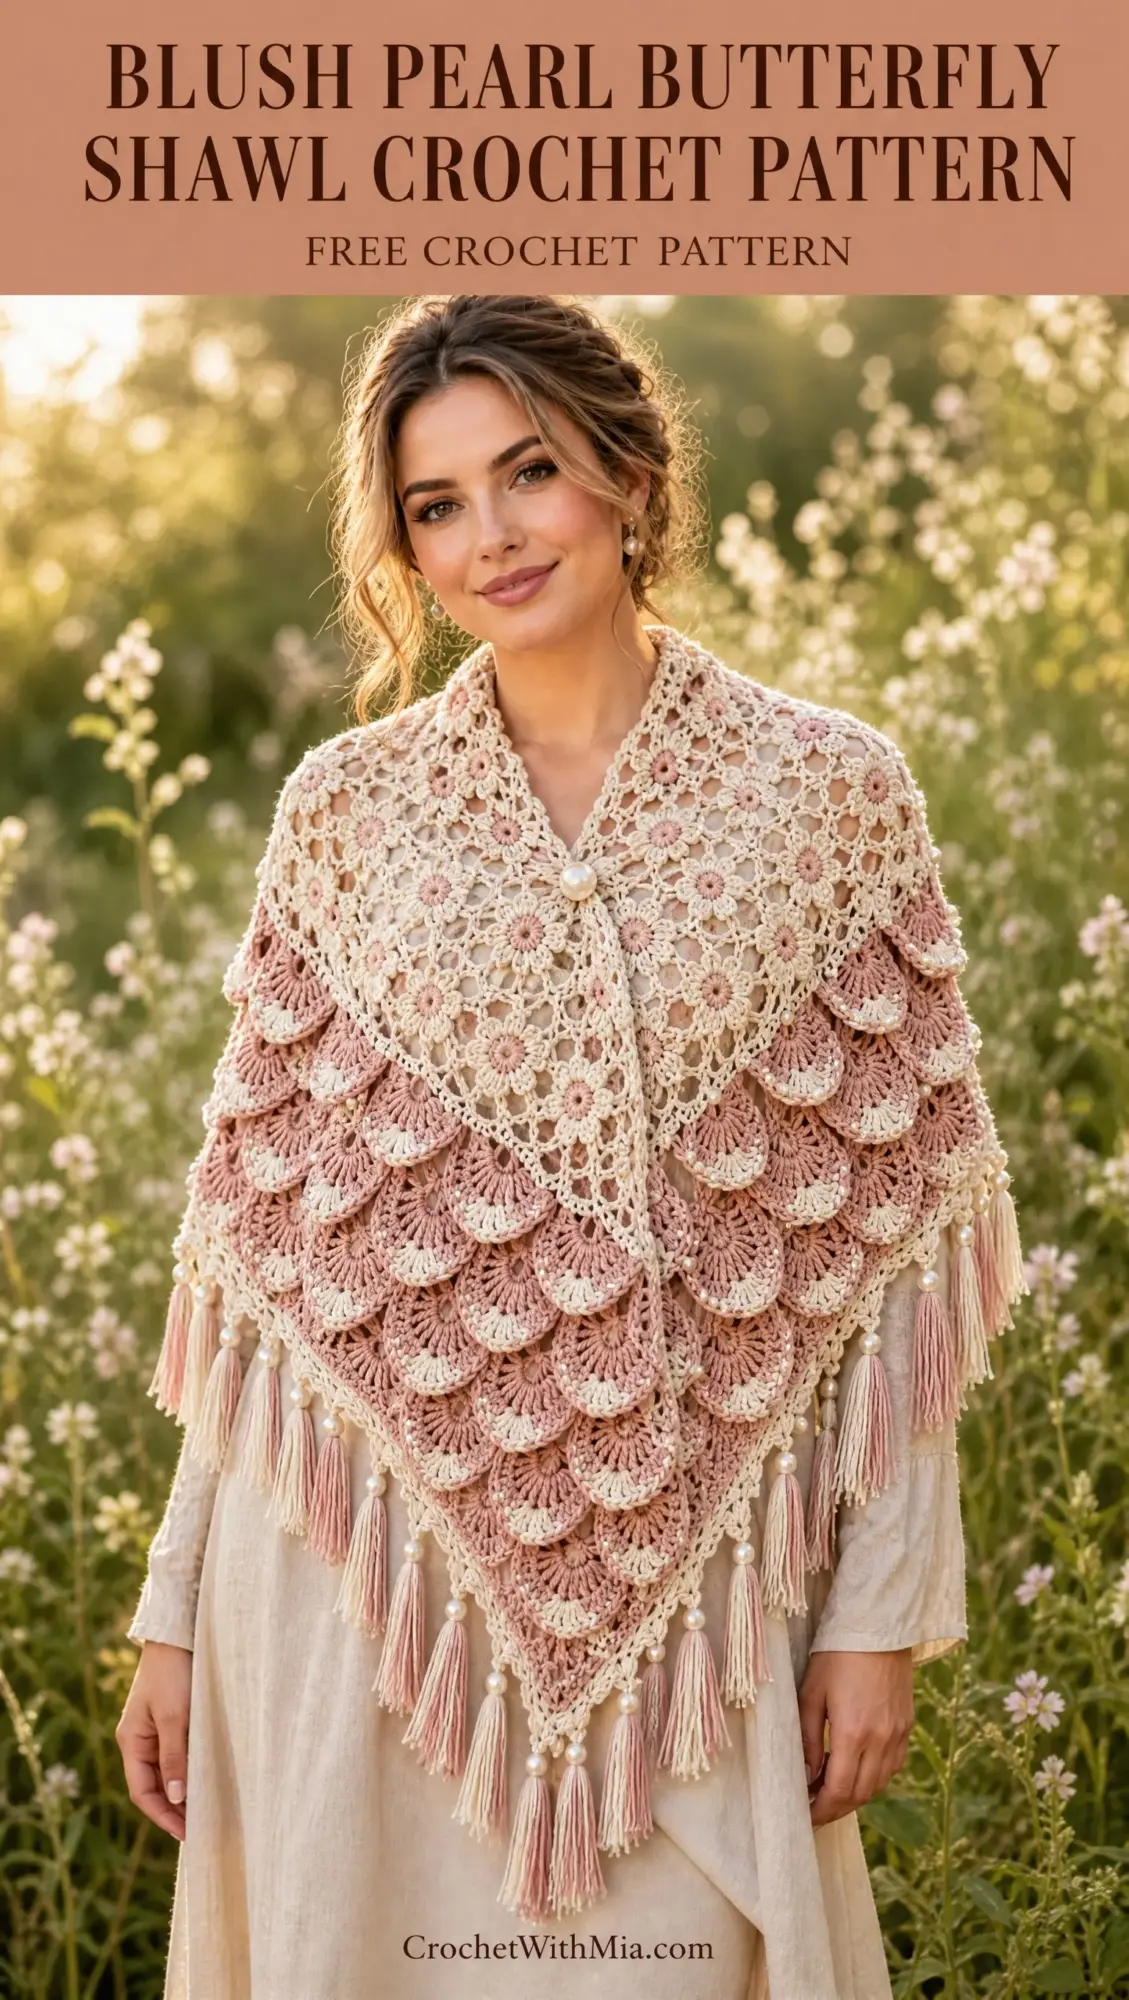
Okay, yarn lovers. This is your sign to dig through that stash and pull out those gorgeous skeins you have been saving for something special. The Blush Pearl Butterfly Shawl combines airy floral lace with dramatic layered shell scales, pearl accents, and a stunning three-dimensional butterfly fastening. This is an intermediate to advanced project that will challenge your skills and reward you with a truly breathtaking heirloom piece.
Get the Ad-Free PDF Pattern
You can find the free pattern below, or you can purchase the ad-free printable PDF from my shop.
Get the Printable PDF →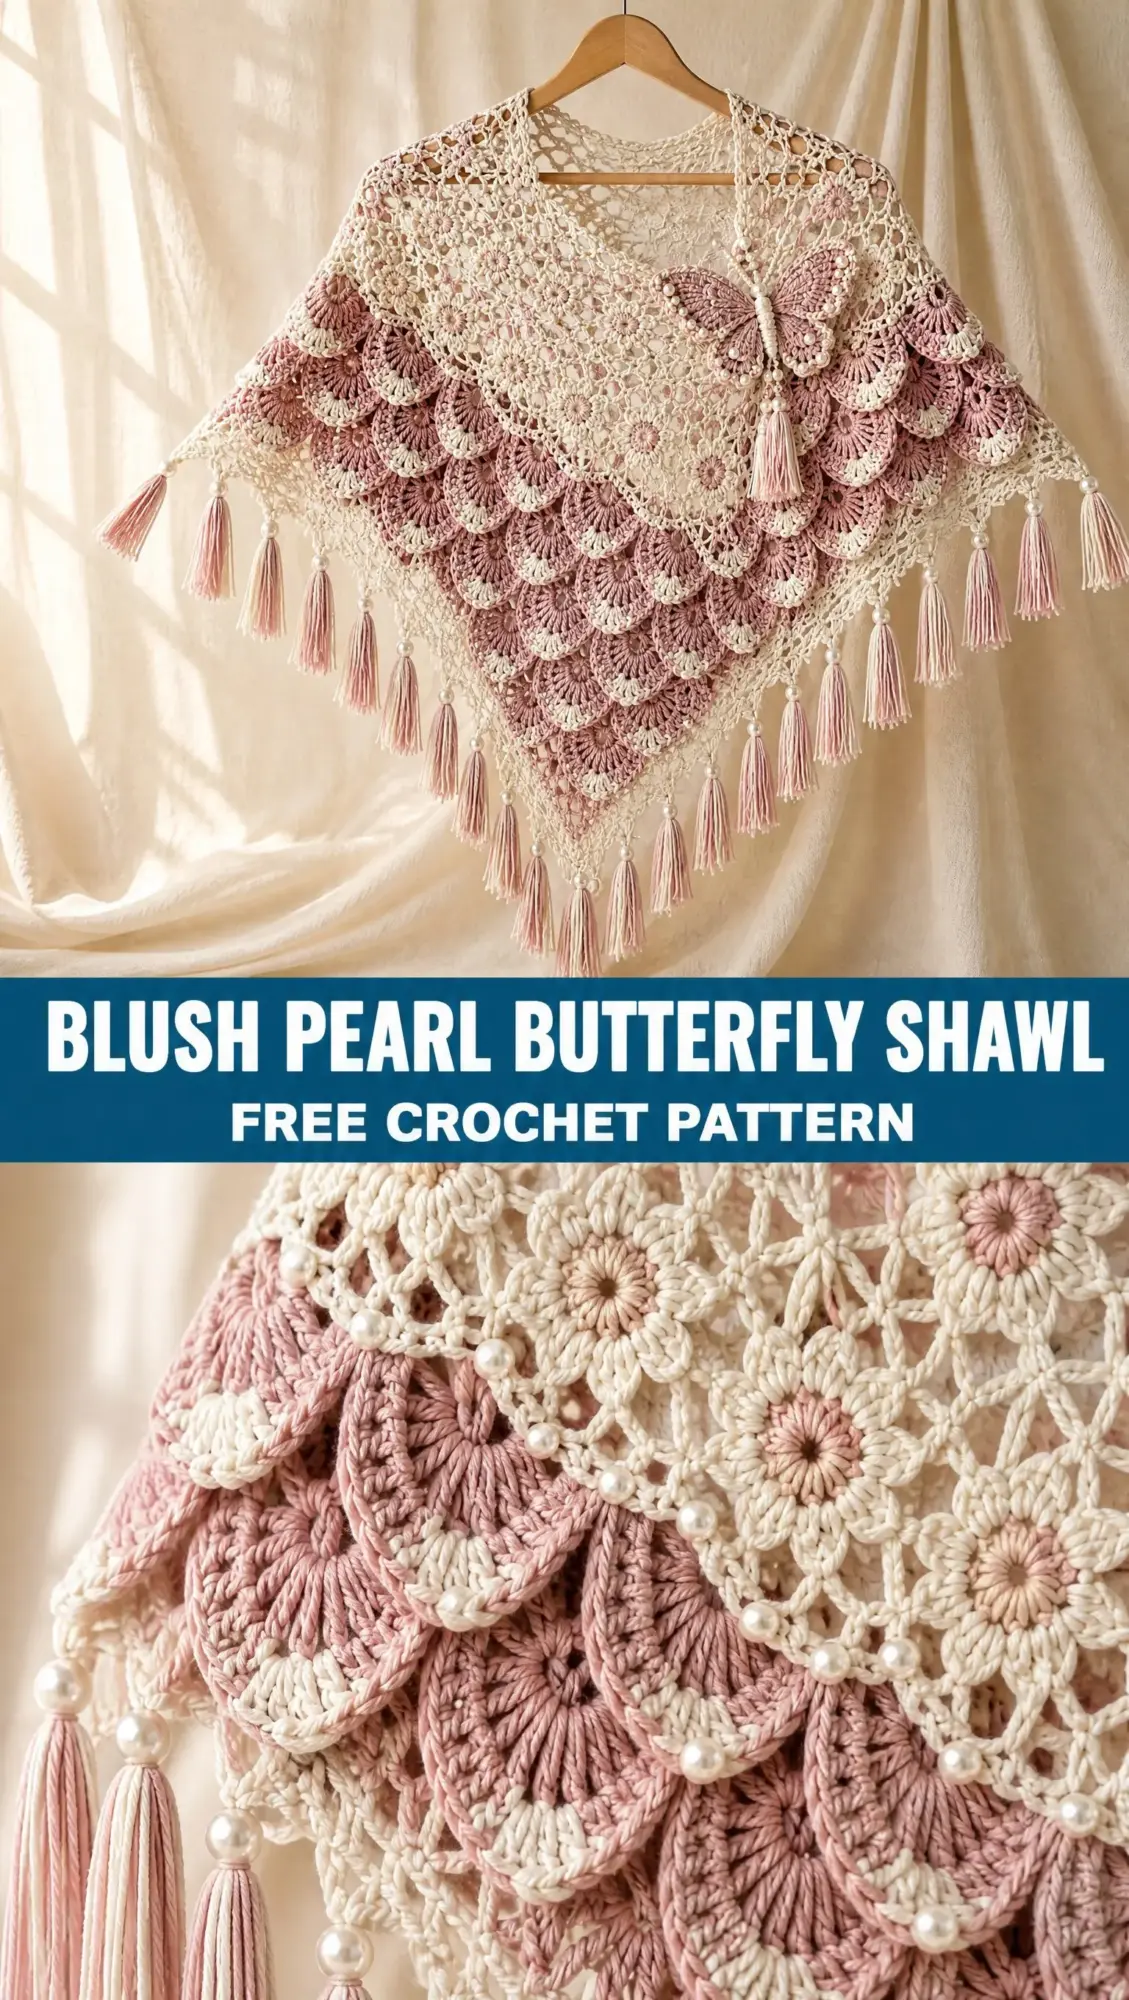
The construction is genuinely interesting. You start at the center back neck and work your way down, building an open ivory mesh shoulder section before transitioning into those eye-catching dusty blush scales. The butterfly is made separately and attached as a functional fastening. Every element works together to create something romantic, sophisticated, and absolutely showstopping.
Fair warning: this is not a weekend project. You will be working with chain spaces, clusters, shells, color changes, and bead handling. But if you have been crocheting for a while and want to level up, this pattern will teach you so much while creating something you will treasure forever.
Materials You Will Need
Before you begin, gather everything so you can work without interruption. Here is what the pattern calls for:
Yarn (Fingering weight / 4-ply mercerized cotton or cotton-bamboo blend):
Hooks:
Notions:
Pearl Note: For a washable shawl, choose high-quality acrylic or glass pearls with holes large enough for your thread. Sew each pearl with multiple passes. This accessory is intended for adults, and you should inspect attachments regularly.
Finished Measurements
After blocking, your shawl will measure:
Gauge Information
Gauge is not rigid for this pattern, but it does control your overall size. In blocked floral mesh, 4 floral repeats should measure about 10 cm (4 inches) across. In the scale section, one large fan should measure about 5.5 to 6 cm (2.2 to 2.4 inches) wide.
You want a fluid, draping fabric. The chains should open cleanly and the fans should lie softly rather than becoming stiff. If your fabric feels tight or cardboard-like, go up a hook size.
Adjustment Rule: If your piece is too narrow after Row 18, add 2 to 4 more floral mesh rows before beginning the scale transition. If the shawl is already wide enough, begin the scale section sooner. Always preserve the center increase line and both edge increases.
Abbreviations and Special Stitches
Let me walk you through every abbreviation and special stitch you will encounter. I am defining each one so you can reference this section anytime you get stuck.
| Abbreviation | Meaning |
|---|---|
| ch | chain |
| sl st | slip stitch |
| sc | single crochet |
| hdc | half double crochet |
| dc | double crochet |
| tr | treble crochet |
| sp | space |
| st(s) | stitch(es) |
| sk | skip |
| rep | repeat |
| RS / WS | right side / wrong side |
| MR | magic ring |
Special Stitches Defined
V-stitch (V-st): Work (dc, ch 2, dc) all in the same stitch or space. This creates a little V shape with a chain space in the center.
3-dc cluster: Yarn over, insert hook in indicated space, pull up a loop, yarn over and pull through 2 loops. Repeat twice more in the same space. You now have 4 loops on your hook. Yarn over and pull through all 4 loops. This draws three partial double crochets together at the top.
5-dc fan: Work 5 dc all in the same space. This creates a small fan shape.
Large scale fan: Work 9 dc in the same chain space. On the next row, the fan gets outlined with front-loop or surface stitches to make it read as a layered scale.
Picot: Chain 3, then slip stitch in the first chain. This creates a tiny decorative bump.
Floral unit: A small 5-petal flower worked into a chain loop. Work [sc, ch 2, 2 dc, ch 2, sc] five times around the loop, distributing evenly.
Raised vein: Surface slip stitch worked along a finished crochet wing using champagne thread.
Section One: Upper Floral Lace (Rows 1 to 18)
Use IVORY yarn. The shawl grows from the center back neck downward. Every right side row increases at both outer edges and around the center point. Turn after every row unless stated otherwise.
Marker Setup: Place one marker in the center ch-2 space. Move it upward each row. This is the spine of your triangle and the easiest way to keep the shape symmetrical.
Foundation Rows
Row 1 (RS): Ch 5. In 5th ch from hook work 2 dc, ch 2, 3 dc. Turn.
Row 2: Ch 4 (counts as dc + ch 1), dc in first st; ch 2, sk 1 dc, V-st in next dc; ch 3, V-st in center ch-2 sp; ch 2, V-st in last dc. Turn.
Row 3: Ch 4, dc in first st; ch 3, sc in next ch-2 sp, ch 3, V-st in next ch-2 sp across to center; in center sp work (dc, ch 3, dc, ch 3, dc); mirror from to to end; finish with (dc, ch 1, dc) in top of turning ch. Turn.
Row 4: Ch 4, dc in first st; ch 4, sc in next ch-3 sp, ch 4, V-st in next V-sp across; in center middle ch-3 sp work (dc, ch 3, dc, ch 3, dc); mirror to end. Turn.
Row 5: Ch 4, dc in first st; ch 3, 3-dc cluster in next ch-4 sp, ch 3, V-st in next V-sp across; work center increase as in Row 4; mirror. Turn.
Row 6: Ch 4, dc in first st; ch 5, sc in top of next cluster, ch 5, V-st in next V-sp across; center increase; mirror. Turn.
Rows 7 to 18: Floral Mesh Repeat
Repeat the following 4-row sequence three times. Each time you reach the center marker, replace the normal center element with the center increase (dc, ch 3, dc, ch 3, dc). At each outer edge, work (dc, ch 1, dc) into the first and last stitch to maintain edge growth.
1. Mesh A: ch 5, sc in next large loop, ch 5, V-st in next V-sp across each half.
2. Flower foundation: ch 3, sc in next ch-5 sp, ch 6, sc in next ch-5 sp, ch 3, V-st in next V-sp across each half.
3. Flower row: In each ch-6 loop work one Floral unit. Between flowers ch 4 and anchor with sc in the next small loop. Continue to the center, work center increase, then mirror.
4. Open recovery row: ch 5, sc in the tip of the middle petal of next flower, ch 5, V-st in next V-sp or structural space across each half.
At the end of Row 18: Lay the shawl flat. You should have a wide, airy shoulder section with visible flower motifs and a straight-ish upper neckline edge. Block lightly now if needed before beginning the heavier scales.
Section Two: Transition Band and Layered Shell Scales (Rows 19 to 41)
Switch to DUSTY BLUSH for the scale body, keeping ivory and champagne nearby for accent rows. The scale texture is created in staggered rows: a foundation row establishes chain loops, the next row fills alternating loops with large fans, and the following row anchors and offsets the next set.
Transition Row 19 (RS)
Join blush at the first corner. Ch 3, 2 dc in same place. Work ch 3, sc in next open mesh loop, ch 3, 3 dc in next structural V-sp across to center. In center marker sp work (3 dc, ch 3, 3 dc). Mirror to end. Finish 3 dc in last edge space. Turn.
Row 20: Scale Foundation
Ch 1, sc in first st, ch 5, sk approximately 3 sts or one small interval, sc in next stable point across to center. At center work ch 5, sc in center sp, ch 5. Continue to end. Adjust skips by 1 stitch when necessary so the loops remain evenly spaced and symmetric.
Row 21: First Scale Row
Ch 1. In first ch-5 sp work 9 dc. Sc in next ch-5 sp. 9 dc in next ch-5 sp, sc in next ch-5 sp across. At the center, work a fan in the loop immediately before the center, then (5 dc, ch 3, 5 dc) in the center loop, then continue the alternating sequence on the opposite half. Turn.
Row 22: Champagne Edge and Offset Loops
Join CHAMPAGNE. Ch 1. Working across the tops of fans, sc in first dc of fan, ch 2, sk 1 dc, sc in next dc four times, ending with sc in last dc. This lightly outlines each fan. Between fans, ch 5 and sc into the anchor sc from the row below. At the center fan, keep the ch-3 point open and work the same outline on both sides. Fasten champagne off.
Row 23: Offset Foundation
With BLUSH, join in the center of the first fan edge. Ch 1, sc there. Ch 5, sc into the valley between fans, ch 5, sc into the center top of the next fan across. At center, work ch 5, sc in center ch-3 point, ch 5. Continue symmetrically. Turn.
Row 24: Offset Scales
Work 9 dc in each alternate ch-5 loop so the new fans fall between the fans below. Anchor with sc in the intervening loops. At the center, preserve the triangular point by working (5 dc, ch 3, 5 dc) into the center loop.
Rows 25 to 38: Continue the Scale Field
Repeat Rows 22 to 24, alternating full and offset fan placement, until you have completed 6 total visible tiers of overlapping scales below the floral section. Count the first tier made on Row 21. On every second champagne outline row, replace the middle ch-2 accent on every other fan with IVORY: join ivory, work 3 sc centered over the fan tip, fasten off, and carry on with champagne around the remaining fan. This produces the small cream highlights visible on alternating scale tips.
Important Shaping: The triangular silhouette must continue to widen. If a repeat seems to reduce the side width, add one extra ch-5 loop at each outer edge before the next fan row. At the center point, always maintain a dedicated center loop or ch-3 space.
Rows 39 to 41: Tapered Lower Point
To emphasize the long central point, work one final foundation row of ch-5 loops, but place fans only from approximately one-third of the way in from each side toward the center. Work a center fan (5 dc, ch 3, 5 dc), then mirror. Outline these fans in champagne. This leaves the outer wings slightly lighter and makes the center drape visually longer.
Section Three: Ivory Lace Perimeter
With RS facing, join IVORY at the upper-right corner. Work evenly down the first side edge, around the lower point, and up the opposite side. Do not edge the top neckline yet.
Round/Row A: sc in edge space, ch 4, sk approximately 1 cm (3/8 in) of edge; repeat evenly. At the lower point work (sc, ch 5, sc) in the point space.
Round/Row B: In each ch-4 loop work (sc, ch 3, 2 dc, ch 3, sc). At the lower point loop work (sc, ch 3, 3 dc, picot, 3 dc, ch 3, sc).
Top Neckline: Work one stabilizing row of sc across the top edge, placing approximately 2 sc per row-end space. Do not pull tight. Finish with one row of reverse sc (crab stitch) or simple sl st for a polished edge.
Section Four: Blush and Cream Pearl Fringe
Cut strands 28 to 30 cm (11 to 12 inches) long. Each finished fringe bundle will be about 13 to 14 cm (5 to 5.5 inches) after folding and trimming. Mix blush and ivory strands for a silky two-tone effect.
1. For each bundle, use 6 strands total: 4 blush plus 2 ivory, or alternate ratios for a softer mixed look.
2. Fold bundle in half. Insert hook through a border loop, pull folded center through, then pass all loose ends through the loop and tighten gently.
3. Space bundles approximately every second lace scallop along both sloping sides and more closely near the lower point.
4. For pearl bundles, thread one 5 to 7 mm pearl onto a strong auxiliary thread and stitch it firmly around the head of the fringe knot with 3 to 4 passes. Add pearls to roughly every second or third bundle, keeping the distribution balanced.
5. Trim fringe only after wet blocking and complete drying.
Section Five: Oversized Blush Butterfly Fastening
The butterfly is made as one central body with four separately shaped wings attached around it. Use DUSTY BLUSH for wings, IVORY for the body and picot edging, and CHAMPAGNE for raised surface veins.
Upper Wing (Make 2)
Row 1: With blush, ch 8. Sc in 2nd ch from hook, hdc, dc, 2 tr, dc, hdc. Turn.
Row 2: Ch 1, sc in first st, hdc in next, 2 dc in next, 2 tr in each of next 2 sts, 2 dc in next, hdc, sc. Turn.
Row 3: Ch 2, hdc in first st, dc in next 2, 2 dc in each of next 3 sts, dc in next 2, hdc in last. Turn.
Row 4: Ch 1, sc evenly around the wing, placing 2 sc in each outer corner. Fasten off.
Ivory Edging: Join at lower inner edge; sc in next 2 sts, picot around outer curve only. Fasten off.
Lower Wing (Make 2)
Row 1: With blush, ch 6. Sc in 2nd ch, hdc, dc, tr, 5 tr in last ch; rotate to work back along opposite side of foundation chain: tr, dc, hdc, sc. Join with sl st.
Round 2: Ch 1, sc in next 2 sts, 2 hdc in next 2 sts, 2 dc in next 4 sts around the rounded outer end, 2 hdc in next 2 sts, sc in remaining sts. Join and fasten off.
Ivory Edging: Work sc in next 2 sts, picot around the broad outer edge, leaving the inner attachment edge plain.
Butterfly Body and Antennae
1. With IVORY and 2.5 to 3.0 mm hook, make an MR (magic ring). Work 8 sc into ring; do not join tightly yet.
2. Continue in a narrow spiral for 8 to 10 rounds of 8 sc to form a firm 6 to 7 cm (2.5 inch) body. Lightly stuff with yarn tails if desired, then close the final round by decreasing around.
3. For each antenna, attach ivory at the top, ch 11, sl st back down 9 ch, leaving the final 2 chains as a tiny curled tip. Make second antenna on opposite side.
4. Sew two upper wings beside the top half of the body and two lower wings beside the lower half. Angle upper wings upward about 25 to 35 degrees and lower wings slightly downward.
Champagne Veins and Pearls
Using CHAMPAGNE and a tapestry needle or hook, work surface sl st from the wing base toward each outer curve, making 2 to 3 raised vein lines per upper wing and 1 to 2 per lower wing.
Sew 2 to 4 small pearls near the outer edge of each upper wing and 1 to 2 on each lower wing. Keep pearls away from the exact outermost picot tips so the crochet remains visible. Secure every pearl individually with multiple passes and knot on the wrong side of the wing.
Pale Blush Tassel
1. Wrap blush yarn 24 to 30 times around a 9 cm (3.5 inch) card. Tie firmly at the top and cut the lower loops.
2. Wrap ivory or champagne thread several times around the tassel 1.5 cm (5/8 inch) below the top and knot securely.
3. Trim to 7 to 8 cm (2.75 to 3.25 inches). Sew directly under the butterfly body.
Butterfly Placement and Front Fastening
Place the butterfly on the wearer’s upper-right chest, where the right front edge crosses the floral lace. The butterfly should sit above the heavier scale field so its wings remain distinct.
1. Pin butterfly temporarily with the shawl on a dress form or while worn over clothing. Check that the wings lie flat and do not curl into the neckline.
2. Sew the butterfly body securely through the shawl at 5 to 7 points. Tack the inner 1 cm (3/8 inch) of each wing to the shawl, leaving most of the wing free for dimension.
3. If using a hidden snap, sew one half beneath the butterfly and the other to the corresponding left-front lace section. A small shawl pin may be used instead.
4. Sew the blush tassel beneath the fastening so it hangs vertically from the lower body.
Finishing and Blocking Your Shawl
1. Weave in all tails on the wrong side, changing direction at least once so cotton ends remain secure.
2. Check every scale edge and floral connection. Reinforce any loose joins before blocking.
3. Wet the shawl in cool water with a small amount of wool-safe or delicate wash suitable for your yarn. Press out water without wringing.
4. Block to a broad triangle: pin the upper edge nearly straight, open the floral mesh, shape each side symmetrically, and pull the center point downward to the desired length.
5. Arrange the shell scales so each fan overlaps the row below without folding. Pin the ivory lace points individually if needed.
6. Allow to dry completely before adding or final-adjusting the pearl fringe. Steam only if your yarn label permits it. Never press directly on acrylic pearls.
Size Customization Options
| Desired Result | Adjustment | Where to Change It |
|---|---|---|
| Smaller shawl | Stop floral mesh 2 to 4 rows earlier and make 4 to 5 scale tiers | Rows 7 to 18 and 25 to 38 |
| Larger shoulder span | Add 4-row floral repeat(s) before scales | After Row 18 |
| Longer central point | Add 1 to 2 extra scale tiers focused toward center | Before Rows 39 to 41 |
| Lighter shawl | Use fewer scales and more floral mesh | Upper/lower section balance |
| Less fringe | Place bundles every third scallop | Perimeter finishing |
| More dramatic pearls | Add pearls to every fringe bundle and extra wing tips | Fringe/butterfly only |
Final Assembly Checklist
Before you wear your beautiful creation, run through this checklist:
You Did It!
Thank you so much for choosing this pattern and trusting me to guide you through such an intricate project. This shawl is a true labor of love, and I hope you feel incredibly proud every time you wear it or gift it to someone special. I would absolutely love to see your finished piece! Tag me on Instagram or share in my Facebook group so I can celebrate your gorgeous work.
If this pattern is calling to you for a future project, go ahead and save it to your Pinterest boards so you can find it when you are ready. And please drop a comment below if you make one. I love hearing about your color choices, any modifications you tried, and how the process went for you. Happy crocheting!
Want a Quick & Easy Printable Version?
Get a clean, beautifully formatted PDF of this pattern — easy to follow step by step, ready to print or save on any device. No scrolling, no distractions, just the pattern.
Get the Printable PDF →