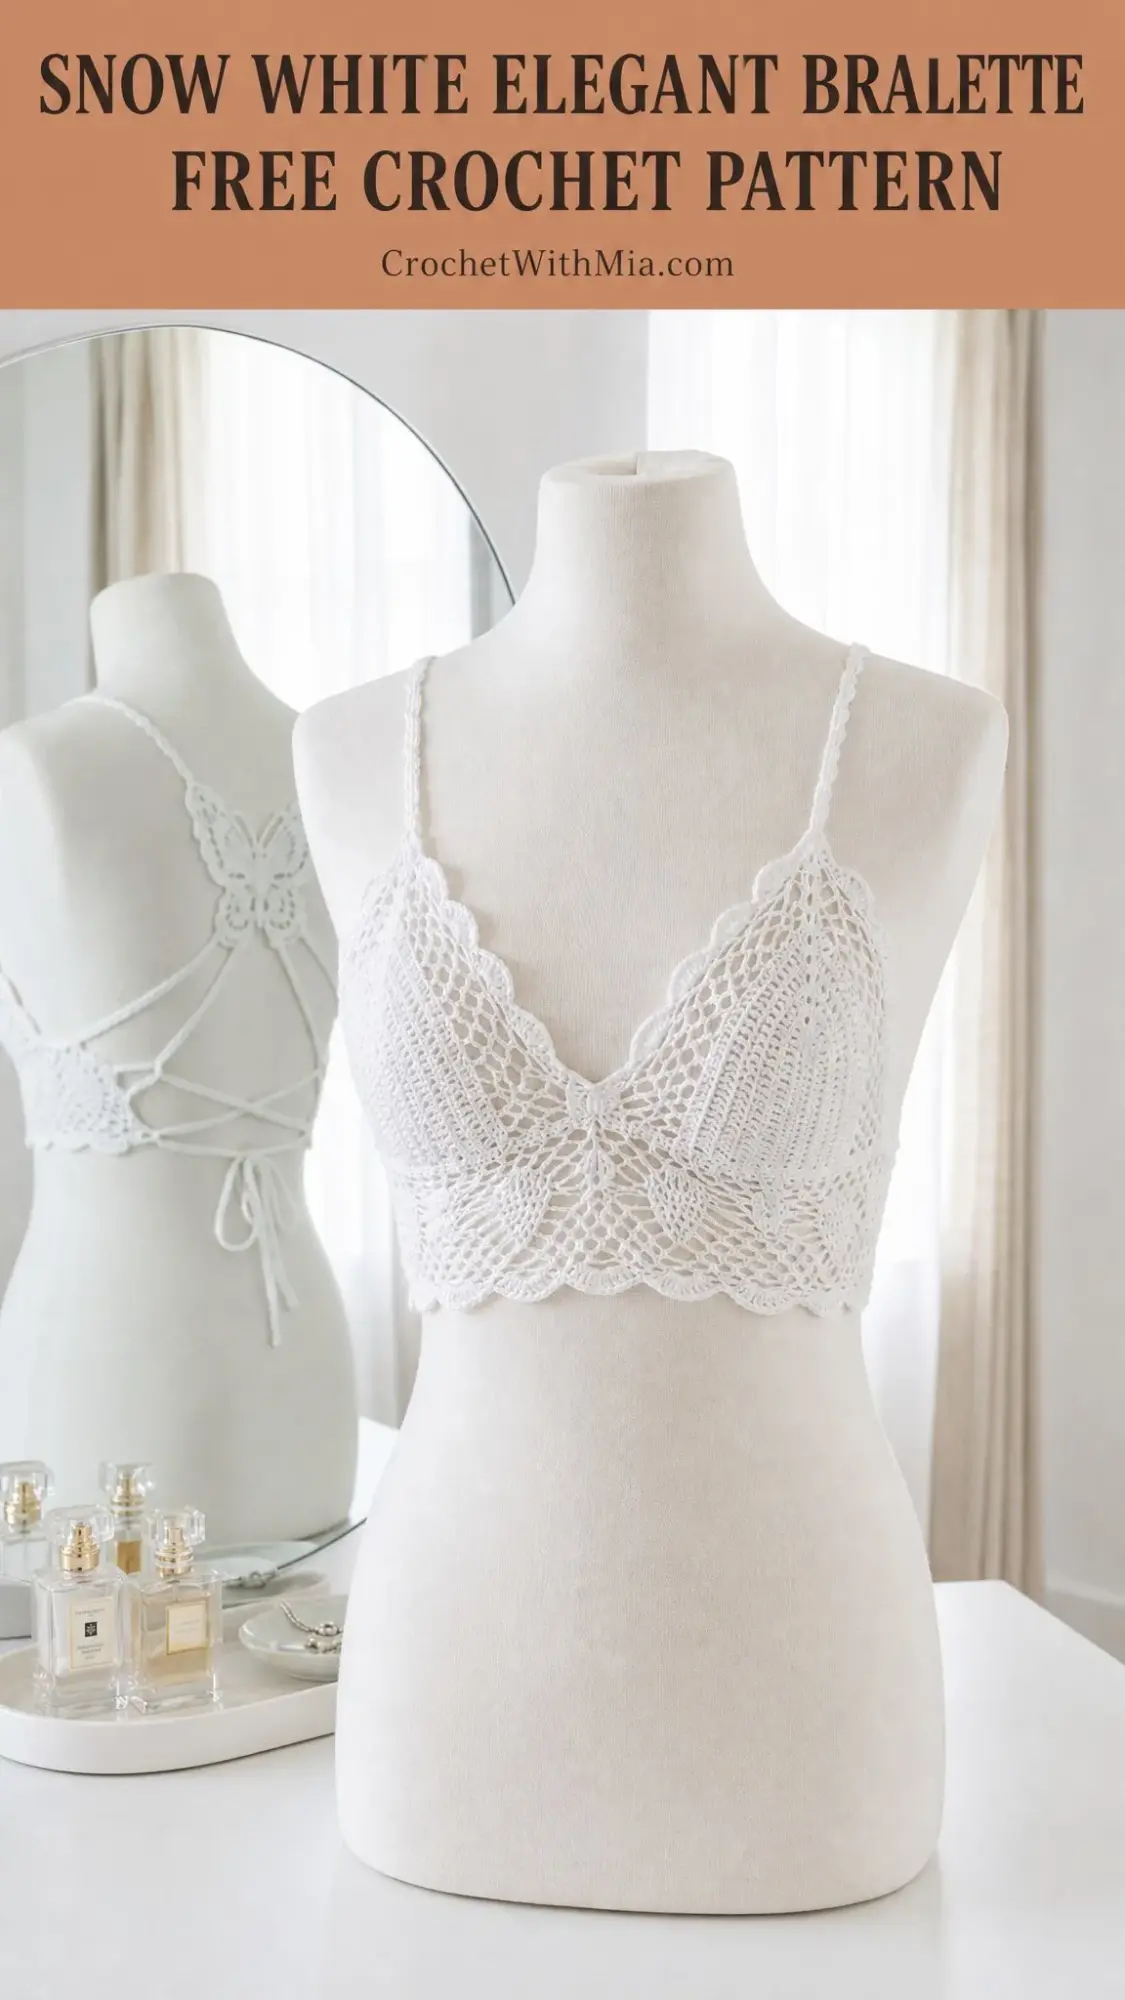
Last summer, my best friend called me in a mild panic. She had a beach vacation coming up, found the perfect white linen pants, but could not find a bralette that felt romantic enough to peek out from under her loose tank tops. She wanted something delicate, a little bit dreamy, with that handmade look you simply cannot buy off a rack. So I grabbed my hook, some soft cotton yarn, and got to work. The result was this Snow White Elegant Bralette, and honestly, it exceeded both our expectations. The crossed cord straps at the back, the sweet butterfly accent, and those scalloped edges made her feel like she was wearing something truly special. Now I am sharing it with you.
Get the Ad-Free PDF Pattern
You can find the free pattern below, or you can purchase the ad-free printable PDF from my shop.
Get the Printable PDF →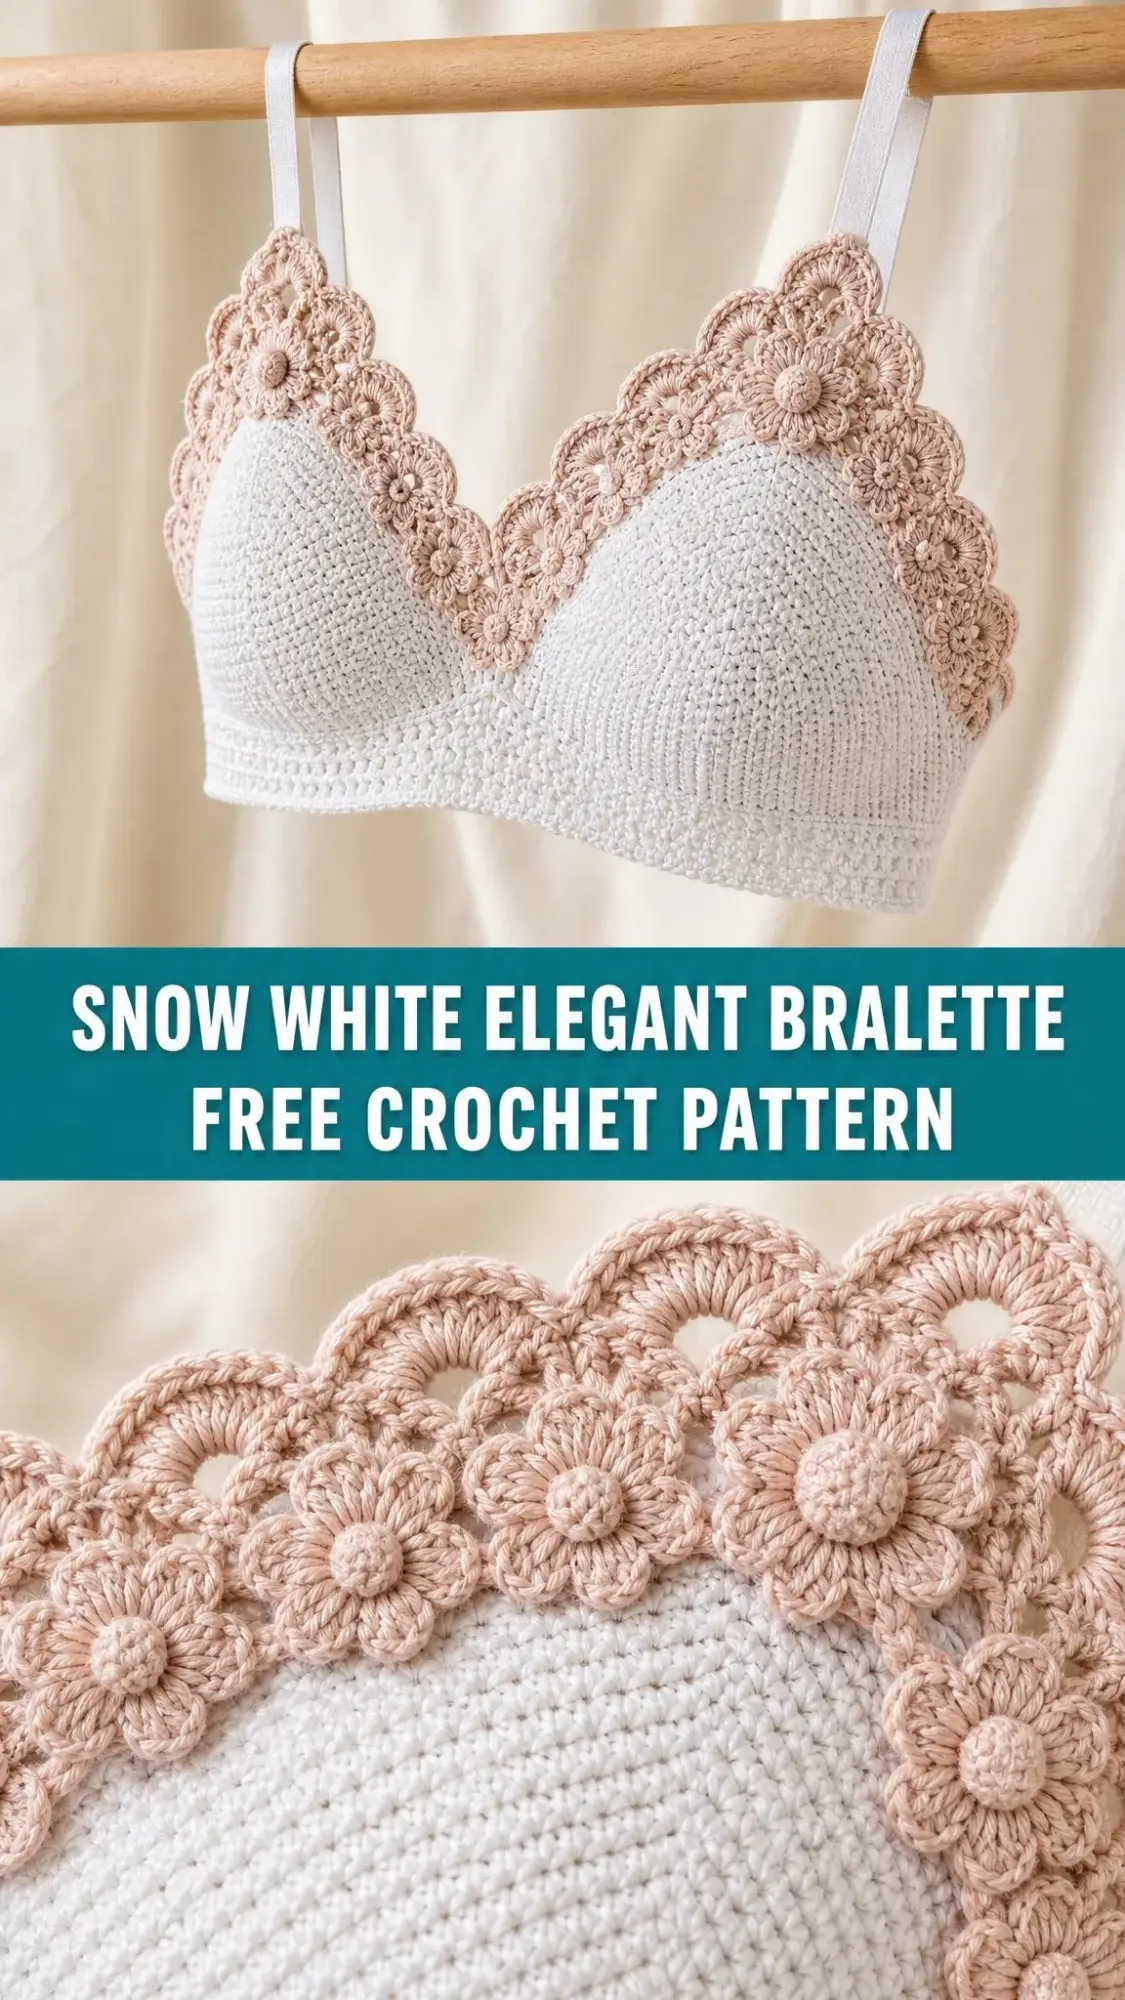
This intermediate crochet pattern creates a delicate lace bralette featuring shaped triangle cups, a firm underbust band with beautiful scalloped edging, adjustable lace-up back ties, and an adorable crocheted butterfly motif. The fabric is intentionally airy and decorative, perfect for layering over a camisole, bandeau, or swimsuit top. If you have been wanting to try your hand at crocheted lingerie or festival wear, this project is the perfect place to start.
What You Will Need: Materials and Tools
Before you begin, gather these supplies. Having everything ready makes the process so much smoother.
Yarn: You will need 300 to 360 yards (275 to 330 meters) of fingering or fine sport weight cotton blend yarn in white or ivory. The pattern suggests Scheepjes Catona 4-ply, Paintbox Cotton 4-ply, or Hobbii Rainbow Cotton 8/4. Look for a smooth, washable cotton or cotton-bamboo blend that blocks crisply and holds lace definition well.
Hook: A 3.0 mm (US C/2) crochet hook, or whatever size you need to achieve gauge.
Notions: Locking stitch markers, a tapestry needle, pins, a blocking mat, and measuring tape.
Optional: Soft lining cups or removable pads, 2 small rings, and 2 clasps if you prefer a more structured closure.
Gauge: Please Do Not Skip This Step
I know swatching feels tedious, but it matters so much for a fitted garment like this bralette. Your gauge determines whether this will fit beautifully or end up in your unfinished project pile.
For the cup fabric: 21 double crochet (dc) stitches and 13 dc rows equals 4 inches (10 cm) after light blocking.
For the band: 23 single crochet (sc) stitches and 26 sc rows equals 4 inches (10 cm) in firm single crochet.
Checkpoint: After completing Cup Row 20, one cup should measure about 7.75 inches (19.5 cm) across the base and 6.25 inches (16 cm) tall. If yours is larger, try a smaller hook. If it is smaller, go up a hook size.
Finished Size and Fit
The finished bralette has a cup base of approximately 7.75 inches (19.5 cm) each, with a cup height of about 6.25 inches (16 cm). The front underbust measures roughly 16.25 inches (41.5 cm) before back lacing.
This size fits approximately a 30 to 34 inch (76 to 86 cm) bust measurement. The adjustable back ties allow you to customize the fit with negative-to-zero ease, meaning it will hug your body rather than hang loose.
Time estimate: Plan for about 5 to 7 relaxed hours of crocheting.
Abbreviations and Stitch Guide
Let me walk you through all the abbreviations and special stitches you will encounter. If you are newer to reading patterns, bookmark this section.
ch = chain (wrap yarn over hook, pull through loop)
sl st = slip stitch (insert hook, yarn over, pull through both loops at once)
sc = single crochet (insert hook, yarn over, pull up a loop, yarn over, pull through both loops)
hdc = half double crochet (yarn over, insert hook, pull up loop, yarn over, pull through all 3 loops)
dc = double crochet (yarn over, insert hook, pull up loop, yarn over, pull through 2 loops, yarn over, pull through remaining 2 loops)
tr = treble crochet (yarn over twice, insert hook, pull up loop, then yarn over and pull through 2 loops three separate times)
st/sts = stitch/stitches
sp = space
RS = right side
WS = wrong side
rep = repeat
UK crocheters note: US sc equals UK dc, and US dc equals UK tr.
Special Stitches
Picot: Chain 3, then slip stitch in the third chain from hook. This creates a tiny decorative bump.
Shell: Work 5 dc in the indicated stitch or space. Shells create that beautiful scalloped look.
Scallop: Skip 2 stitches, work a shell in the next stitch, skip 2 stitches, slip stitch in the next stitch.
Butterfly cluster: A group of tall stitches worked into one ring to form a wing. Keep the ring loose until all wings are complete.
Construction Overview
Understanding how this bralette comes together helps the instructions make more sense. Here is the order of operations:
1. Make two triangle cups
2. Join cups with a narrow center bridge
3. Work the underbust band across both cup bases
4. Add scalloped edging to the cup neckline and lower band
5. Make two shoulder cords and two back ties
6. Create the butterfly motif
7. Attach all pieces and block
Triangle Cups: Make 2
Each cup starts at the point and increases outward to create the triangle shape. The beginning chain 3 counts as 1 dc throughout.
Foundation: Ch 4.
Row 1: 2 dc in 4th ch from hook. (3 dc)
Row 2: Ch 3, dc in same st, dc in each st across to last st, 2 dc in last st. Turn. (3 dc)
Row 3: Ch 3, dc in same st, dc in each st across to last st, 2 dc in last st. Turn. (5 dc)
Row 4: Ch 3, dc in same st, dc in each st across to last st, 2 dc in last st. Turn. (7 dc)
Row 5: Ch 3, dc in same st, dc in each st across to last st, 2 dc in last st. Turn. (9 dc)
Row 6: Ch 3, dc in same st, dc in each st across to last st, 2 dc in last st. Turn. (11 dc)
Row 7: Ch 3, dc in same st, dc in each st across to last st, 2 dc in last st. Turn. (13 dc)
Row 8: Ch 3, dc in same st, dc in each st across to last st, 2 dc in last st. Turn. (15 dc)
Row 9: Ch 3, dc in same st, dc in each st across to last st, 2 dc in last st. Turn. (17 dc)
Row 10: Ch 3, dc in same st, dc in each st across to last st, 2 dc in last st. Turn. (19 dc)
Row 11: Ch 3, dc in same st, dc in each st across to last st, 2 dc in last st. Turn. (21 dc)
Row 12: Ch 3, dc in same st, dc in each st across to last st, 2 dc in last st. Turn. (23 dc)
Row 13: Ch 3, dc in same st, dc in each st across to last st, 2 dc in last st. Turn. (25 dc)
Row 14: Ch 3, dc in same st, dc in each st across to last st, 2 dc in last st. Turn. (27 dc)
Row 15: Ch 3, dc in same st, dc in each st across to last st, 2 dc in last st. Turn. (29 dc)
Row 16: Ch 3, dc in same st, dc in each st across to last st, 2 dc in last st. Turn. (31 dc)
Row 17: Ch 3, dc in same st, dc in each st across to last st, 2 dc in last st. Turn. (33 dc)
Row 18: Ch 3, dc in same st, dc in each st across to last st, 2 dc in last st. Turn. (35 dc)
Row 19: Ch 3, dc in same st, dc in each st across to last st, 2 dc in last st. Turn. (37 dc)
Row 20: Ch 3, dc in same st, dc in each st across to last st, 2 dc in last st. Turn. (39 dc)
Cup Lace Overlay
With RS facing and the base at the bottom, join yarn at the lower right edge. Work evenly up the side edge, placing (sc, ch 3, sc) around every second row-end until you reach the cup point. Work a picot at the point, then repeat the (sc, ch 3, sc) pattern down the opposite side. Across the base, work 1 sc in each dc. Fasten off. Repeat for the second cup.
Checkpoint: Each cup should have 41 dc along the base before edging. The two lower points should match in height and width.
Join Cups and Underbust Band
Place both cups side by side with lower edges level and inner lower corners touching. With RS facing, join yarn at the outer lower corner of Cup A.
Bridge: Sc across Cup A base, ch 3 for center bridge, sc across Cup B base. Turn. (85 sc/ch positions)
Band Row 1: Ch 1, sc in each st and ch across, working 1 sc in each bridge ch. Turn. (85 sc)
Rows 2 through 5: Ch 1, sc in each st across. Turn after each row. (85 sc)
Row 6: Ch 1, sc in first st, ch 2, skip 2, shell in next st, ch 2, skip 2, sc in next st; rep from across. (14 shells + 15 sc anchors)
Row 7: Ch 1, sc in first sc, 2 sc in ch-2 sp, sc in each of next 5 dc, 2 sc in ch-2 sp, sc in next sc; rep from across. (141 sc)
Row 8: Ch 1, sc in each st across. Fasten off. (141 sc)
Why does the band expand? Row 7 fills the shell row into a soft scalloped lower edge. Keep Row 8 relaxed so the band lies flat after blocking.
Cup Neckline Edging
Join yarn at the outer top side of one cup. Work scallops evenly along the neckline edge to the point, work a picot at the point, then scallop down the inner neckline. Repeat on the second cup. Use the row-end sc/ch loops as your placement guide.
Shoulder Straps
At each cup point, ch 70. Sc in second ch from hook and each ch back. Sl st to cup point and fasten off. Each strap measures 69 sc. Cross straps at the back before tying or stitching to the band corners.
Back Ties and Butterfly Accent
Back Ties
Join yarn to one outer band corner. Ch 120, sc in second ch from hook and each ch back, sl st to band corner. Fasten off. Repeat at the opposite band corner. Each tie measures 119 sc. For longer ties, add chains in multiples of 5.
Butterfly Motif
Round 1: Make a magic ring. Ch 4, 5 tr in ring, ch 4, sl st in ring for first upper wing. Repeat once for second upper wing. (2 upper wings)
Round 2: Ch 3, 4 dc in ring, ch 3, sl st in ring for first lower wing. Repeat once for second lower wing. (2 lower wings)
Round 3: Tighten ring. Ch 12 for antenna, sl st in second ch and next 10 ch, sl st into ring. Repeat for second antenna. Fasten off. (2 antennae)
Round 4: Wrap yarn twice around the center, knot at back, and sew butterfly to the upper back strap crossing. (centered motif)
Size Customization Tips
For more cup coverage: Add cup rows before edging. Each extra row adds 2 dc to the cup base and about 0.31 inches (0.8 cm) in height.
For less coverage: Stop after Row 18 for a 37 dc base.
Recalculating the band: If you change cup size, recalculate the first band count as Cup A base + 3 bridge chains + Cup B base. Choose a shell row only when the count equals a multiple of 6 plus 1. If your count does not work out, add or subtract bridge chains until it does.
Fit tip: The open back is intentionally adjustable. Pin straps while wearing the bralette over your intended layer, then sew or tie them in place.
Finishing and Blocking
Weave in all ends securely on the WS. Wet-block gently by soaking for 10 minutes, rolling in a towel, then pinning cups symmetrically on your blocking mat. Open the scallops with pins but do not overstretch the band. Let dry fully before trying on.
If you are adding lining cups, hand-stitch them only to the inside cup edges so the lace remains visible from the outside.
Care Instructions
Hand wash in cool water with mild soap. Press dry in a towel and reshape flat. Do not wring or twist the fabric. Store flat or folded gently so the cup points and butterfly do not crease.
Troubleshooting Common Issues
Cup curls inward: Block more firmly and loosen your beginning chains. A slight curve is normal on a shaped cup.
Cup is too shallow: Add 1 to 3 cup rows before edging and lengthen the straps accordingly.
Band ruffles: Work Row 8 with a smaller hook, or skip Row 7 entirely and use a plain sc band.
Band pulls tight: Use a larger hook for band rows, or add bridge chains until the front sits smoothly.
Back butterfly tilts: Pin the crossed straps first, then sew the butterfly through the strap crossing and not just the motif itself.
A Note for Left-Handed Crocheters
Work the same instructions as written. Your cups and straps will mirror the photos naturally. When crossing straps at the back, cross them in the direction that feels comfortable and keeps the butterfly centered.
Final Thoughts on This Crochet Bralette Pattern
This Snow White Elegant Bralette pattern combines delicate lace techniques with practical construction for a piece that looks far more complicated than it actually is. The triangle cups grow predictably, the band provides structure, and those finishing touches like the scalloped edging and butterfly accent transform simple stitches into something truly romantic. Whether you make it for yourself, a friend, or as a special gift, this bralette is the kind of handmade piece that makes people ask, "You made that yourself?"
Thank you so much for choosing this pattern for your next project. I hope you love making it as much as I loved designing it. If you complete your bralette, I would absolutely love to see it! Tag me on Instagram or share a photo in our Facebook group. Seeing your finished makes is genuinely one of my favorite parts of sharing patterns.
Do not forget to pin this Snow White Elegant Bralette crochet pattern to your Pinterest boards so you can find it when you are ready to start. And if you have any questions along the way or want to share your progress, drop a comment below. Happy hooking!
Want a Quick & Easy Printable Version?
Get a clean, beautifully formatted PDF of this pattern — easy to follow step by step, ready to print or save on any device. No scrolling, no distractions, just the pattern.
Get the Printable PDF →