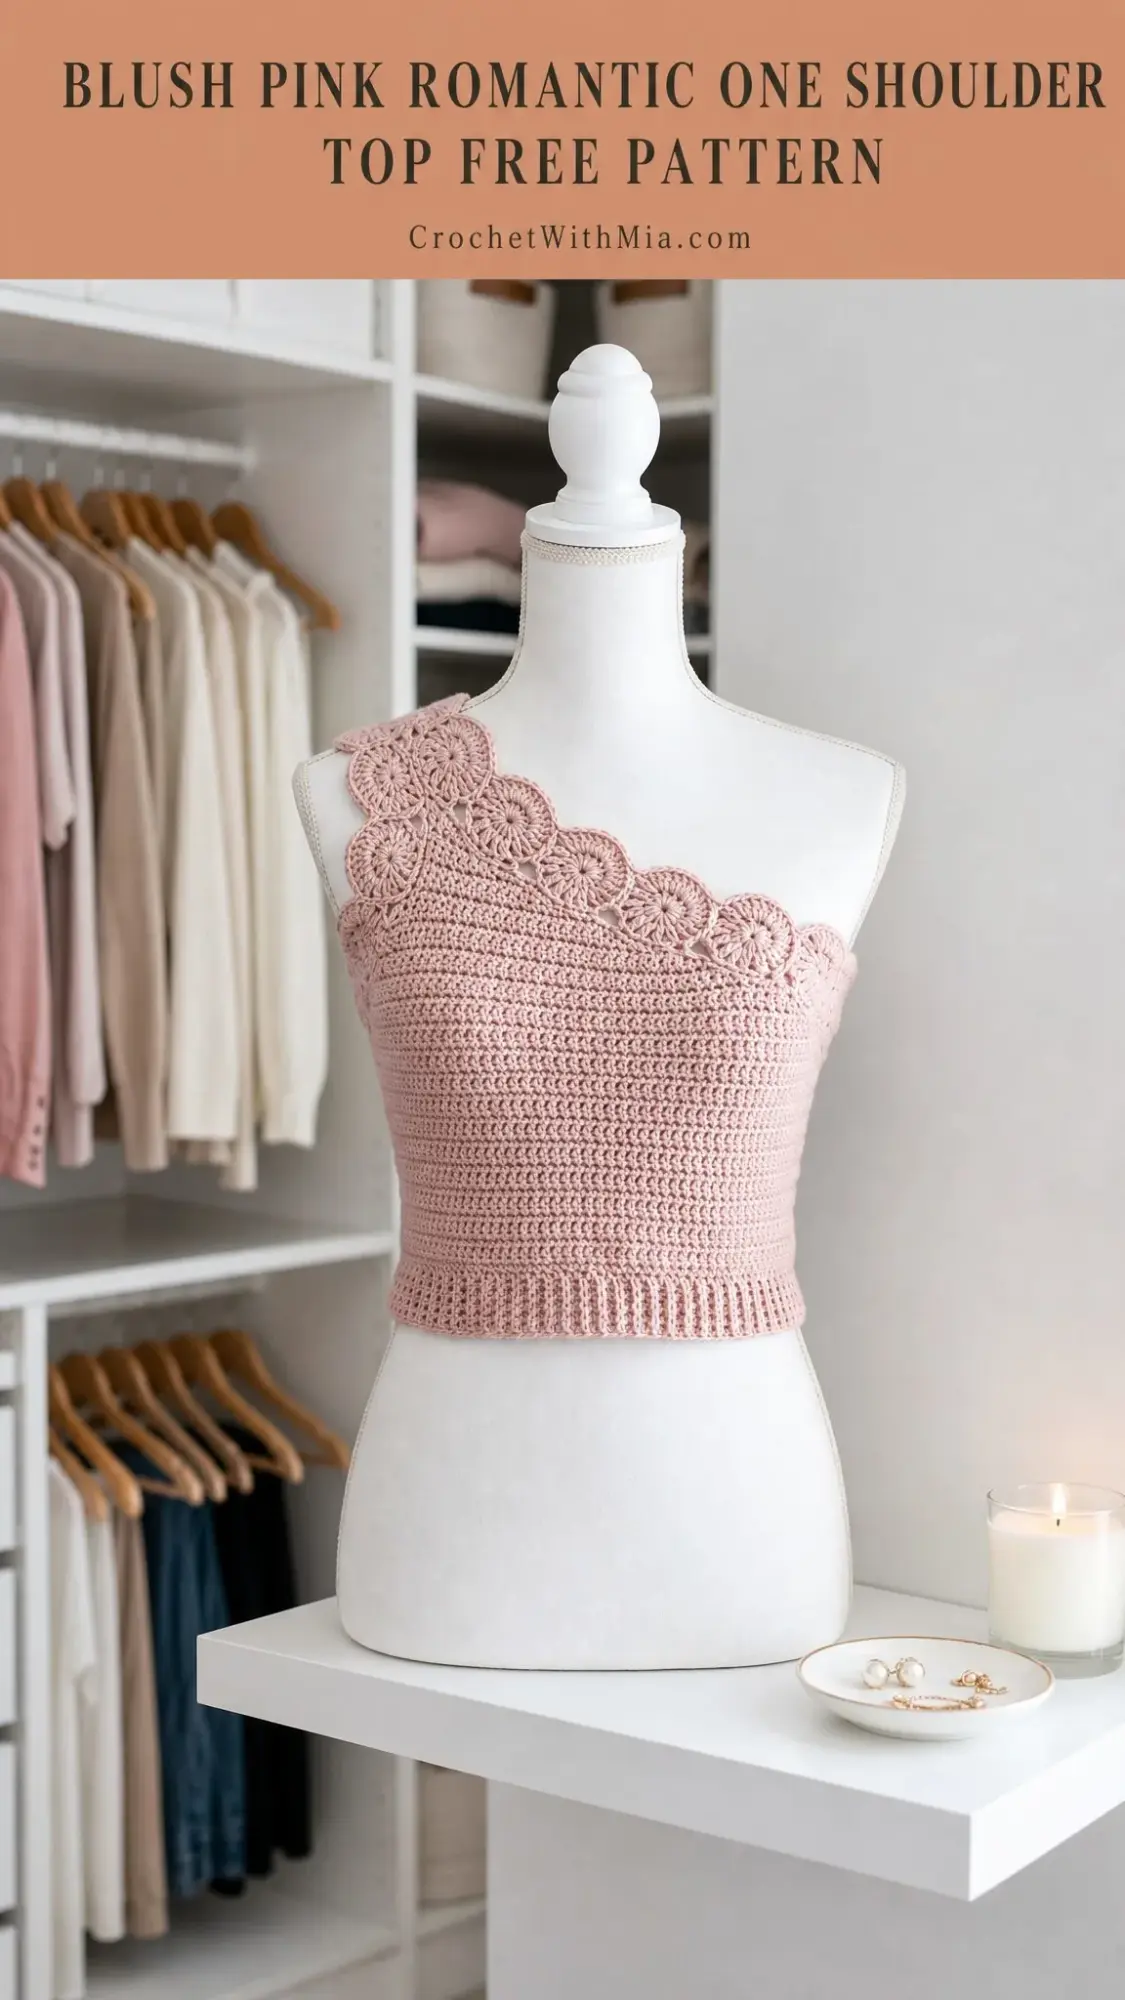
I’ve been searching for the perfect summer crochet top pattern for months, and this one immediately caught my eye. The diagonal neckline, the delicate floral trim, the fitted silhouette. This is my favourite kind of project: sophisticated enough to feel special, but constructed in a way that makes sense once you understand the flow.
Get the Ad-Free PDF Pattern
You can find the free pattern below, or you can purchase the ad-free printable PDF from my shop.
Get the Printable PDF →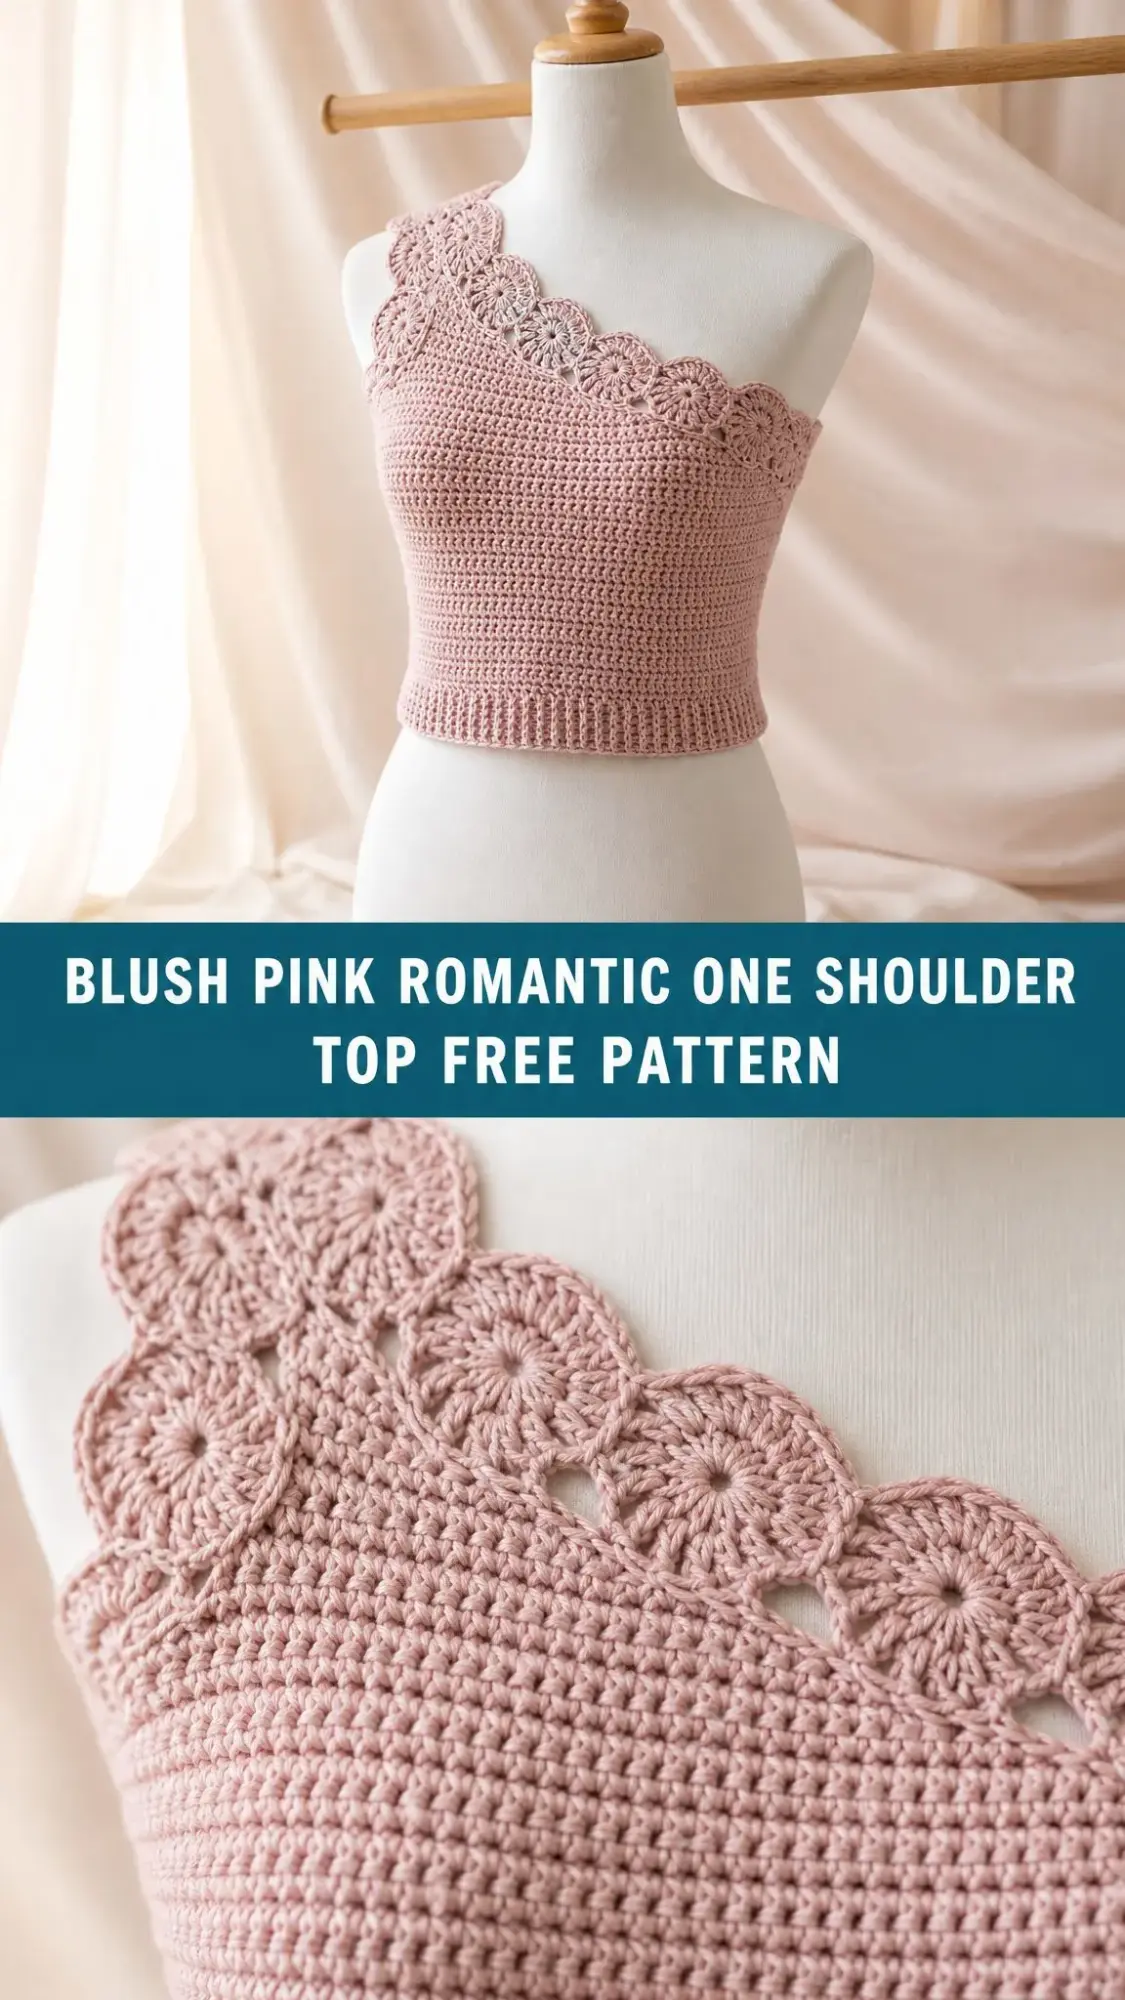
This Blush Pink Romantic One Shoulder Top combines a stretchy ribbed hem, a compact moss stitch body, and sweet six-petal flower motifs along the neckline. The result is a cropped top that looks far more complicated than it actually is. If you’ve been wanting to try garment construction but felt intimidated, this pattern breaks everything into manageable stages with clear checkpoints along the way.
Let me walk you through everything you need to know to make this beautiful piece.
What Makes This Crochet Top Special
This isn’t your average summer top pattern. The construction method is clever and satisfying. You start with a ribbed band worked sideways, then pick up stitches along the edge and work the body in joined turned rounds. The upper section transitions to flat shaping, creating that gorgeous diagonal one-shoulder line. Finally, you add handmade flower motifs along the entire neckline and strap.
The moss stitch body creates a compact, slightly textured fabric that holds its shape beautifully. Combined with the stretchy back-loop rib hem, you get a fitted top that moves with you and stays put where it should.
This pattern is rated intermediate level. You should be comfortable with gauge swatching, working into rib edges, joined turned rounds, shaping a diagonal neckline, making motifs, and seaming a fitted garment. Don’t let that list scare you though. Each technique builds on the last, and I’ll explain everything as we go.
Finished Measurements and Fit
Before you start, let’s talk sizing. The finished measurements for this pattern are:
This top is designed with 1 to 3 inches (2.5 to 7.5 cm) of negative ease at the bust. That means it fits snugly against your body rather than draping loosely. Choose your size based on your actual bust measurement, understanding that the finished garment will be slightly smaller to create that fitted look.
The pattern includes customization instructions for other sizes, which I’ll cover later in this article.
Materials You’ll Need
Gather these supplies before you begin:
Yarn:
Hooks:
Tools:
Optional:
Yarn Suggestions
Here are some yarns that work beautifully for this project:
When substituting yarn, choose something that meets gauge and has enough memory to hold a fitted top. Very slippery or heavy yarns may cause the neckline to slip, which is when you’d want to add that optional elastic.
Gauge Information
Body gauge in moss stitch, blocked:
18 stitches and 22 rows = 4 inches / 10 cm
Rib gauge:
8 single crochet back loop only stitches = approximately 1.6 inches / 4 cm tall
One flower motif:
Approximately 1.25 to 1.4 inches / 3 to 3.5 cm across after blocking
Every fitted measurement in this pattern depends on matching both stitch gauge AND row gauge. Please swatch before starting and change hook sizes until your swatch matches.
Abbreviations and Stitch Guide
This pattern uses US crochet terminology. Here are all the abbreviations you’ll encounter:
| Abbreviation | Meaning |
|---|---|
| ch | chain |
| sc | single crochet |
| dc | double crochet |
| sl st | slip stitch |
| blo | back loop only |
| st(s) | stitch(es) |
| sp | space |
| RS / WS | right side / wrong side |
| rep | repeat |
| rnd / row | round / row |
Special Stitches Explained
Back-Loop Rib:
Work each single crochet (sc) through the back loop only. This creates vertical ridges that stretch horizontally, perfect for a waistband that hugs your body.
Moss Stitch:
This creates a beautiful, compact texture. Start with an even number of stitches. The pattern unit is: sc in next stitch or chain space, ch 1, skip next stitch. On following rows or rounds, work each sc into the ch-1 space below. Count each sc and each ch-1 as one stitch.
Six-Petal Flower Motif:
Note for left-handed crocheters: Work all shaping as written, but your diagonal will naturally mirror the photos. To match the shown shoulder direction, seam the opposite side or turn the finished top inside out before attaching motifs.
Pattern Instructions
Fit and Measurement Checkpoints
Use these checkpoints to make sure you’re on track:
| Stage | Target Measurement |
|---|---|
| Rib band loop | 33.25 in / 84.5 cm around, 1.6 in / 4 cm tall |
| After body rnd 28 | Approx. 6.7 in / 17 cm from top of rib |
| After upper shaping | Approx. 11 in / 28 cm at shoulder side and 7.3 in / 18.5 cm at low underarm side |
| Flower trim | 17 flowers placed evenly along diagonal neckline and shoulder strap |
Section 1: Ribbed Hem Band
With the smaller hook (US D/3 / 3.25 mm), ch 9.
Row 1: Sc in 2nd ch from hook and in each ch across. Turn. (8 sc)
Rows 2 through 150: Ch 1, sc blo in each st across. Turn. (8 sc)
Join the short ends with sl st through both layers, forming a loop. Do not twist the band. Turn the rib so one long edge faces upward.
Checkpoint: Your band should measure about 33.25 inches / 84.5 cm around before adding the body fabric.
Section 2: Pick Up for Body
Switch to the larger hook (US E/4 / 3.5 mm).
Rnd 1: Ch 1. Work 1 sc into the end of each rib row around. Sl st to first sc. Turn. (150 sc)
Rnd 2: Ch 1, sc in first st, ch 1, skip next st, sc in next st; rep from to last st, ch 1, skip last st, sl st to first sc. Turn. (75 sc + 75 ch-1 sps = 150 sts)
Rnd 3: Ch 1, sc in first ch-1 sp, ch 1, sc in next ch-1 sp; rep from around, ch 1, sl st to first sc. Turn. (150 sts)
Rnds 4 through 28: Repeat Rnd 3. (150 sts each rnd)
Here’s a quick summary of your body section:
| Body Section | Operation | Count |
|---|---|---|
| Pick-up rnd | 1 sc in each of 150 rib rows | 150 sc |
| Moss set-up | 75 moss units | 150 sts |
| Rnds 3-28 | Maintain moss stitch | 150 sts each rnd |
Section 3: Diagonal One-Shoulder Shaping
Place a marker at the side seam. The marked side will become the high shoulder side. From this point, you’ll work flat instead of in rounds.
Keep the moss pattern aligned by working each sc into the next ch-1 sp and chaining over each skipped stitch.
Rows 29 through 48: At the start of each row, sl st loosely across 4 sts, ch 1, work moss stitch across remaining sts. Turn.
Your stitch counts reduce by 4 stitches each row:
| Row | Math | Count | Row | Math | Count |
|---|---|---|---|---|---|
| 29 | 150 – 4 | 146 | 40 | 106 – 4 | 102 |
| 30 | 146 – 4 | 142 | 41 | 102 – 4 | 98 |
| 31 | 142 – 4 | 138 | 42 | 98 – 4 | 94 |
| 32 | 138 – 4 | 134 | 43 | 94 – 4 | 90 |
| 33 | 134 – 4 | 130 | 44 | 90 – 4 | 86 |
| 34 | 130 – 4 | 126 | 45 | 86 – 4 | 82 |
| 35 | 126 – 4 | 122 | 46 | 82 – 4 | 78 |
| 36 | 122 – 4 | 118 | 47 | 78 – 4 | 74 |
| 37 | 118 – 4 | 114 | 48 | 74 – 4 | 70 |
| 38 | 114 – 4 | 110 | 49 | Work even | 70 |
| 39 | 110 – 4 | 106 |
Row 49: Ch 1, work even in moss stitch across the remaining shoulder edge. Turn. (70 sts)
Fasten off. The diagonal edge will look stepped right now, but don’t worry. The flower trim will soften that line into beautiful scallops.
Section 4: Flower Motifs
Make 17 motifs using the smaller hook (US D/3 / 3.25 mm). Each motif has 12 sc in Round 1 and 6 petals in Round 2. Block them lightly before attaching.
Motif Placement:
| Placement | Number of Motifs |
|---|---|
| Front diagonal neckline | 7 |
| Over-shoulder strap curve | 5 |
| Back diagonal neckline | 5 |
Attach motifs edge-to-edge along the diagonal upper edge with the center holes facing outward. Sew through the back loops of neighboring petals and the top edge of the bodice. Keep your attachment smooth, not stretched.
Finishing Your Top
Before weaving in ends: Try on the top first. Adjust the motif spacing so the strap sits comfortably over your shoulder.
Seaming: Close any small gap at the high side using mattress stitch.
Optional security edge: With the smaller hook, work 1 round of sl st along the inside upper edge, easing in clear elastic as you go. This helps if your yarn is slippery.
Weave in all ends on the wrong side. Steam lightly or wet block flat to measurements.
Blocking Tips
Pin the rib band straight. Smooth the bodice without overstretching. Arrange the flower petals into rounded scallops. Let everything dry completely before wearing.
Care Instructions
Troubleshooting Common Issues
| Issue | Fix |
|---|---|
| Top feels loose | Use optional elastic inside upper edge or remove 2-4 rib rows before joining band |
| Top feels tight | Add rib rows in multiples of 2, then pick up the same number of body sts |
| Moss stitch leans | Turn after every joined round and keep sc worked into ch-1 spaces |
| Diagonal edge looks jagged | Block first; motifs are designed to cover the step shaping |
| Motifs ripple | Use fewer attachment stitches or block motifs flatter before sewing |
How to Customize the Size
At gauge, 18 stitches = 4 inches / 10 cm, so 4.5 stitches = 1 inch / 2.5 cm.
Work the rib band to your desired finished bust circumference using an even number of rib rows. Pick up 1 body stitch per rib row. Keep the final stitch count even for moss stitch.
| Desired Finished Bust | Rib Rows / Body Sts | Yardage Guide |
|---|---|---|
| 31.5 in / 80 cm | 142 | 390-470 yd / 357-430 m |
| 33.25 in / 84.5 cm | 150 | 430-520 yd / 393-475 m |
| 35.5 in / 90 cm | 160 | 485-585 yd / 443-535 m |
| 37.25 in / 94.5 cm | 168 | 540-650 yd / 494-594 m |
For the upper shaping, subtract 4 stitches at the start of each shaping row until the shoulder edge is 44 to 48% of your starting body count. Keep the final shoulder count even.
Length adjustments: Add or remove body rounds before the shaping section. Each 5 to 6 rounds changes length by about 1 inch / 2.5 cm after blocking.
Final Thoughts on This One Shoulder Crochet Top Pattern
This Blush Pink Romantic One Shoulder Top is the kind of project that makes you feel like a real garment maker. The construction is logical, the checkpoints keep you on track, and the finished piece looks absolutely stunning.
Take your time with gauge swatching. Trust the measurements. And don’t skip the blocking step, because it really does transform the finished top.
Thank you so much for choosing this pattern. I hope you love making it as much as I loved putting this tutorial together for you.
If you make this top, I would absolutely love to see it! Save this pattern to your Pinterest boards so you can find it when you’re ready to start, and please leave a comment below to share your finished project or ask any questions. Your photos and feedback mean the world.
Want a Quick & Easy Printable Version?
Get a clean, beautifully formatted PDF of this pattern — easy to follow step by step, ready to print or save on any device. No scrolling, no distractions, just the pattern.
Get the Printable PDF →