Puff stitches look intimidating, don’t they? All those yarn overs, all those loops on your hook at once. I completely understand. But here’s the truth: if you can work a half double crochet, you already have the foundation for this stitch. The puff is simply that motion repeated a few times in the same spot before you close everything up. This Butter Yellow Puff Stitch Shoulder Top breaks down every step so you can tackle those plush, rounded stitches with confidence. Whether you’ve never tried a puff stitch before or you’ve made dozens, this pattern guides you through a stunning one-shoulder cropped top that looks far more complex than it actually is.
Get the Ad-Free PDF Pattern
You can find the free pattern below, or you can purchase the ad-free printable PDF from my shop.
Get the Printable PDF →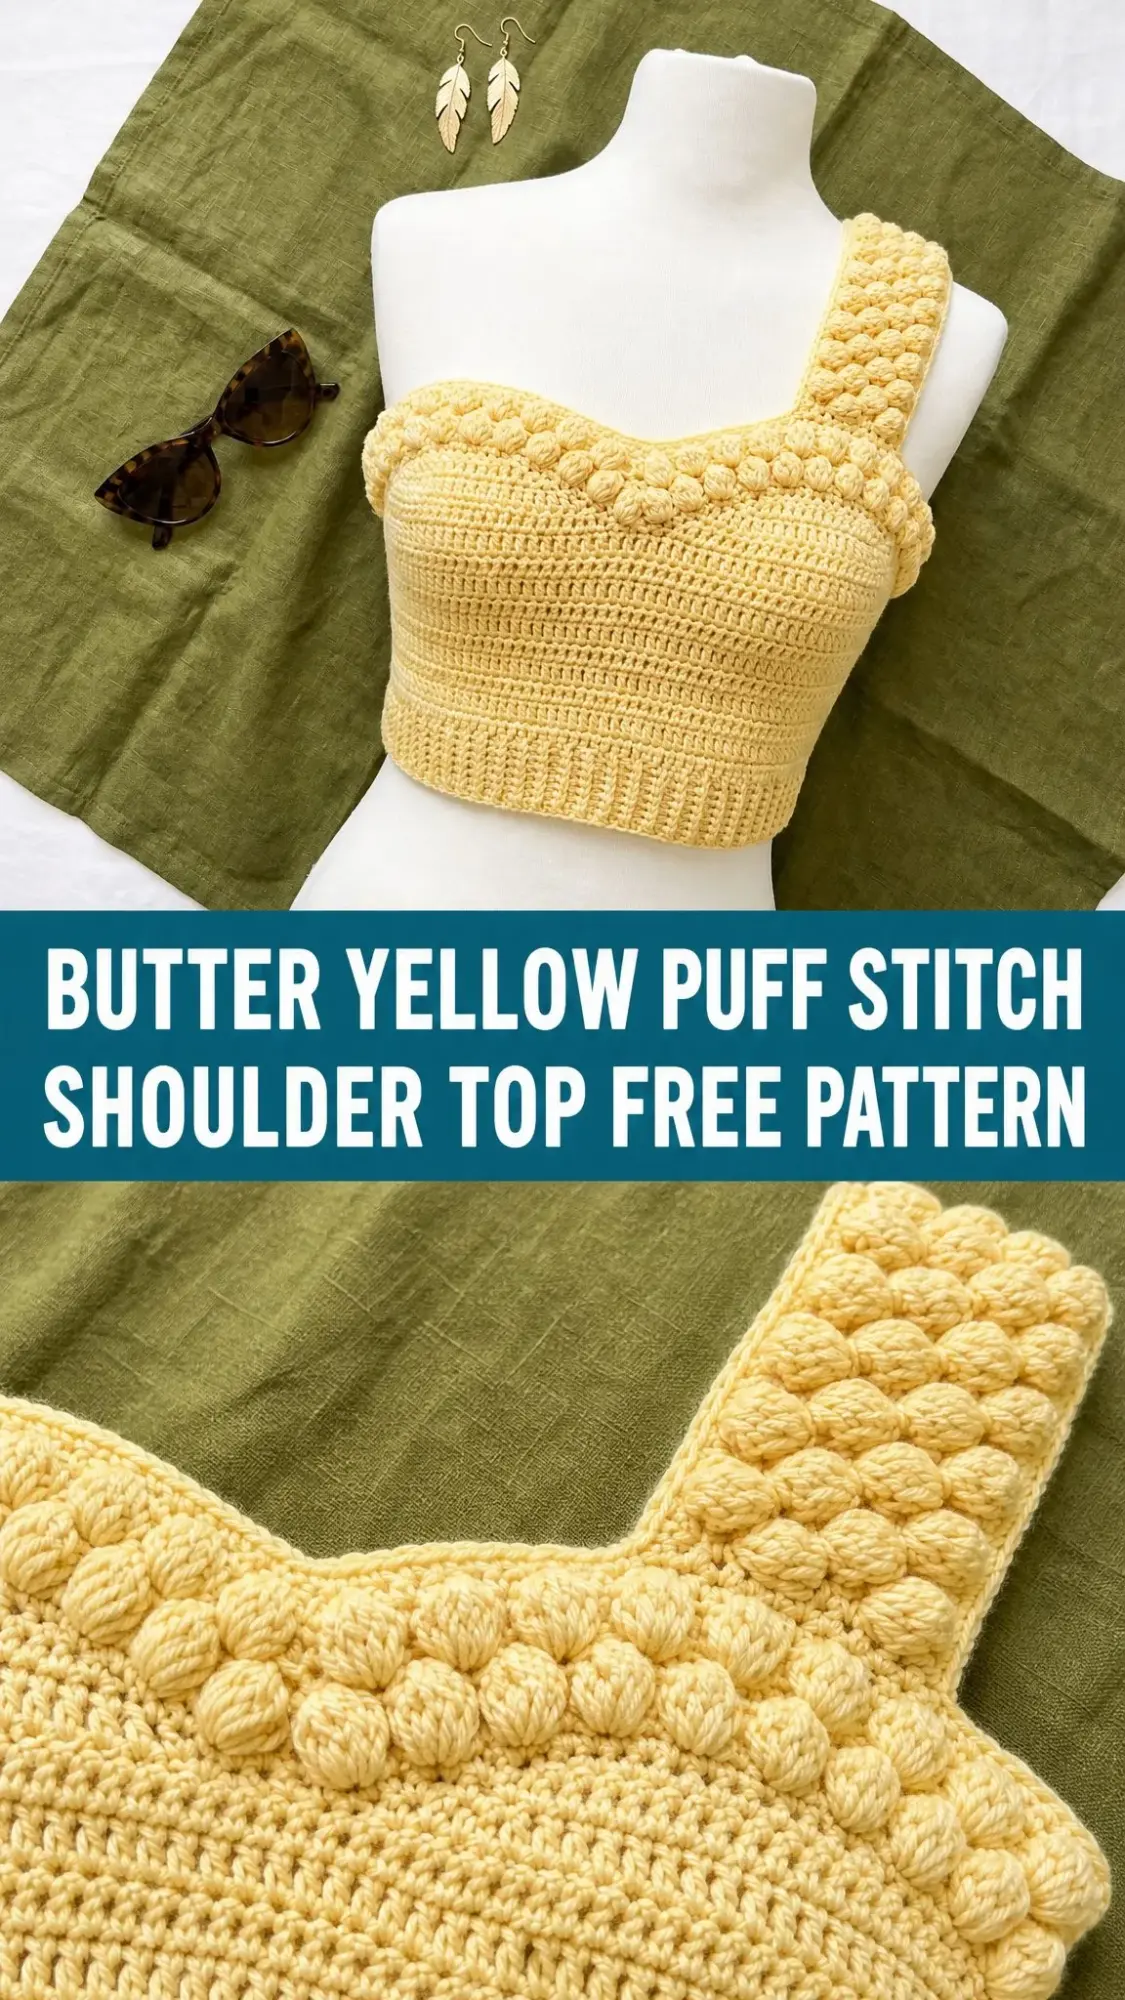
About This Pattern
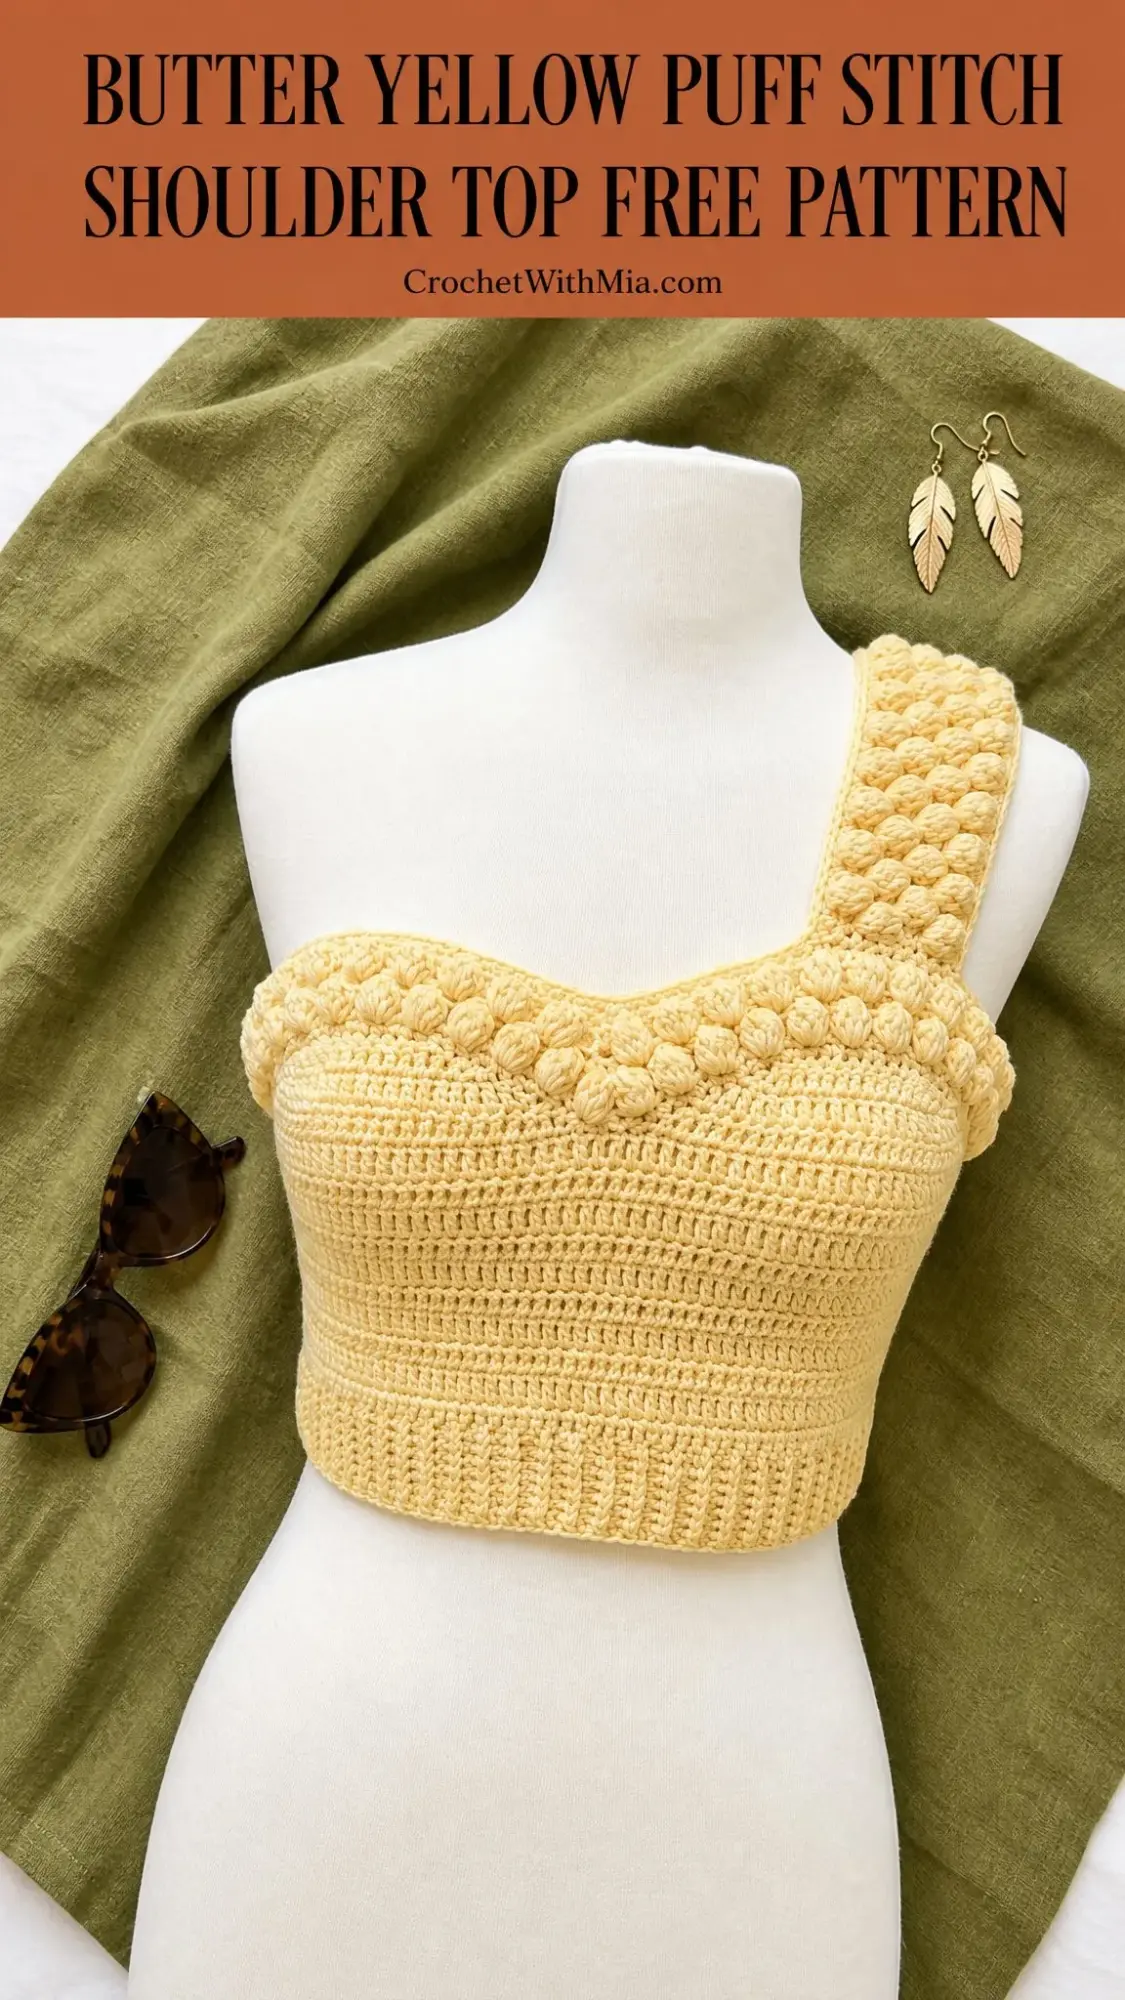
This sunny cropped top features a ribbed hem that hugs your lower edge, a smooth half double crochet body worked in the round, and sculptural puff stitch trim along the top edge and wide shoulder strap. The asymmetrical one-shoulder design gives it a modern, boutique-worthy look that pairs beautifully with high-waisted jeans, linen trousers, or a flowy summer skirt.
The construction is straightforward once you understand the order. You’ll start with a flat ribbed strip, seam it into a ring, pick up stitches around the top edge, work the body upward in joined rounds, add the puff trim, then create a separate wide strap with matching puff edging. Finally, you’ll seam the strap to the body at the front and back.
This pattern is written for one main size with clear adjustment points, so you can customize the bust circumference, body length, and strap fit to match your measurements.
Skill Level
Intermediate
You should be comfortable with basic crochet stitches including chain, single crochet, half double crochet, and slip stitch. You’ll also need to know how to work in the back loop only and join rounds. The puff stitch is explained in detail, so even if it’s new to you, you’ll be able to follow along.
Finished Measurements
| Measurement | Finished Size |
|---|---|
| Bust circumference | 32 in / 81.5 cm |
| Hem circumference, relaxed | 28 in / 71 cm (stretches to about 32 in / 81.5 cm) |
| Body height including rib | 9.5 in / 24 cm |
| Strap width | 4 in / 10 cm |
| Strap length before seaming | 14 in / 35.5 cm |
Intended ease: 0 to 2 in / 0 to 5 cm negative ease. This top is designed to fit snugly.
Materials
Yarn Suggestions
When substituting yarn, choose something that creates a firm but flexible fabric. Avoid slippery or heavy yarns that might stretch downward in the strap or along the top edge.
Gauge
Getting gauge right is essential for fit, especially in a garment like this with intended negative ease.
| Area | Gauge |
|---|---|
| Body hdc | 16 hdc x 12 rows = 4 in / 10 cm after blocking |
| Ribbing | 4 rib rows = 1 in / 2.5 cm measured along the long edge |
| Puff trim | 1 puff repeat = 4 sts; repeat must divide evenly |
Gauge tip: Swatch in half double crochet, wash or steam block the swatch, then measure. Match stitch gauge for circumference first. Match row gauge or adjust the number of rounds for height.
Abbreviations (US Terms)
UK crocheters note: US sc equals UK dc, and US hdc equals UK htr.
Special Stitches
Ribbed Single Crochet
Insert your hook in the back loop only of the next stitch, yarn over, pull up a loop, yarn over and pull through both loops. Working in the back loop only creates those beautiful horizontal ridges that give ribbing its stretch.
Puff Stitch
This stitch creates those plush, rounded bumps you see along the top edge and strap. Here’s how to work it:
1. Yarn over, insert hook in the indicated stitch
2. Yarn over and pull up a loop to half double crochet height
3. Repeat steps 1 and 2 three more times in the same stitch (you’ll have 9 loops on your hook)
4. Yarn over and pull through all loops on the hook
5. Chain 1 to close
The closing chain does not count as a separate stitch. Don’t worry if this feels awkward at first. After a few puffs, you’ll find your rhythm.
Invisible Join
This technique creates a seamless finish when ending rounds:
1. Fasten off and thread your tail through a tapestry needle
2. Pass the needle under both loops of the first stitch
3. Pass the needle back down through the center of the last stitch
4. Tighten gently
Pattern Notes
Before you begin, keep these points in mind:
Construction Order
1. Crochet the bottom rib as a flat strip and seam it into a ring
2. Pick up around the rib and work the body upward in joined rounds
3. Add puff trim around the top edge
4. Crochet the wide strap separately, add puff edging, then seam it to the front and back upper edge
Instructions: Bottom Rib
The body is built on 128 stitches for a 32 in / 81.5 cm bust at gauge. The rib begins smaller so it hugs your lower edge comfortably.
Row 1: Ch 11, sc in 2nd ch from hook and in each ch across. Turn. (10 sc)
Row 2: Ch 1, sc blo in each st across. Turn. (10 sc)
Rows 3 through 112: Rep Row 2. (10 sc each row; 112 rib rows total)
Bring the short ends together without twisting. Slip stitch or whipstitch Row 112 to the foundation edge to form a ring. The long edge should measure about 28 in / 71 cm relaxed.
Instructions: Pick Up Around Rib
Rnd 1: Ch 1. Working into the row ends around one long edge of the rib, sc in each of next 6 row ends, 2 sc in next row end; rep from around. Join. (128 sc)
Instructions: Body
Rnd 2: Ch 1, hdc in each st around. Join. (128 hdc)
Rnds 3 through 24: Rep Rnd 2. (128 hdc each rnd)
Body checkpoint: After Rnd 24, the body above the rib should measure about 8 in / 20.5 cm tall and 32 in / 81.5 cm around. Including the rib, the piece should measure about 9.5 in / 24 cm tall.
Do not fasten off if continuing directly to the top edging.
Instructions: Puff Top Trim
Rnd 25: Ch 1, sc in each st around. Join. (128 sc)
Rnd 26: Ch 1, puff in next st, sc in each of next 3 sts; rep from around. Join. (32 puffs + 96 sc = 128 sts)
Rnd 27: Ch 1, sc in each st around, working into the top of each puff and each sc. Join invisibly and fasten off. (128 sc)
Instructions: Wide One-Shoulder Strap
Row 1: Ch 17, hdc in 2nd ch from hook and in each ch across. Turn. (16 hdc)
Row 2: Ch 1, hdc in each st across. Turn. (16 hdc)
Row 3: Ch 1, hdc in each of next 3 sts, puff in next st; rep from across. Turn. (12 hdc + 4 puffs = 16 sts)
Rows 4 through 6: Ch 1, hdc in each st across. Turn. (16 hdc)
Rows 7 through 42: Rep Rows 3 through 6 nine more times. End after a Row 6 repeat. (16 sts each row; 42 rows total)
Instructions: Strap Puff Edging
Rnd 1: Ch 1. Work 16 sc across the top short edge, 40 sc evenly down the first long edge, 16 sc across the foundation short edge, and 40 sc evenly up the second long edge. Join. (112 sc)
Rnd 2: Ch 1, puff in next st, sc in each of next 3 sts; rep from around. Join invisibly and fasten off. (28 puffs + 84 sc = 112 sts)
Strap checkpoint: The finished strap should measure about 4 in / 10 cm wide and 14 in / 35.5 cm long before seaming. Try it on before final stitching. Add or remove 4-row repeats to adjust the length.
Assembly and Finishing
Mark Strap Placement
Lay the body flat with the side seam at the left side. Place a marker at the front center and back center. On the wearer’s right side, mark a 16-stitch section centered about 8 stitches to the right of the front center for the front strap join. Mark a matching 16-stitch section on the back edge, directly above the front section when worn.
Attach Strap
Pin one short end of the strap to the 16 marked front stitches with the right side facing out. Use a whipstitch or mattress stitch through the inside loops only so the puff edging remains visible. Repeat for the back strap end. The strap should lie flat over your shoulder without twisting.
Side Puff Accent (Optional)
For a softly raised side detail, join yarn at the left side underarm edge. Work one decorative line down the side seam: *sl st in next row end, puff around the next row end, sl st in next row end; rep for 7 to 9 puffs, ending above the rib. Fasten off and weave in ends. Repeat only if you want matching texture on both sides.
Blocking
Steam lightly or wet block flat to measurements. Pin the top edge straight and smooth the strap so the puff stitches sit rounded and even. Do not over-stretch the ribbing.
Finishing Checklist
Fit Customization
Adjusting Bust Width
The body stitch count must remain a multiple of 4 for the puff trim. At gauge, every 4 stitches adds or removes about 1 in / 2.5 cm from the circumference.
Adjusting Length
Add or remove body rounds before Rnd 25. At row gauge, 3 rounds add about 1 in / 2.5 cm. Keep the top trim instructions unchanged once the height is right.
Adjusting Strap Length
Add or remove one 4-row repeat for about 1.3 in / 3.4 cm change in length. Maintain the 16-stitch width and the same edging pick-up count by distributing 40 sc evenly along each long edge, or adjust the edging to the nearest multiple of 4.
Troubleshooting
| Issue | Fix |
|---|---|
| Top edge gaps | Use a smaller hook for Rnds 25 through 27 or add elastic thread inside the final round |
| Rib too tight | Add rib rows in multiples of 4, then pick up a body count that is still a multiple of 4 |
| Puffs look flat | Pull loops to the same height and close firmly. Block with light steam only |
| Strap twists | Pin both ends while the top is on a form or flat surface before sewing |
Care Instructions
Hand wash cool or use a gentle machine cycle in a mesh bag if your yarn label allows. Lay flat to dry. Store folded rather than hanging to protect the strap and top edge from stretching.
You Did It!
Thank you so much for choosing this pattern for your next crochet project. I hope you love making this top as much as I loved designing it. The combination of that stretchy ribbed hem, the smooth body, and those satisfying puff stitches creates something truly special to wear all summer long.
If you make this Butter Yellow Puff Stitch Shoulder Top, I would absolutely love to see it! Tag me on Instagram or share a photo in my Facebook group. Seeing your finished projects brings me so much joy.
If you want to find this pattern again later, go ahead and save it to your Pinterest boards. And please drop a comment below if you make it or have any questions along the way. Happy crocheting!
Want a Quick & Easy Printable Version?
Get a clean, beautifully formatted PDF of this pattern — easy to follow step by step, ready to print or save on any device. No scrolling, no distractions, just the pattern.
Get the Printable PDF →