I don’t know about you, but I have a serious soft spot for doll clothes that look like tiny works of art. There’s something so satisfying about creating miniature fashion pieces that could rival anything on a real runway.
Get the Ad-Free PDF Pattern
You can find the free pattern below, or you can purchase the ad-free printable PDF from my shop.
Get the Printable PDF →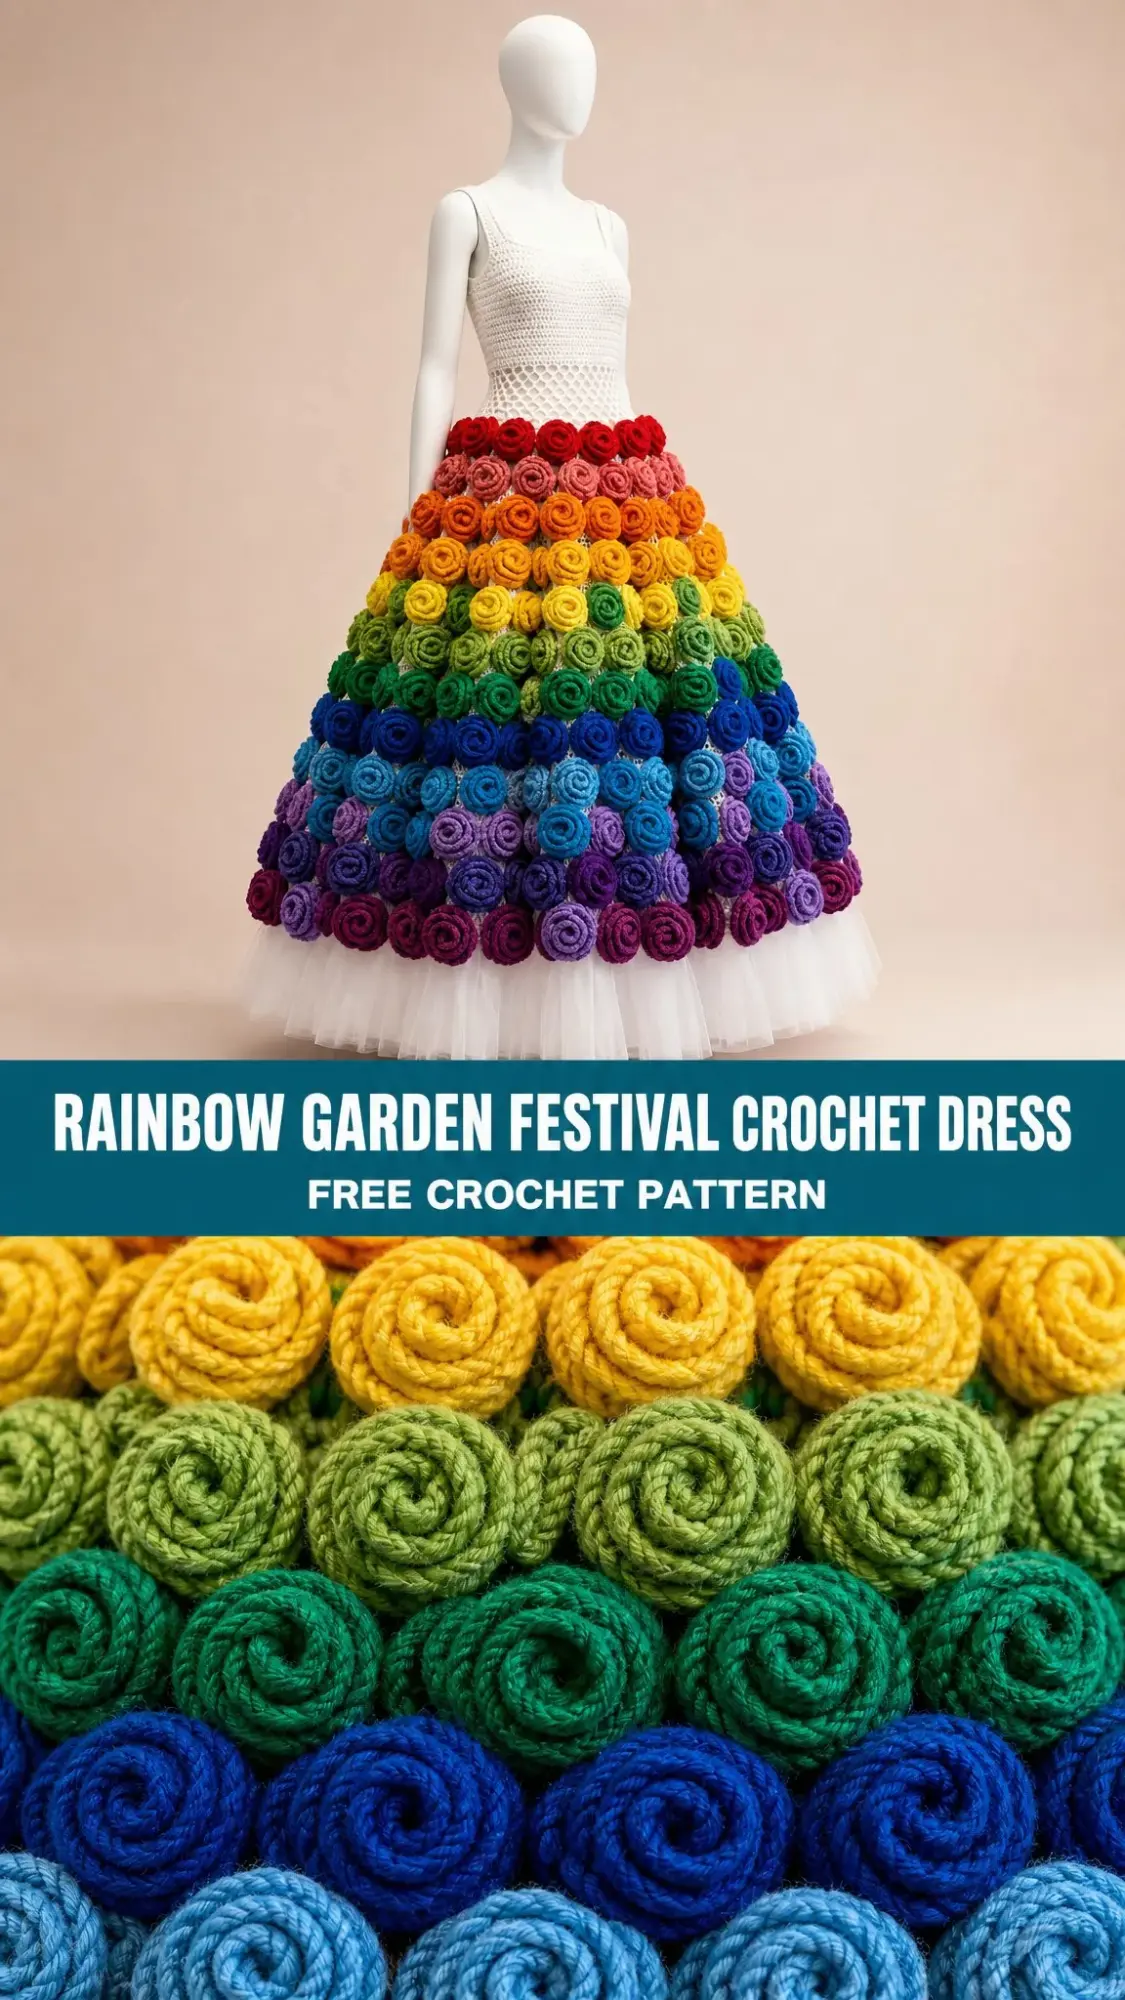
This Rainbow Garden Festival Crochet Dress delivers all the wow factor without requiring you to be a crochet wizard. The construction is surprisingly straightforward once you break it down into manageable pieces. You’re essentially making a simple bodice, a basic skirt foundation, and a whole bunch of adorable mini roses.
The roses are where the magic happens, and I promise they’re easier than they look. By the time you finish this project, you’ll have a showstopping dress that turns an ordinary fashion doll into a garden party queen.
About This Crochet Doll Dress Pattern
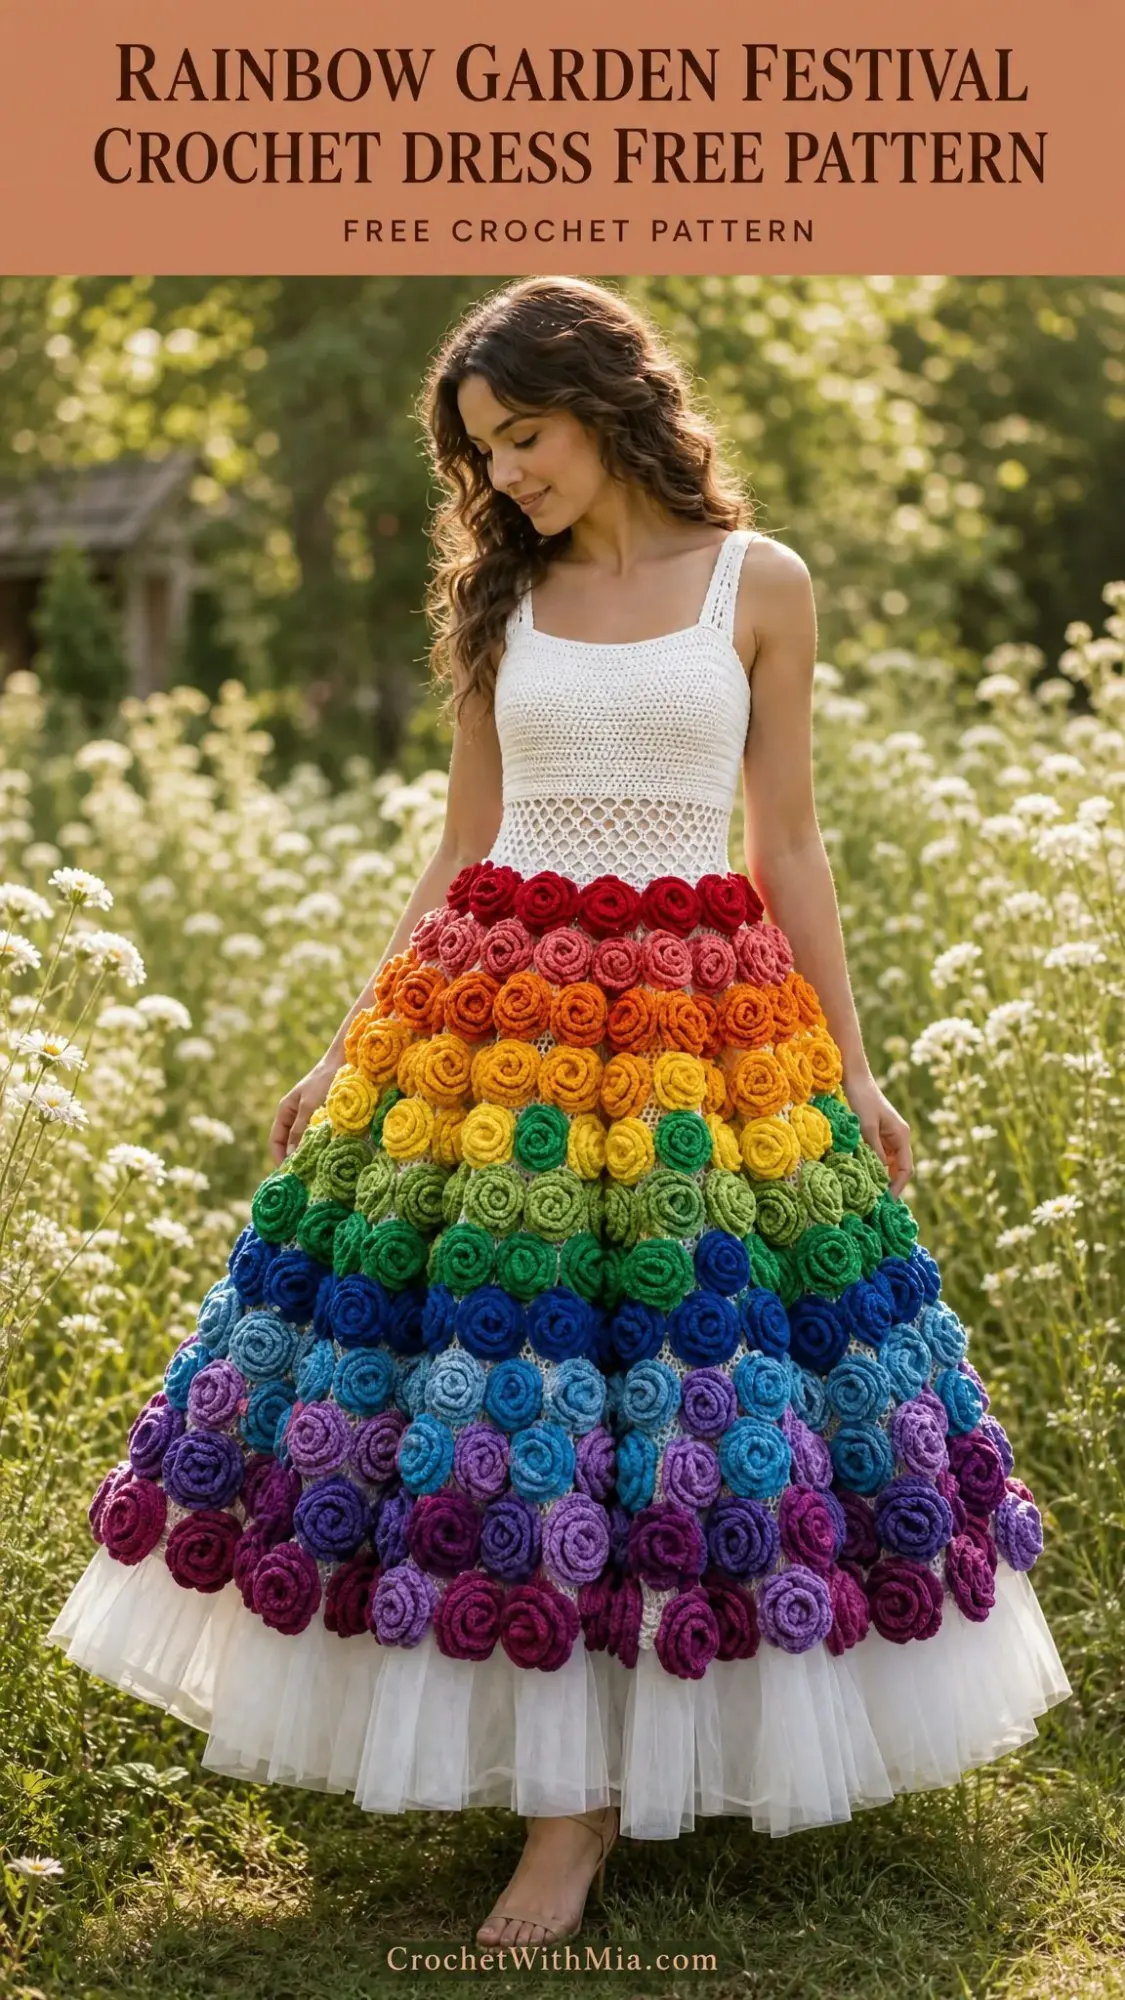
This premium doll dress pattern creates a removable festival style dress designed to fit an 11.5 to 12 inch (29 to 30.5 cm) fashion doll. Think Barbie and similar dolls in your collection.
The dress features three main components working together beautifully. First, you have a fitted crochet bodice worked flat with a back button opening. Then there’s a shaped crochet skirt base that gives structure to the dramatic rose covered skirt. Finally, 126 individually crocheted mini roses in rainbow colors transform the simple base into something spectacular. A gathered tulle underskirt adds volume and that dreamy festival vibe at the hem.
Skill Level: Intermediate. You should be comfortable keeping stitch counts, joining rounds, sewing small motifs neatly, and adjusting fit around a doll body. If you’ve made a few amigurumi projects or crocheted clothing items before, you’ve got this.
Time Estimate: 12 to 16 hours, depending on your rose making speed and finishing style. I recommend spreading this across several crafting sessions. Making roses is perfect for TV watching time!
Finished Measurements
Before you start, here’s what your completed dress will measure:
| Measurement | Finished Size |
|---|---|
| Chest/top edge | 6 in / 15 cm around before button overlap |
| Waist after buttoning | 6.5 to 6.75 in / 16.5 to 17 cm |
| Dress length from top bodice to tulle hem | 7.25 to 7.75 in / 18.5 to 19.5 cm |
| Skirt hem circumference | 18 to 19 in / 46 to 48 cm |
Materials You’ll Need
Gather these supplies before you begin:
Yarn: DK/light worsted cotton or cotton acrylic blend. You’ll need 3.5 oz / 100 g of main cream color plus small amounts of rainbow colors (red, coral, orange, yellow, green, teal/blue, violet/purple).
Hooks: 3.5 mm (E) for the dress. A 3.25 mm (D) hook is optional if you want tighter roses.
Tulle: 5 in x 22 in / 13 x 56 cm strip in white, ivory, or sheer sparkle.
Fasteners: 2 tiny buttons or snaps for the back closure.
Tools: Yarn needle, stitch markers, scissors, pins, measuring tape, sewing needle and thread.
Recommended Yarn Brands
Any of these work beautifully for this crochet doll dress pattern:
1. Paintbox Yarns Cotton DK offers crisp stitch definition and strong rose colors
2. Lion Brand 24/7 Cotton DK provides a smooth cotton with a polished finish
3. Hobbii Rainbow Cotton 8/6 is excellent for small motifs with many color options
When substituting yarn, choose a smooth DK/light worsted that meets gauge. Use the same fiber family for both bodice and roses so the skirt weight hangs evenly.
Gauge Information
Gauge is mandatory for a fitted doll dress. Don’t skip this step!
For the bodice in single crochet with a 3.5 mm hook: 20 sc x 22 rows = 4 in / 10 cm
For the skirt in double crochet: 22 dc x 10 rows = 4 in / 10 cm
Make a swatch and match both stitch and row gauge before starting. Your finished dress won’t fit properly if your tension is off.
Checkpoints to Measure Against
After completing the bodice: approximately 2.5 in / 6.5 cm tall and 6 to 6.8 in / 15 to 17 cm wide before buttoning.
After completing the skirt base: approximately 5 in / 12.5 cm from waist to crochet hem before adding tulle.
Abbreviations Used in This Pattern
Let me break down every stitch abbreviation you’ll encounter:
ch = chain. The foundation loops that start most crochet projects.
sl st = slip stitch. Insert hook, yarn over, pull through both loops on hook at once. Used for joining rounds.
sc = single crochet. Insert hook, yarn over and pull up a loop (2 loops on hook), yarn over and pull through both loops.
hdc = half double crochet. Yarn over, insert hook, yarn over and pull up a loop (3 loops on hook), yarn over and pull through all 3 loops.
dc = double crochet. Yarn over, insert hook, yarn over and pull up a loop (3 loops on hook), yarn over and pull through 2 loops, yarn over and pull through remaining 2 loops.
inc = increase. Work 2 stitches into the same stitch to add width.
st/sts = stitch/stitches
RS = right side (the pretty side that faces out)
WS = wrong side (the inside of your work)
UK crocheters note: US sc = UK dc, and US dc = UK tr. This pattern uses US terminology throughout.
Special Techniques
How to Make the Mini Rose Strip
This is the technique you’ll use 126 times (I know, but they go fast once you get the hang of it):
Ch 16.
Row 1: Sc in 2nd ch from hook and in each ch across. (15 sc)
Row 2: Ch 1, turn. [Sc in next st, hdc in next st, 3 dc in next st, hdc in next st, sc in next st] 3 times. (21 sts)
Fasten off with a 10 in / 25 cm tail. Roll from one short end into a rose, keeping petals slightly staggered. Sew through the base several times to secure.
Neat Increase Technique
Work 2 stitches into the same stitch. For the bodice, place increases at the first and last stitch of the row so both side edges widen evenly.
Invisible Join for Skirt Rounds
Join with a sl st to the top of the beginning ch 3, pull the joining strand snug, then begin the next round. The ch 3 counts as the first dc on all skirt rounds.
Left Handed Maker Note
Work the written rows as usual. Your skirt rounds will travel in the opposite direction, but the shaping and counts remain the same. Place roses by color band rather than by direction.
Pattern Instructions: Bodice
With cream yarn and 3.5 mm hook, ch 31. Work flat. Ch 1 to turn; turning ch does not count as a stitch.
| Row | Instruction | Count |
|---|---|---|
| 1 | Sc in 2nd ch from hook and in each ch across. | 30 sc |
| 2 to 4 | Sc across. | 30 sc |
| 5 | Inc in first st, sc across to last st, inc in last st. | 32 sc |
| 6 to 8 | Sc across. | 32 sc |
| 9 | Inc in first st, sc across to last st, inc in last st. | 34 sc |
| 10 to 14 | Sc across. | 34 sc |
Do not fasten off if continuing directly to the skirt base. If you prefer to add bands first, fasten off and rejoin at the lower right corner later.
Back Button Bands
Work along each short back edge. Pick up 14 sc evenly along the edge.
Plain side Row 2: Ch 1, turn, sc across. (14 sc)
Buttonhole side Row 2: Sc 2, ch 1, skip 1, sc 7, ch 1, skip 1, sc 3. (14 sts including ch spaces)
Straps (Make 2)
Ch 5.
Row 1: Sc in 2nd ch from hook and across. (4 sc)
Rows 2 to 13: Ch 1, turn, sc across. (4 sc)
Fasten off, leaving a long tail. Sew straps to the front top edge at sts 7 to 10 and 21 to 24. You can cross them at the back or place them straight, whatever looks best on your doll.
Pattern Instructions: Skirt Base
Join cream yarn at the bodice waist if needed. Work in joined rounds with RS facing. Ch 3 counts as first dc on dc rounds.
| Rnd | Instruction | Count |
|---|---|---|
| 1 | Sc evenly across the lower bodice edge, one sc in each bodice stitch. Join. | 34 sc |
| 2 | Ch 3, dc in same st; [dc in next st, 2 dc in next st] 16 times; dc in final st. Join. | 51 dc |
| 3 | Ch 3; dc in next st; 2 dc in next st; [dc in next 2 sts, 2 dc in next st] 16 times. Join. | 68 dc |
| 4 | Ch 3; dc in next 2 sts; 2 dc in next st; [dc in next 3 sts, 2 dc in next st] 16 times. Join. | 85 dc |
| 5 | Ch 3; dc in next 3 sts; 2 dc in next st; [dc in next 4 sts, 2 dc in next st] 16 times. Join. | 102 dc |
| 6 to 12 | Ch 3, dc in each st around. Join. | 102 dc |
Skirt checkpoint: After Round 12, the crochet skirt should measure about 5 in / 12.5 cm from waist to hem and about 18 to 19 in / 46 to 48 cm around the lower edge. A slight flare is intentional because the rose layer needs room.
Tulle Underskirt Instructions
Cut tulle to 5 in x 22 in / 13 x 56 cm. Fold the top edge down 1/4 in / 6 mm. Run a gathering stitch along the folded edge, gather to the waist size, and sew inside the dress just below the bodice/skirt seam.
Trim the lower edge evenly after the dress is on the doll. This ensures a perfect length every time.
Rainbow Rose Layer
Now for the fun part! Make roses using the Mini Rose Strip technique. Leave tails for sewing. Steam lightly only if needed, and avoid flattening the petals.
| Band | Color | Roses | Placement |
|---|---|---|---|
| 1 | Red | 12 | Around waist seam/Rnds 1 to 2 |
| 2 | Coral | 14 | Just below Band 1/Rnd 3 |
| 3 | Orange | 16 | Rnd 4 |
| 4 | Yellow | 18 | Rnds 5 to 6 |
| 5 | Green/teal | 20 | Rnds 7 to 8 |
| 6 | Blue/indigo | 22 | Rnds 9 to 10 |
| 7 | Violet/purple | 24 | Rnds 11 to 12 and lower edge |
Rose Placement Method
Divide each band into quarters with removable markers. Pin one rose at each quarter first, then fill the spaces evenly. Sew through the base of each rose and into the skirt base. Stagger each new band between roses from the row above so the skirt looks full rather than gridded.
Total roses: 126 mini roses.
Quicker Version Option
For a faster project, make 84 larger roses by using ch 21 and four petal repeats instead of three. Then use this distribution: 8, 10, 10, 12, 12, 16, 16 roses by band.
Assembly and Finishing
Follow these steps for a polished final result:
1. Weave in all bodice and skirt base ends before attaching roses.
2. Sew button bands neatly. Add buttons opposite the buttonholes or use tiny snaps for a flatter back.
3. Sew straps after trying the dress on the doll. Straps should lie flat without pulling the top edge upward.
4. Add tulle underskirt inside the waist seam. Keep stitches small so they do not show through the bodice.
5. Pin rose bands from top to bottom, then sew from top to bottom. Let lower roses overlap the tulle slightly for a soft festival hem.
6. Final fit: button the dress, adjust strap placement, fluff roses with fingertips, and trim tulle evenly.
Blocking Tips
Block the bodice only if needed. Pin to measurements and mist lightly. Avoid heavy steam on acrylic blends and avoid pressing the roses flat.
Care Instructions
Spot clean when possible. If washing is necessary, hand wash gently in cool water, press in a towel, reshape, and dry flat. Keep tulle away from high heat.
Size Customization Options
Width: Add or remove foundation chains in multiples of 2. Keep the back opening wide enough for the doll hips.
Bodice height: Add or remove plain sc rows before Row 14. Pick up the same number of stitches as rows when making button bands.
Skirt fullness: For a fuller skirt, add one more plain 102 dc round before attaching roses. For a slimmer skirt, stop after Round 10 and use fewer lower band roses.
Straps: Add or remove strap rows until the top edge sits smoothly.
Troubleshooting Common Issues
| Issue | Fix |
|---|---|
| Bodice will not close | Check gauge first. Add one extra row to each button band or move snaps closer to the edge. |
| Top edge gaps | Shorten straps by 1 to 2 rows or sew them slightly closer to the center front. |
| Skirt base ruffles before roses | Your dc gauge may be loose. Go down a hook size for skirt rounds or block lightly. |
| Roses look sparse | Pin roses closer together and stagger bands. Add 2 to 4 roses to the band with visible gaps. |
| Tulle sticks out unevenly | Trim after the dress is buttoned on the doll, not while flat. |
Quick Reference Counts
Keep these handy while you work:
Bodice: 30, 30, 30, 30, 32, 32, 32, 32, 34, 34, 34, 34, 34, 34.
Skirt: 34 sc, then 51, 68, 85, 102 dc; Rounds 6 to 12 remain 102 dc.
Rose strip: 15 sc on Row 1 and 21 sts on Row 2.
Maker Checkpoints
Use these to verify you’re on track:
After Row 14: bodice has 34 sc and sits just below the doll waist.
After skirt Round 5: skirt has 102 dc and a clear flare.
After skirt Round 12: lower edge is wide enough to accept 24 bottom band roses.
Before final sewing: all roses are pinned by band, quartered evenly, and staggered between rows.
Final Thoughts on This Rainbow Crochet Dress Pattern
This Rainbow Garden Festival Crochet Dress is truly a labor of love, but the finished result is absolutely worth every rose you make. The combination of the simple fitted bodice, the dramatic rainbow rose skirt, and the dreamy tulle hem creates a doll dress that looks like it belongs in a museum or on a red carpet.
I hope this step by step crochet tutorial gives you everything you need to create your own miniature masterpiece. The techniques you learn here, especially the mini roses, can be applied to so many other projects too.
Thank you so much for choosing this pattern! I would absolutely love to see your finished rainbow garden dress. Please save this pattern to your Pinterest boards so you can find it easily when you’re ready to start. And if you make this dress, leave a comment below with how it turned out. Seeing your creations truly makes my day!
Want a Quick & Easy Printable Version?
Get a clean, beautifully formatted PDF of this pattern — easy to follow step by step, ready to print or save on any device. No scrolling, no distractions, just the pattern.
Get the Printable PDF →