This structured mini handbag features a raised bobble texture, a padded handle, and an antique brass clasp. It uses basic stitches plus a 5 dc bobble. If you can single crochet and double crochet, you can make this bag.
Get the Ad-Free PDF Pattern
You can find the free pattern below, or you can purchase the ad-free printable PDF from my shop.
Get the Printable PDF →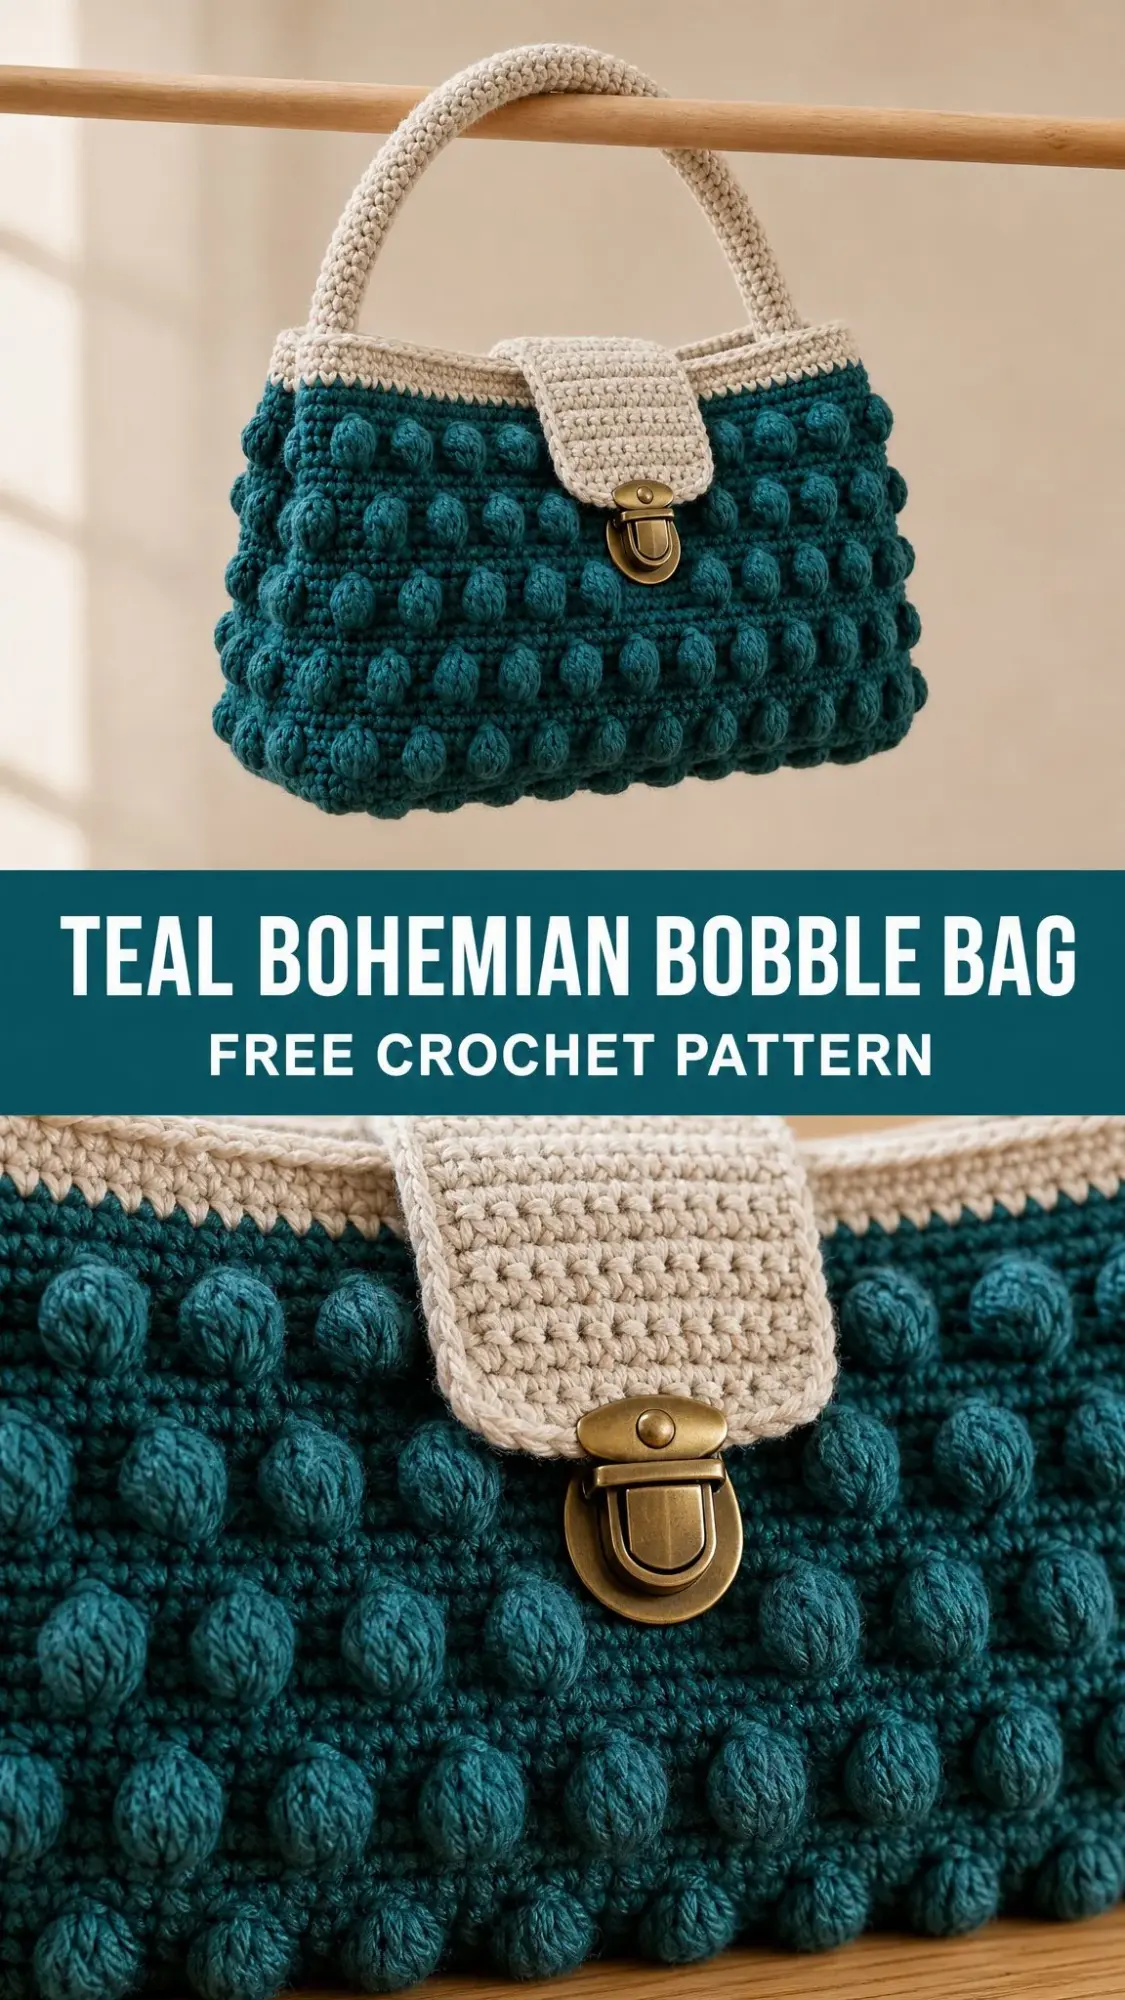
The construction is straightforward. You start with a flat rectangular base, pick up stitches around the edges, then work upward in continuous rounds. The bobble pattern creates that gorgeous textured surface without any complicated techniques.
I love how polished this bag looks with the beige trim and hardware. It takes about 8 to 10 hours to complete and works up to approximately 11 inches wide by 6.75 inches high by 3.5 inches deep. The handle drop is about 4.25 inches, perfect for carrying on your arm.
Materials You Will Need
Gathering your supplies before you start makes the whole process smoother. Here is everything you need for this bobble bag crochet pattern.
Main Yarn: Worsted weight cotton in teal, approximately 240 yards or 220 meters. This forms the base and textured body.
Trim Yarn: Worsted weight cotton in beige, approximately 95 yards or 87 meters. This creates the top band, handle, and front tab.
Hook: US E/4 (3.5 mm), or whatever size you need to match gauge.
Hardware: One small bag clasp or turn lock with an antique brass finish.
Tools: Tapestry needle, stitch markers, pins, sewing needle, and optional fabric for lining.
Yarn Suggestions
The pattern designer recommends these options:
Paintbox Yarns Cotton Aran offers firm stitch definition and comes in many teal tones.
Lion Brand 24/7 Cotton provides crisp cotton with excellent structure.
Knit Picks Dishie Worsted is smooth, budget friendly, and shows great bobble texture.
Choose a smooth worsted cotton that holds its shape. Avoid very soft acrylics unless you plan to add a firm lining. The bobbles and base need structure to look their best.
Gauge Information
Getting your gauge right ensures your bag turns out the correct size.
Bobble texture gauge: 18 stitches and 10 rounds equals 4 inches or 10 cm, lightly blocked.
Base gauge: 18 single crochet and 18 rows equals 4 inches or 10 cm.
Make a swatch before starting. If your swatch is too small, try a larger hook. If it is too big, go down a hook size.
Checkpoint: After Round 13 of the body, your bag should measure about 6 inches or 15 cm tall from the base edge before adding the beige band.
Abbreviations and Special Stitches
Let me walk you through every stitch abbreviation you will encounter in this crochet bag tutorial.
ch = chain
sc = single crochet (insert hook, yarn over, pull up a loop, yarn over, pull through both loops)
hdc = half double crochet (yarn over, insert hook, yarn over, pull up a loop, yarn over, pull through all three loops)
dc = double crochet (yarn over, insert hook, yarn over, pull up a loop, yarn over, pull through two loops, yarn over, pull through remaining two loops)
sl st = slip stitch
st(s) = stitch(es)
RS = right side
WS = wrong side
rep = repeat
rnd = round
yo = yarn over
UK crocheters: US sc equals UK dc. US dc equals UK tr.
Special Stitches Explained
Bobble (5 dc bobble): This stitch creates those beautiful raised bumps. Here is how to work it step by step. Yarn over, insert hook in the indicated stitch, yarn over and pull up a loop, yarn over and pull through two loops. You now have two loops on your hook. Repeat this sequence four more times in the same stitch. You will have six loops on your hook. Yarn over and pull through all six loops at once. Push the bobble to the right side of your work.
Surface slip stitch: With yarn held on the wrong side, insert your hook from right side to wrong side, pull up a loop, insert hook in the next stitch, pull up a loop and draw it through the loop on your hook. Keep your tension relaxed.
Invisible join: Cut your yarn and pull the tail through the last stitch. Thread your tapestry needle under both top loops of the first stitch, then back into the center of the final stitch. This creates a seamless finish.
Pattern Instructions: Base
The base is worked flat in teal. The chain 1 at the beginning of rows does not count as a stitch.
Foundation: Chain 49.
Row 1: Single crochet in the second chain from hook and in each chain across, turn. (48 sc)
Rows 2 through 15: Chain 1, single crochet in each stitch across, turn. (48 sc)
Do not fasten off. Place stitch markers at all four corners of your rectangle. Your base should measure approximately 10.75 inches by 3.3 inches, or 27 cm by 8.5 cm.
Pattern Instructions: Pick Up Body Round
Now you will work around the entire base to create the foundation for your bag body.
Round 1: Chain 1, work 48 single crochet across the long edge, 15 single crochet down the short edge, 48 single crochet across the opposite long edge, 15 single crochet up the final short edge. Join with a slip stitch or continue working in a spiral. (126 sc)
Pattern Instructions: Body Texture
Keep the right side facing you throughout. Place a marker at the first stitch and a second marker at the center front for clasp placement later.
Round 2: Bobble in the next stitch, single crochet in the next 5 stitches; repeat from around. (21 bobbles, 105 sc; 126 sts total)
Round 3: Single crochet in each stitch around. (126 sc)
Round 4: Single crochet in the next 3 stitches, bobble in the next stitch, single crochet in the next 2 stitches; repeat from around. (21 bobbles, 105 sc; 126 sts total)
Round 5: Single crochet in each stitch around. (126 sc)
Round 6: Repeat Round 2. (126 sts)
Round 7: Single crochet in each stitch around. (126 sc)
Round 8: Repeat Round 4. (126 sts)
Round 9: Single crochet in each stitch around. (126 sc)
Round 10: Repeat Round 2. (126 sts)
Round 11: Single crochet in each stitch around. (126 sc)
Round 12: Repeat Round 4. (126 sts)
Round 13: Single crochet in each stitch around, ending at center back or side. (126 sc)
Notice how the bobble rounds alternate. Round 2 places bobbles at the start of each repeat. Round 4 offsets them by starting with 3 single crochets. This creates that beautiful staggered texture you see in the photos.
Pattern Instructions: Top Band
Change to beige yarn.
Round 14: Chain 1, single crochet in each stitch around. (126 sc)
Round 15: Chain 1, half double crochet in each stitch around. (126 hdc)
Round 16: Chain 1, single crochet in each stitch around. (126 sc)
Round 17: Work a surface slip stitch around the top edge for a clean corded finish. Fasten off and weave in your ends.
Texture Checkpoint
Your front face should show about 8 bobble columns across each bobble round. The alternating rounds create a staggered look. The body should stand upright but remain slightly flexible.
Shape Checkpoint
Before adding the handle, your bag should measure approximately 11 inches or 28 cm wide, 6.75 inches or 17 cm high, and 3.5 inches or 9 cm deep after light blocking.
Handle Instructions
The handle is worked in beige.
Foundation: Chain 52.
Row 1: Half double crochet in the second chain from hook and in each chain across, turn. (51 hdc)
Rows 2 through 4: Chain 1, half double crochet in each stitch across, turn. (51 hdc)
Fold the strip lengthwise with wrong sides together. Seam the long edge with whip stitch to form a rounded padded handle.
Pin the ends inside the top band, centered over the side seams. Sew securely through the band and the first body round. The finished handle length is approximately 13.5 inches or 34 cm. The handle drop is approximately 4.25 inches or 11 cm.
Front Tab Instructions
The tab is also worked in beige.
Foundation: Chain 15.
Row 1: Single crochet in the second chain from hook and in each chain across, turn. (14 sc)
Rows 2 through 10: Chain 1, single crochet in each stitch across, turn. (14 sc)
Edging: Chain 1, single crochet evenly around the entire tab, working 3 single crochet in each lower corner. Use an invisible join to finish.
Sew the top of the tab to the inside center back of the top band so it folds over to the front.
Clasp Attachment
Attach one half of your clasp to the tab and the matching half to the front center of the bag. Reinforce the back of the crochet fabric with a small piece of fabric or felt before tightening the hardware. This prevents the clasp from pulling through over time.
Security tip: Handbags get tugged at the handle and clasp constantly. Sew through multiple layers with strong thread and knot securely on the inside.
Finishing Your Bobble Bag
Weave in all ends on the wrong side. Bury the tails through dense single crochet areas for extra security.
Steam lightly from a distance or wet block gently. Do not flatten your bobbles. Shape the base while drying by placing folded towels inside the bag to support the sides.
Optional Lining
For a professional interior finish, cut two fabric rectangles approximately 12 inches by 8 inches, or 30.5 cm by 20 cm. Cut one base strip approximately 12 inches by 4 inches, or 30.5 cm by 10 cm.
Sew these pieces into a shallow box pouch. Turn under the top edge, place the lining inside your bag, and hand stitch it to the beige top band. Make sure your hardware stays accessible through both layers.
Care Instructions
Hand wash in cold water only if your hardware and lining allow it. Lay flat to dry with the bag stuffed to maintain its shape. Do not bleach. Do not tumble dry. You can cool iron the lining only if needed.
Troubleshooting Common Issues
Bobbles sink inward: Pop each bobble to the right side immediately after completing it. Keep your following single crochet stitches firm.
Bag flares at the top: Use a smaller hook for the beige band or work your surface slip stitch a little firmer.
Base curls: Block the base before working the body rounds, or add a firm lining insert.
Handle stretches: Sew the handle ends deeper into the band and add extra reinforcement stitches.
Customization Options
Make it taller: Add pairs of rounds before the beige band. Work one bobble round and one single crochet round, continuing the alternating bobble placements. Each pair of rounds adds about 0.8 inches or 2 cm.
Make it wider: Add 6 stitches to the base foundation for every extra bobble repeat you want around the bag. For a wider version, try chaining 55 for a 54 stitch base, keep 15 base rows, and pick up 138 body stitches.
Make the handle longer: Add 4 chains for about 1 inch or 2.5 cm of extra strap length. For shoulder length, make two separate handles and reinforce each attachment point.
Stitch Count Summary
This quick reference helps you verify your work as you go.
Base rows: 48 sc per row for 15 rows
Body pickup: 126 sc
Bobble rounds: 21 bobbles plus 105 sc equals 126 stitches
Plain body rounds: 126 sc
Top band rounds: 126 stitches each
Handle: 51 hdc per row for 4 rows
Tab: 14 sc per row for 10 rows
Left Handed Makers
Work the same stitch counts and rounds. Your texture will travel in the opposite direction. Place your front marker on the side that faces you when the clasp is centered.
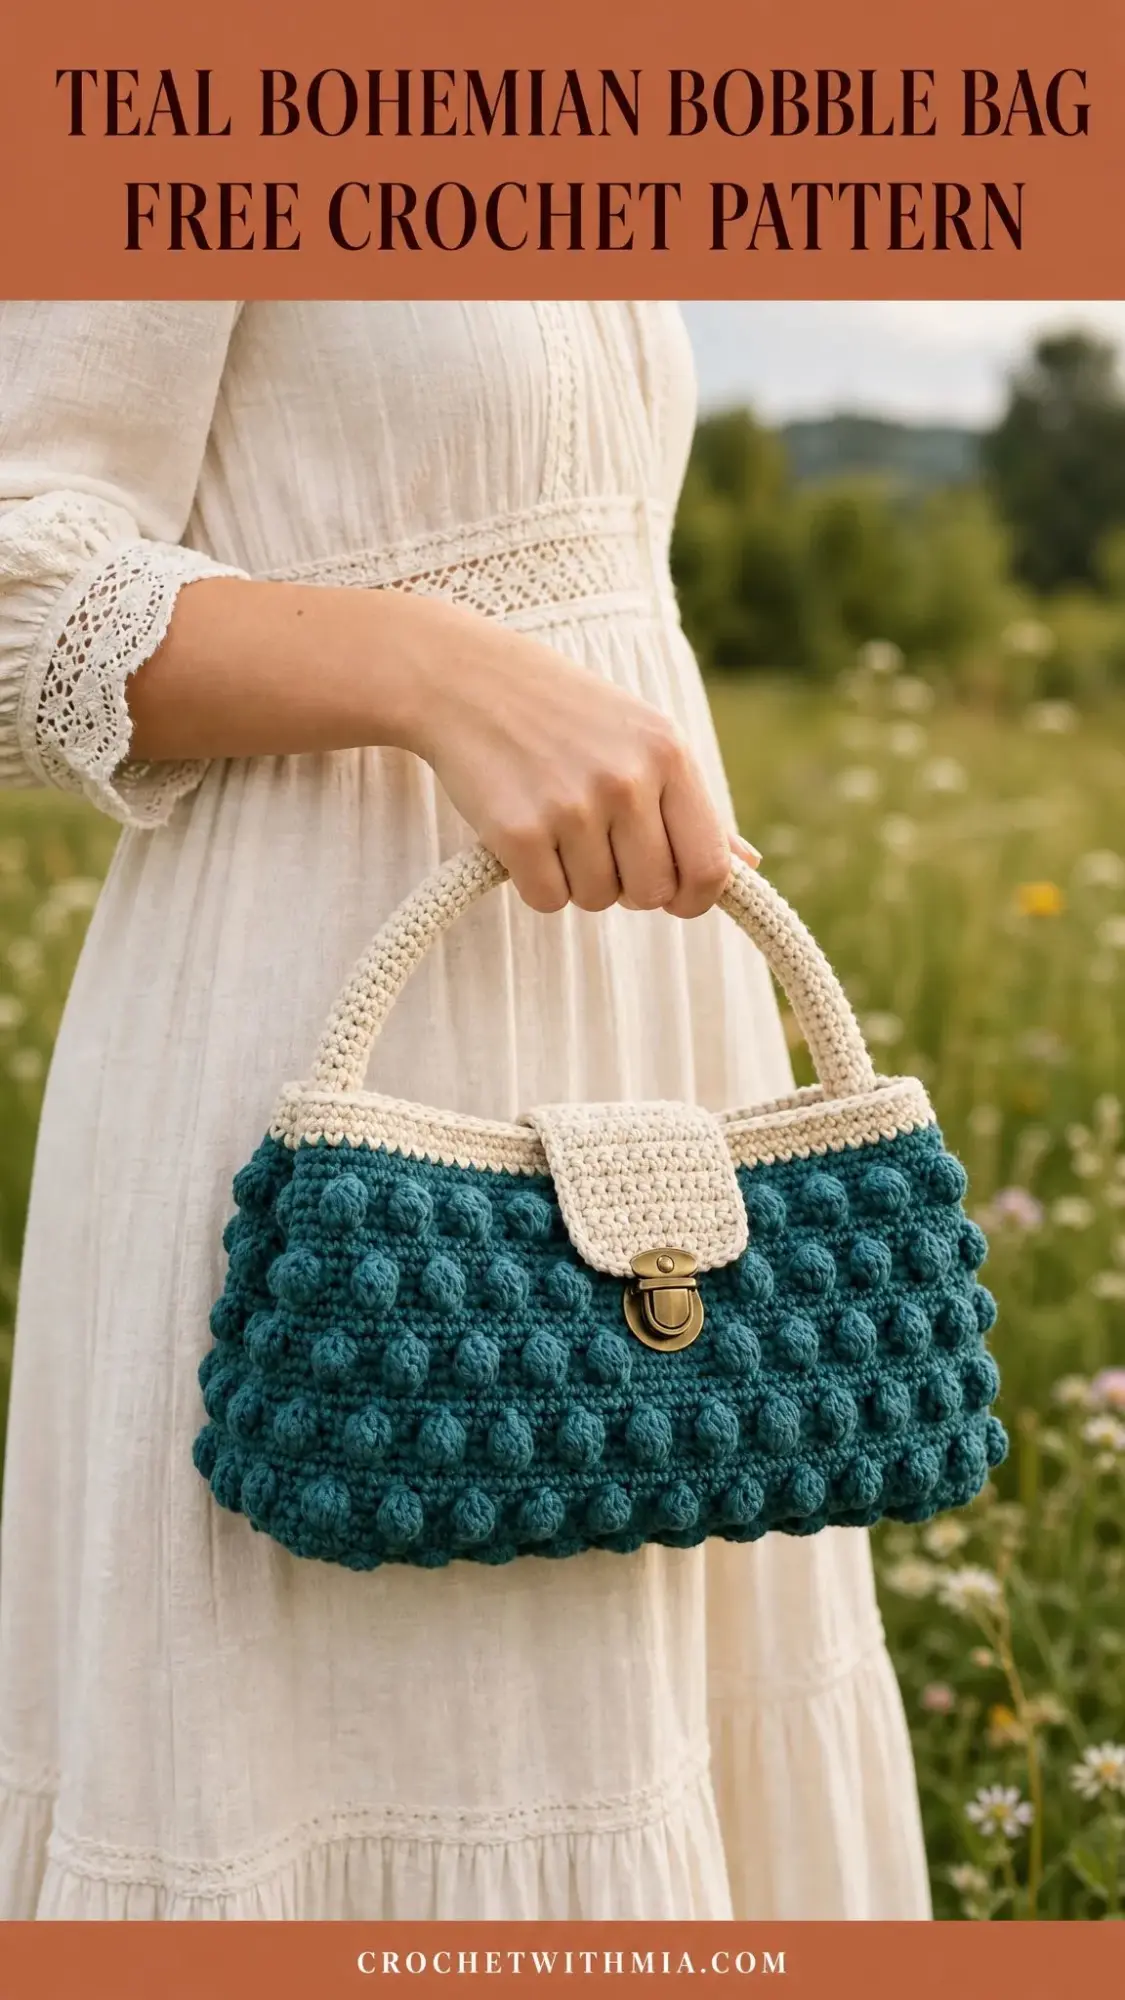
Final Thoughts on This Bohemian Bobble Bag Pattern
This step by step crochet pattern creates a truly stunning accessory. The combination of textured bobbles, clean trim, and polished hardware gives you a bag that looks like it came from a boutique.
Take your time with the bobble stitches. They become second nature after the first few rounds. And remember to push each bobble to the right side as you complete it.
Thank you so much for choosing this pattern for your next project. I would absolutely love to see your finished bag! If you make one, please share a photo on Instagram or Facebook and tag me. Seeing your color choices and personal touches is honestly the best part of designing patterns.
Save this pattern to your Pinterest boards so you can find it easily when you are ready to start. And if you have any questions or want to share your finished project, drop a comment below. I read every single one and love connecting with fellow makers. Happy crocheting!
Want a Quick & Easy Printable Version?
Get a clean, beautifully formatted PDF of this pattern — easy to follow step by step, ready to print or save on any device. No scrolling, no distractions, just the pattern.
Get the Printable PDF →