
This dress pattern brings together classic lattice openwork, a fitted bodice, and a dreamy gathered skirt that flows beautifully at tea length. The construction uses flat panels joined at the waist, which means you can work each section at your own pace and see real progress with every piece you complete.
Get the Ad-Free PDF Pattern
Scroll down for the full pattern, or get the ad-free printable PDF from the shop.
Get the Printable PDF →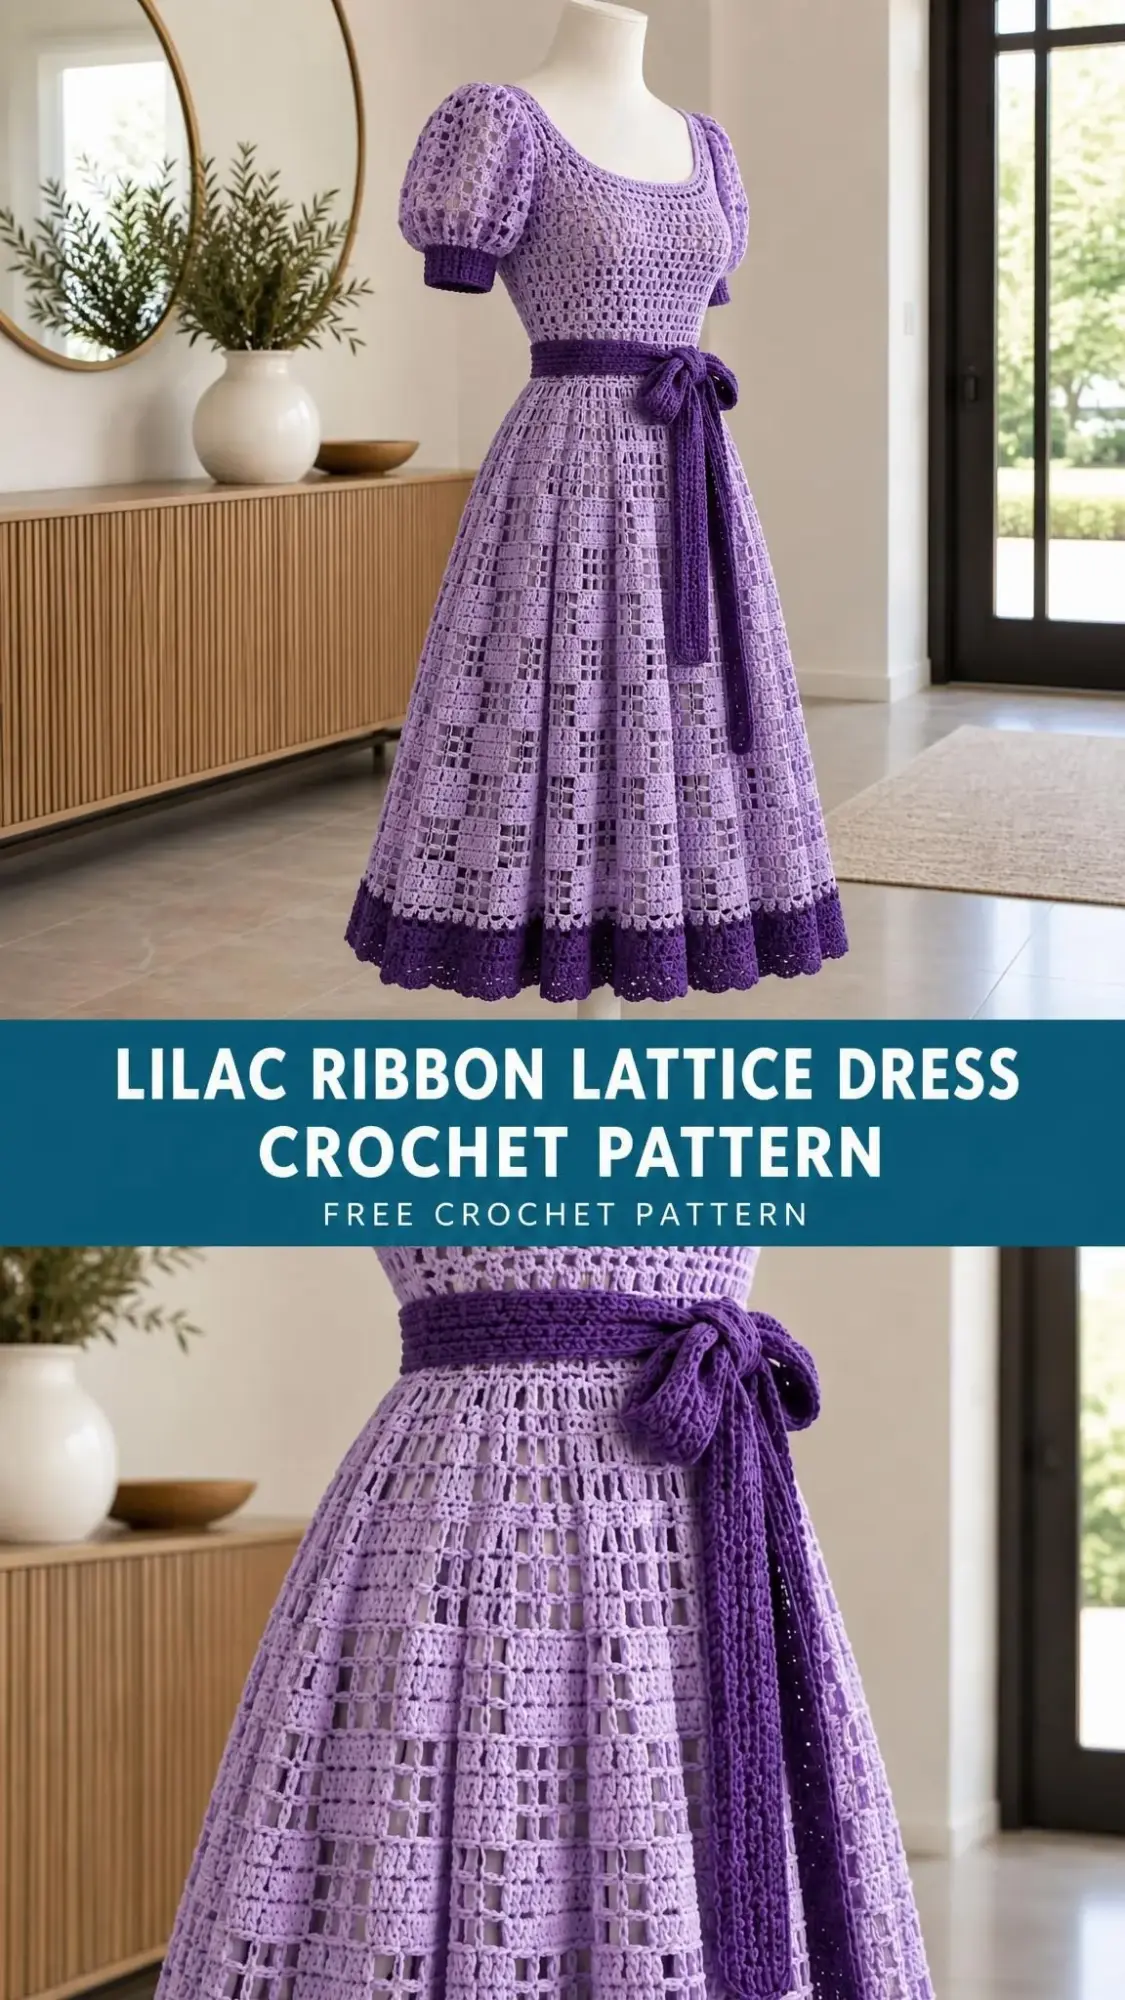
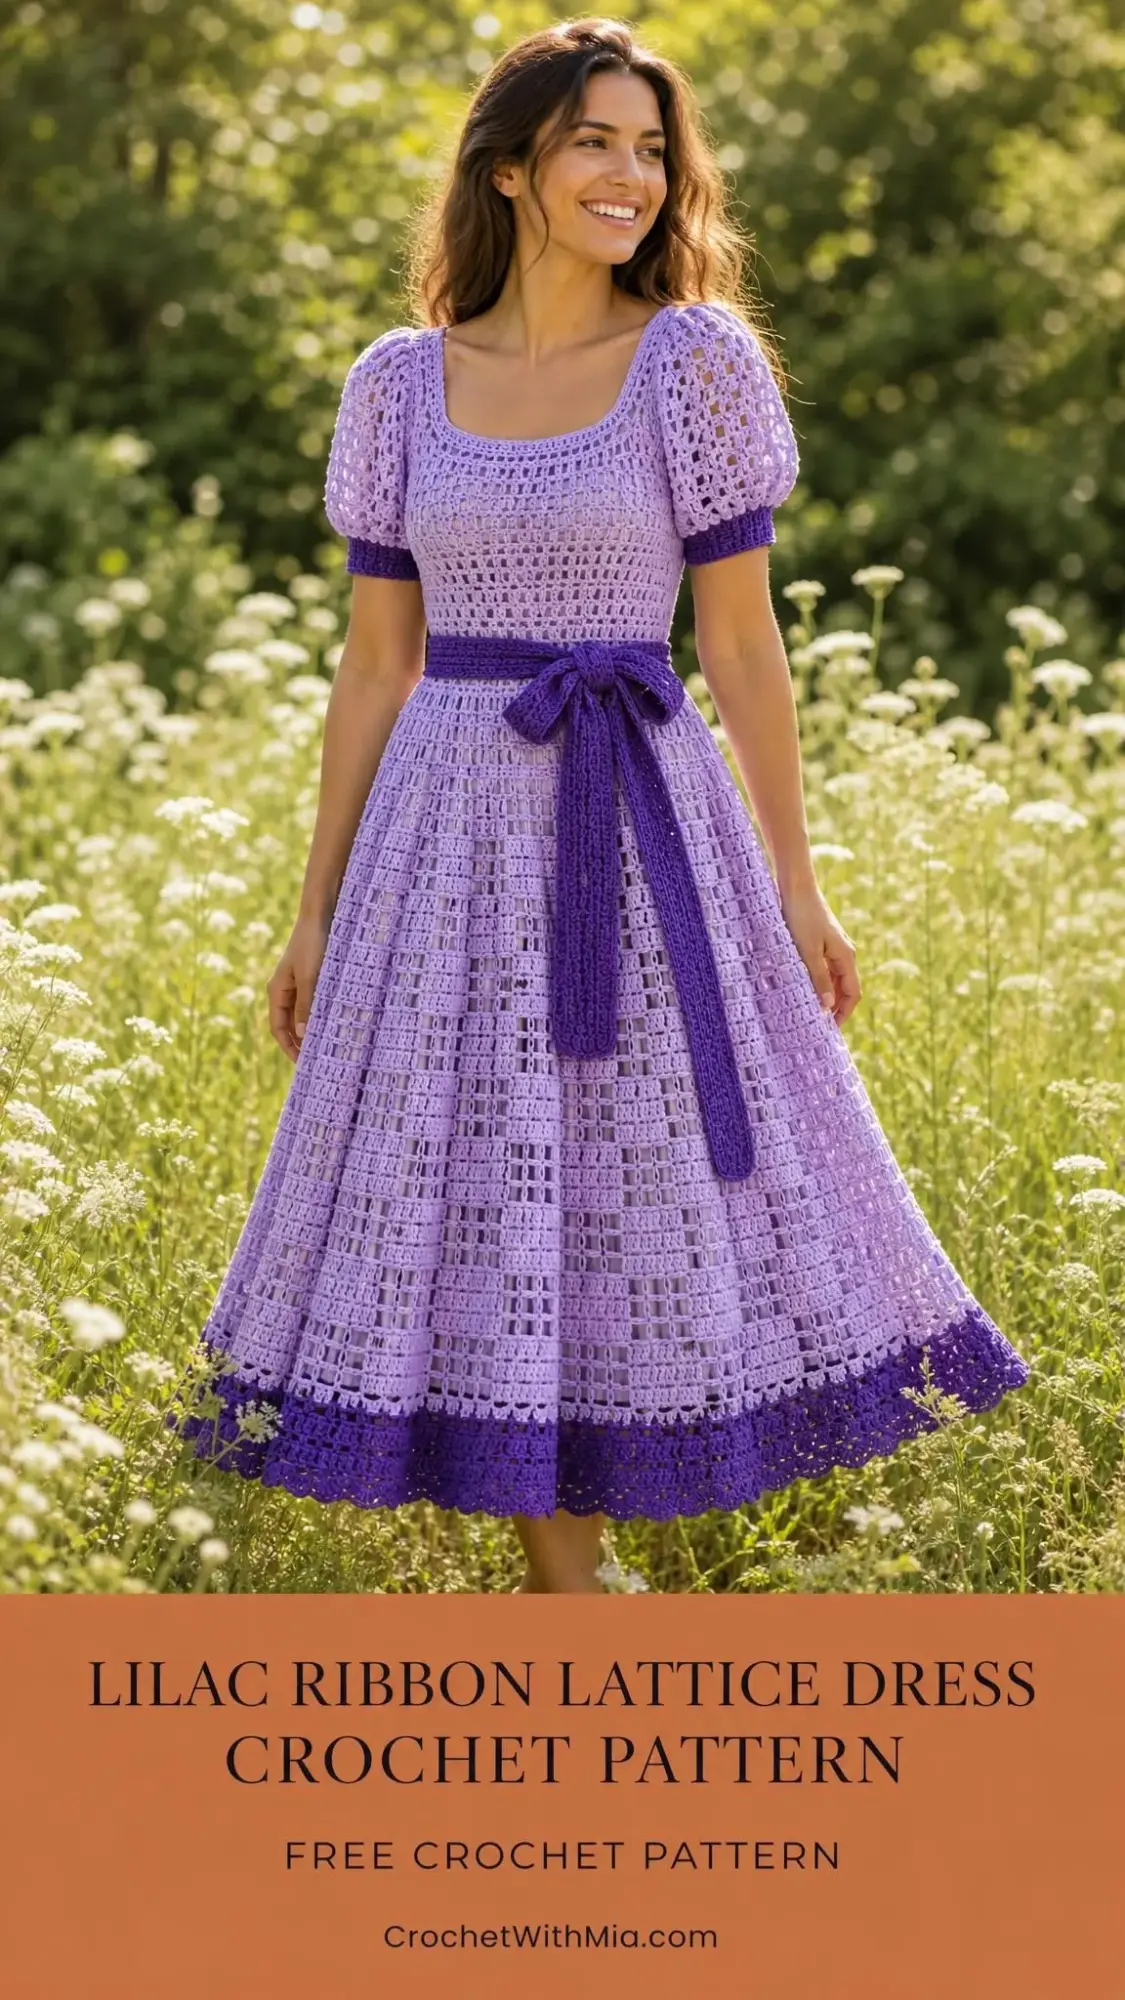
The design achieves something lovely: a vintage silhouette with modern simplicity. The checker lattice stitch creates those signature square windows throughout, while the deep violet accents at the hem, cuffs, and belt add just the right amount of contrast. Short puff sleeves give it a romantic feel without overwhelming the clean lines.
Whether you’re planning a special occasion piece or simply want a stunning project to sink your hooks into, this intermediate to advanced pattern delivers. The six-panel skirt construction might sound complex, but each panel is worked identically, so once you’ve mastered one, you’ve mastered them all. Let’s walk through everything you need to bring this lilac beauty to life.
About This Crochet Dress Pattern
The Lilac Ribbon Lattice Dress is worked as separate flat pieces: two bodice panels (front and back), six rectangular skirt panels, and two sleeve rectangles. Everything comes together at assembly, where the skirt’s generous 180 cm of fabric gets gathered into the 100 cm bodice waist. That gathering is what creates the lovely fullness you see in the finished piece.
Finished measurements:
- Bust: approximately 100 cm
- Intended body bust: 90 to 94 cm (with 6 to 10 cm ease)
- Untied waist: 100 cm, cinched with belt to 80 to 90 cm
- Skirt length: 72 cm
- Bodice shoulder to waist: 40 cm
- Sleeve length: 20 cm
This is a single-size draft pattern. Before you begin, compare these measurements to a well-fitting garment you already own. If you need to adjust for a larger size, you’ll want to make a new swatch and recalculate your repeat counts.
Materials You’ll Need
Yarn:
- Smooth sport-weight cotton, approximately 300 m per 100 g
- Main colour (lilac): 882 g (2646 m)
- Accent colour (deep violet): 120 g (360 m) total
These amounts include a planning allowance. Confirm your actual needs by weighing your swatch. Use yarns of equal thickness throughout.
Hooks:
- 3.5 mm for main fabric
- 3.0 mm for firm borders and belt
Adjust hook sizes as needed to meet blocked gauge.
Notions:
- Tapestry needle
- Removable stitch markers
- Tape measure
- Scissors
- Blocking mats and rust-resistant pins
- Sewing needle and matching thread
- 40 cm dress zipper
- 1 m of 10 mm cotton tape (for waist stabilization)
- Optional: 6 mm sew-on pearls for layered flowers
Important: Because this is openwork with visible holes, you’ll need a separate opaque slip for wearing underneath.
Gauge
Getting gauge right is essential for this dress to fit properly. Don’t skip this step!
Blocked main-stitch gauge: 4 lattice repeats and 10 rows = 10 x 10 cm
One repeat measures approximately 2.50 cm wide. Always measure away from edges for accuracy.
Border gauge: 20 single crochet (sc) and 24 sc rows = 10 cm
Making your swatch: Work the lattice stitch recipe with N = 8 (that’s 8 horizontal motif repeats). Complete at least 20 rows. Wet-block your swatch, dry it flat for 24 hours, then hang it for 12 hours to check for cotton growth. Measure the central 10 cm and recheck your length after hanging.
Keep your swatch for washing and colourfastness tests. This gauge governs every count in the pattern, so if you can’t achieve it without distorting your fabric, change your hook size or yarn.
Abbreviations and Stitch Definitions
Here’s every abbreviation you’ll encounter, with plain-English explanations:
- ch = chain: wrap yarn over hook and pull through the loop on your hook
- sc = single crochet: insert hook, pull up a loop, yarn over and pull through both loops
- hdc = half double crochet: yarn over, insert hook, pull up loop, yarn over and pull through all three loops
- dc = double crochet: yarn over, insert hook, pull up loop, (yarn over, pull through two loops) twice
- tr = treble crochet: yarn over twice, insert hook, pull up loop, (yarn over, pull through two loops) three times
- sl st = slip stitch: insert hook, yarn over and pull through both the stitch and the loop on hook
- st(s) = stitch(es)
- sp = space
- RS/WS = right side/wrong side
- BLO = back loop only: work into only the back loop of the stitch
- rep = repeat
- N = number of horizontal motif repeats in a piece
Understanding the Lattice Repeat
One lattice repeat equals ch 3 followed by 3 dc. Each row starts with one edge dc. A row with N repeats contains 3N+1 dc and N ch-3 spaces. The beginning ch 3 always counts as the first dc.
The key to this stitch pattern: keep your blocks directly above blocks to form the square window columns. Don’t mistake a ch-3 window for a turning chain!
Special Stitches: The Lattice Pattern
This stitch creates the beautiful checker effect throughout the dress. Here’s how it works:
Foundation: Ch 6N+4 (where N is your number of repeats)
Row 1: Dc in fourth ch from hook, [ch 3, skip 3 ch, dc in each of next 3 ch] N times. The skipped three turning chains do not count on this foundation row. Count: 3N+1 dc and N spaces.
Row 2 and all plain rows: Ch 3, turn, skip first dc, dc in each of next 2 dc, [ch 3, skip ch-3 space, dc in each of next 3 dc] N-1 times, ch 3, skip last space, dc in final edge dc. Count: 3N+1 dc, N spaces.
Row 3 (mirror row): Ch 3, turn, skip first edge dc, [ch 3, skip space, dc in each of next 3 dc] N times. Count: 3N+1 dc, N spaces.
Alternate Rows 2 and 3 throughout. Three dc blocks alternate with ch-3 windows, and columns align vertically.
Pattern Notes Before You Begin
Read through all instructions before starting. Work flat and turn after every row. Mark Row 1 as your right side (RS).
Count at every row end. Check your measurements after each 10 cm of work. This catches mistakes early when they’re easier to fix.
Fasten off with 20 cm tails for weaving in later. Seams use only the edge loops.
For neckline shaping, restart your yarn at a complete motif boundary. Don’t carry yarn across the neck gap. The stepped neckline shaping gets smoothed out with the border.
Colour placement: Use lilac for all main pieces. Use deep violet on the last two skirt rows, all borders, and the belt.
Back Bodice Instructions
With main colour (lilac) and 3.5 mm hook, start the foundation with N = 20. Work upward from the waist.
Row 1: Work foundation row. Count: 20 lattice repeats.
Rows 2 through 37: Work the next plain recipe row. Count: 20 lattice repeats each row.
Neckline Shaping:
After Row 37, mark the central 8 repeats as the back neck opening. Work the outer 6 repeats at each side separately, restarting at the outer edge or neck edge as required by row direction. Leave the marked center unworked.
At a lattice boundary, retain the border dc shared with the neighboring repeat. It’s an edge, not an additional repeat.
Rows 38 through 40, each shoulder: Continue the recipe over the outer 6 repeats only. Count: 6 lattice repeats per shoulder.
Front Bodice Instructions
Begin the same as the back with N = 20. Work the following rows as one panel.
Rows 1 through 32: Work foundation row, then plain recipe rows. Count: 20 lattice repeats each row.
Front Neckline Shaping:
Leave center 4 repeats unworked and work each side separately. On a reduction row, leave one full repeat at the neck edge unworked and restart at the new motif boundary. Border stitches smooth these shallow steps.
Rows 33 and 34, each shoulder: Continue next recipe row over this shoulder only. Count: 8 lattice repeats per shoulder.
Row 35, each shoulder: Omit one complete neck-edge repeat, rejoin yarn and work remaining motifs. Count: 7 lattice repeats per shoulder.
Row 36, each shoulder: Continue next recipe row. Count: 7 lattice repeats per shoulder.
Row 37, each shoulder: Omit one complete neck-edge repeat, rejoin yarn and work remaining motifs. Count: 6 lattice repeats per shoulder.
Rows 38 through 40, each shoulder: Continue next recipe row. Count: 6 lattice repeats per shoulder.
Skirt Panels (Make Six)
Work from waist downward. Start with N = 12. Each rectangular panel measures 30 cm wide. The combined 180 cm top gets gathered into the 100 cm bodice waist during assembly, creating that lovely skirt fullness.
Row 1: Work foundation row. Count: 12 lattice repeats.
Rows 2 through 72: Work next plain recipe row, following colour plan. Count: 12 lattice repeats each row.
Checkpoint: Block all six panels to 72 cm length, within one row of tolerance. Width should be 30 cm.
Sleeves (Make Two)
Use main colour, 3.5 mm hook, and N = 16. Work from shoulder edge to cuff. Both sleeve rectangles start at 40 cm wide. The wrist edge gets gathered to the cuff for a balloon shape.
Row 1: Work foundation row. Count: 16 lattice repeats.
Rows 2 through 16: Continue the plain recipe row. Count: 16 lattice repeats each row.
Checkpoint: Each rectangle measures 40 cm wide and approximately 16 cm long before border. Ensure both sleeves match.
Waist Tie Belt
With 3.0 mm hook and belt colour (deep violet):
Row 1: Ch 8, sc in second chain and next 6 chains. Count: 7 sc.
Row 2 and every following row: Ch 1, turn, sc BLO in each stitch. Count: 7 sc per row.
Continue until belt measures 160 cm. Record your row total because row gauge varies with hook and yarn.
Checkpoint: Belt should measure 160 x approximately 3.5 cm. Don’t stretch while measuring. Make it longer only if needed to tie comfortably.
Assembly
Gather your lilac yarn tails, tapestry needle, 3.5 mm hook (for optional slip-stitch seams), zipper, sewing needle, thread, and cotton waist tape.
Join 1, Shoulders: Mattress-stitch corresponding outer shoulder edges. Align 6 complete motifs on each seam. You’ll have 2 shoulder seams with 6 motifs each.
Join 2, Sleeves: Mark 20 cm down each side of front and back. Match sleeve midpoint to shoulder seam, then sew its 40 cm upper edge around this opening. For puff styling, ease 2 cm at the sleeve midpoint.
Join 3, Sides: Sew from waist to armhole on the right side. On the left, leave the bodice portion of the 40 cm zipper opening. Continue that opening into the skirt below waist as needed. Close sleeve underarms.
Join 4, Skirt: Align equal row ends and mattress-stitch six panels into a ring, retaining the left-side zipper gap.
Join 5, Waist: Quarter-mark both bodice and skirt. Run two gathering threads through skirt foundation loops. Draw to 100 cm, matching quarter marks. Sew to bodice waist. Sew stabilizing cotton tape inside the waist without stretching.
Join 6, Closure: Hand-baste then backstitch zipper tapes to the inside of the left opening. Keep teeth clear of crochet loops. Secure top and lower stops.
Assembly Checkpoint: Shoulders should be level. Waist measures 100 cm before belt. Armholes measure approximately 40 cm perimeter. Zipper opens without catching. Try over the intended slip before trimming.
Edgings and Details
Use lilac and deep violet with 3.0 mm hook. Use accent colour for designated hem, neckline, and cuffs.
Neckline Edging:
Round 1: Join at back neck. Sc evenly around, approximately 2 sc per dc-row end and 1 sc per stitch. Adjust at steps to lie flat. At square inside corners, work sc2tog (pull up a loop in each of 2 stitches, yarn over and draw through all 3 loops) across the corner. Join with sl st. Record your stitch count as E.
Round 2: Ch 1, sc in each sc, join. For round and V necks, work sc2tog at any remaining inner step. Record decrease total as D.
Hem Edging:
Round 1: Sc evenly along lower edge without drawing it in. Work one sc per dc and one per chain. Don’t count seam loops twice. Record count as H.
Rounds 2 through 8: Ch 1, sc BLO in every sc, join. Count: H sc each round.
Cuffs (Make Two):
Row 1: Ch 9, sc in second ch and across. Count: 8 sc.
Row 2 and every subsequent row: Ch 1, turn, sc BLO across until strip fits comfortably around hand and wrist (approximately 22 to 24 cm).
Cuff join: Sew strip ends together and evenly gather sleeve edge to cuff ring. Sew through edge loops. Each cuff should be approximately 4 cm deep.
Finishing Your Dress
Weaving in ends: Pass each tail through at least 5 cm of solid stitches, reverse direction twice, and trim only after the first wash.
Blocking: Soak according to yarn label, lift supported, press between towels, and lay flat to finished measurements. Shape each scallop gently.
Final check: After fully dry, hang for 12 hours. Remeasure length and check zipper, belt, and decoration.
Final measurements to confirm:
- Bust approximately 100 cm
- Bodice 40 cm
- Skirt 72 cm plus border
- Sleeves 20 cm plus any extra scallop depth
Cotton can grow in wear, so shorten only after the hanging check. Store folded, not suspended from shoulders.
Care and Safety Notes
Follow your yarn care label. For cotton, cool gentle hand washing and flat drying work well. Test colours first. Support the full wet garment and avoid wringing. Remove detachable trim before washing.
This is an adult garment. Use an opaque slip for coverage. Secure any pearls or buttons and check them regularly. Keep long belt ends clear of moving equipment and flames. Check that the hem doesn’t trip the wearer.
This dress is a true statement piece, the kind of project that reminds you why you fell in love with crochet in the first place. If you make the Lilac Ribbon Lattice Dress, please save this pattern to your Pinterest boards so you can find it easily later. And I’d love to see your finished piece! Leave a comment below or tag your photos on social media. Happy crocheting!
Want a Quick & Easy Printable Version?
Get a clean, beautifully formatted PDF of this pattern — easy to follow step by step, ready to print or save on any device. No scrolling, no distractions, just the pattern.
Get the Printable PDF →