I don’t know about you, but I love a crochet dress that actually looks like a dress. Not a glorified tunic. Not a beach cover-up. A real, proper, wear-it-to-dinner dress with structure, shape, and serious presence.
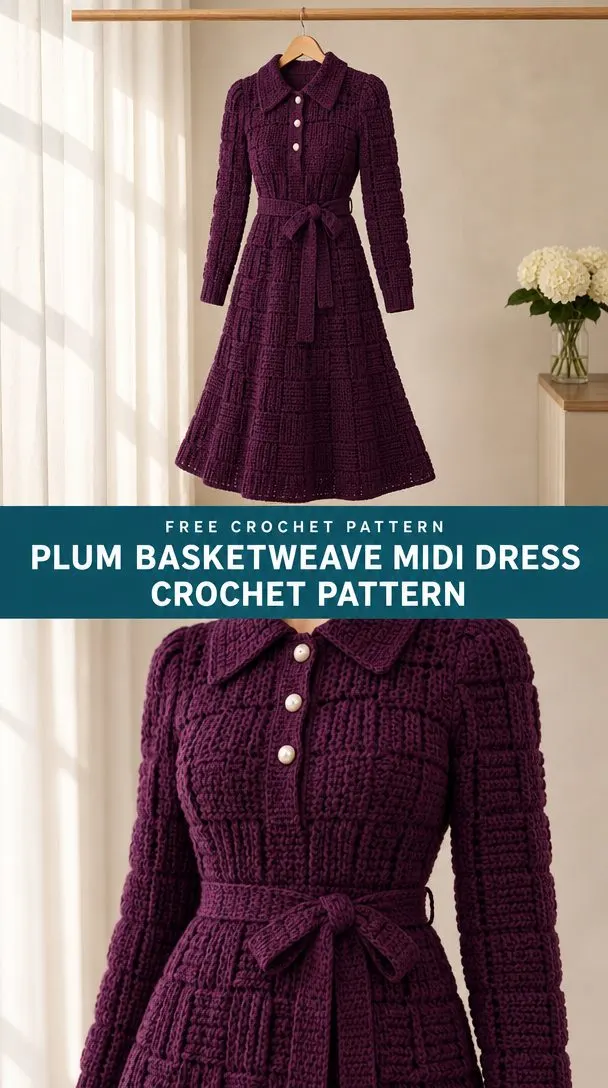
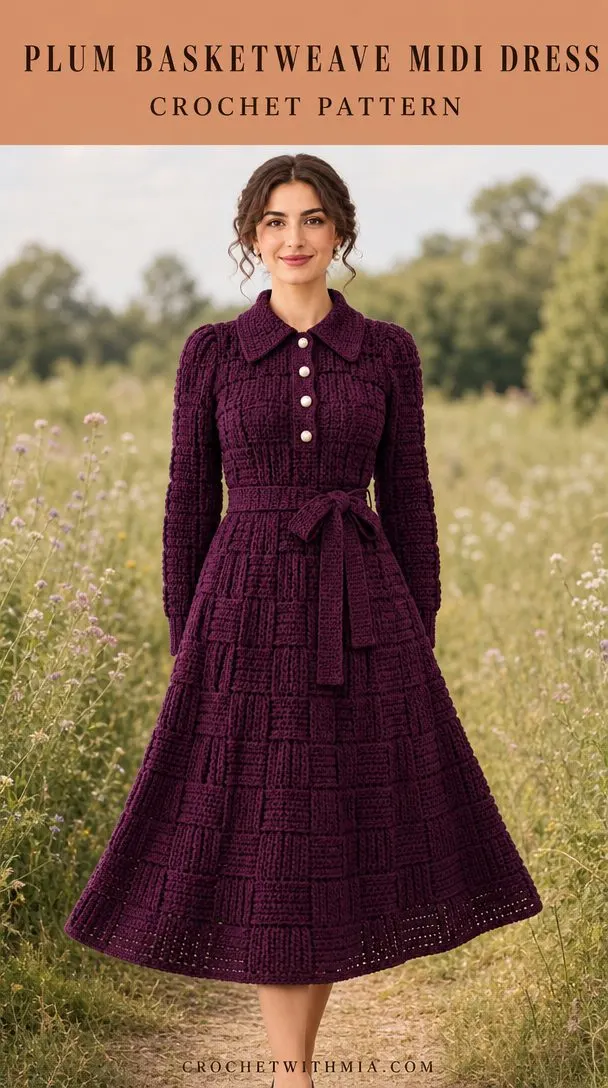
This plum basketweave midi dress delivers exactly that. The rich dark plum color feels elegant without being fussy, and that textured basketweave stitch creates the kind of visual depth that makes people lean in and ask, "Wait, did you make that?" The pointed collar, pearl-colored buttons, and matching belt bring it all together into something genuinely sophisticated.
Whether you’re crocheting for yourself or dreaming up a statement piece for someone special, this pattern walks you through every step. From the top-down yoke construction to the gently flared A-line skirt, you’ll know exactly what to do and when.
Why This Design Works
The basketweave stitch is the star here. Those alternating raised and recessed blocks create a woven texture that photographs beautifully and feels substantial in the hand. It’s not lacy or see-through, which means this dress has real presence and drape.
The construction is clever too. You’ll work the yoke from the neck down, which means no seaming the shoulders later. Once you reach the underarms, you separate the sleeves and continue shaping the bodice with gentle decreases down to the waist. Then the skirt flares out gradually with evenly spaced increases, giving you that classic A-line silhouette.
The pointed collar and four pearl buttons add vintage charm without overwhelming the design. And the crocheted belt? It ties at the waist to define your shape, but the dress looks polished with or without it.
Skill Level
This pattern is best suited for intermediate crocheters who are comfortable with:
- Working in the round and in flat rows
- Front post and back post double crochet stitches
- Basic shaping (increases and decreases)
- Following a longer pattern with multiple sections
If you’ve never tried post stitches before, don’t panic. They’re easier than they sound, and this pattern defines them clearly. The basketweave texture is simply a matter of alternating which direction you wrap around the stitch posts.
Finished Measurements
This pattern is written for one sample size. Please compare these measurements to your own body before starting:
| Measurement | Sample Size |
|---|---|
| Bust | 92 cm |
| Waist | 80 cm |
| Neck to waist | 44 cm |
| Waist to hem | 70 cm + edging |
| Upper sleeve | 37 cm |
| Wrist | 18 cm |
The dress fits an adult bust of 84 to 88 cm with 4 to 8 cm of positive ease. If your measurements differ significantly, see the adjustment notes in Section 5 of the pattern.
Materials
Yarn:
- DK weight / category 3 cotton blend, approximately 250 m per 100 g
- Dark plum: 1350 g / approximately 3375 m
The yarn estimate includes the belt and a modest allowance. If you plan to lengthen the skirt or your swatch is denser than the pattern gauge, buy an extra 15 to 20 percent.
Hooks:
- 4.0 mm main hook
- 3.5 mm edging hook
- Or sizes needed to achieve gauge
Notions:
- Tapestry needle
- Scissors
- Measuring tape
- 12 locking stitch markers
- Blocking mat and pins
- Matching strong sewing thread and needle
- 4 buttons, 15 mm diameter, in pearl color
An opaque slip is recommended if your swatch shows gaps between stitches.
Gauge
Blocked main fabric: 20 stitch positions and 12 rows/rounds = 10 x 10 cm with the 4.0 mm hook.
A chain-space position counts as one position in the mesh yoke. Ribbing is measured relaxed, not pulled sideways.
How to swatch:
Chain 35. Double crochet (dc) in the third chain from the hook and in each chain across (33 dc). Work 20 more rows in the bodice stitch, using chain 2 to turn each row. Wash and dry flat. Measure the central 10 cm away from the edges. Change hook size and repeat until both stitch and row gauge are close.
Abbreviations and Special Stitches
- ch = chain
- sl st = slip stitch
- sc = single crochet
- hdc = half double crochet
- dc = double crochet
- FPdc = front post double crochet
- BPdc = back post double crochet
- BLO = back loop only
- st(s) = stitch(es)
- sp(s) = space(s)
- RS/WS = right side / wrong side
- rnd = round
- rep = repeat
- inc = increase
- dec = decrease
Front Post Double Crochet (FPdc)
Yarn over, insert your hook around the post of the indicated stitch from the front, pull up a loop, and finish as a regular dc. Do not also crochet into the top loops of that same stitch.
Back Post Double Crochet (BPdc)
Same as FPdc, but insert your hook around the post from the back.
dc2tog
Work a partial dc in each of the next 2 stitches, leaving the last loop of each on the hook. Yarn over and draw through all 3 loops. This consumes 2 stitches and produces 1 stitch.
sc2tog
Same principle as dc2tog, without the initial yarn overs.
Basketweave Stitch
Blocks are 4 posts wide and 4 rows tall. In RS rows or unturned rounds, work FPdc across the first block and BPdc across the next. Alternate across. On WS rows, reverse FPdc and BPdc so the same face remains raised. Swap which blocks are raised after every block-height of rows. Work incomplete edge blocks only over the available stitches.
Picot
Chain 3, slip stitch into the first of these 3 chains.
Shell
5 dc into the same specified stitch or space.
Written repeats in square brackets are worked exactly the stated number of times.
Pattern Notes
Turning chains:
- Chain 2 at a dc row start does not count as a stitch. Work into the first stitch.
- Chain 1 at a sc row start does not count.
Joined rounds:
End with a slip stitch in the first actual stitch. Never count the join. Do not turn joined rounds unless directed. Mark the first stitch and move the marker each round.
Corner spaces:
Four ch-2 corner spaces separate the yoke segments. Corner chains are excluded from dc-position totals. An increase corner is [dc, ch 2, dc] into that corner space. The two new dc belong to the adjacent segments, adding 8 positions across all four corners.
After the underarm split:
There are no corner spaces. Count underarm foundation chains as stitches on the next round. Work shaping stitches as ordinary dc, then resume the established texture. At each increase round, distribute the additions in plain columns. Do not double-work a rib post.
Important: Gauge and finished measurements take priority over the picture. The illustration is an AI-generated design guide. The written stitch route is an original interpretation of the visible features. Review here covers internal counts, completeness, and page layout. It does not mean a physical sample was crocheted.
Construction Overview
Work order:
- Neck foundation
- Shaped yoke
- Underarm split
- Fitted bodice
- Flared skirt
- Sleeves
- Collar, neck edge, and motifs
- Assembly and blocking
Try on the dress over a slip after the underarm split and again at the waist. This helps you catch fit issues before committing to the skirt.
Instructions
Yoke
Begin flat at center front. Chain 86. The yoke remains open until the underarm split. Place a marker in each corner space.
Row 1 (RS): Dc in third ch and next 14 ch (15 dc), ch 2, dc 12, ch 2, dc 30, ch 2, dc 12, ch 2, dc 15. Turn. (84 dc; 4 corner spaces)
Rows 2 through 28: Work basketweave across each segment. Work an increase corner into each corner space. Chain 2 and turn after every row. Count dc plus ch-1 positions in the mesh version.
| Row | Positions | Corner Spaces |
|---|---|---|
| 2 | 92 | 4 |
| 3 | 100 | 4 |
| 4 | 108 | 4 |
| 5 | 116 | 4 |
| 6 | 124 | 4 |
| 7 | 132 | 4 |
| 8 | 140 | 4 |
| 9 | 148 | 4 |
| 10 | 156 | 4 |
| 11 | 164 | 4 |
| 12 | 172 | 4 |
| 13 | 180 | 4 |
| 14 | 188 | 4 |
| 15 | 196 | 4 |
| 16 | 204 | 4 |
| 17 | 212 | 4 |
| 18 | 220 | 4 |
| 19 | 228 | 4 |
| 20 | 236 | 4 |
| 21 | 244 | 4 |
| 22 | 252 | 4 |
| 23 | 260 | 4 |
| 24 | 268 | 4 |
| 25 | 276 | 4 |
| 26 | 284 | 4 |
| 27 | 292 | 4 |
| 28 | 300 | 4 |
Checkpoint: Two edge half-panels of 42, one center panel of 84, and two sleeves of 66 positions. Total 300. Depth approximately 23.3 cm.
Underarm Split and Bodice
Work first 42-position half-panel, ch 8, skip 66 sleeve positions, work center 84-position panel, ch 8, skip 66 sleeve positions, work final 42-position half-panel. Join to first stitch. Leave the four corner spaces unworked. (184 body positions; 66 held positions per sleeve)
The join closes the bottom of the front placket. Keep both opening edges separate above it for the button bands. Continue basketweave in unturned rounds.
The split is not counted as Bodice Round 1. Work over the chains on Round 1. Mark 8 equally spaced points, 23 stitches apart in the initial 184-stitch round. Move these markers to keep decreases evenly distributed.
Bodice Rounds 1 through 5: Work established bodice texture in every position. (184 sts)
Bodice Round 6: [21 stitches in texture, dc2tog] 8 times. (176 sts)
Bodice Rounds 7 through 11: Work established bodice texture in every position. (176 sts)
Bodice Round 12: [20 stitches in texture, dc2tog] 8 times. (168 sts)
Bodice Rounds 13 through 17: Work established bodice texture in every position. (168 sts)
Bodice Round 18: [19 stitches in texture, dc2tog] 8 times. (160 sts)
Bodice Rounds 19 through 25: Work established bodice texture in every position. (160 sts)
Checkpoint: 160 stitches = 80 cm waist. Neck-to-waist length about 44 cm, before any added collar. If the fit is wrong, correct it here before adding the skirt.
Skirt
Skirt Round 1: [Dc in next 3 sts, 2 dc in next st] 40 times. Join. (200 sts)
On ordinary skirt rounds, work the established rib or basketweave texture. On each numbered increase round below, divide the old count into the 16 blocks specified. Work each block in texture with 2 dc in its last stitch. Each increase round adds 16 stitches. Re-establish the texture over the new positions on the next round.
Skirt Round 8: [12 sts in texture, 2 dc in next st] 8 times, then [11 sts in texture, 2 dc in next st] 8 times. (216 sts)
Skirt Round 16: [13 sts in texture, 2 dc in next st] 8 times, then [12 sts in texture, 2 dc in next st] 8 times. (232 sts)
Skirt Round 24: [14 sts in texture, 2 dc in next st] 8 times, then [13 sts in texture, 2 dc in next st] 8 times. (248 sts)
Skirt Round 32: [15 sts in texture, 2 dc in next st] 8 times, then [14 sts in texture, 2 dc in next st] 8 times. (264 sts)
Skirt Round 40: [16 sts in texture, 2 dc in next st] 8 times, then [15 sts in texture, 2 dc in next st] 8 times. (280 sts)
Skirt Round 48: [17 sts in texture, 2 dc in next st] 8 times, then [16 sts in texture, 2 dc in next st] 8 times. (296 sts)
Skirt Round 56: [18 sts in texture, 2 dc in next st] 8 times, then [17 sts in texture, 2 dc in next st] 8 times. (312 sts)
Skirt Round 64: [19 sts in texture, 2 dc in next st] 8 times, then [18 sts in texture, 2 dc in next st] 8 times. (328 sts)
Skirt Round 72: [20 sts in texture, 2 dc in next st] 8 times, then [19 sts in texture, 2 dc in next st] 8 times. (344 sts)
Skirt Round 80: [21 sts in texture, 2 dc in next st] 8 times, then [20 sts in texture, 2 dc in next st] 8 times. (360 sts)
All unlisted skirt rounds: One textured stitch in each stitch, without increases. The stitch count stays at the most recent stated total. Stop at Round 84, before the hem edging.
Final Skirt Round 84: Work texture as scheduled, including an increase if this is an increase round. (360 sts)
Skirt checkpoint: 70 cm waist-to-hem before edging. The planned neck-to-hem length is approximately 114 cm, plus 1 to 3 cm for edging. Hold the garment upright for a few minutes to check cotton stretch before committing to the hem.
Sleeves (Make Two)
Sleeve Round 1: Join at underarm. 8 dc across underarm chains, then 66 sts in texture across held sleeve stitches. Join. (74 sts)
Sleeve Round 2: [Work 35 sts in texture, dc2tog] twice. Join. (72 sts)
On Rounds 4, 8, 12, 16, 20, 24, 28, 32, 36, 40, 44, and 48, decrease 2 stitches: [work half of the old count minus 2 sts in texture, dc2tog] twice. Work all other rounds evenly.
| Round | Stitches |
|---|---|
| 4 | 70 |
| 8 | 68 |
| 12 | 66 |
| 16 | 64 |
| 20 | 62 |
| 24 | 60 |
| 28 | 58 |
| 32 | 56 |
| 36 | 54 |
| 40 | 52 |
| 44 | 50 |
| 48 | 48 |
Continue evenly through Sleeve Round 54. Final sleeve count is 48 stitches.
Cuff Round 1: [Sc in next 2 sts, sc2tog] 12 times. Join. (36 sts)
Cuff Round 2: Dc in each st. Join. (36 sts)
Cuff Rounds 3 through 6: Alternate FPdc, BPdc around. Join each round. (36 sts per round)
Checkpoint: Cuff circumference about 18 cm. If your wrist cannot pass through, undo the cuff and use 40 or 44 stitches, keeping an even rib count.
Assembly
You’ll need: Main-color yarn (dark plum), 4.0 mm hook for joining gaps, tapestry needle, matching sewing thread, markers. Work with the garment RS out.
Pass 1: Close any small hole at the underarm corners with a short duplicate-stitch pass through adjacent stitch legs. Do not tighten the opening. (2 underarms closed)
Pass 2: Secure the bottom of the placket or keyhole with 3 small sewn reinforcing stitches across the join. Keep the opening above it separate. (1 reinforced opening when present)
Pass 3: Lay the garment flat and compare sleeve seams, waist, and hem. Remove temporary construction markers after the checks. (2 sleeves matched)
Checkpoint: The garment hangs level, the underarms contain no gaps, and the neck/front opening remains usable. Check bust and waist circumference again. Never force a too-small neck opening over the head.
Edgings and Details
You’ll need: Main yarn, 3.5 mm hook for neck/cuffs, 4.0 mm hook for motifs, tapestry needle, and matching thread.
Button Band
Row 1: With RS facing, work 42 sc evenly up the first front-opening edge, about 3 sc per 2 dc row ends. Turn. (42 sc)
Row 2: Ch 1, sc across. Turn. (42 sc)
Row 3: Ch 1, sc across. Fasten off. (42 sc)
Buttonhole Band
Row 1: Work 42 sc up the opposite opening edge. Turn. (42 sc)
Row 2: Ch 1, sc 4, ch 2, skip 2, sc 8, ch 2, skip 2, sc 8, ch 2, skip 2, sc 8, ch 2, skip 2, sc 6. Turn. (42 positions; 4 buttonholes)
Row 3: Sc in each sc and work 2 sc in each ch-2 space. Fasten off. (42 sc)
Collar
Row 1: Leaving the button bands unworked, pick up 80 sc evenly around the neck foundation, excluding corner chains. Turn. (80 sc)
Row 2: Ch 2, dc in every st. Turn. (80 dc)
Rows 3 through 8: Ch 2, 2 dc in first st, dc across to last st, 2 dc in last st. Turn. (82, 84, 86, 88, 90, 92 dc respectively)
Collar Edge: Sc around the two short ends and outer collar edge, placing 3 sc at each outer corner. Fasten off. (92 outer-edge sc plus measured end pickups)
Fold the collar outward. Tack each point lightly to the first collar row if it curls. Sew buttons opposite the holes using doubled thread and four passes through each button. Secure on the WS.
Belt
Row 1: Ch 7, sc in second ch and across. Turn. (6 sc)
Row 2: Ch 1, sc BLO across. Turn. (6 sc)
Following Rows: Repeat Row 2 until belt measures 140 cm. Fasten off. (6 sc per row; about 280 rows at 20 sc rows per 10 cm)
Hem
Hem Round: Sc evenly in each final skirt stitch. Join and fasten off. (Same stitch count as final skirt round)
Checkpoint: Edges lie flat without rippling. Buttons pass through their loops or holes. Compare the detail count with this design before weaving in ends.
Finishing
You’ll need: Matching yarn tails, tapestry needle, blocking pins and mat, main 4.0 mm hook only if a repair is needed. Use water suited to the yarn label.
Pass 1: Weave every yarn end through the WS of at least 6 stitches, reverse direction twice, and trim only after washing. (All ends secured)
Pass 2: Soak briefly in cool water with gentle detergent. Squeeze in a towel without twisting. Lay flat and pin the waist and skirt to the planned measurements. (1 blocked garment)
Pass 3: Let dry completely, remove pins, and measure again. Support the heavy skirt when lifting. Do not hang wet cotton. (1 final measurement check)
Checkpoint: Bust approximately 92 cm, waist 80 cm, skirt length 70 cm before edging. Sleeve lengths match within 0.5 cm. Record any difference and your actual yarn use before making another size.
Care and Safety
Follow the yarn label. Hand wash cool, support the weight, reshape, and dry flat. Do not wring or tumble dry unless the yarn permits it. Test strong colors for bleeding before combining them with pale yarn. Remove or protect delicate beads before laundering.
This adult garment is not a toy or a children’s pattern. Beads and buttons are small parts. Check their stitching before each wear and keep them away from babies and young children. Long belts and ties can catch, so secure them during wear. Lace needs an appropriate opaque slip for coverage.
Final Thoughts
This plum basketweave midi dress is a project that rewards patience. The construction is logical, the texture is satisfying to watch develop, and the finished piece is genuinely stunning. It’s the kind of dress that makes you feel like you’ve accomplished something real.
Take your time with gauge. Trust the checkpoints. And don’t skip the try-on moments at the underarm split and waist. They’ll save you from heartbreak later.
Thank you so much for choosing this pattern. If you make this dress, I would love to see it! Share your photos on Instagram or Facebook and tag your work so fellow crocheters can admire your creation. Happy hooking!
If you loved this pattern, save it to your Pinterest boards so you can find it whenever you’re ready to start. And if you do make this dress, drop a comment below. I’d love to hear how it turned out for you!