
Last summer, my niece called me in a panic three weeks before her garden party. She had this vision of a romantic lace dress but could not find anything that matched what she pictured. "Something vintage but not stuffy," she said. "With flowers, but make it modern." I grabbed my sketchbook and started drawing before we even hung up the phone.
Get the Ad-Free PDF Pattern
You can find the free pattern below, or you can purchase the ad-free printable PDF from my shop.
Get the Printable PDF →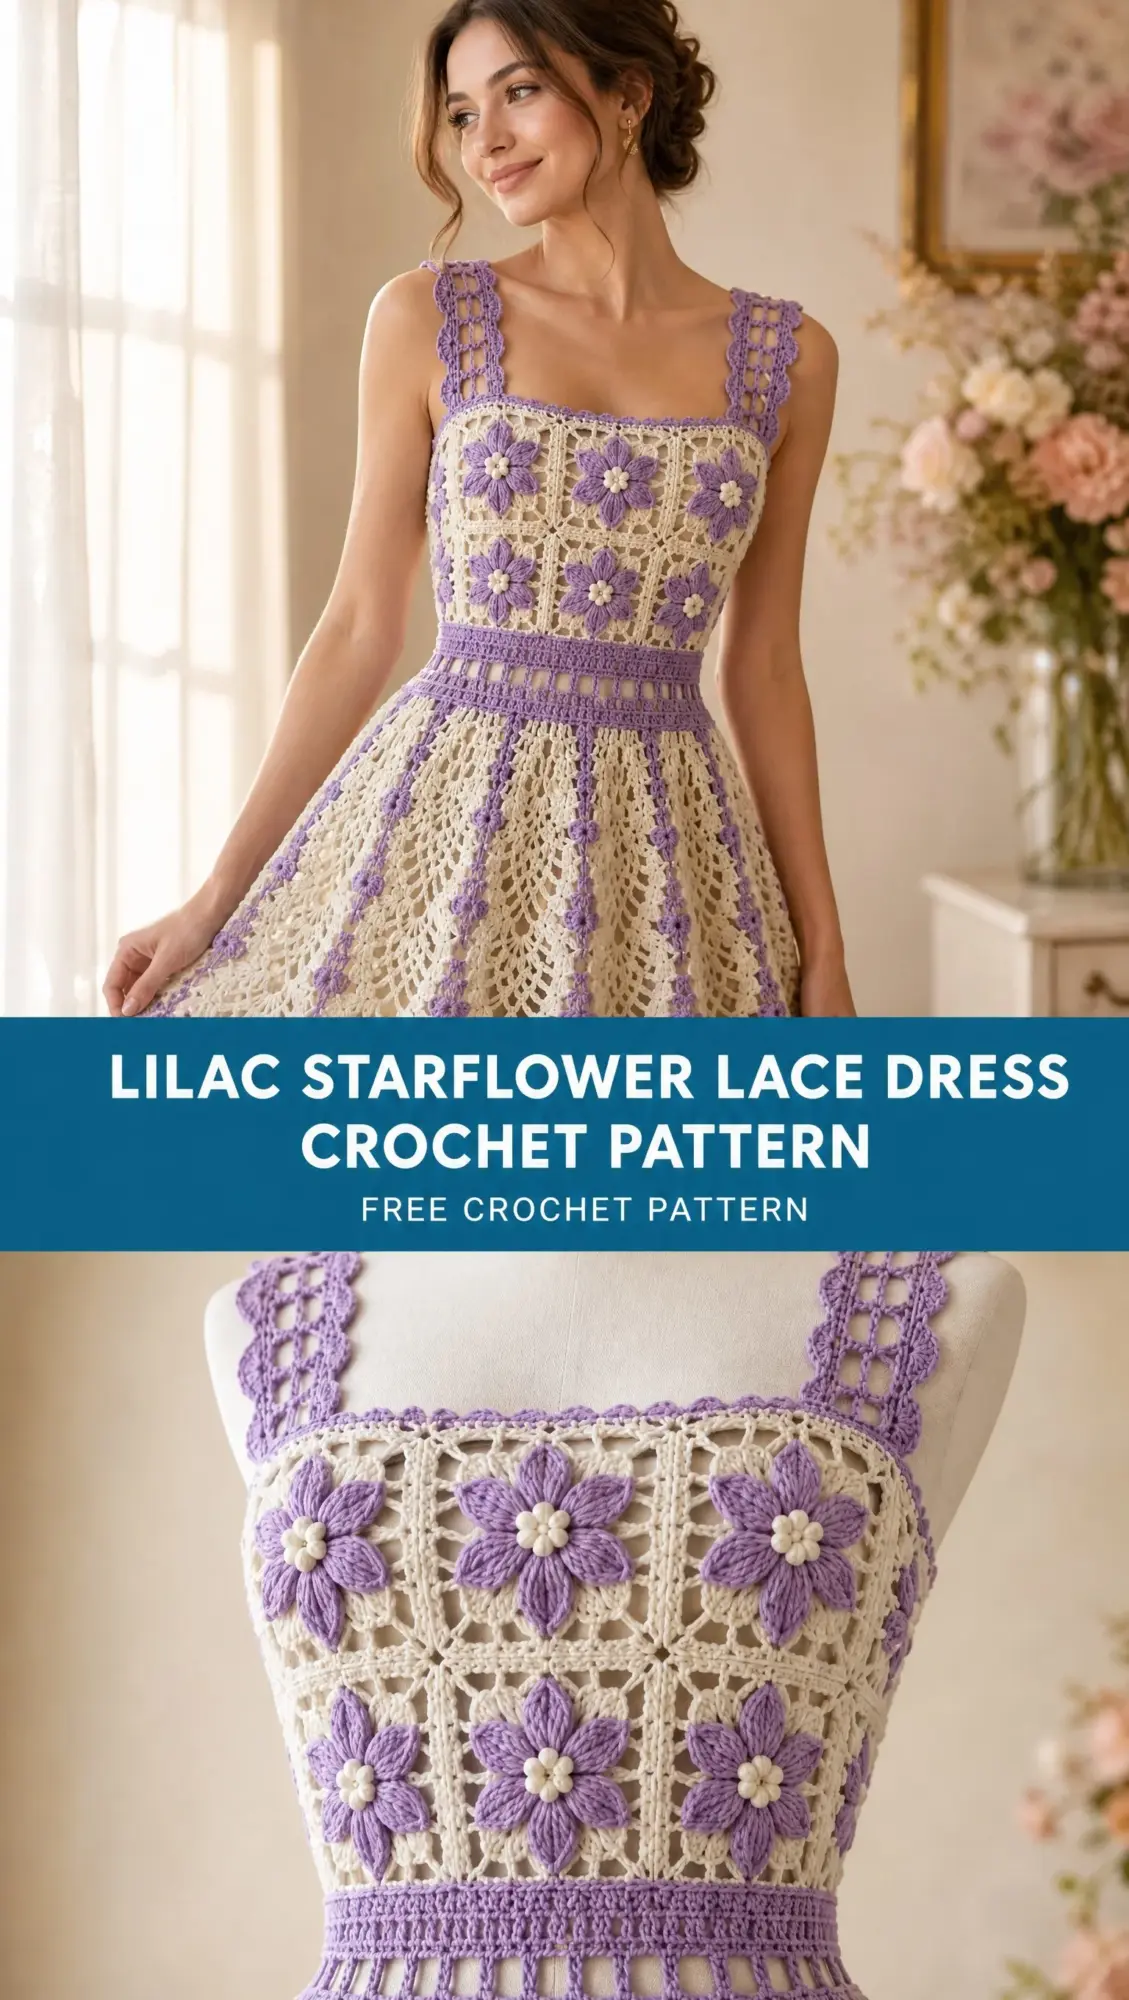
That phone call turned into late nights swatching pineapple lace, testing flower appliqués, and reworking the waistband until it sat just right. The result is this Lilac Starflower Lace Dress, and honestly, it might be the prettiest thing I have ever designed.
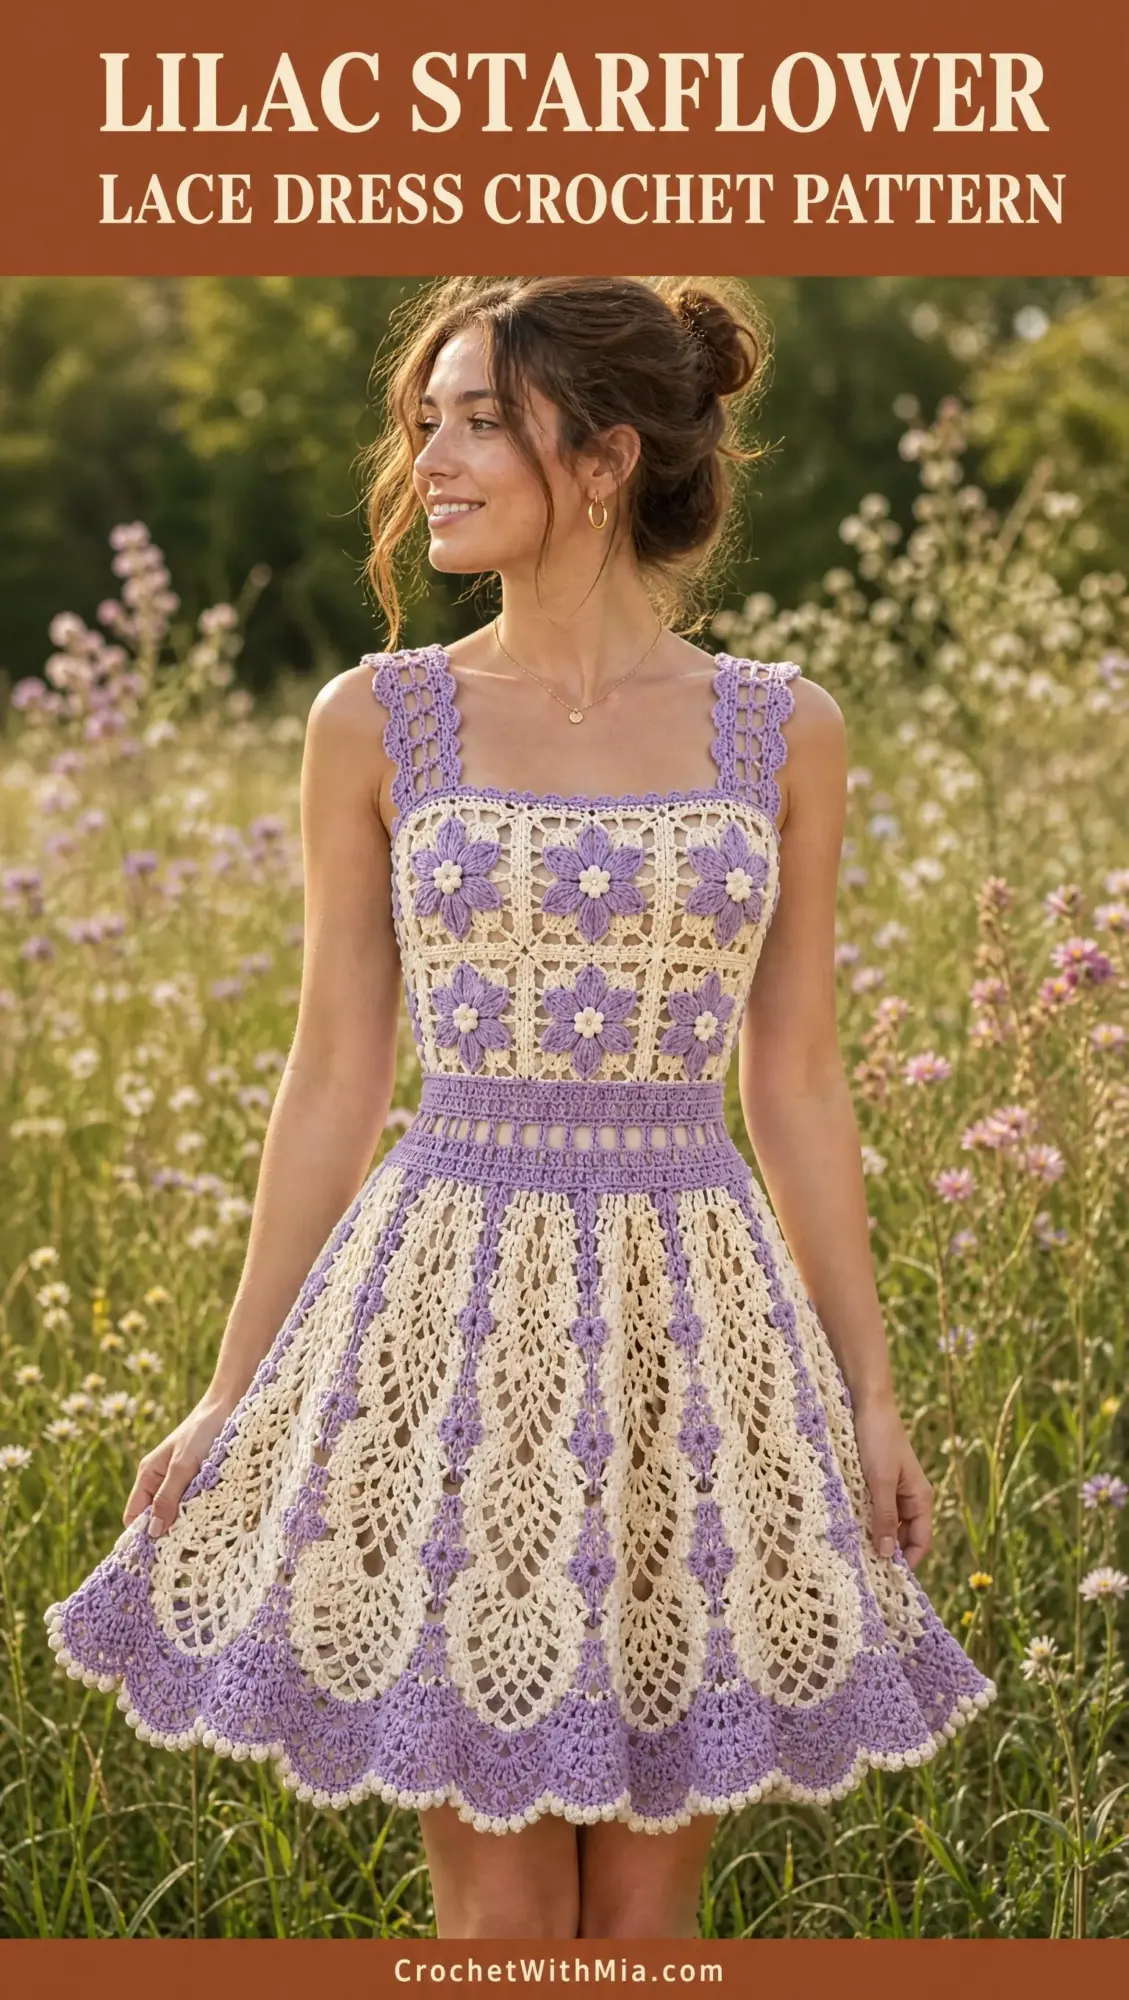
This fitted square neck sundress features raised six petal starflowers on a granny square bodice, a structured lilac waistband, and a full pineapple lace skirt that swishes when you walk. It is meant to be worn over a slip because the lace is intentionally open and airy. This is an intermediate to advanced project that will take between 35 and 55 hours depending on your size and how quickly you work the flowers. But trust me, every hour is worth it.
Project Overview and Construction
The Lilac Starflower Lace Dress is constructed in several distinct sections that come together beautifully. The bodice is assembled from blocked warm white granny square bases with separate lilac starflower appliqués sewn on top. Sizes S, L, and 2XL use narrow side gussets for half step sizing. A firm waistband is picked up around the lower bodice edge, and the skirt is worked downward in joined rounds of pineapple inspired lace. The hem is finished with a broad lilac scallop and delicate white picots. Two broad lace straps are made separately and sewn to the bodice.
This dress is designed with approximately 0 to 2 inches (0 to 5 cm) of negative ease at the bust, and the waist is stabilized. The skirt length measures approximately 18 inches (46 cm) from the waistband before the final border. Finished dress length runs approximately 31 to 34 inches (79 to 86 cm) from shoulder, depending on your strap length and blocking.
Why This Pattern is Intermediate to Advanced
I want to be upfront with you about what this project requires. You will need to join motifs cleanly, maintain blocked motif gauge throughout, place appliqués symmetrically, pick up an exact waistband stitch count, follow a lace repeat while increasing, and finish a scalloped border without ruffling. If you have made granny square garments before and feel comfortable with lace, you are ready for this dress.
Finished Sizes and Fit
This pattern includes adult sizes XS through 3XL. Here is the complete sizing breakdown:
Size XS: Body bust 30 to 32 inches (76 to 81 cm), finished bust 32 inches (81 cm), waistband stitches 128, bodice squares 16, skirt repeats 8
Size S: Body bust 33 to 36 inches (84 to 91 cm), finished bust 36 inches (91 cm), waistband stitches 144, bodice squares 16 plus gussets, skirt repeats 9
Size M: Body bust 37 to 40 inches (94 to 102 cm), finished bust 40 inches (102 cm), waistband stitches 160, bodice squares 20, skirt repeats 10
Size L: Body bust 41 to 44 inches (104 to 112 cm), finished bust 44 inches (112 cm), waistband stitches 176, bodice squares 20 plus gussets, skirt repeats 11
Size XL: Body bust 45 to 48 inches (114 to 122 cm), finished bust 48 inches (122 cm), waistband stitches 192, bodice squares 24, skirt repeats 12
Size 2XL: Body bust 49 to 52 inches (124 to 132 cm), finished bust 52 inches (132 cm), waistband stitches 208, bodice squares 24 plus gussets, skirt repeats 13
Size 3XL: Body bust 53 to 56 inches (135 to 142 cm), finished bust 56 inches (142 cm), waistband stitches 224, bodice squares 28, skirt repeats 14
The bodice height before the waistband is approximately 8 inches (20.5 cm), which equals 2 square rows. Strap length is customized after you try on the bodice.
Materials Needed
Yarn: #1 Super Fine / fingering weight mercerized or matte cotton
Here are the yardage requirements by size:
Hook: 2.75 mm (C-2). Use 2.5 mm or 3.0 mm if needed for gauge. Optional 2.5 mm hook for waistband if you need extra firmness.
Notions: Tapestry needle, locking stitch markers, rust proof pins, scissors, measuring tape
Optional: 1/4 inch (6 mm) clear elastic for the top edge or waistband, cotton voile or slip for coverage
Yarn Suggestions: Scheepjes Catona, Hobbii Rainbow Cotton 8/4, or KnitPro Mercerized fingering cotton. Choose a smooth yarn with crisp stitch definition.
If substituting yarn, match blocked gauge and fabric behavior rather than label weight alone. A very soft bamboo or loose spun yarn can stretch substantially in the skirt. Cotton or a cotton linen blend is more stable.
Gauge and Preparation
Blocked motif gauge: One completed warm white base square measures 4 x 4 inches (10 x 10 cm). Four rounds of double crochet (dc) granny clusters should lie flat without cupping.
Waistband gauge: 20 dc x 11 rows = 4 inches (10 cm)
Lace gauge is less critical, but the skirt should hang vertically without drawing in.
Make and wet block one complete square before starting production. If your square is too small, use a larger hook. If too large, use a smaller hook. A difference of even 1/4 inch (6 mm) per square compounds around the entire bodice, so this step matters.
Abbreviations
Special Stitches
Bobble: (Yarn over, insert hook, yarn over and pull up loop, yarn over and pull through 2 loops) 5 times in same stitch, yarn over and pull through all 6 loops. Ch 1 to close.
Lilac shell: 5 dc in indicated space
V-stitch: (dc, ch 2, dc) in indicated stitch or space
Scallop: 7 dc in indicated space, sk next space, sc in next space
Join as you go option: Replace a center chain of a corner or side space with a sl st through the matching space on the neighboring motif.
Section 1: Warm White Granny Square Base
Make 16 (16, 20, 20, 24, 24, 28) squares for XS (S, M, L, XL, 2XL, 3XL). Each square is crocheted in warm white and blocked to exactly 4 inches (10 cm).
Step 1: Ch 4, join with sl st to form a ring.
Rnd 1: Ch 3 (counts as dc), 2 dc in ring, ch 2, 3 dc in ring, ch 2 three times. Join to top of ch-3. You now have 4 clusters and 4 corners.
Rnd 2: Sl st to first corner. (Ch 3, 2 dc, ch 2, 3 dc) in corner, ch 1, (3 dc, ch 2, 3 dc) in next corner three times, ch 1, join.
Rnd 3: Sl st to corner. Work (3 dc, ch 2, 3 dc) in corner, ch 1, 3 dc in next ch-1 sp, ch 1, (3 dc, ch 2, 3 dc) in corner around, join.
Rnd 4: Repeat the granny square logic, placing 3 dc in each ch-1 side space and (3 dc, ch 2, 3 dc) in each corner. Join and fasten off.
Block each square to 4 inches (10 cm) with corners square and sides straight. Weave in ends before adding flowers.
Consistency Tip: Make all white squares first, block them together, then batch crochet flowers. This gives the cleanest color rhythm and prevents motif size drift.
Section 2: Raised Six Petal Starflower
Make one flower for every bodice square. Work in lilac and add the center in warm white.
Step 1: With lilac, ch 4 and join to form ring.
Rnd 1: Ch 1, work 12 sc in ring, join.
Step 2 (Petal foundation): Ch 5, sk 1 sc, sl st in next sc six times. You now have 6 chain loops.
Step 3 (Petal layer): In each ch-5 loop work (sc, hdc, dc, tr, ch 1, tr, dc, hdc, sc). The ch-1 forms the pointed tip. Join after the sixth petal and fasten off.
Step 4 (Center bobble): Join warm white into the original center ring from the front. Ch 2, work one 5-dc bobble into the center opening, ch 1 to close, fasten off. For the beaded look in the reference photo, make 3 tiny French knot style yarn wraps around the bobble with the tail.
Step 5: Pin flower centered over the white base square. With lilac tail, tack the base of each petal to the square, leaving the outer half of every petal raised. Sew the flower center securely but do not flatten it.
Section 3: Assemble the Bodice
Lay motifs right side up in two rectangles: front and back. Each rectangle is 2 squares high. Columns per panel: 4 (4, 5, 5, 6, 6, 7) for XS (S, M, L, XL, 2XL, 3XL).
Join horizontal and vertical edges with a flat slip stitch seam in warm white through the outer loops, or whipstitch through both loops for a nearly invisible seam.
Step 1: Join the squares into two complete panels. Keep all flower tips oriented consistently.
Step 2 (For XS, M, XL, 3XL): Seam front to back directly at both side edges.
Step 3 (For S, L, 2XL): Make two side gussets. Ch 13. Row 1: dc in 4th ch from hook and each ch across (10 dc). Row 2: ch 3, turn, dc across. Repeat Row 2 until strip measures 8 inches (20.5 cm). Block each strip to 2 inches (5 cm) wide. Sew one gusset between front and back at each side.
Step 4: Try on the bodice. The top edge should sit level across the upper chest and back without gaping. If needed, run one round of sc around the upper edge, skipping 1 stitch every 1 to 1.5 inches (2.5 to 4 cm) to tighten slightly.
Fit Checkpoint: Do not begin the skirt until the bodice fit is correct. The waistband can stabilize the lower edge, but it cannot fix an overly loose upper bodice.
Section 4: Structured Lilac Waistband
Join lilac at a side seam along the lower bodice edge. Work evenly around and adjust the pickup count to exactly 128 (144, 160, 176, 192, 208, 224) sts for your size. Place markers every 16 sts. These markers define 8 (9, 10, 11, 12, 13, 14) skirt repeats.
Rnd 1: Ch 3, dc in each st around, join. Count must remain exact.
Rnd 2: Ch 1, sc BLO in each st around, join. This creates the first fine ridge.
Rnd 3: Ch 3, dc in each st around, join.
Rnd 4 (Open rectangles): Ch 3, dc in next st, ch 2, sk 2 sts, dc in next 2 sts around, join. Every 4-st unit forms one opening.
Rnd 5: Ch 3, dc in each dc, 2 dc in each ch-2 sp around, join. Restore original stitch count.
Rnd 6: Ch 1, sc BLO in each st around, join.
Rnd 7: Ch 3, dc in each st around, join. Fasten off lilac.
Optional stabilization: Thread 1/4 inch (6 mm) clear elastic through the wrong side ridge of Rnd 2 or Rnd 6 and overlap ends by 1 inch (2.5 cm) before stitching them securely.
Section 5: White Pineapple Lace Skirt
The skirt is worked top down in joined rounds. Each 16-st repeat becomes one vertical lace panel. Maintain the repeat markers established in the waistband. The lace instructions are written as one 16-st repeat. Repeat it 8 (9, 10, 11, 12, 13, 14) times around for your size.
A "panel space" is the central ch-space in each repeat. When the instructions say to place a V-stitch in the panel space, work into the chain space itself, not into an individual chain.
Pineapple Section A: Establish the Panels
Rnd A1 (white): Join at any marker. In the first stitch of each 16-st repeat work (2 dc, ch 2, 2 dc), ch 3, sk 3 sts, sc in next st, ch 5, sk 5 sts, sc in next st, ch 3, sk the final 5 sts of the repeat. Begin the next repeat with (2 dc, ch 2, 2 dc) in its first stitch. Repeat around and join. Each marked 16-st segment now contains one V-shell and one central ch-5 arch.
Rnd A2: Sl st to first ch-2 shell space. (2 dc, ch 2, 2 dc) in shell space, ch 3, sc in first ch-3 sp, ch 3, 7 dc in ch-5 arch, ch 3, sc in next ch-3 sp, ch 3. Repeat around, join.
Rnd A3: In each repeat work shell in shell space, ch 3, sc in adjacent ch-3 sp, ch 3. Over the 7-dc group work (dc in first dc, ch 1) six times, dc in last dc, ch 3, sc in next ch-3 sp, ch 3. Join.
Rnd A4: Shell in shell space, ch 4, sc in first ch-1 sp of pineapple, ch 3, sc in next ch-1 sp five times, ch 4. Repeat around. Join.
Rnd A5: Shell in shell space, ch 4, skip first small loop, sc in next loop, ch 3, sc in next loop three times, ch 4. Repeat around. Join.
Rnd A6: Shell in shell space, ch 5, skip first small loop, sc in next loop, ch 3, sc in next loop, ch 5. Repeat around. Join.
Rnd A7: Shell in shell space, ch 6, sc in remaining center loop, ch 6. Repeat around. Join.
Rnd A8: Shell in shell space, ch 5, 5 dc in center ch-3/loop area, ch 5. Repeat around. Join. You have completed the tapered top of each pineapple.
Pineapple Section B: Flare the Skirt
The skirt flares by widening the chain bridges and enlarging the side shells without changing the number of vertical panels.
Rnd B1: In every shell space work (3 dc, ch 2, 3 dc), ch 4, sc in next ch-5 sp, ch 4, (dc, ch 1) four times across the 5-dc center group, dc, ch 4, sc in next ch-5 sp, ch 4. Repeat.
Rnd B2: Work (3 dc, ch 3, 3 dc) in each shell space. Over each center pineapple, repeat the narrowing method from A4: sc into successive ch-1 spaces separated by ch 3, with ch 5 bridges at both sides.
Rnd B3: Same as B2, but use ch 6 bridges at both sides and omit the outermost small pineapple loop on each side.
Rnd B4: Work (4 dc, ch 3, 4 dc) in each shell space, ch 6, sc in the center remaining loop, ch 6. Repeat.
Rnd B5: Work (4 dc, ch 3, 4 dc) in each shell space, ch 6, 7 dc into the center loop, ch 6. Repeat.
Rnd B6: Work (4 dc, ch 4, 4 dc) in each shell space. Over the 7-dc group work (dc, ch 1) across as in A3. Use ch 6 bridges between shell and pineapple.
Rnds B7-B10: Narrow the pineapple exactly as in A4-A7, but keep ch 6 side bridges and the (4 dc, ch 4, 4 dc) side shells. On B10, finish with 9 dc in the final center loop instead of 5 dc.
Repeat Section B once more for a short dress, or twice for a longer above knee dress. On the second repeat, increase each side shell to (5 dc, ch 4, 5 dc) and use ch 7 side bridges. Stop when skirt measures approximately 17 to 18 inches (43 to 46 cm) from the lower edge of the waistband, before the border.
Length Adjustment: For each extra full B repeat, plan on roughly 3.5 to 4.5 inches (9 to 11.5 cm) after blocking. If you need only 1 to 2 inches (2.5 to 5 cm), repeat the last two open rounds instead of adding a whole pineapple cycle.
Section 6: Lilac Connecting Shell Accent
To echo the vertical lilac lines in the reference dress, surface crochet a narrow accent down the valley between every second pineapple panel. With RS facing, join lilac just below waistband. Work a relaxed line of sl sts through the chain bridges, placing one tiny 3-dc shell every 1.5 to 2 inches (4 to 5 cm). Do not pull tight. Fasten off 1 round before the hem border.
This accent is decorative and may be omitted for a cleaner all white skirt.
Section 7: Broad Lilac Scalloped Hem and White Picots
Hem Rnd 1 (lilac): Work sc evenly around the last skirt round, placing 3 sc in each major valley chain space and enough sc across shells to prevent puckering. Adjust total to a multiple of 8.
Hem Rnd 2: Ch 1, sc in next st, sk 3 sts, 7 dc in next st, sk 3 sts around, join. Large lilac scallops formed.
Hem Rnd 3: Sl st to center (4th) dc of first scallop. Ch 5, sc in center dc of next scallop around, join. This creates a light upper arch across the scallops.
Picot Rnd (white): Join white in first ch-5 arch. Sc in arch, ch 3, sl st in first ch (picot), sc in same arch, ch 2, sc in next arch around. Adjust the final ch-2 only if needed to close smoothly.
Steam or wet block the hem into even half circles. Do not stretch picots into sharp points unless that is the look you want.
Section 8: Broad Scalloped Openwork Straps
Make 2 in lilac. The strap is approximately 1.75 inches (4.5 cm) wide. Crochet to your measured shoulder length plus 1 inch (2.5 cm) for sewing. Typical finished lengths are 10 to 14 inches (25 to 36 cm).
Row 1: Ch 10. Dc in 4th ch from hook and next 2 ch, ch 2, sk 2 ch, dc in last 3 ch. Turn. You have two solid 3-dc columns separated by a ch-2 window.
Row 2: Ch 3, dc in next 2 dc, ch 2, 2 dc in ch-2 sp, ch 2, dc in last 3 dc. Turn.
Row 3: Ch 3, dc in next 2 dc, ch 3, sc between the 2 center dc, ch 3, dc in last 3 dc. Turn.
Rows 4 onward: Alternate Rows 2 and 3 until strap reaches required length. End after a Row 2.
Scallop edging: Rotate strap. Along each long edge work sc in row-end space, 5 dc in next row-end space repeatedly. Keep scallops relaxed and symmetrical. Fasten off.
Attaching Straps: Pin straps 1 square width apart at the front and back so they form a clean square neckline. Try on before sewing. Sew each strap over at least 1 inch (2.5 cm) of bodice edge for strength.
Strap Fit Tip: If the neckline gaps, move the back strap attachments 1/2 to 1 inch (1.3 to 2.5 cm) closer to center before shortening the straps. This often improves fit without making the armhole tight.
Final Assembly and Finishing
Step 1: Weave every end securely on the WS, changing direction at least once. Cotton can work loose if tails are clipped too short.
Step 2: Wet block the entire dress in cool water with a small amount of wool safe or gentle detergent. Roll in a towel and do not wring.
Step 3: Lay flat to measurements. Pin the square bodice straight, then pin pineapple points and hem scallops into even curves. Allow to dry completely.
Step 4: If desired, hand sew clear elastic inside the upper bodice edge and waistband using loose zigzag stitches.
Step 5: For coverage, wear over a separate slip. If adding a permanent lining, tack it only at the upper bodice and waistband so the skirt lace can move independently.
Troubleshooting Common Issues
Squares curl or cup: Tension is too tight or hook is too small. Re-swatch with larger hook and block before assembly.
Bodice grows after wearing: Cotton was not pre-blocked or seams are too loose. Wet block motifs first and reinforce side seams and upper edge.
Waistband ruffles: Too many pickup stitches. Reduce evenly to stated size count before Rnd 2.
Waistband pulls in: Too few pickup stitches. Add evenly until stated count and verify gauge.
Skirt twists: Repeat marker drift. Re-count each 16-st panel at waistband and check joins every round.
Skirt looks narrow: Chain bridges are too tight. Make chains loosely or use hook 0.25 to 0.5 mm larger for lace.
Hem flares excessively: Too many sc on Hem Rnd 1. Undo first hem round and reduce evenly to a flat multiple of 8.
Straps stretch: Openwork is too loose. Use smaller hook for straps or sew narrow clear elastic to WS.
Care Instructions
Hand wash or machine wash in a lingerie bag on cold/gentle if your yarn label permits. Reshape and dry flat. Avoid hanging the wet dress because the skirt weight can lengthen the bodice and straps. Store folded. If the hem loses definition, lightly re-block the scallops and picots.
Pattern Notes and Personalization Ideas
Color ideas: Keep the warm white base and change lilac to dusty rose, sage, cornflower, or butter yellow. For a more formal dress, use one tonal color for flowers, waistband, and hem. For a bridal version, work the entire dress in warm white and add pearl beads only at flower centers.
Bust length adjustment: If you need more than 8 inches (20.5 cm) from upper chest to waist, add 1 to 3 rounds of dc or filet mesh beneath the joined square panels before starting the lilac waistband. Keep the final lower edge count compatible with your waistband size.
Skirt fullness: The given panel count creates a full A-line. For less volume, stop after one B repeat and work the hem. For more dramatic fullness, complete another B repeat, increasing side shells by one dc on each side and lengthening bridges by one chain.
Notes for Left Handed Crocheters
The pattern is symmetrical and works equally well left handed. Your rounds will travel in the opposite visual direction, but stitch counts and placement are unchanged. When joining motifs, keep all flowers facing RS and simply mirror the order in which you assemble rows. For the vertical surface crochet accents, work from waistband to hem regardless of dominant hand so tension stays consistent.
Thank you so much for choosing this pattern. I truly hope you love making your Lilac Starflower Lace Dress as much as I loved designing it. When you finish yours, I would absolutely love to see it! Share your photos on Instagram or Facebook and tag me so I can celebrate your beautiful work.
If this pattern is calling to you, go ahead and save it to your Pinterest boards so you can find it when you are ready to start. And please leave a comment below if you make one. I always love hearing about your projects and seeing how you personalize them.
Want a Quick & Easy Printable Version?
Get a clean, beautifully formatted PDF of this pattern — easy to follow step by step, ready to print or save on any device. No scrolling, no distractions, just the pattern.
Get the Printable PDF →