
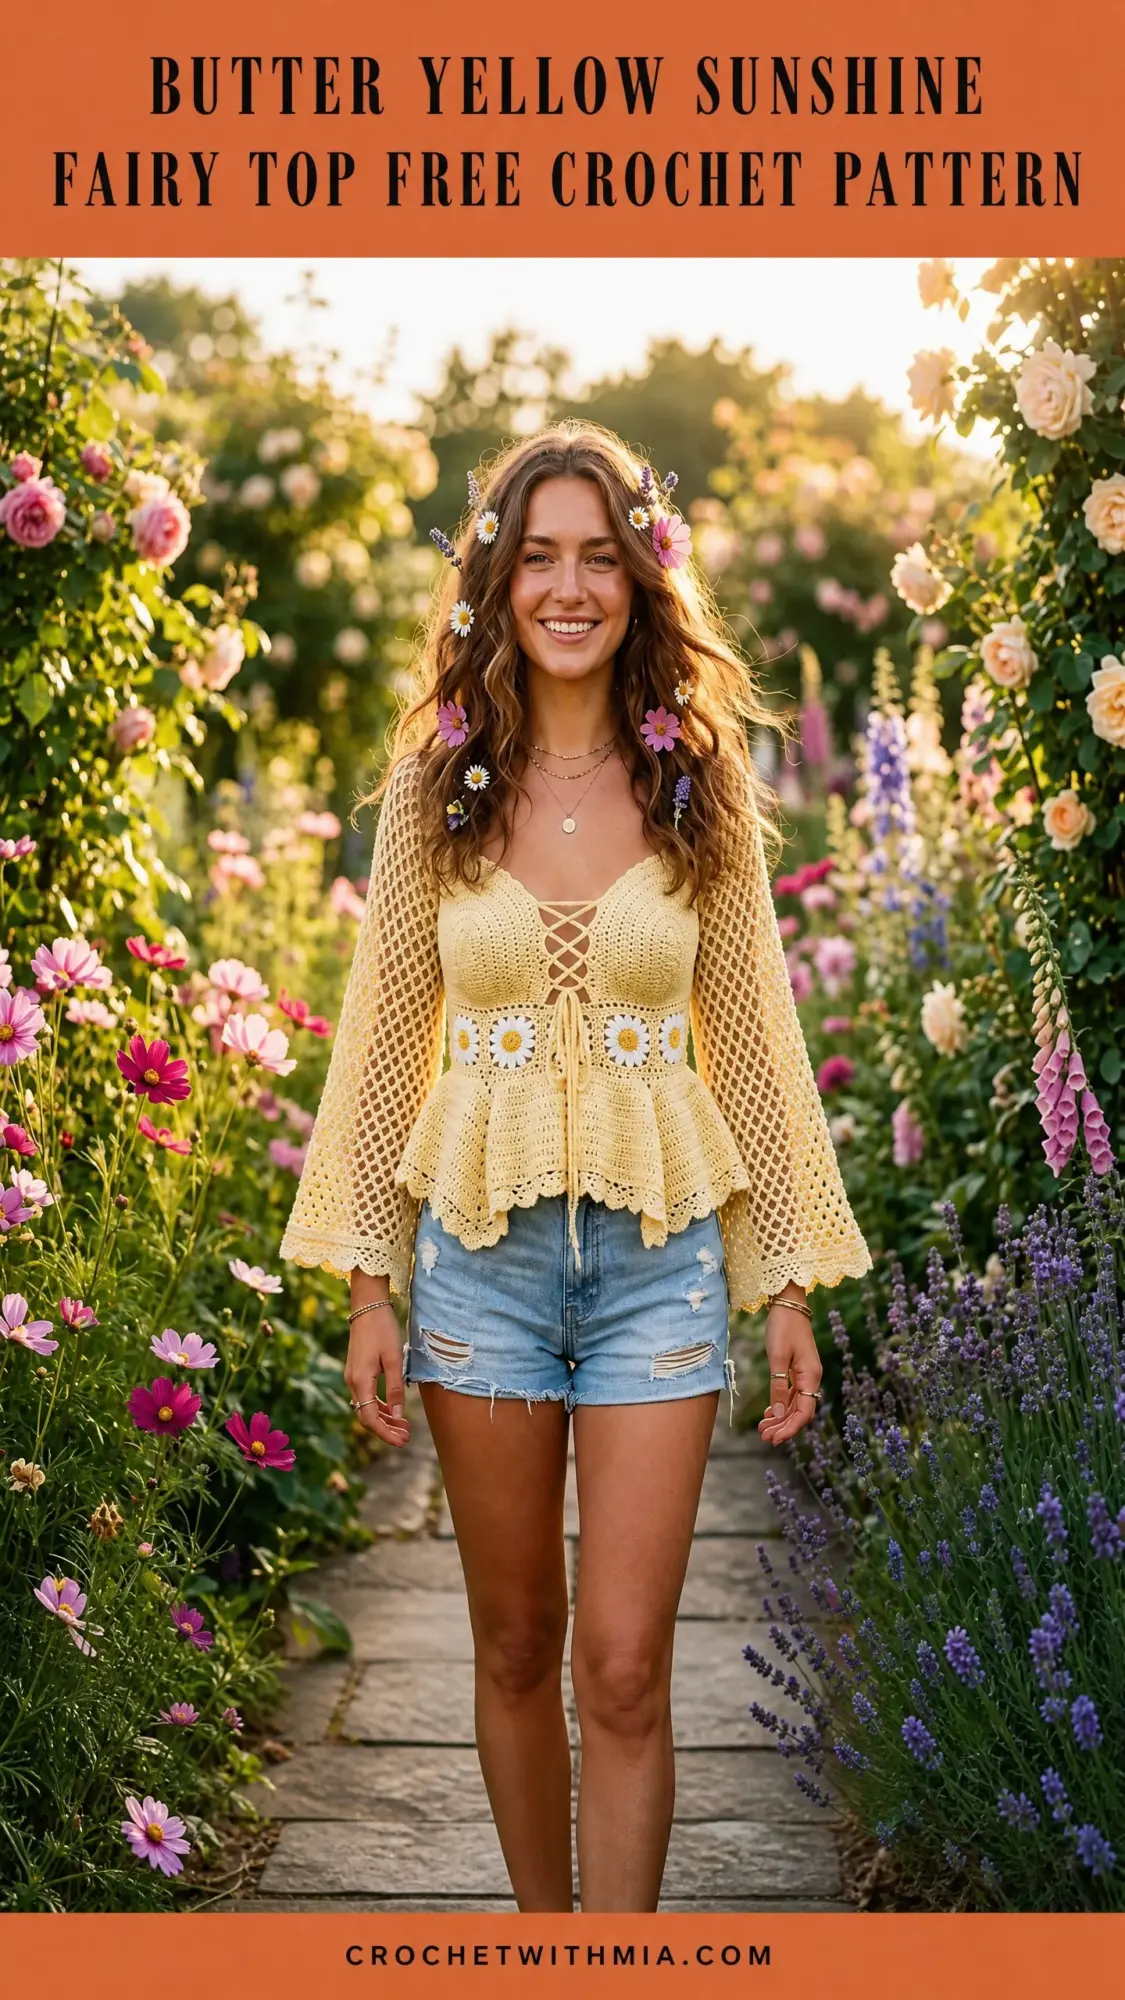
You know that gorgeous skein of cotton yarn you’ve been saving for "the right project"? This is it. Dig into your stash because this bohemian beauty combines three different textures in one stunning garment: a dense single crochet bodice, open diamond mesh sleeves that flare dramatically, and the sweetest daisy granny squares at the waist.

I won’t sugarcoat it. This top sits firmly in the intermediate to advanced category. You’ll need comfort with granny squares, mesh stitch patterns, garment shaping, and seaming pieces together. But if you’ve made a few simpler garments and you’re ready to level up, this project will teach you so much.
The construction is fascinating. You’ll work the bodice in three vertical zones, create a lace-up eyelet column down the center front, attach handmade daisy squares as a decorative waistband, and finish with a flirty peplum hem edged in picot scallops. It’s the kind of project that looks absolutely stunning at summer festivals, garden parties, or anywhere you want to feel like a woodland fairy.
About This Butter Yellow Crochet Top Pattern
This romantic top features several design elements working together beautifully. The fitted bodice has a dense single crochet (sc) center panel that provides structure and support for the lace-up closure. Flanking that center panel, open diamond mesh sections add airiness and visual interest.
The bell sleeves start fitted at the upper arm and gradually flare out to a dramatic width, ending in a delicate picot-scallop border. At the waist, you’ll attach individually crafted daisy granny squares that echo the flower-in-hair cottage aesthetic. The whole piece finishes with a flowing peplum hem that uses the same scallop edging as the sleeves.
Working time runs approximately 30 to 45 hours for an average-speed crocheter making size Medium. The daisy squares and lace-up eyelets add extra time, so plan this as a satisfying long-term project rather than a weekend make.
Finished Sizes
This pattern includes five sizes with 1 to 2 inches of positive ease built in. The lace-up front allows an additional inch of adjustability.
Size XS: Bust 32 inches (81 cm), Length 22 inches (56 cm)
Size S: Bust 34 inches (86 cm), Length 22.5 inches (57 cm)
Size M: Bust 36 inches (91 cm), Length 23 inches (58 cm)
Size L: Bust 38 inches (97 cm), Length 23.5 inches (60 cm)
Size XL: Bust 40 inches (102 cm), Length 24 inches (61 cm)
Instructions throughout are written for size S, with changes for other sizes noted in parentheses in this format: XS (S, M, L, XL).
Materials Needed for This Crochet Top
Yarn:
The daisy squares use slightly heavier yarn intentionally. This creates a padded, dimensional look for the petals.
Yarn Suggestions:
1. Lion Brand 24/7 Cotton in Buttercup offers excellent stitch definition
2. Paintbox Yarns Simply DK in Banana Cream is budget-friendly with good drape
3. We Are Knitters The Cotton in Yellow provides luxurious softness
Avoid yarns with too much elasticity like pure acrylic. The mesh and peplum sections rely on cotton’s natural drape.
Hooks:
Additional Supplies:
Gauge
Getting gauge right is mandatory for this garment. An incorrect gauge means your top won’t fit properly.
Bodice Panel (single crochet):
20 sc x 24 rows = 4 inches (10 cm) square, blocked
Mesh Section:
One mesh repeat = 0.75 inches wide
16 rows = 4 inches tall
Daisy Granny Square:
One completed square = 3 x 3 inches (7.5 x 7.5 cm), blocked
Make and block a 6-inch swatch before starting. Trust me on this one.
Abbreviations Used
Let me walk you through every abbreviation you’ll encounter. I’ll explain each one in plain English so you know exactly what to do.
sc = single crochet. Insert hook in stitch, yarn over, pull up a loop (2 loops on hook), yarn over, pull through both loops.
dc = double crochet. Yarn over, insert hook in stitch, yarn over, pull up a loop (3 loops on hook), yarn over, pull through 2 loops, yarn over, pull through remaining 2 loops.
hdc = half double crochet. Yarn over, insert hook, yarn over, pull up a loop (3 loops on hook), yarn over, pull through all 3 loops at once.
ch = chain. Yarn over, pull through loop on hook.
sl st = slip stitch. Insert hook, yarn over, pull through stitch AND loop on hook in one motion.
sk = skip. Pass over the indicated stitch without working into it.
ch-sp = chain space. The gap created by a chain in the previous row.
sc2tog = single crochet two together (a decrease). Insert hook in next stitch, yarn over, pull up loop, insert hook in following stitch, yarn over, pull up loop (3 loops on hook), yarn over, pull through all 3 loops.
RS = right side. The public-facing side of your work.
WS = wrong side. The inside of your garment.
MC = main color (butter yellow)
CC = contrast color (white)
AC = accent color (golden yellow)
Special Stitches Explained
Diamond Mesh Stitch (worked flat)
This creates the beautiful open texture on the bodice sides and sleeves. You need a stitch count divisible by 4, plus 1 extra.
Row 1 (RS): Ch 1, sc in first st, (ch 3, sk 3 sts, sc in next st) across, turn.
Row 2 (WS): Ch 4 (counts as dc + ch 1), dc in first ch-3 sp, (ch 1, dc in same ch-3 sp, ch 1, dc in next ch-3 sp) across, ending dc in last sc, turn.
Row 3: Ch 1, sc in first dc, (ch 3, sc in next dc) across, turn.
Repeat Rows 2 and 3 for pattern.
Picot Scallop Border
This creates the delicate edging on sleeves and peplum.
Join yarn with sl st, ch 1, sc in same st. Then work: (sk 1 st, 5 dc in next st, sk 1 st, sc in next st) across. For the picot on each fan, after working the 3rd dc of the 5-dc group, ch 3, sl st in 3rd ch from hook (picot made), then complete the remaining 2 dc.
Lace-Up Eyelet Column
On every 4th row of the center bodice panel, work the center 2 stitches as: sk 1 sc, ch 2, sk 1 sc. On the following row, work 2 sc in that ch-2 space. This creates holes approximately every 0.7 inches for threading your ribbon.
How to Make the Daisy Granny Squares
These sweet squares form the decorative waistband. Make 4 for XS, 5 for S and M, 6 for L, or 7 for XL.
Round 1 (Daisy Center): Using AC and D-3 hook, make a magic ring. Ch 2, work 12 dc in ring, join with sl st to top of beginning ch-2. Fasten off AC. (12 dc)
Round 2 (Petals): Join CC in any dc. Working in the back loop only of each dc from Round 1, work (ch 5, sl st in same back loop, sl st in back loop of next dc) 6 times. Then in remaining 6 back loops, work (ch 5, sl st in same back loop, sl st in next back loop) 6 times. This creates 12 petal loops total. Working in the front loops you skipped, sl st in each front loop around to stabilize (12 sl st). Fasten off CC.
Round 3 (Square Frame): Join MC in any petal loop at the tip. Work the corner groups and sides as follows:
For each corner: (2 dc, ch 2, 2 dc) in petal tip.
For each side: dc in tip of each of next 2 petals.
Work all 4 corners and 4 sides. Join with sl st to first sc. Fasten off.
Each finished side has 6 dc, plus 4 corner ch-2 spaces. Block squares to 3 x 3 inches.
Front Bodice Panel Instructions
The front bodice has three vertical zones: Left Mesh Zone, Center Dense Panel, Right Mesh Zone. Place markers at zone boundaries and move them up each row.
Foundation: Using MC and E-4 hook, ch 92 (96, 100, 104, 108).
Row 1 (RS): Sc in 2nd ch from hook and in each ch across. Turn. (91, 95, 99, 103, 107 sc)
Zone Division:
Rows 2 through 4: Ch 1, sc in each st across. Turn. (91, 95, 99, 103, 107 sc)
Row 5 (RS, begin zone texture):
Continue alternating mesh pattern on sides and sc on center (with eyelet every 4th row) until bodice measures 7 inches from foundation.
Front Armhole Shaping
Next Row (RS): Sl st across first 8 (8, 9, 9, 10) sts, ch 1, work in pattern until 8 (8, 9, 9, 10) sts remain, leave unworked. Turn. (75, 79, 81, 85, 87 sts)
Decrease Rows 1 through 4: Sc2tog at beginning and end of each row. (67, 71, 73, 77, 79 sts after Row 4)
Work even for 6 (6, 7, 7, 8) more rows.
Front Neckline Shaping
Divide for neckline on next RS row.
Right Shoulder: Work first 20 (21, 22, 23, 24) sts. Turn and work these sts only.
Decrease at neck edge every row for 3 rows, then work even for 4 rows. (17, 18, 19, 20, 21 sts) Fasten off.
Skip center 27 (29, 29, 31, 31) sts for neckline opening.
Left Shoulder: Attach yarn, work remaining sts, mirror right shoulder shaping. (17, 18, 19, 20, 21 sts) Fasten off.
Back Bodice Panel Instructions
Work same as front but without the lace-up eyelet column. The center section is plain sc throughout.
Foundation and Rows 1 through 4: Same as front. (91, 95, 99, 103, 107 sc)
Row 5 onward: Begin mesh zones on sides, sc in center (no eyelets). Continue until 7 inches.
Armhole Shaping: Same as front.
Work even for 10 (10, 11, 11, 12) rows after decrease rows.
Back Neckline: On next RS row, work first 17 (18, 19, 20, 21) sts for right shoulder. Fasten off. Skip center 33 (35, 35, 37, 37) sts. Work remaining 17 (18, 19, 20, 21) sts for left shoulder. Fasten off.
Sleeves (Make 2)
Sleeve Cap
Foundation: Using MC and E-4 hook, ch 40 (42, 44, 46, 48).
Row 1 (RS): Sc in 2nd ch from hook and across. (39, 41, 43, 45, 47 sc)
Rows 2 through 4: Increase 1 st at each end. (45, 47, 49, 51, 53 sc after Row 4)
Rows 5 through 8: Work even in sc.
Rows 9 through 16: Sc2tog at each end every row. (29, 31, 33, 35, 37 sc after Row 16)
Fasten off.
Upper Sleeve Tube
After setting cap into armhole, join MC at underarm. Work sc evenly around armhole opening, targeting 44 (46, 48, 50, 52) sts. Join with sl st.
Rnds 2 through 4: Sc around, join.
Adjust stitch count for mesh (must be divisible by 3): 45 (45, 48, 51, 54) sts.
Begin Bell Sleeve Mesh and continue as established, increasing gradually for bell shaping.
Assembly and Finishing
Step 1: Block all pieces before seaming.
Step 2: With RS together, sl st shoulder seams through both layers.
Step 3: Sl st side seams from underarm to bottom edge.
Step 4: Set sleeve caps into armholes and seam.
Step 5: Attach daisy squares evenly across the waist.
Step 6: Work peplum in the round from lower bodice edge, finishing with picot scallop border.
Step 7: Thread ribbon through eyelet column for lace-up closure.
Pattern Notes to Remember
The chain-1 turning chain for sc rows does NOT count as a stitch. The chain-3 turning chain for dc rows DOES count as one dc.
Block mesh sections thoroughly. They grow significantly with wet blocking.
The front neckline sits lower than the back, creating the flattering V-style scoop.
I really hope you love making this dreamy sunshine fairy top as much as I loved designing it. If you create one, I would absolutely love to see it! Save this pattern to your Pinterest boards so you can find it when you’re ready to start, and please drop a comment below if you give it a try. Happy crocheting, friend!