
Let’s talk about that open diamond mesh. I know it looks intimidating. Those perfectly spaced lattice diamonds seem like something only an advanced crocheter could pull off, right?

Here’s the truth: if you can chain and single crochet, you can absolutely make this halter top. The mesh is just chains and slip stitches repeated over and over. That’s it. The magic happens because of where you place your stitches, not because the stitches themselves are complicated.
Whether you’ve been crocheting for years or you’re ready to tackle your first wearable garment, this pattern breaks everything down into manageable pieces. A solid bodice you build row by row. A mesh section that’s honestly kind of meditative once you get the rhythm. And a sweet little daisy that ties the whole thing together. Let’s walk through this together.
About This Crochet Halter Top Pattern
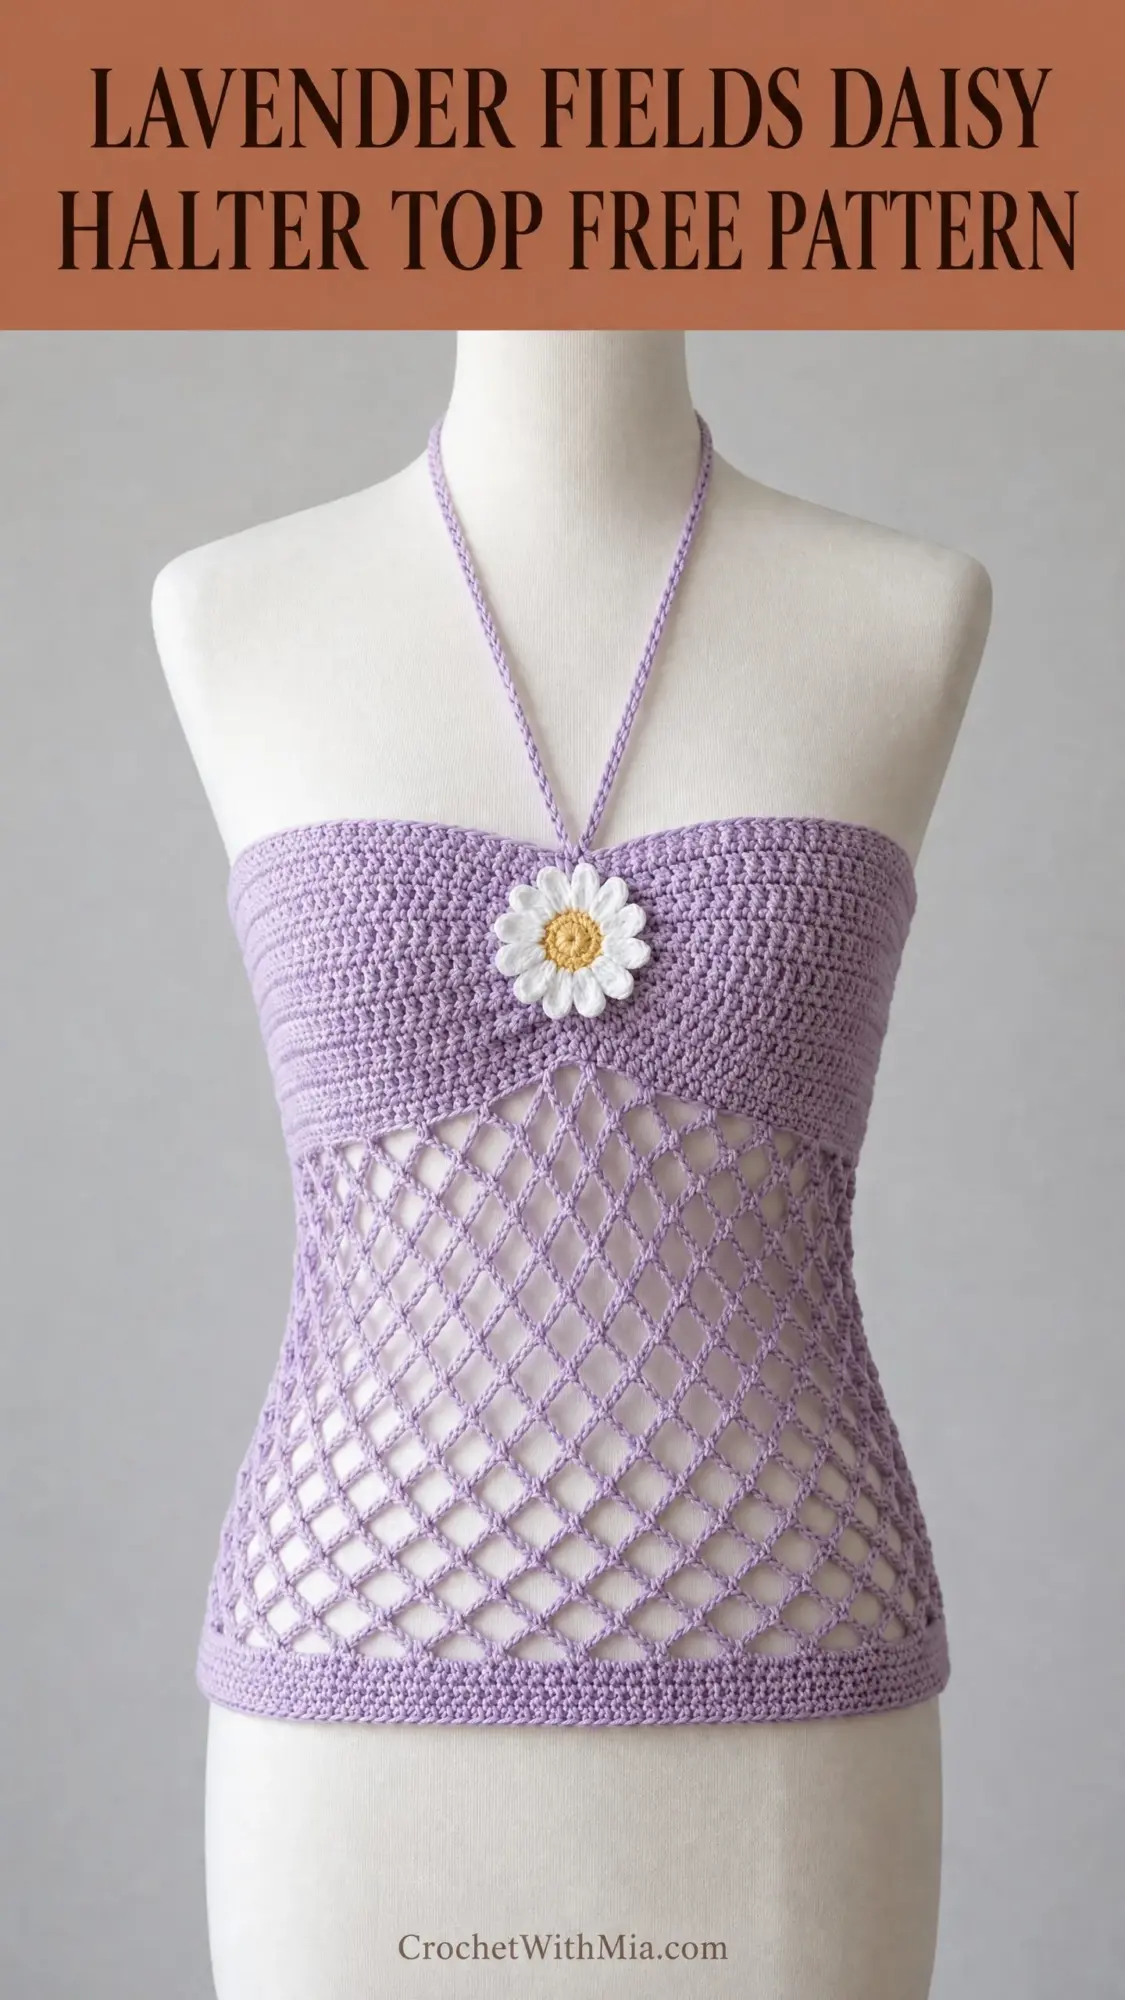
This Lavender Fields Daisy Halter Top features a structured bandeau bodice at the bust, an airy diamond mesh body that extends to the hip, and twisted halter ties that wrap around the neck. The crocheted daisy applique at center front adds a playful, feminine touch that makes this piece truly special.
The construction is more straightforward than it appears. You’ll work the bodice flat in two identical panels, join them at the sides, then work the mesh body in the round from the bottom edge of the bodice. No complicated shaping. No confusing increases in the mesh. Just solid fundamentals applied with intention.
This design fits a 34 to 36 inch bust and measures approximately 14 inches from top to bottom. The top is meant to be worn over a bandeau bralette or bikini top since the mesh body is intentionally open and breezy.
Skill Level
Intermediate. You should be comfortable working both flat and in the round, joining panels, and reading stitch counts. If you’ve made a basic hat or a simple top before, you have the skills for this project.
The most important thing here is maintaining even tension. Cotton yarn can be unforgiving if your stitches vary wildly in size. Take your time, especially in the mesh section, and you’ll be rewarded with those gorgeous, uniform diamonds.
Time Estimate
Plan for approximately 12 to 18 hours for the main garment, plus 1 to 2 hours for the daisy applique and finishing. This isn’t a weekend project, but it’s not a marathon either. Break it into sections: bodice one evening, mesh over a few sessions, daisy and finishing as a satisfying final step.
Materials Needed
Yarn:
Hooks:
Additional Materials:
Yarn Suggestions
Lion Brand 24/7 Cotton in Lavender is my top pick. It’s a DK weight, 100% mercerized cotton with excellent stitch definition for mesh work. You’ll need 3 skeins at 186 yards per skein.
Paintbox Yarns Cotton DK in Dusty Lilac is another great option. It’s crisp and smooth, holds mesh shape beautifully. You’ll need 4 skeins at 137 yards per skein.
Drops Safran in Lilac offers a slightly softer hand, which is nice for next-to-skin wear. You’ll need 3 skeins at 175 yards per skein.
Avoid yarns with significant stretch or halo. These will obscure the mesh pattern and make your diamonds look fuzzy instead of crisp. Cotton or cotton-blend yarns are strongly recommended for their structure and washability.
Gauge
Bodice solid section: 18 single crochet stitches by 22 rows equals 4 inches / 10 cm, worked flat with US E-4 / 3.5 mm hook, blocked.
Mesh section: One diamond mesh repeat (4 chains plus join) equals approximately 1.5 inches / 3.8 cm wide and 1 inch / 2.5 cm tall, blocked.
Gauge matters here. This is a fitted garment. If your gauge is looser, go down a hook size. If tighter, go up a hook size. Swatch before you start, even if you’re eager to dive in.
Finished Measurements
Size Customization Tips
The foundation chain for the bodice determines your bust circumference. Every 4 chains added or removed adjusts the circumference by approximately 1 inch at the gauge given.
Always add or remove chains in multiples of 4 to keep the mesh repeat divisible.
For a 32 inch bust, subtract 8 chains from the starting chain.
For a 38 inch bust, add 8 chains.
Each full diamond mesh repeat adds approximately 1.5 inches of width. The bodice height can be increased by adding more rows of single crochet (sc) before beginning the mesh section.
Abbreviations
Special Stitches
Diamond Mesh Stitch (Worked in Rounds)
This creates the large open diamond lattice visible in the lower body of the top.
Each repeat works like this: chain 4, skip 3 stitches or chain spaces, slip stitch into the next stitch or chain space.
On subsequent rounds, you work: chain 4, slip stitch into the center of the chain-4 space from the previous round (the 2nd chain of the chain-4 arch). This creates offset diamonds that give you that beautiful lattice effect.
Sc2tog (Single Crochet Decrease)
Insert hook into next stitch, yarn over, pull up a loop (2 loops on hook). Insert hook into following stitch, yarn over, pull up a loop (3 loops on hook). Yarn over, draw through all 3 loops. You’ve decreased by 1 stitch.
Pattern Notes Before You Begin
1. The bodice is worked flat in two identical panels (front and back), then joined at the side edges with slip stitch seams.
2. The halter tie chains are worked directly from the top corners of the front bodice panel, then twisted together for that rope-like appearance.
3. The mesh body is worked in the round, attached to the bottom edge of the joined bodice.
4. Turning chains: For single crochet rows, chain 1 at the beginning of each row. This chain-1 does NOT count as a stitch. Always work the first single crochet into the first stitch at the base of the turning chain.
5. The right side is the smooth side of the single crochet fabric. Mark your RS at the beginning to avoid confusion.
6. The mesh rounds create a slight natural taper toward the waist due to the diagonal drape of the diamond lattice. No additional shaping decreases are needed.
7. Both the bottom border of the mesh and the top edge of the bodice are finished with a round of slip stitches or single crochet to stabilize the edges.
Step-by-Step Instructions
Front Bodice Panel
The front bodice is a solid single crochet rectangle with gentle shaping at the top corners to create a slight flat-top bust line. It is worked flat.
Foundation chain: With lavender yarn and E-4 hook, ch 79.
Row 1 (RS): Sc in 2nd ch from hook and in each ch across. Turn. (78 sc)
Row 2: Ch 1, sc in each st across. Turn. (78 sc)
Rows 3 through 24: Repeat Row 2. Turn at end of each row. (78 sc per row)
Now you’ll work the top edge shaping. The top edge has a slight center rise and two halter attachment points at the top corners.
Row 25 (begin shaping left corner for halter attachment):
Ch 1, sc in first 10 sts. Leave remaining sts unworked. Turn. (10 sc)
Row 26: Ch 1, sc2tog, sc to end of short row. Turn. (9 sc)
Row 27: Ch 1, sc to last 2 sts, sc2tog. Turn. (8 sc)
Row 28: Ch 1, sc2tog, sc to end. Turn. (7 sc)
Row 29: Ch 1, sc to last 2 sts, sc2tog. Turn. (6 sc)
Fasten off. This creates the left shoulder tab for the halter tie.
Return to Row 24 with RS facing. Skip the center 58 sts. Attach yarn to the 69th st (counting from left edge) to begin right corner shaping.
Row 25 (right corner): Ch 1, sc in same st and in each of the last 10 sts. Turn. (10 sc)
Row 26: Ch 1, sc to last 2 sts, sc2tog. Turn. (9 sc)
Row 27: Ch 1, sc2tog, sc to end. Turn. (8 sc)
Row 28: Ch 1, sc to last 2 sts, sc2tog. Turn. (7 sc)
Row 29: Ch 1, sc2tog, sc to end. Turn. (6 sc)
Fasten off.
The center 58 sts of the top edge remain as the straight bust band top. Do not add additional rows to the center. This creates the flat-top bandeau look.
Checkpoint: Your front bodice panel should measure approximately 6 inches tall and 17.25 inches wide.
Back Bodice Panel
Work exactly as the Front Bodice Panel through Row 29 on both corner tabs. The back bodice is identical to the front.
Checkpoint: Both panels should match in dimensions before joining.
Joining the Bodice Panels
Place front and back bodice panels with wrong sides together (right sides facing out on both sides).
Left side seam: With RS facing, align left edges of front and back panels. Using lavender yarn and E-4 hook, sl st through both layers from bottom edge to the base of the left corner tab. Fasten off. (Approximately 24 sl sts)
Right side seam: Repeat for right edges. Fasten off.
The top of the bodice remains open between the corner tabs on each side. These become the armhole openings.
Checkpoint: The bodice tube should measure approximately 34.5 inches total circumference when opened.
Halter Ties
With lavender yarn and E-4 hook, attach yarn to top of left front corner tab.
Row 1: Ch 1, sc across all 6 sts of tab. Turn. (6 sc)
Row 2: Ch 1, sc2tog, sc 2, sc2tog. Turn. (4 sc)
Row 3: Ch 1, sc2tog twice. Turn. (2 sc)
Row 4: Ch 1, sc2tog. (1 sc)
Now work a foundation chain tie: Ch 72. Fasten off leaving a 6-inch tail.
Repeat for right front corner tab.
For the back corner tabs, attach yarn to top of left back corner tab. Work Rows 1 through 4 exactly as front tabs, then Ch 72. Fasten off.
Repeat for right back corner tab.
To create the twisted rope look: Hold the left front tie and left back tie together. Twist them around each other 6 to 8 times along the length. Secure the twist with a few hand stitches at the neckline. Repeat for right side. Tie both twisted ropes in a bow or knot at the back of the neck.
Mesh Body
The mesh body is worked in the round, attached to the bottom edge of the joined bodice tube.
Setup round: With RS of bodice facing and bottom edge up, attach lavender yarn to the bottom edge at the left side seam.
Round 1 (setup, sc border): Ch 1, sc evenly around entire bottom edge of bodice. Work 1 sc into each foundation chain stitch. Join with sl st to first sc. Do not turn. (156 sc)
Note: 156 is divisible by 4, which is required for the mesh repeat.
Round 2 (begin mesh): Ch 5 (counts as first dc + ch 2). Skip 3 sts, dc in next st. (Ch 2, skip 3 sts, dc in next st) repeat around to last 3 sts. Ch 2, skip 3 sts, join with sl st to 3rd ch of beginning ch-5. (39 dc, 39 ch-2 spaces)
Round 3: Sl st into first ch-2 sp. Ch 4 (counts as dc + ch 1). (Dc in next ch-2 sp, ch 1) repeat around. Join with sl st to 3rd ch of beginning ch-4. (39 dc, 39 ch-1 spaces)
Round 4 (diamond mesh begins): Ch 1, sc in same sp. Ch 4, skip to next ch-1 sp, sc in ch-1 sp. (Ch 4, sc in next ch-1 sp) repeat around. End ch 4, join with sl st to first sc. (39 ch-4 arches, 39 sc)
Round 5: Sl st into first ch-4 arch, sl st 2 along arch to center of arch. Sc in center of arch. (Ch 4, sc in center of next ch-4 arch) repeat around. End ch 4, join with sl st to first sc. (39 ch-4 arches, 39 sc)
Rounds 6 through 19: Repeat Round 5. Work sc into the center (2nd chain) of each ch-4 arch from the previous round. (39 ch-4 arches, 39 sc per round)
Continue until mesh section measures 8 inches from the sc border round.
Checkpoint: Total garment should measure approximately 14 inches from top edge of bodice to bottom of mesh.
Bottom Border
Round 1: Ch 1, sc in each sc and 3 sc into each ch-4 arch around entire bottom edge of mesh. Join with sl st to first sc. (156 sc)
Round 2: Ch 1, sc in each st around. Join with sl st to first sc. (156 sc)
Round 3: Ch 1, sc in each st around. Join with sl st to first sc. (156 sc)
Fasten off and weave in end.
Top Bodice Border
With RS facing, attach yarn to top edge of bodice at center front. Work 1 round of sc evenly around the top edge, including around the shaped corner tabs. Work approximately 78 sc across front top, 6 sc down left tab, 78 sc across back top, 6 sc down right tab. Adjust count to keep edge flat. Join with sl st to first sc. Fasten off.
Daisy Applique
With white yarn and D-3 hook:
Round 1: Make a magic ring. Ch 1, work 12 sc into magic ring. Pull ring closed. Join with sl st to first sc. (12 sc)
Round 2 (petals): Working in each sc around: (ch 8, sl st back into the base sc, sl st into next sc) 12 times. You will have 12 petals. Join with sl st to base of first petal. Fasten off white.
Round 3 (center): Attach yellow yarn to magic ring. Work 6 sc over and into the center ring, catching the ring loop. Join with sl st to first sc. (6 sc)
Round 4: Ch 1, 2 sc in each st around. Join with sl st to first sc. (12 sc) Fasten off yellow.
Pin the daisy to the center front of the bodice, approximately 1 inch down from the top edge, centered horizontally. Using your yarn needle and a length of lavender yarn, whip stitch around the back of the daisy center to attach it firmly. Do not sew through the petals.
Finishing and Blocking
Weave in all ends securely using a yarn needle. Darn ends in two directions for cotton yarn to prevent slipping.
Wet blocking is strongly recommended for cotton. Soak the completed top in cool water for 20 minutes. Gently squeeze out excess water without wringing. Lay flat on a blocking mat or clean towels. Shape the bodice to the finished measurements. Open and pin each mesh diamond to size and shape, using rust-proof pins to hold each intersection. Allow to dry completely, which takes 12 to 24 hours.
Blocking evens the mesh diamonds and gives the bodice a crisp, professional finish. Don’t skip this step.
Care Instructions
Machine wash on a gentle or delicate cycle in cold water. Use a mesh laundry bag to protect the open mesh from snagging. Lay flat to dry. Do not tumble dry, as heat will shrink cotton and distort the mesh. Do not iron directly on the daisy applique. Store folded, not hanging, to prevent the mesh from stretching under its own weight.
Final Thoughts on This Crochet Halter Top Pattern
Thank you so much for choosing to make this Lavender Fields Daisy Halter Top crochet pattern. I hope you found the step-by-step instructions easy to follow and that you’re feeling confident about tackling that diamond mesh. Remember, it really is just chains and slip stitches once you get going.
This piece is perfect for warm weather layering, beach days, or any time you want to feel a little bit like a meadow fairy. The lavender cotton is breathable and lovely, and that daisy adds just the right amount of whimsy.
If you make this top, I would absolutely love to see it! Share your finished piece on Instagram or Facebook and tag me so I can admire your work. There’s nothing better than seeing these patterns come to life in your hands.
If you loved this pattern, go ahead and save it to your Pinterest boards so you can find it whenever inspiration strikes. And please drop a comment below if you make this top. I’d love to hear how it turned out for you!