
I have been dreaming about this dress for months. I wanted to create something that felt vintage and romantic but still wearable for modern life. The goal was a feminine silhouette with interesting construction details, a flattering fit through the waist, and that gorgeous flare at the hem that makes you feel like twirling. I spent weeks tweaking the yoke lace, adjusting the medallion placement, and perfecting the chevron stripe proportions.
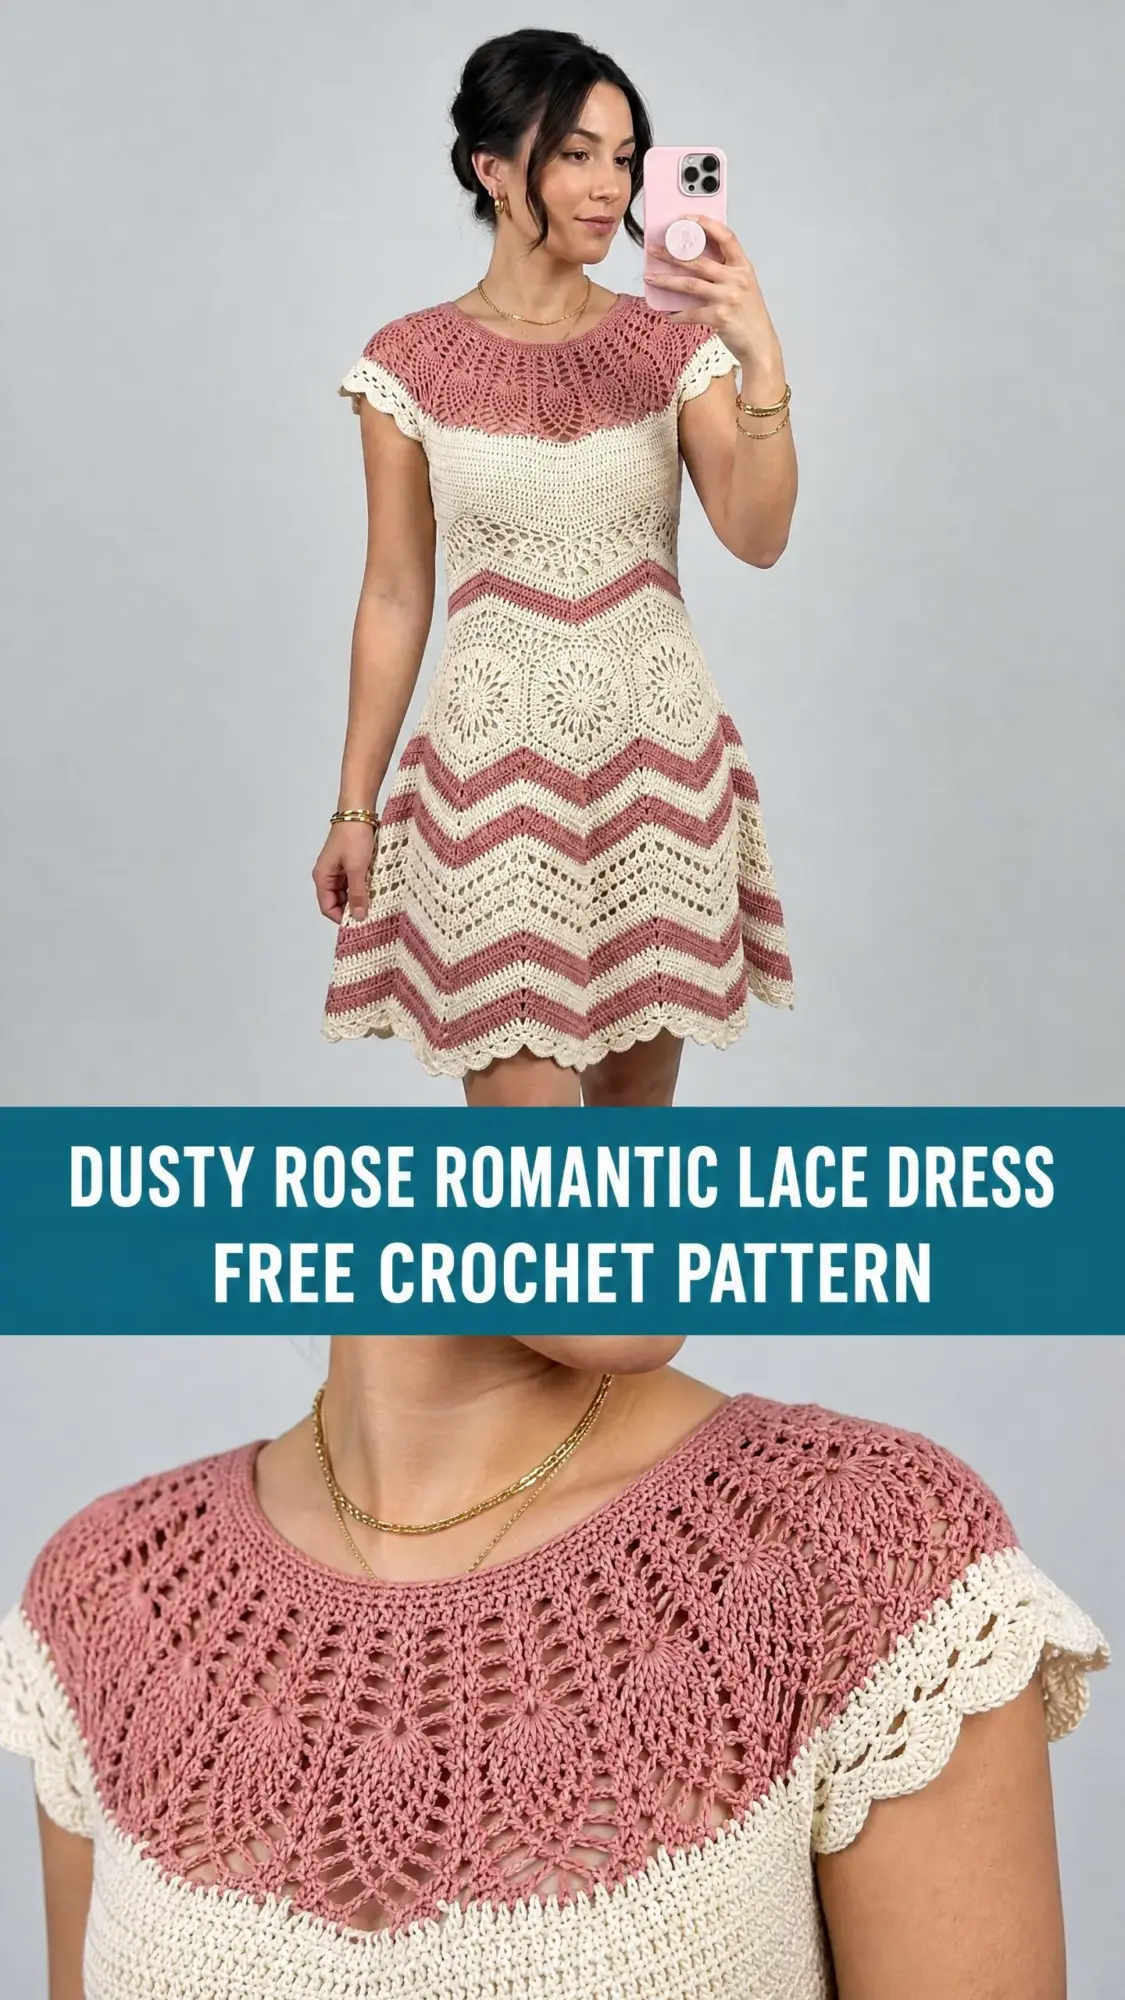
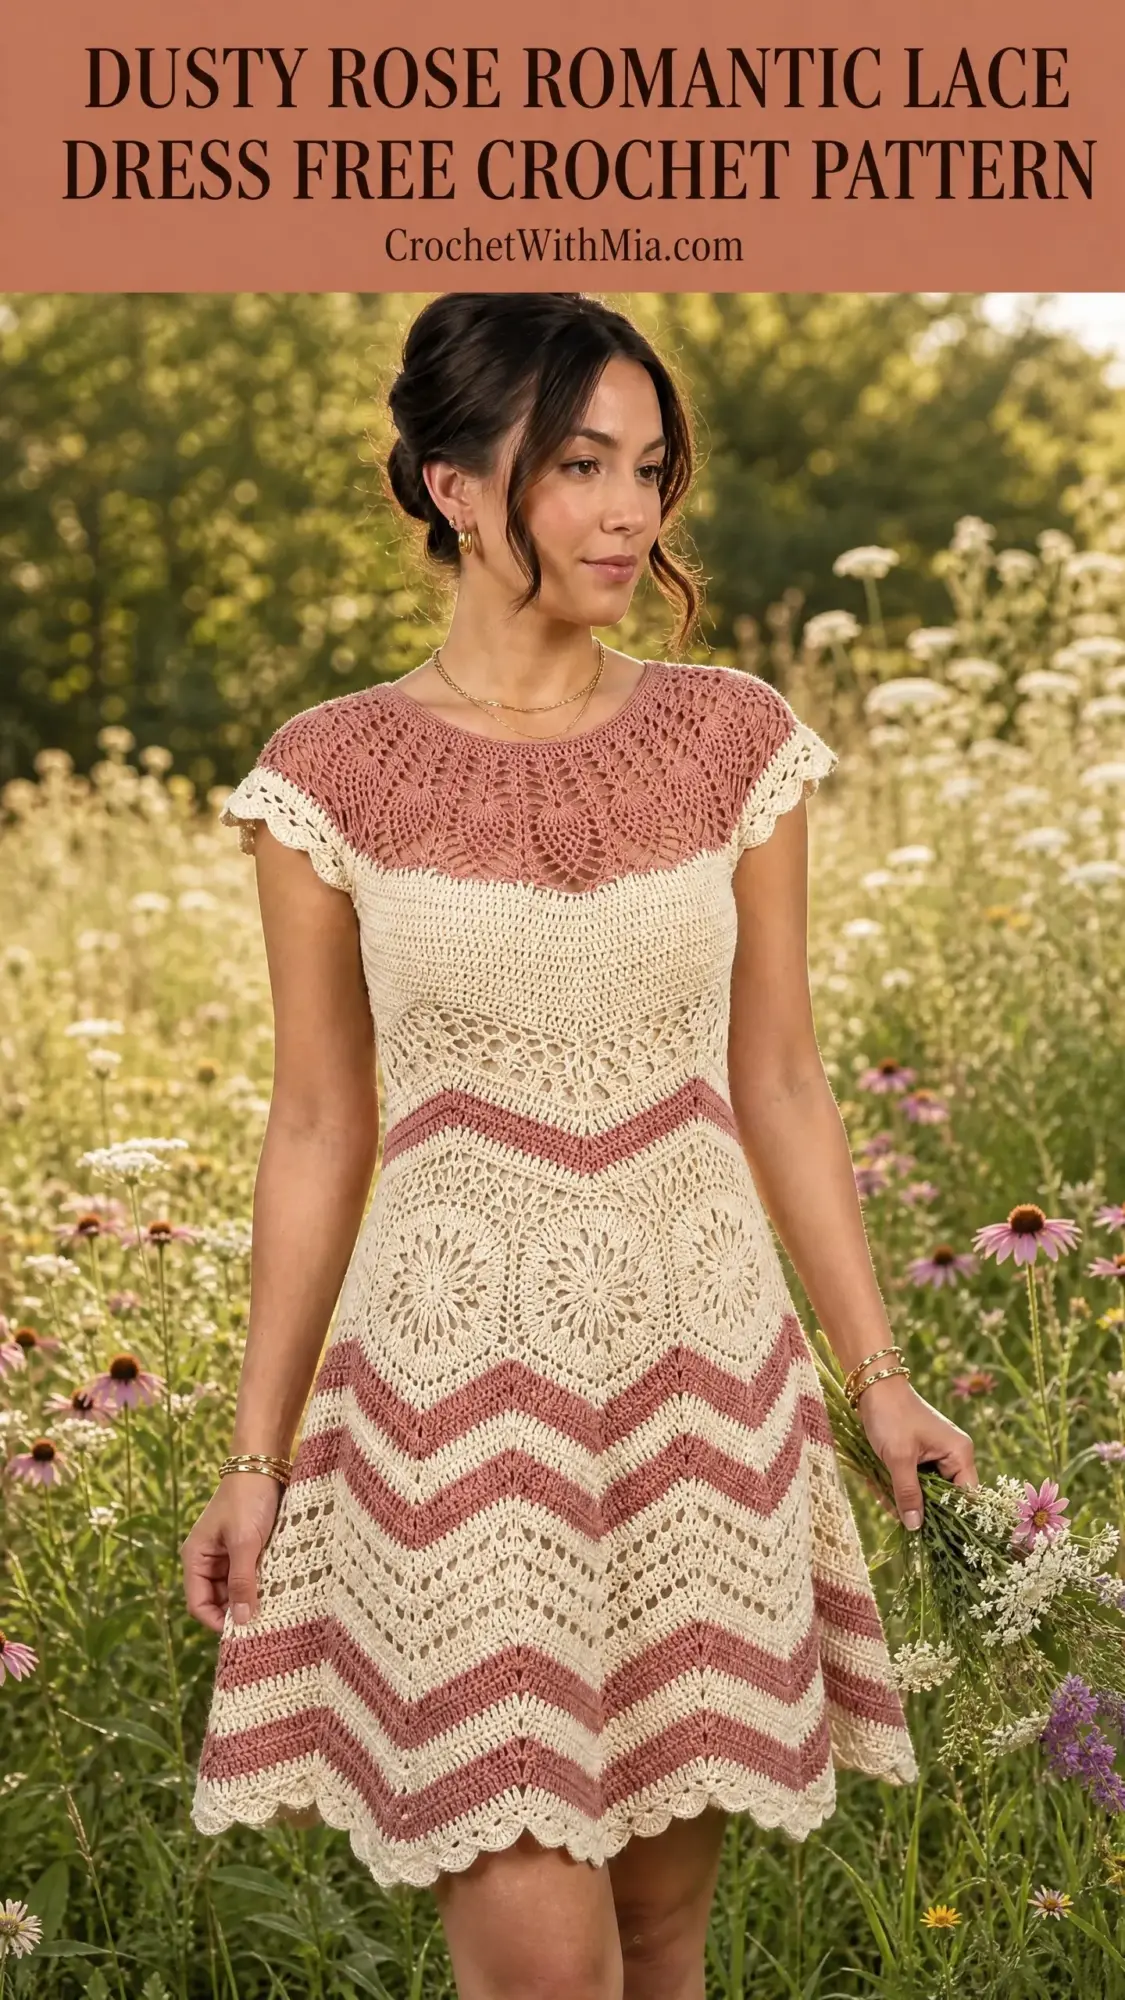
The result is everything I hoped for and more. This dress combines so many techniques I love: a delicate pineapple lace yoke, a fitted bodice with waist shaping, granny-style circular medallions at the hip, and bold chevron stripes that create visual drama as they flow toward the hem.
I am SO pleased with how it turned out! The dusty rose and cream color combination feels timeless and romantic without being too sweet. Whether you wear it to a garden party, a summer wedding, or just a special brunch with friends, this dress is guaranteed to turn heads.
About This Crochet Dress Pattern
This top-down dress is worked in the round from a lace yoke that transitions into a fitted bodice, then flares into a stunning skirt featuring chevron stripes and floral medallion panels. The construction method means minimal seaming, and the top-down approach lets you try it on as you go to check the fit.
The yoke features a beautiful pineapple fan lace pattern in dusty rose. The bodice uses simple half double crochet (hdc) stitches in cream with strategic decreases for waist shaping. The skirt is where the magic really happens, with large circular medallions joined at the hips and dramatic zigzag stripes that emphasize the A-line silhouette.
Cap sleeves are shaped naturally by the yoke construction and finished with a sweet scallop edging. A small keyhole or invisible seam at the center back makes it easy to get in and out of the dress.
Skill Level
This is an advanced crochet pattern. You should be comfortable with top-down yoke construction, colorwork in the round, reading multiple stitch patterns within a single project, working lace fan repeats, joining granny-style circular medallions, and maintaining consistent gauge across different stitch textures.
If you have made garments before and feel confident following complex patterns, you are ready for this project. If you are newer to garment construction, I recommend practicing the individual stitch patterns on swatches first.
Time estimate: Approximately 40 to 60 hours depending on your experience level.
Finished Measurements
The written pattern is sized for:
Size customization tips are included at the end of this crochet tutorial.
Materials Needed
Yarn
Yarn Suggestions
Option 1: Lion Brand 24/7 Cotton in Ecru and Dusty Pink. This 100% mercerized cotton is smooth, shows great stitch definition, and is machine washable.
Option 2: Paintbox Yarns Cotton DK in Paper White and Blush Pink. Consistent dye lots, excellent stitch clarity, and an affordable price point.
Option 3: Drops Safran in Off White and Old Rose. A fine cotton yarn with a slight sheen and excellent drape for lace motifs.
Substitution Note: Choose a smooth 100% cotton or cotton-blend yarn at fingering-to-light-DK weight with good stitch definition. Avoid fluffy or halo yarns as they will obscure the lace pattern.
Hook
US size E-4 / 3.5 mm crochet hook (adjust to meet gauge)
Notions
Gauge
22 stitches and 20 rows = 4 inches / 10 cm in half double crochet worked in the round with Color A using a US E-4 / 3.5 mm hook.
Lace chevron repeat: One 12-stitch chevron repeat = approximately 2.2 inches / 5.5 cm wide. One 6-row chevron stripe sequence = approximately 1.3 inches / 3.3 cm tall.
Gauge is mandatory for this garment. Swatch in both the half double crochet section and the chevron section. Adjust your hook size as needed to match gauge.
Abbreviations
Special Stitches
Fan Stitch (worked in lace yoke)
Step 1: Skip 2 stitches.
Step 2: Work 5 double crochets into the next stitch.
Step 3: Skip 2 stitches.
Step 4: Single crochet into the next stitch.
This creates one fan unit spanning 6 stitches. Fans alternate with single crochets to form the lace yoke.
Shell Scallop Edging
Step 1: Slip stitch into the first stitch.
Step 2: Work 5 double crochets into the same stitch.
Step 3: Skip 2 stitches.
Step 4: Slip stitch into the next stitch.
Step 5: Repeat from Step 2 across.
This creates the decorative shell border at sleeve cuffs and skirt hem.
Chevron Ripple Stitch (worked in the round over a multiple of 12 stitches)
Step 1: Chain 3 (counts as first dc).
Step 2: Work 1 dc in the same stitch at the base of the chain (increase peak made).
Step 3: Work 1 dc in each of the next 4 stitches.
Step 4: Skip 1 stitch, work dc2tog over the next 2 stitches (valley made).
Step 5: Skip 1 stitch.
Step 6: Work 1 dc in each of the next 4 stitches.
Step 7: Work 2 dc in the next stitch (peak made).
Step 8: Repeat Steps 3 through 7 across the round.
Step 9: Join with slip stitch to top of beginning chain-3.
Lace Chevron Row (worked in the round, alternating with solid chevron rows)
Step 1: Chain 4.
Step 2: Work 2 dc, ch 1, 2 dc into the peak stitch (lace peak made).
Step 3: Work dc in next 2 stitches.
Step 4: Ch 1, skip 1 stitch, dc2tog, ch 1, skip 1 stitch (lace valley made).
Step 5: Work dc in next 2 stitches.
Step 6: Repeat from Step 2 around.
Step 7: Join.
Circular Medallion (worked separately and seamed)
Round 1: With Color A, make a magic ring. Work 12 sc into the ring. Join. (12 sc)
Round 2: Ch 3 (counts as dc), dc in same st, ch 1, (2 dc, ch 1) in each st around. Join. (24 dc, 12 ch-1 sps)
Round 3: Sl st into ch-1 sp. Ch 3, 2 dc, ch 2, 3 dc into same sp. Ch 1. (3 dc, ch 2, 3 dc) in each ch-1 sp around. Ch 1. Join. (12 shell pairs, 12 ch-2 corner sps)
Round 4: Sl st to ch-2 sp. (Sc, hdc, 3 dc, hdc, sc) into each ch-2 sp. (Sc) into each ch-1 sp. Join. (12 petal shells, 12 sc connectors)
Fasten off leaving a 12-inch / 30 cm tail for seaming.
Pineapple Fan (used in yoke transition band)
Step 1: Into a chain-4 space, work (2 dc, ch 2, 2 dc).
Step 2: Into the adjacent chain-2 space on the next round, work (sc, ch 3, sc).
Step 3: In the following round, work 7 dc into the ch-3 space to form the pineapple body.
Step 4: On subsequent rounds, work sc between adjacent dc pairs, reducing by 1 sc each round until the pineapple closes.
This technique is used only in the yoke fan section and is described fully in the yoke instructions below.
Pattern Notes
Step by Step Crochet Pattern Instructions
Neckline Foundation
With Color B and a US E-4 / 3.5 mm hook, loosely chain 120. Taking care not to twist the chain, join with a slip stitch to the first chain to form a ring.
Round 1 (right side): Ch 1. Sc in each chain around. Join with sl st to first sc. (120 sc)
Round 2: Ch 1. Sc in first 30 sts. (This marks center back opening area.) Turn work. You are now working flat for 4 rows across 30 center back stitches to create the back neck opening.
Back Neck Opening Rows (worked flat, Color B)
Row 1 (ws): Ch 1. Sc in each of 30 sts. Turn. (30 sc)
Row 2 (rs): Ch 1. Sc in each of 30 sts. Turn. (30 sc)
Row 3 (ws): Ch 1. Sc in each of 30 sts. Turn. (30 sc)
Row 4 (rs): Ch 1. Sc in each of 30 sts. Do not turn. (30 sc)
Resume working in rounds. Continue along remaining 90 sts of neckline round 1 foundation by connecting with sc at the first unworked stitch after back opening. You now have 120 total stitches in the round.
Yoke Section (Color B)
Round 3: Ch 1. Sc in each st around. Join. (120 sc)
Round 4 (Fan Lace Set-up): Ch 1. Work Fan Stitch across: (sk 2, 5 dc in next st, sk 2, sc in next st) 20 times. Join. (20 fans, 20 sc = 120 sts worked, 120 counted positions)
Round 5: Ch 1. (Sc in center dc of fan, ch 3, sc in sc between fans, ch 3) 20 times. Join. (40 sc, 40 ch-3 sps)
Round 6 (Pineapple bodies begin): Sl st to ch-3 sp. Ch 3 (counts as dc). 6 dc in same ch-3 sp (pineapple base of 7 dc). Sc in next ch-3 sp (the sc-to-sc sp). Rep (7 dc into next ch-3 sp, sc into next ch-3 sp) 19 times. Join. (20 pineapple bases of 7 dc each, 20 sc)
Round 7: Ch 1. Sc in first dc. (Ch 1, sc in next dc) 6 times (7 sc across pineapple, 6 ch-1 sps). Ch 3. Sk sc. Rep across all 20 pineapples. Join. (140 sc, 120 ch-1 sps, 20 ch-3 sps)
Round 8 (pineapple narrows): Sl st to first ch-1 sp. Ch 1. Sc in same sp. (Ch 1, sc in next ch-1 sp) 5 times (6 sc, 5 ch-1 sps per pineapple). Ch 3. Sk ch-3 sp. Rep across. Join. (120 sc, 100 ch-1 sps, 20 ch-3 sps)
Round 9: Sl st to first ch-1 sp. Ch 1. Sc in same sp. (Ch 1, sc in next ch-1 sp) 4 times. Ch 3. Sk ch-3 sp. Rep across. Join. (100 sc, 80 ch-1 sps, 20 ch-3 sps)
Round 10: Sl st to first ch-1 sp. Sc in same sp. (Ch 1, sc in next ch-1 sp) 3 times. Ch 3. Sk ch-3 sp. Rep across. Join. (80 sc, 60 ch-1 sps, 20 ch-3 sps)
Round 11: Sl st to first ch-1 sp. Sc in same sp. (Ch 1, sc in next ch-1 sp) 2 times. Ch 3. Sk ch-3 sp. Rep across. Join. (60 sc, 40 ch-1 sps, 20 ch-3 sps)
Round 12: Sl st to first ch-1 sp. Sc in same sp. Ch 1. Sc in next ch-1 sp. Ch 3. Sk ch-3 sp. Rep across. Join. (40 sc, 20 ch-1 sps, 20 ch-3 sps)
Round 13 (pineapple tips close): (Sc, ch 1, sc) in each ch-1 sp. Sc in each ch-3 sp. Rep across. Join. (80 sc from ch-1 sps, 20 sc from ch-3 sps = 100 sc)
Round 14: Ch 1. Sc in each st around. Join. (100 sc)
Round 15: Ch 1. Sc2tog evenly 10 times distributed across round. (Sc2tog, sc in next 8 sts) 10 times. Join. (90 sc)
Checkpoint: After completing Round 15 of the yoke, your piece should measure approximately 5 inches / 12.7 cm from the top of the neckline to the bottom of the yoke. The lower edge of the dusty rose lace yoke should have 90 stitches.
Underarm Divide and Bodice (Color A)
On Round 16, you will divide for front, back, and sleeves. The 90-stitch round is divided as follows: 30 stitches front, 30 stitches back, 15 stitches each sleeve (the sleeve stitches will be placed on a holder to become cap sleeves later).
Round 16: Join Color A at any point. Hdc in next 15 sts (right back). Place next 15 sts on a stitch holder or waste yarn (right sleeve). Hdc in next 30 sts (front). Place next 15 sts on a stitch holder or waste yarn (left sleeve). Hdc in next 15 sts (left back). Join. (60 hdc across front and back combined)
Round 17: Ch 2 (does not count as st). Hdc in each st around. Join. (60 hdc)
Round 18: Ch 2. Hdc in each st around. Join. (60 hdc)
Round 19 (waist shaping begins, decrease round): Ch 2. (Hdc in next 9 sts, hdc2tog) 6 times. Join. (54 hdc)
Round 20: Ch 2. Hdc in each st around. Join. (54 hdc)
Round 21: Ch 2. Hdc in each st around. Join. (54 hdc)
Round 22 (decrease round): Ch 2. (Hdc in next 7 sts, hdc2tog) 6 times. Join. (48 hdc)
Round 23: Ch 2. Hdc in each st around. Join. (48 hdc)
Round 24: Ch 2. Hdc in each st around. Join. (48 hdc)
Round 25 (decrease round): Ch 2. (Hdc in next 6 sts, hdc2tog) 6 times. Join. (42 hdc)
Round 26: Ch 2. Hdc in each st around. Join. (42 hdc)
Round 27: Ch 2. Hdc in each st around. Join. (42 hdc)
Checkpoint: After Round 27, your bodice tube should measure approximately 6 inches / 15.2 cm from the underarm divide to this point. The waist circumference should be approximately 28 inches / 71 cm with 42 hdc at gauge.
Bodice Lace Waistband (Color A)
Round 28 (lace row): Ch 4 (counts as dc, ch 1). (Sk 1 st, dc in next st, ch 1) around. Join to 3rd ch of beg ch-4. (21 dc, 21 ch-1 sps = 42 counted positions)
Round 29: Sl st into ch-1 sp. Ch 3 (counts as dc). Dc in same sp. Ch 1. (2 dc in next ch-1 sp, ch 1) around. Join. (42 dc, 21 ch-1 sps)
Round 30: Ch 1. Sc in each dc and each ch-1 sp around. Join. (63 sc)
Round 31 (increase round, transitioning to skirt width): Ch 1. (Sc in next 4 sts, 2 sc in next st) 12 times. Sc in rem 3 sts. Join. (75 sc)
Round 32: Ch 2. Hdc in each st around. Join. (75 hdc)
Round 33: Ch 2. Hdc in each st around. Join. (75 hdc)
Round 34 (hip increase round): Ch 2. (Hdc in next 4 sts, 2 hdc in next st) 15 times. Join. (90 hdc)
Round 35: Ch 2. Hdc in each st around. Join. (90 hdc)
Round 36: Ch 2. Hdc in each st around. Join. (90 hdc)
Round 37 (hip increase round): Ch 2. (Hdc in next 8 sts, 2 hdc in next st) 10 times. Join. (100 hdc)
Round 38: Ch 2. Hdc in each st around. Join. (100 hdc)
Round 39: Ch 2. Hdc in each st around. Join. (100 hdc)
Round 40 (increase to chevron-ready count): Ch 2. (Hdc in next 9 sts, 2 hdc in next st) 10 times. Join. (110 hdc)
Round 41: Ch 2. Hdc in each st around. Join. (110 hdc)
Round 42: Ch 2. (Hdc in next 10 sts, 2 hdc in next st) 10 times. Join. (120 hdc)
Checkpoint: After Round 42, your piece should measure approximately 13 inches / 33 cm from the neckline to this point.
Medallion Hip Panel
Work 10 Circular Medallions using Color A as described in Special Stitches. Each medallion measures approximately 3.5 inches / 9 cm in diameter after blocking. Set medallions aside.
Round 43 (joining round): Ch 1. Sc in first 6 sts. Holding first medallion with right sides facing outward, sc through next 2 sts of dress and through 2 edge stitches on outer petal of medallion simultaneously (joining medallion to dress). Continue sc through medallion edge for 12 stitches total to span one medallion width. Sc in next 2 sts of dress only. Repeat joining process for each medallion. Join. (120 sc total, 10 medallions joined)
Note: Arrange the 10 medallions evenly spaced around the circumference so that each medallion occupies 12 stitches and each gap between medallions is 0 stitches.
Round 44: Ch 1. Sc in each st around. Join. (120 sc)
Round 45 (increase for skirt flare): Ch 1. (Sc in next 5 sts, 2 sc in next st) 20 times. Join. (140 sc)
Round 46: Ch 1. Sc in each st around. Join. (140 sc)
Round 47 (increase): Ch 1. (Sc in next 6 sts, 2 sc in next st) 20 times. Join. (160 sc)
Round 48: Ch 1. Sc in each st around. Join. (160 sc)
Round 49 (increase to chevron multiple): Ch 1. (Sc in next 7 sts, 2 sc in next st) 20 times. Join. (180 sc)
Round 50: Ch 1. Sc in each st around. Join. (180 sc)
Note: 180 is divisible by 12 (the chevron repeat). 180 divided by 12 equals 15 repeats. Confirm your stitch count before beginning the chevron section.
Checkpoint: After Round 50, your skirt should measure approximately 18 to 19 inches / 46 to 48 cm from the neckline. The working edge should have 180 stitches.
Chevron Skirt Section
The chevron section consists of alternating solid chevron rounds in Color A and Color B. Each full stripe sequence is: 2 rounds Color B (dusty rose), 2 rounds Color A (cream), repeated.
Solid Chevron Rounds (Rounds 51 to 62)
Round 51 (Color B, Chevron Round 1): Ch 3 (counts as dc). 2 dc in same st (peak start). Dc in next 4 sts. Dc3tog over next 3 sts (valley). Dc in next 4 sts. (3 dc in next st, dc in next 4 sts, dc3tog, dc in next 4 sts) 14 times. Join with sl st to top of ch-3. (180 dc)
Round 52 (Color B, Chevron Round 2): Ch 3. 2 dc in same st. Dc in next 4 sts. Dc3tog. Dc in next 4 sts. (3 dc in next st, dc in next 4 sts, dc3tog, dc in next 4 sts) 14 times. Join. (180 dc)
Round 53 (Color A, Chevron Round 3): Ch 3. 2 dc in same st. Dc in next 4 sts. Dc3tog. Dc in next 4 sts. (3 dc in next st, dc in next 4 sts, dc3tog, dc in next 4 sts) 14 times. Join. (180 dc)
Round 54 (Color A, Chevron Round 4): Rep Round 53. (180 dc)
Rounds 55 through 62: Continue alternating 2 rounds Color B, 2 rounds Color A, following the same chevron pattern. (180 dc each round)
Checkpoint: After Round 62, your chevron skirt section should measure approximately 7 to 8 inches / 18 to 20 cm tall.
Lace Chevron Section (Rounds 63 to 74)
Round 63 (Color B, Lace Chevron): Ch 4 (counts as dc, ch 1). Dc in same st. Ch 1. Dc in next 2 sts. Ch 1. Sk 1 st. Dc3tog. Ch 1. Sk 1 st. Dc in next 2 sts. Ch 1. (Dc, ch 1, dc) in peak st. Rep across 14 more times. Join. (180 working positions)
Rounds 64 through 74: Continue alternating colors every 2 rounds, following the lace chevron pattern. (180 positions each round)
Checkpoint: After Round 74, your full dress length from neckline to this point should measure approximately 30 to 32 inches / 76 to 81 cm.
Hem Scallop Edging (Color A)
Round 75: Ch 1. Sc in each dc and each ch-1 sp around. Join. (180 sc)
Round 76 (Shell Scallop Edging): Join Color A at any sc. (5 dc in same st. Sk 2 sts. Sl st in next st. Sk 2 sts.) 30 times. Join. (30 scallops)
Fasten off Color A. Weave in end.
Cap Sleeves
Return to the 15 held stitches from one underarm sleeve. Join Color B.
Round 1: Ch 1. Sc in each of 15 held sts. Pick up and sc 3 sts along the underarm join edge for a total of 18 sts. Join. (18 sc)
Round 2: Ch 1. Sc in each st around. Join. (18 sc)
Round 3: Ch 1. (Sc2tog, sc in next st) 6 times. Join. (12 sc)
Round 4 (Shell Scallop Edging): Join Color B. (5 dc in same st. Sk 2 sts. Sl st in next st.) 4 times. Join. (4 scallops)
Fasten off. Rep for second sleeve.
Neckline Finishing
Join Color B at back neck edge. Ch 1. Sc evenly around neckline edge. Work 2 rounds sc. On final round, work (sc, ch 1, sc) at each corner of back neck opening to neaten. Fasten off. Weave in ends.
If using a button closure at back neck opening, attach a small button to left back edge and work a ch-3 button loop on right back edge, or use a snap for an invisible closure.
Size Customization Tips
To make this dress larger or smaller, adjust the starting foundation chain in increments of 12 stitches (to maintain fan repeat divisibility). Each 12-stitch increase adds approximately 2.2 inches / 5.5 cm to the neckline circumference.
For the bodice, scale the hdc stitch counts proportionally. For the chevron skirt, the 180-stitch chevron foundation must remain divisible by 12. If your hip shaping results in a different stitch count, adjust with even increases or decreases on Round 49 to reach the nearest multiple of 12.
For length adjustments, add or remove solid chevron stripe rounds in the Rounds 51 to 62 section. Each 2-round set adds approximately 0.65 inches / 1.65 cm to skirt length.
Finishing and Blocking
Weave in all ends on wrong side using a yarn needle, working through the back loops of surrounding stitches to secure cotton yarn which tends to slip.
Wet blocking is strongly recommended for this dress. Fill a basin with cool water and a small amount of wool wash or gentle soap. Submerge the dress and allow to soak for 20 minutes. Gently press (do not wring) to remove water.
Lay flat on blocking mats. Use rust-proof pins to open and define the lace yoke fan points, the pineapple tips, and each scallop along the hem and sleeve cuffs. Pin the chevron peaks and valleys to emphasize the zigzag shape. Allow to dry fully in a well-ventilated area, which may take 24 to 48 hours depending on humidity.
Care Instructions
Hand wash in cool water with a gentle, pH-neutral detergent. Do not machine wash or tumble dry as cotton lace may stretch or distort. Lay flat to dry after each washing. Store folded rather than hung to prevent the skirt from stretching under its own weight.
If the dress wrinkles after washing, a cool iron on the wrong side with a pressing cloth may be used on the cream cotton sections. Do not iron directly over the scallop edging or lace fan sections.
You Did It!
Thank you so much for choosing this pattern! I truly hope you love making this romantic lace dress as much as I loved designing it. The combination of techniques makes it a challenging but incredibly rewarding project. If you make one, I would absolutely love to see it. Tag me on Instagram or share your finished dress in my Facebook group. Seeing your creations is honestly the best part of sharing patterns.
If this pattern caught your eye, go ahead and pin it to your Pinterest boards so you can find it when you are ready to start. And please drop a comment below if you have any questions or want to share your progress. I love hearing from you!