
Last Easter, my niece showed up to brunch wearing the most adorable store-bought bunny sweater. Within twenty minutes, she’d spilled grape juice down the front and the cheap acrylic was already pilling. I watched my sister’s face fall as she tried to dab out the stain, and I thought to myself, "I can make something better." Something machine washable. Something that would actually last. Something so cute that every other parent at the egg hunt would ask where it came from.
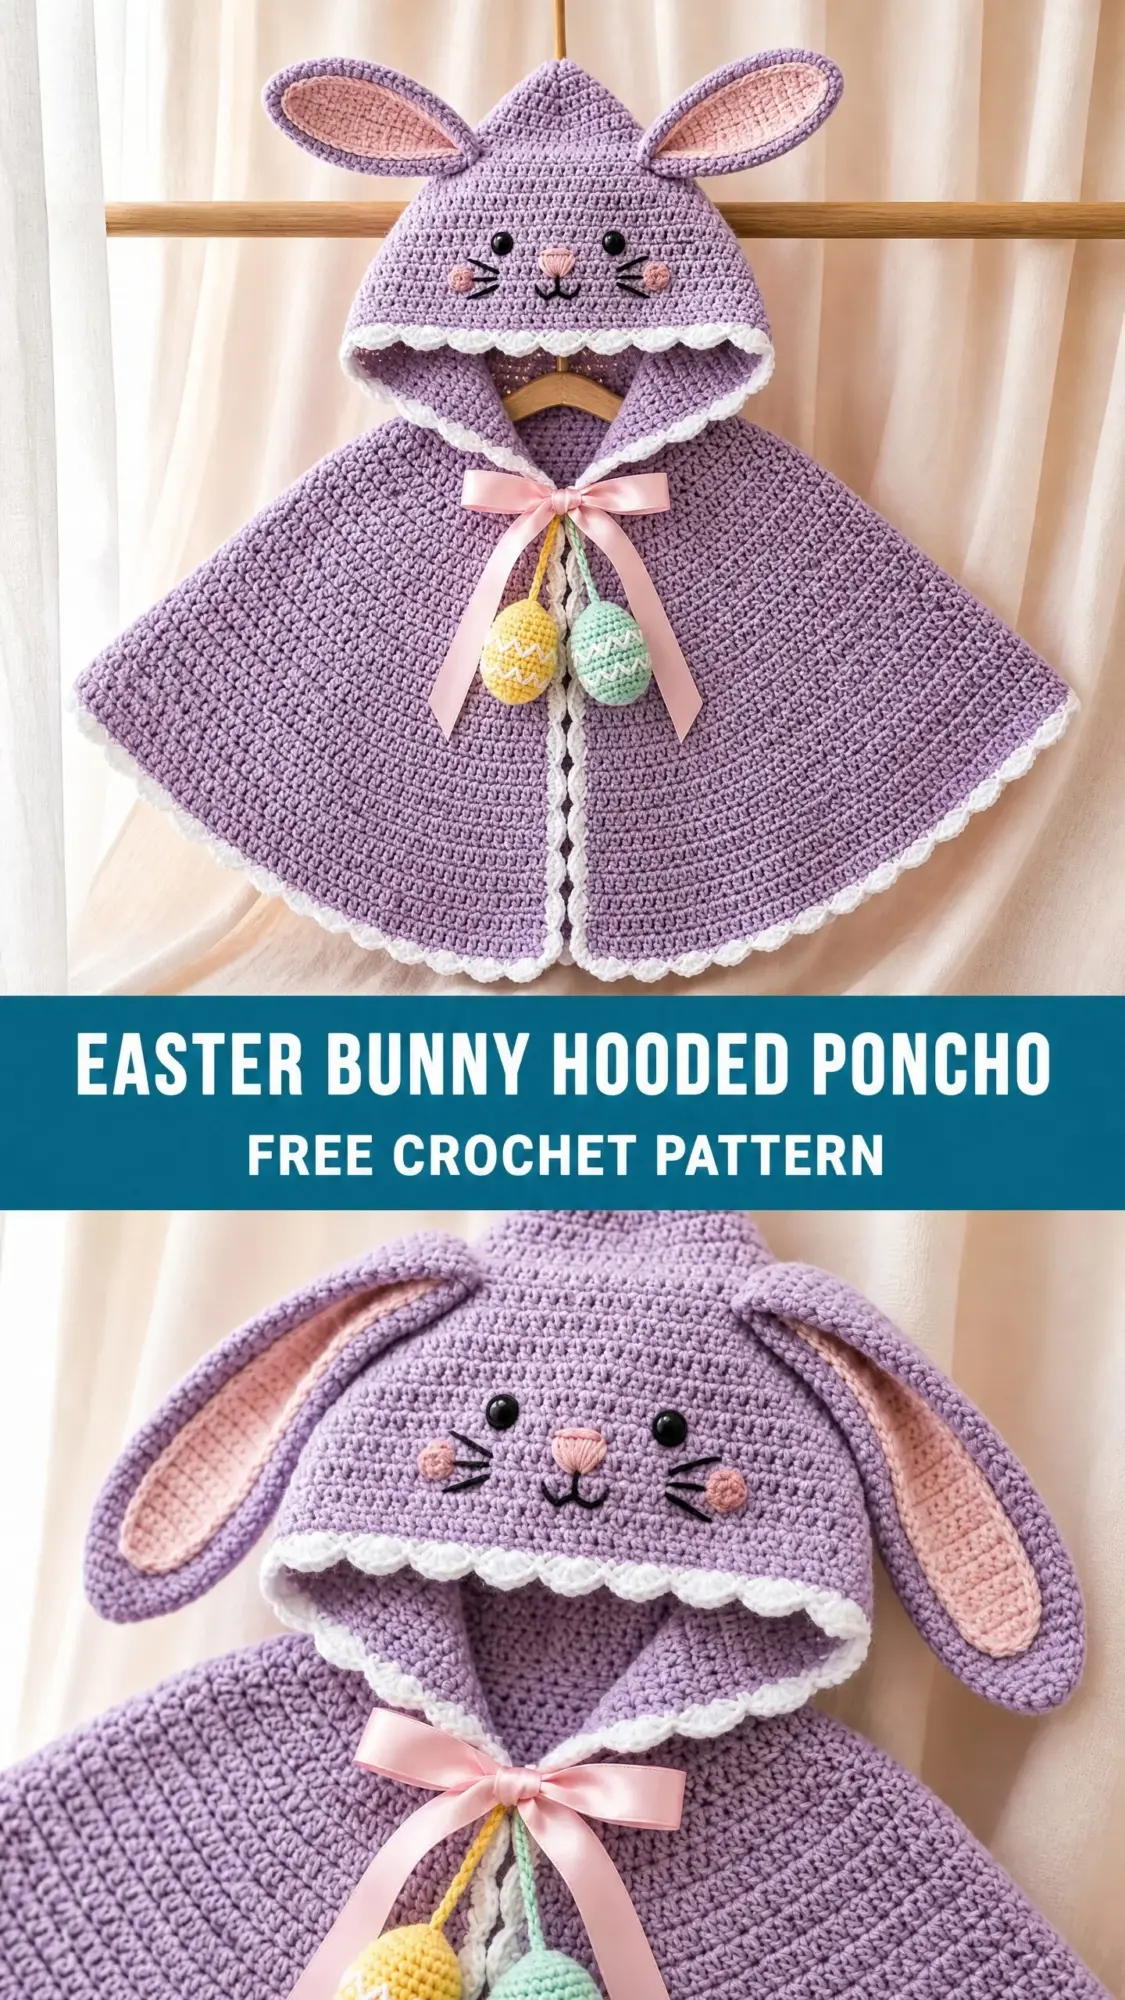
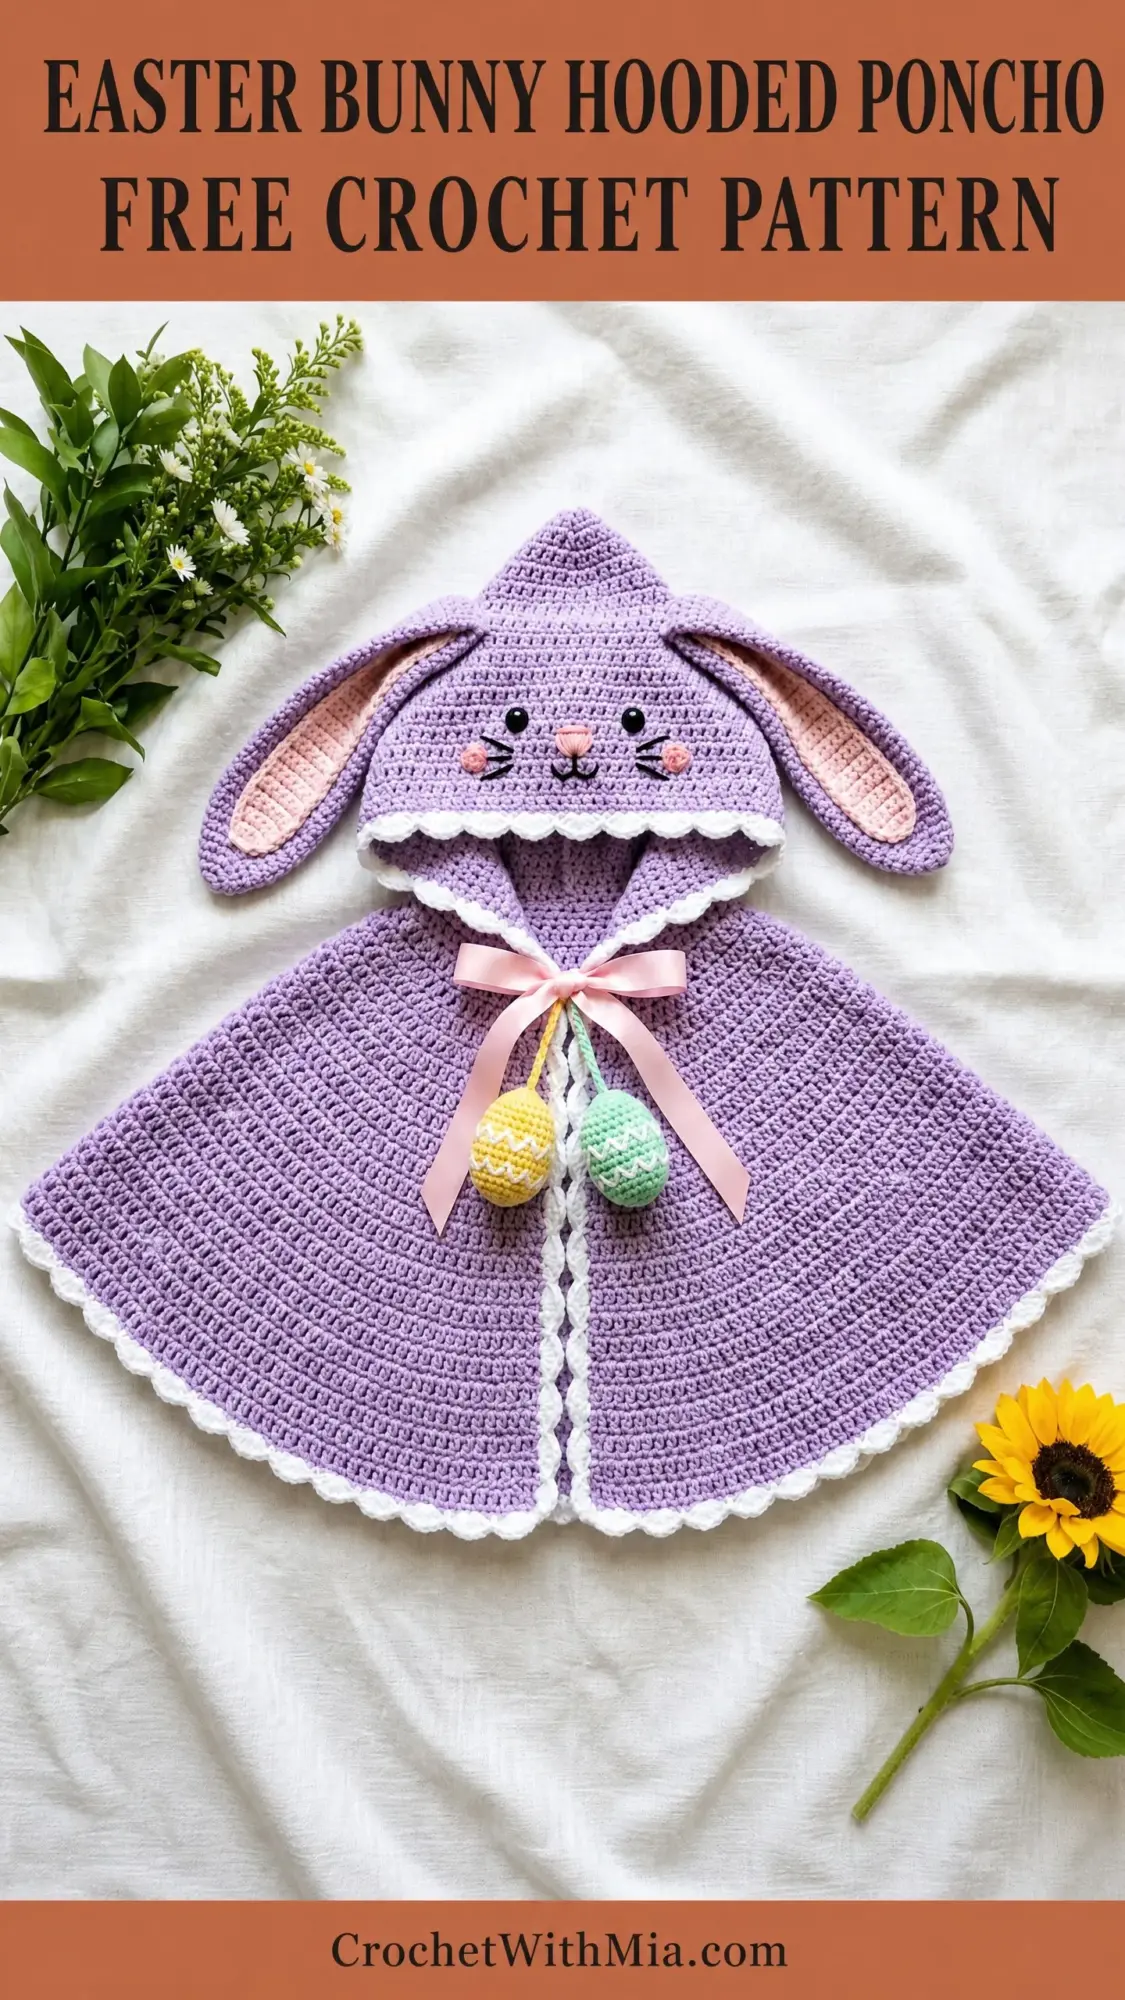
That’s how this Easter Bunny Hooded Poncho was born. I spent weeks perfecting the hood shaping so those floppy ears would sit just right. I tested three different border styles before landing on the crisp white picot edge you see here. And those little crocheted Easter egg charms hanging from a twisted cord? Pure last-minute inspiration that ended up being my favorite detail.
This poncho is worked from the neckline down, which means minimal seaming and maximum satisfaction. The hood is constructed separately and attached at the back, giving you that sweet pointed peak with bunny ears that makes kids squeal with delight. Fair warning: once you finish this, you’ll want to make one in every color.
Pattern Overview and Skill Level
This Easter Bunny Hooded Poncho pattern is rated intermediate. If you’ve completed two or three projects and feel comfortable with increases, working in rounds, and basic seaming, you’re ready for this one.
The poncho body uses single crochet (sc) worked in continuous rounds from the neckline, then converts to rows to create the open front. The hood is a shaped panel with decreases at the top to form that adorable pointed peak. You’ll also make separate ear pieces and two little stuffed Easter egg charms.
Don’t let the "intermediate" label scare you. I’ll walk you through every step, explain the tricky bits, and give you checkpoints along the way so you know you’re on track.
Finished Measurements
This pattern fits toddlers approximately 2 to 4 years old (size 2T to 4T).
Materials Needed
Yarn:
Recommended Yarn Brands:
Choose any smooth worsted weight yarn that matches gauge. Avoid fuzzy or heavily textured yarns since they’ll obscure your stitch definition. Machine washable fibers are ideal for anything a toddler will wear.
Hooks:
Notions:
Gauge
14 sc and 16 rows = 4 inches / 10 cm worked in single crochet with a US J / 6.0 mm hook, blocked.
To make a gauge swatch, chain 20 and work single crochet back and forth for 20 rows. Block your swatch and measure the center 14 stitches and 16 rows.
Gauge matters here. If your gauge is off, your neckline won’t fit properly and the poncho dimensions will be wrong. Adjust your hook size up or down as needed.
Abbreviations and Stitch Definitions
Let me break down every abbreviation you’ll encounter. If you’re newer to crochet, read through this section before starting.
Special Stitches
Picot Stitch (used for border)
This creates those pretty little bumps along the white edging.
1. Work 1 sc in the indicated stitch
2. Chain 3
3. Work 1 sl st into the first chain of the 3-chain you just made (this creates the picot bump)
4. Continue along the edge as directed
Twisted Cord (for hanging Easter eggs)
1. Cut 6 strands of Yarn A, each 18 inches / 46 cm long
2. Hold all strands together and fold in half to create a loop
3. Anchor the loop end to a hook or doorknob
4. Twist the free ends in one direction until the cord starts to kink when relaxed
5. Fold the twisted length in half, allowing it to twist together
6. Knot the cut ends to secure
7. Finished cord will be approximately 4 to 5 inches / 10 to 13 cm long
Pattern Notes Before You Begin
A few things to keep in mind as you work through this crochet tutorial:
1. The poncho body is worked in continuous rounds from the neckline. Use a stitch marker to track where each round begins.
2. The hood is worked separately in rows, then seamed and attached to the neckline.
3. The front opening is created by switching from rounds to rows. No cutting required.
4. The white border is applied last, after all seaming is complete.
5. A turning chain of 1 does NOT count as a stitch throughout this pattern.
6. Stitch counts appear in parentheses at the end of each row or round.
Step by Step Instructions
Section 1: Poncho Body
The poncho is worked from the neckline downward.
Foundation:
Using Yarn A and a US J / 6.0 mm hook, make a magic ring.
Round 1: Work 8 sc into the magic ring. Pull ring closed. Do not join. Place marker in the last stitch. (8 sc)
Round 2: Work 2 sc in each st around. (16 sc)
Round 3: [Inc, sc 1] around. (24 sc)
Round 4: [Inc, sc 2] around. (32 sc)
Round 5: [Inc, sc 3] around. (40 sc)
Round 6: [Inc, sc 4] around. (48 sc)
Round 7: [Inc, sc 5] around. (56 sc)
Round 8: [Inc, sc 6] around. (64 sc)
Checkpoint: Your neckline circle should measure approximately 18 inches / 46 cm in circumference and about 4.5 inches / 11.5 cm in diameter.
Converting to Rows for the Open Front
After Round 8, you’ll work back and forth in rows to create the center front opening. Turn your work so the wrong side faces you.
Row 9 (WS): Ch 1 (does not count as st), turn. Sc across all 64 sts. (64 sc)
Row 10 (RS): Ch 1, turn. [Inc, sc 7] 8 times across. (72 sc)
Row 11 (WS): Ch 1, turn. Sc across. (72 sc)
Row 12 (RS): Ch 1, turn. [Inc, sc 8] 8 times across. (80 sc)
Row 13 (WS): Ch 1, turn. Sc across. (80 sc)
Row 14 (RS): Ch 1, turn. [Inc, sc 9] 8 times across. (88 sc)
Row 15 (WS): Ch 1, turn. Sc across. (88 sc)
Row 16 (RS): Ch 1, turn. [Inc, sc 10] 8 times across. (96 sc)
Row 17 (WS): Ch 1, turn. Sc across. (96 sc)
Row 18 (RS): Ch 1, turn. [Inc, sc 11] 8 times across. (104 sc)
Row 19 (WS): Ch 1, turn. Sc across. (104 sc)
Row 20 (RS): Ch 1, turn. [Inc, sc 12] 8 times across. (112 sc)
Row 21 (WS): Ch 1, turn. Sc across. (112 sc)
Row 22 (RS): Ch 1, turn. [Inc, sc 13] 8 times across. (120 sc)
Row 23 (WS): Ch 1, turn. Sc across. (120 sc)
Row 24 (RS): Ch 1, turn. [Inc, sc 14] 8 times across. (128 sc)
Row 25 (WS): Ch 1, turn. Sc across. (128 sc)
Row 26 (RS): Ch 1, turn. [Inc, sc 15] 8 times across. (136 sc)
Row 27 (WS): Ch 1, turn. Sc across. (136 sc)
Row 28 (RS): Ch 1, turn. [Inc, sc 16] 8 times across. (144 sc)
Row 29 (WS): Ch 1, turn. Sc across. (144 sc)
Row 30 (RS): Ch 1, turn. [Inc, sc 17] 8 times across. (152 sc)
Row 31 (WS): Ch 1, turn. Sc across. (152 sc)
Row 32 (RS): Ch 1, turn. [Inc, sc 18] 8 times across. (160 sc)
Row 33 (WS): Ch 1, turn. Sc across. (160 sc)
Row 34 (RS): Ch 1, turn. [Inc, sc 19] 8 times across. (168 sc)
Row 35 (WS): Ch 1, turn. Sc across. (168 sc)
Checkpoint: Your poncho body should measure approximately 12 inches / 30 cm from the neckline center to the bottom hem edge. The bottom edge should span approximately 44 to 46 inches / 112 to 117 cm across.
Do not fasten off. Set the poncho body aside.
Section 2: Hood
Using Yarn A and a US J / 6.0 mm hook, chain 39.
Row 1 (RS): Sc in 2nd ch from hook and in each ch across. (38 sc)
Rows 2 through 20: Ch 1, turn. Sc across. (38 sc each row)
Begin Top Shaping:
Row 21 (RS): Ch 1, turn. Sc2tog, sc across to last 2 sts, sc2tog. (36 sc)
Row 22 (WS): Ch 1, turn. Sc2tog, sc across to last 2 sts, sc2tog. (34 sc)
Row 23 (RS): Ch 1, turn. Sc2tog, sc across to last 2 sts, sc2tog. (32 sc)
Row 24 (WS): Ch 1, turn. Sc2tog, sc across to last 2 sts, sc2tog. (30 sc)
Row 25 (RS): Ch 1, turn. Sc2tog, sc across to last 2 sts, sc2tog. (28 sc)
Row 26 (WS): Ch 1, turn. Sc2tog, sc across to last 2 sts, sc2tog. (26 sc)
Row 27 (RS): Ch 1, turn. Sc2tog, sc across to last 2 sts, sc2tog. (24 sc)
Row 28 (WS): Ch 1, turn. Sc2tog, sc across to last 2 sts, sc2tog. (22 sc)
Row 29 (RS): Ch 1, turn. Sc2tog, sc across to last 2 sts, sc2tog. (20 sc)
Row 30 (WS): Ch 1, turn. Sc2tog, sc across to last 2 sts, sc2tog. (18 sc)
Row 31 (RS): Ch 1, turn. Sc2tog, sc across to last 2 sts, sc2tog. (16 sc)
Row 32 (WS): Ch 1, turn. Sc2tog, sc across to last 2 sts, sc2tog. (14 sc)
Row 33 (RS): Ch 1, turn. Sc2tog, sc across to last 2 sts, sc2tog. (12 sc)
Row 34 (WS): Ch 1, turn. Sc2tog, sc across to last 2 sts, sc2tog. (10 sc)
Row 35 (RS): Ch 1, turn. Sc2tog, sc across to last 2 sts, sc2tog. (8 sc)
Row 36 (WS): Ch 1, turn. Sc2tog, sc across to last 2 sts, sc2tog. (6 sc)
Row 37 (RS): Ch 1, turn. Sc2tog, sc 2, sc2tog. (4 sc)
Row 38 (WS): Ch 1, turn. [Sc2tog] twice. (2 sc)
Row 39 (RS): Ch 1, turn. Sc2tog. (1 sc)
Fasten off, leaving a long tail for seaming.
Hood Assembly:
Fold the hood in half lengthwise so the two straight side edges meet. The folded edge forms the top center seam. Using the long tail and a yarn needle, whip stitch along the straight top edge from the tip down to where shaping begins (end of Row 20). Weave in the end.
Attaching the Hood to the Poncho:
Pin the base edge of the hood evenly to the neckline edge of the poncho body, matching center back of the hood to center back of the neckline. Seam using whip stitch or slip stitch join.
Section 3: Bunny Ears (Make 2 of each)
Outer Ear (make 2 in Yarn A):
Using Yarn A and a US J / 6.0 mm hook, chain 8.
Row 1 (RS): Sc in 2nd ch from hook and in each ch across. (7 sc)
Rows 2 through 10: Ch 1, turn. Sc across. (7 sc each row)
Row 11 (RS): Ch 1, turn. Sc2tog, sc 3, sc2tog. (5 sc)
Row 12: Ch 1, turn. Sc across. (5 sc)
Row 13: Ch 1, turn. Sc2tog, sc 1, sc2tog. (3 sc)
Row 14: Ch 1, turn. Sc across. (3 sc)
Row 15: Ch 1, turn. Sc2tog, sc 1. (2 sc)
Row 16: Ch 1, turn. Sc2tog. (1 sc)
Fasten off, leaving a long tail.
Inner Ear (make 2 in Yarn C):
Using Yarn C and a US J / 6.0 mm hook, chain 6.
Row 1 (RS): Sc in 2nd ch from hook and in each ch across. (5 sc)
Rows 2 through 7: Ch 1, turn. Sc across. (5 sc each row)
Row 8: Ch 1, turn. Sc2tog, sc 1, sc2tog. (3 sc)
Row 9: Ch 1, turn. Sc across. (3 sc)
Row 10: Ch 1, turn. Sc2tog, sc 1. (2 sc)
Row 11: Ch 1, turn. Sc2tog. (1 sc)
Fasten off, leaving a long tail.
Ear Assembly:
Center one inner ear on top of one outer ear, right sides facing up. Whip stitch the inner ear to the outer ear along all edges. Add a small amount of fiberfill between layers for dimension.
Attach Ears to Hood:
Position one ear on each side of the hood, approximately 1 to 1.5 inches from the center top seam. Sew securely through the hood fabric.
Section 4: Easter Egg Charms (Make 2)
Using Yarn D (or Yarn E) and a US G / 4.0 mm hook, make a magic ring.
Round 1: 6 sc in MR. Pull ring closed. (6 sc)
Round 2: Inc in each st around. (12 sc)
Round 3: [Inc, sc 1] around. (18 sc)
Round 4: [Inc, sc 2] around. (24 sc)
Rounds 5 and 6: Sc around. (24 sc)
Optional: Using Yarn B, work surface slip stitches in a zigzag line across Round 6 for decoration.
Round 7: [Sc2tog, sc 2] around. (18 sc)
Round 8: [Sc2tog, sc 1] around. (12 sc)
Stuff lightly with fiberfill.
Round 9: [Sc2tog] around. (6 sc)
Fasten off. Thread tail through remaining stitches, pull tight, and weave in.
Section 5: Border
Using Yarn B and a US J / 6.0 mm hook.
Hem Border:
Join Yarn B to any stitch along the bottom edge of the poncho.
Round 1: Work 1 sc in each stitch across the entire bottom edge, up both front edges, and along the neckline front edges.
Picot Round: [Sc 2, work picot stitch] rep around the entire outer edge.
Hood Border:
Join Yarn B to one corner of the hood face opening.
Work 1 sc in each st and row end evenly around the hood face opening (approximately 58 to 62 stitches).
Next round: [Sc 2, work picot stitch] rep around. Join with sl st. Fasten off.
Section 6: Bunny Face
Position the face on the front of the hood, centered below the ear placement.
Eyes: Attach two 6 mm black safety eyes, spaced approximately 1.5 inches apart, centered at the midpoint of hood height. Alternatively, embroider French knot eyes.
Nose: Using blush pink thread, embroider a small triangle shape approximately 0.75 inches below and centered between the eyes.
Whiskers: Using white or pale gray thread, embroider three whisker lines extending from each side of the nose.
Cheeks: Using blush pink thread, work satin stitches or French knots on each side of the nose.
Section 7: Final Embellishments
Twisted Cord and Eggs:
Construct the twisted cord following the special stitches instructions. Attach both Easter eggs to one end. Attach the free end to the inside back of the ribbon bow at center front neckline.
Ribbon:
Cut the pink satin ribbon approximately 22 inches long. Thread through the stitches at the neckline, weaving in and out just below the hood attachment seam. Tie in a bow at center front.
Size Customization Tips
To size up for 4T to 6:
Work 2 additional increase rounds at the neckline before converting to rows. Add 2 to 4 additional rows to the hood and 4 to 6 additional increase rows to the body.
To size down for 12 to 18 months:
Begin converting to rows after Round 7 (56 stitches). Reduce total increase rows in the body to 24 rows. Reduce hood to chain 31 and work 15 plain rows before shaping.
Finishing and Care
Weave in all ends securely. Wet block the poncho by soaking in cool water with wool wash for 15 minutes. Lay flat to dry.
Machine wash cold on gentle cycle if using 100% acrylic yarn. Lay flat to dry. Remove the ribbon before washing and reattach after.
I hope you love making this Easter Bunny Hooded Poncho as much as I loved designing it. There’s nothing quite like seeing a little one’s face light up when they put on something you made with your own two hands. Thank you so much for trusting me with your time and your yarn stash.
If you make this pattern, please save it to your Pinterest boards so you can find it again later, and definitely leave a comment below. I’d love to hear how it turned out and see photos of your finished poncho on your favorite tiny human!