
I call this one the Daisy Mae dress, named after my grandmother who taught me my very first chain stitch on her sun-drenched porch. She had this worn notebook filled with sketches of baby clothes she dreamed of making for her great-grandchildren someday. When I found that notebook tucked in an old cedar chest last spring, I knew I had to bring one of her designs to life.

The original sketch showed a simple A-line dress with flowers at the bodice. I spent months turning her pencil lines into something real, adding the granny square yoke, the lacy fan skirt, and those sweet daisies along the hem. Every stitch feels like a conversation with her.
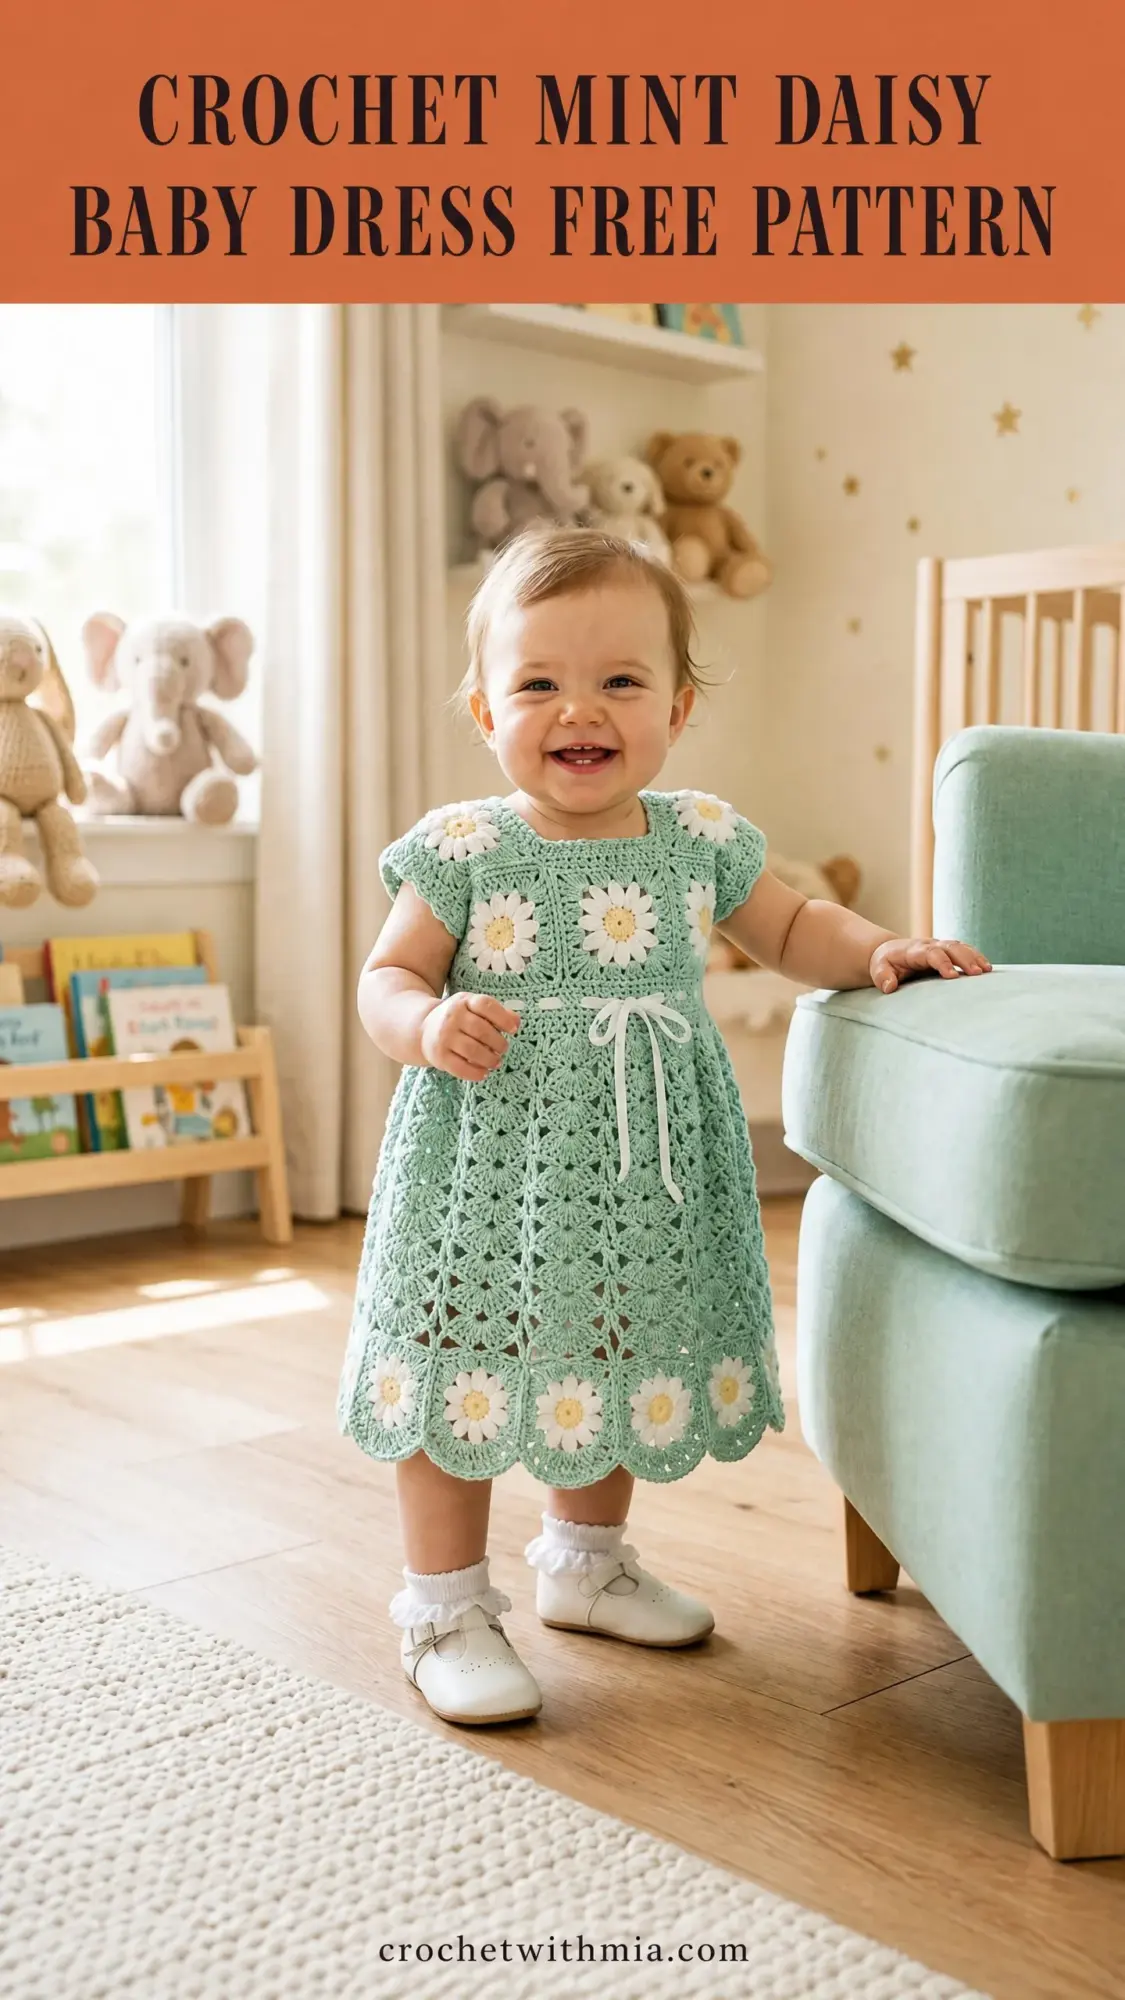
This crochet baby dress pattern combines everything I love about heirloom pieces. The construction moves from top to bottom, starting with daisy granny squares for the yoke, flowing into a breezy lace skirt, and finishing with a scalloped border that makes the hem dance. If you have ever wanted to make a keepsake garment for a little one in your life, this is your project.
About This Baby Dress Pattern
This mint green crochet dress fits babies approximately 12 to 18 months old. The finished measurements give you a chest circumference of about 19 inches and a total length from shoulder to hem of approximately 14.5 inches. The soft mint color paired with white daisy motifs and pale yellow centers creates a fresh, springtime look perfect for photos, special occasions, or just everyday sweetness.
The skill level sits at intermediate. You should feel comfortable with joining granny squares, reading repeating lace patterns, working in both rows and rounds, and basic garment construction. If you are a confident beginner who has tackled several projects and learned basic shaping, you can absolutely make this dress with patience and attention to detail.
Time estimate: Plan for roughly 18 to 25 hours total. The daisy squares alone take about 8 to 10 hours to complete, so this is a perfect project to work on in the evenings over a couple of weeks.
Materials You Will Need
Yarn (DK weight throughout):
Hooks:
Notions:
Yarn Suggestions
Paintbox Yarns Simply DK works beautifully here. It is 100% acrylic with excellent stitch definition, machine washable, and budget-friendly. The Spearmint Green shade is nearly perfect for this design.
Drops Safran gives you a cotton option for warmer weather. At 100% cotton, it creates a slightly denser fabric with lovely drape. Check your gauge carefully with cotton and consider moving up a hook size if your tension runs tight.
Lion Brand Pound of Love offers incredible value. One skein in mint covers all your MC yardage with room to spare.
Use any DK weight yarn (also called Light Worsted or 8-ply) that achieves gauge. Avoid fuzzy or textured novelty yarns since they will hide your beautiful daisy petals and lace pattern.
Gauge
Getting gauge right matters a lot for garment fit. With MC and the US E-4 / 3.5 mm hook:
Make and block one daisy square before starting the full project. If your square measures larger than 2.75 inches, go down one hook size. If smaller, go up one hook size.
Abbreviations and Stitch Definitions
Let me walk you through every abbreviation you will encounter. Each one includes a plain-English explanation so nothing catches you off guard.
Special Stitches
Fan Stitch: This creates your lace skirt. One fan equals (dc, ch 1, dc, ch 1, dc, ch 1, dc, ch 1, dc) all worked into the same stitch or space. That gives you 5 double crochets with ch-1 spaces between each one. One fan occupies a 6-stitch repeat.
Scallop Edging: Worked at the hem. One scallop equals sc in first st, skip 1 st, 5 dc in next st, skip 1 st, sc in next st. Each scallop uses 5 stitches.
Picot: Ch 3, sl st in first ch of the ch-3 just made. Creates a tiny decorative bump.
Daisy Petal: Insert hook into center ring. Yarn over, pull up a loop to the height of a dc (about 1/2 inch tall). Yarn over, pull through both loops. This creates one elongated single crochet. Work a ch 1 to hold the petal shape. Repeat 12 times around the center ring to create all petals.
Step-by-Step Pattern Instructions
Daisy Square Module
Make 13 squares total: 9 for the yoke and 4 for the hem border.
Round 1 (Center): With CB, make a magic ring. Ch 1. Work 12 sc into the ring. Pull ring closed. Sl st to first sc to join. (12 sc)
Round 2 (Petals): Do not cut CB. Drop CB. Attach CA with a sl st into any sc of Round 1. Working into the ring (not into the stitches), work the Daisy Petal stitch 12 times, one petal aligned between each sc of Round 1. After each petal, sl st into the next sc of Round 1 to anchor. When all 12 petals are made, sl st to join round. (12 petals, 12 sl st anchors)
Here is the key to understanding this round: you insert your hook into the center ring each time, not into the stitches from Round 1. The 12 sc serve only as anchor points between petals.
Round 3 (Inner Granny Round): With MC, attach with a sl st to any sl st anchor of Round 2. Ch 3 (does not count as dc throughout). Work 2 dc into same sl st. Ch 2. (3 dc, ch 2) into same sl st for corner cluster. Skip 2 sl sts. (3 dc, ch 2, 3 dc) into next sl st for second corner cluster. Skip 2 sl sts. Repeat twice more for 4 corners total. Sl st to top of first dc to join. (4 corner ch-2 sps, 24 dc total)
Round 4 (Outer Granny Round): With MC, sl st into first ch-2 corner sp. Ch 3. (2 dc, ch 2, 3 dc) into same corner sp. Ch 1. 3 dc into the space between the two 3-dc clusters on the side. Ch 1. (3 dc, ch 2, 3 dc) into next corner sp. Ch 1. 3 dc into the side space. Ch 1. Repeat around all 4 corners. Sl st to top of first dc to join. (4 corner ch-2 sps, 36 dc, 8 ch-1 sps)
Round 5 (Square Edging Round): With MC, sl st into first ch-2 corner sp. Ch 1 (does not count as sc). 3 sc into corner sp. 1 sc into each dc and each ch-1 sp across the side (8 sc per side). 3 sc into corner sp. Repeat around. Sl st to first sc to join. (44 sc total: 12 corner sc plus 32 side sc)
Fasten off. Weave in ends. Block each square to 2.75 inches / 7 cm square.
Yoke Assembly
You will arrange 12 squares in a 4-wide by 3-tall grid. The front and back each have 6 squares arranged 2 wide by 3 tall.
Joining the Squares: Lay out all 12 squares in your grid with RS facing up.
Step 1: Join the 2 front-left squares (Column 1, all 3 rows) by seaming their shared vertical edges. Hold squares RS together. With MC and E-4 hook, sc through corresponding stitches along the shared edge. Each edge has 8 side sc plus 1 corner sc on each end, giving you 10 stitches joined per seam. (10 sc per vertical seam)
Step 2: Join the 2 front-right squares (Column 2, all 3 rows) the same way.
Step 3: Join the front-left and front-right columns along their shared center vertical seam. (10 sc per seam)
Step 4: Repeat Steps 1 through 3 for the back 6 squares.
Step 5: Join front and back at shoulder seams. Align top edges of front top-row squares with top edges of back top-row squares. Join only the outermost 5 stitches for each shoulder, leaving center edges open for the neckline. (5 sc per shoulder seam)
Step 6: Join front and back at side seams. Work sc through corresponding edge stitches, but leave the topmost 8 to 10 stitches open on each side for the armhole.
Waist Ribbon Channel
Before starting the skirt, create the ribbon channel at the bottom edge of the yoke.
Set up: With MC and E-4 hook, join with sl st to any stitch along the bottom edge of the yoke. Work evenly around, picking up 1 sc in each sc and 1 sc in each joining seam stitch. Adjust to reach exactly 84 stitches, which must be divisible by 6 for the fan stitch repeat.
Eyelet Round: Ch 3 (does not count as dc). Dc in same st. (Ch 1, skip 1 st, dc in next st) around, ending with ch 1, sl st to top of first dc. (42 dc, 42 ch-1 sps, 84 working positions)
Skirt Body
The skirt works in joined rounds from the yoke downward using fan lace stitch.
Fan Lace Set-Up Round: With MC, join with sl st to any ch-1 sp of the eyelet round. Ch 1. Sc in same sp. Sc in each dc and each ch-1 sp around. (84 sc)
Skirt Round 1 (Fan Set-Up): Ch 5 (counts as dc + ch 2). Skip first 5 sts. Dc in 6th st. (Ch 2, skip 2 sts, dc in next st) around, ending with ch 2, sl st to 3rd ch of beg ch-5 to join. (28 dc, 28 ch-2 sps)
Skirt Round 2 (First Fan Round): Sl st into first ch-2 sp. Ch 3 (does not count as dc). (Dc, ch 1, dc, ch 1, dc, ch 1, dc, ch 1, dc) into same ch-2 sp. Ch 1. Sc into next ch-2 sp. Ch 1. Rep (fan into next ch-2 sp, ch 1, sc into next ch-2 sp, ch 1) around, ending sl st to top of first dc to join. (14 fans, 14 sc)
Skirt Round 3: Sl st to first ch-1 sp within first fan. Ch 1. Work sc in each of the 4 ch-1 sps within the fan (4 sc). Ch 2. Sc into the single sc between fans. Ch 2. Rep around. Join with sl st to first sc. (56 fan sc, 14 between-fan sc, 28 ch-2 sps)
Skirt Round 4 (Second Fan Round): Sl st into first ch-2 sp. Ch 3. Work a 5-dc fan into the 2nd sc of the 4-sc group of the previous round. Ch 1. Sc into the ch-2 sp before the between-fan sc. Ch 1. Rep around. Join. (14 fans, 14 sc)
Skirt Rounds 5 through 14: Continue alternating Rounds 3 and 4 for a total of 14 rounds of fan lace.
Hem Border
Hem Pickup Round: Join MC with sl st to any sc between fans. Ch 1. Work 1 sc into each st and each ch-sp around to achieve exactly 84 sc. Sl st to first sc to join. (84 sc)
Mark 4 square positions evenly around the circumference. Each square zone uses 11 stitches, and each scallop zone between squares uses 10 stitches.
Attaching Daisy Squares: Hold a finished daisy square with RS facing outward, aligned with the pickup round. With MC, join with sc through both the first st of the square’s top edge and the first st of the square zone simultaneously. Work sc through each pair across the 11-stitch zone. (11 sc, joining square to skirt)
Repeat for all 4 daisy squares.
Scallop Sections Between Squares: In each 10-stitch zone between squares, work: Sc in first st. Skip 1 st. 5 dc in next st. Skip 1 st. Sc in next st. Skip 1 st. 5 dc in next st. Skip 1 st. Sc in last st. (2 scallop shells per zone)
Lower Edge of Daisy Squares: Work scallop edging along the lower 11 stitches of each daisy square: Sc in first st. Skip 1 st. 5 dc in next st. Skip 1 st. Sc in next st. Skip 1 st. 5 dc in next st. Skip 1 st. Sc in last st.
Join all sections with sl st. Fasten off.
Neckline Edging
With CA and D-3 / 3.25 mm hook, join with sl st to any st along the neckline opening.
Round 1: Ch 1. Sc evenly around the neckline opening, approximately 44 sc. Sl st to first sc to join. (44 sc)
Round 2 (Picot Edging): Ch 1. Sc in first st. (Picot: ch 3, sl st in first ch of ch-3 made) in same st. Skip 1 st. Sc in next st. Picot in same st. Skip 1 st. Rep around. Sl st to first sc to join. Fasten off.
Armhole Edging
With CA and D-3 / 3.25 mm hook, join with sl st to any st along one armhole opening.
Round 1: Ch 1. Sc evenly around armhole, approximately 28 sc. Sl st to first sc to join. (28 sc)
Round 2 (Picot Edging): Work the same as neckline Round 2. Fasten off.
Repeat for the second armhole.
Finishing Your Mint Daisy Baby Dress
Weaving in ends: Use your tapestry needle to secure all tails, especially at square joins and color changes. Weave each tail in at least two directions to prevent unraveling during washing.
Blocking: Submerge the completed dress in cool water with a gentle wool wash or baby-safe fabric wash. Squeeze out water gently without wringing. Lay flat on a blocking mat or clean towels. Pin to finished measurements, keeping the skirt hem even and daisy motifs flat. Allow 12 to 24 hours to dry completely.
Adding the ribbon: Thread your white satin ribbon through the eyelet round at the waist, beginning and ending at center front. Tie in a bow. Trim ends at a 45-degree angle and apply clear fabric glue if desired to prevent fraying.
Optional button closure: If you prefer a back opening, work 3 button loops (ch 4, sl st to base) along the left back vertical seam and sew 3 matching buttons to the right back seam.
Size Customization Tips
To size up for 18 to 24 months, add one more daisy square column to the yoke. This gives you 3 squares wide on both front and back instead of 2 and 2. Adjust your fan stitch pickup round to 96 stitches (still divisible by 6) and add 2 to 4 more fan repeat rounds for extra length. The finished chest will measure approximately 21 inches / 53 cm.
Tips for Success
Take your time with the daisy squares. They form the heart of this design, and blocking them before assembly makes joining so much easier. Mark your stitch counts at the end of every few rounds while working the skirt to catch any mistakes early.
The fan lace stitch naturally creates an A-line flare, which is exactly what gives this dress its sweet silhouette. Trust the pattern and resist the urge to add increases.
When attaching the hem border squares, pin them in place first and step back to make sure they are evenly spaced before you commit to stitching. A few minutes of measuring saves hours of frogging.
Thank you so much for choosing this pattern to make something special for a little one. I truly hope you enjoy every stitch as much as I enjoyed designing it. If you make your own Daisy Mae dress, I would absolutely love to see it! Share your finished project on Instagram or Facebook and tag me so I can celebrate with you.
If this pattern caught your heart, go ahead and save it to your Pinterest boards so you can find it whenever inspiration strikes. And please drop a comment below if you give it a try. I read every single one, and hearing about your projects honestly makes my day.