
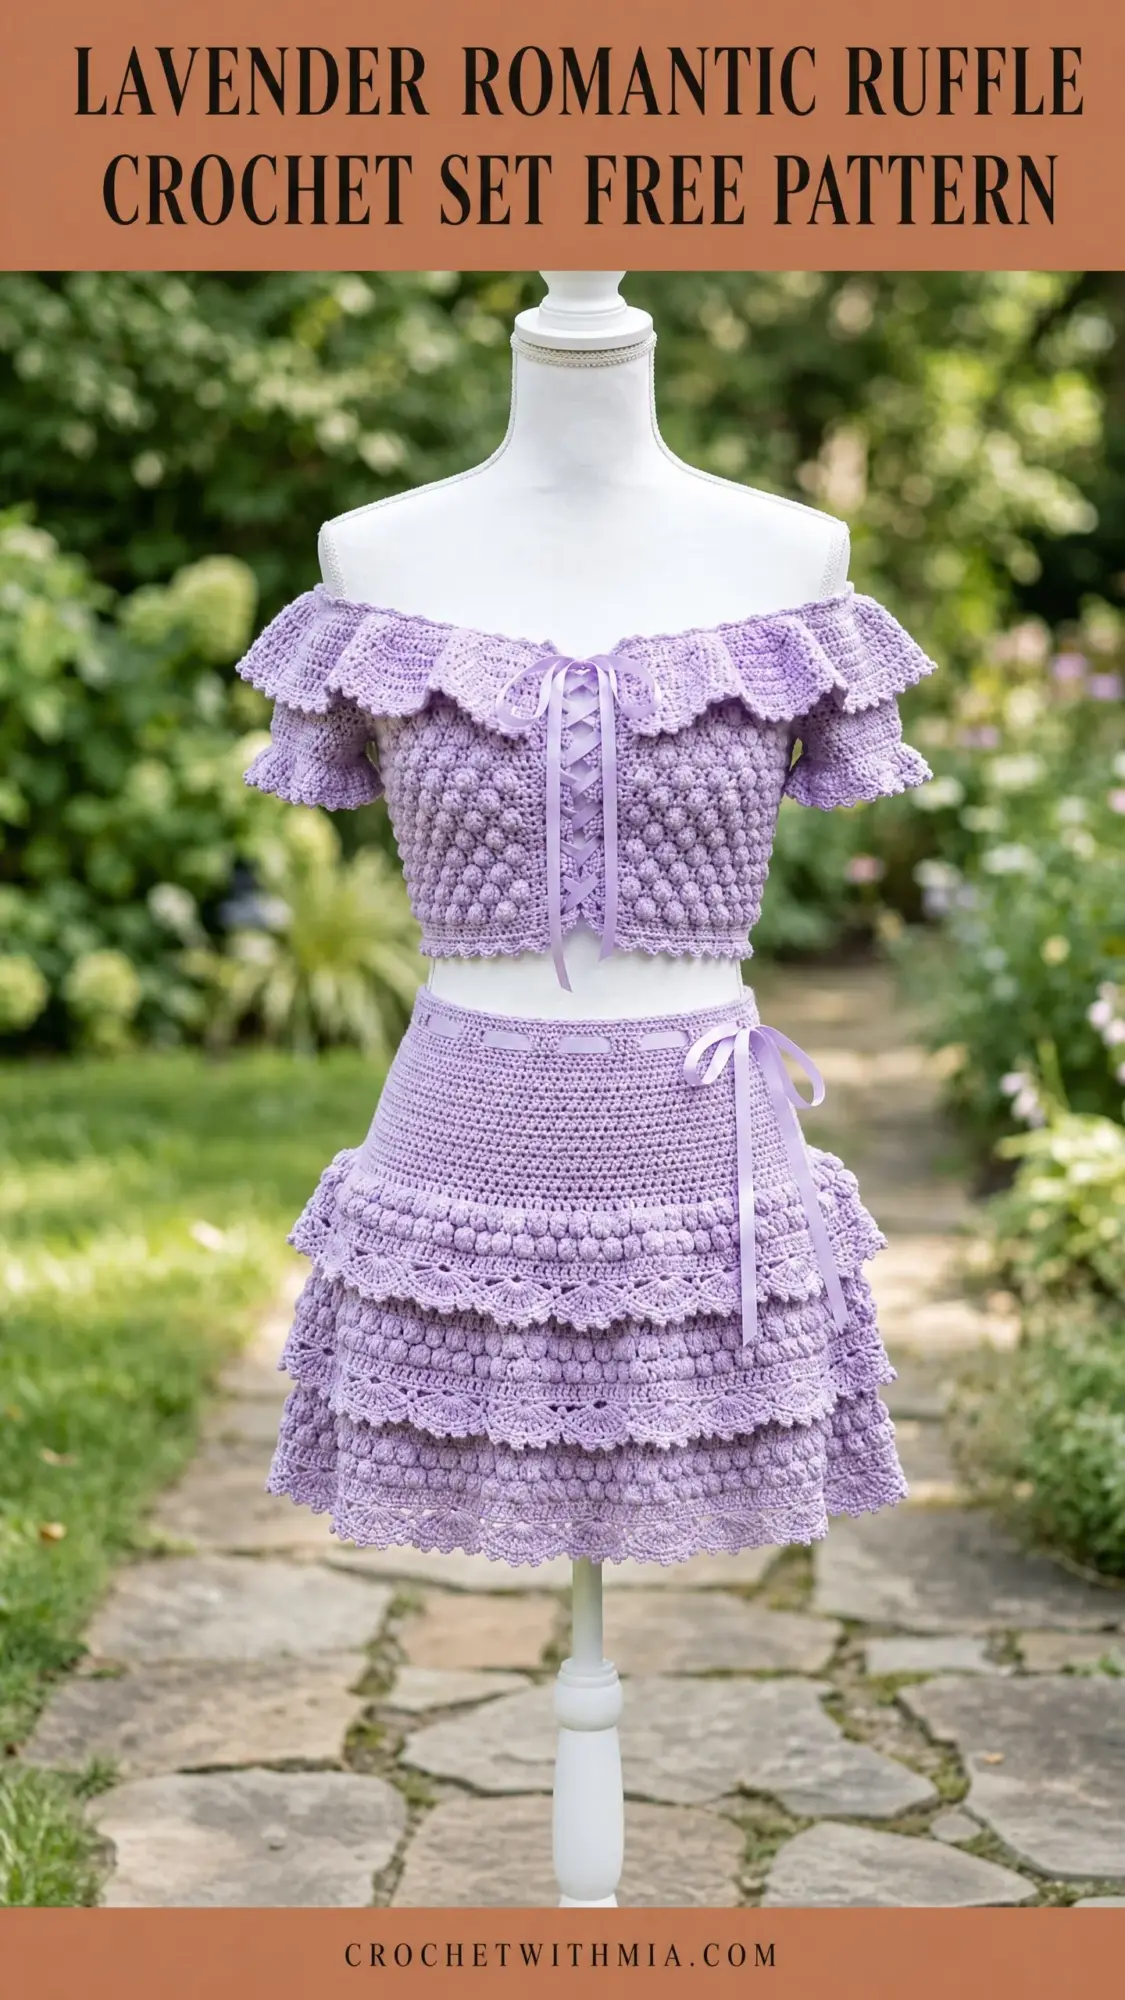
Looking for a stunning handmade outfit that works for summer parties, beach vacations, or even a special bridal shower? This two piece crochet set delivers on all fronts. The off the shoulder crop top features gorgeous bobble stitch texture with a corset style ribbon lace up, while the tiered ruffle skirt cascades beautifully with four layers of feminine ruffles.
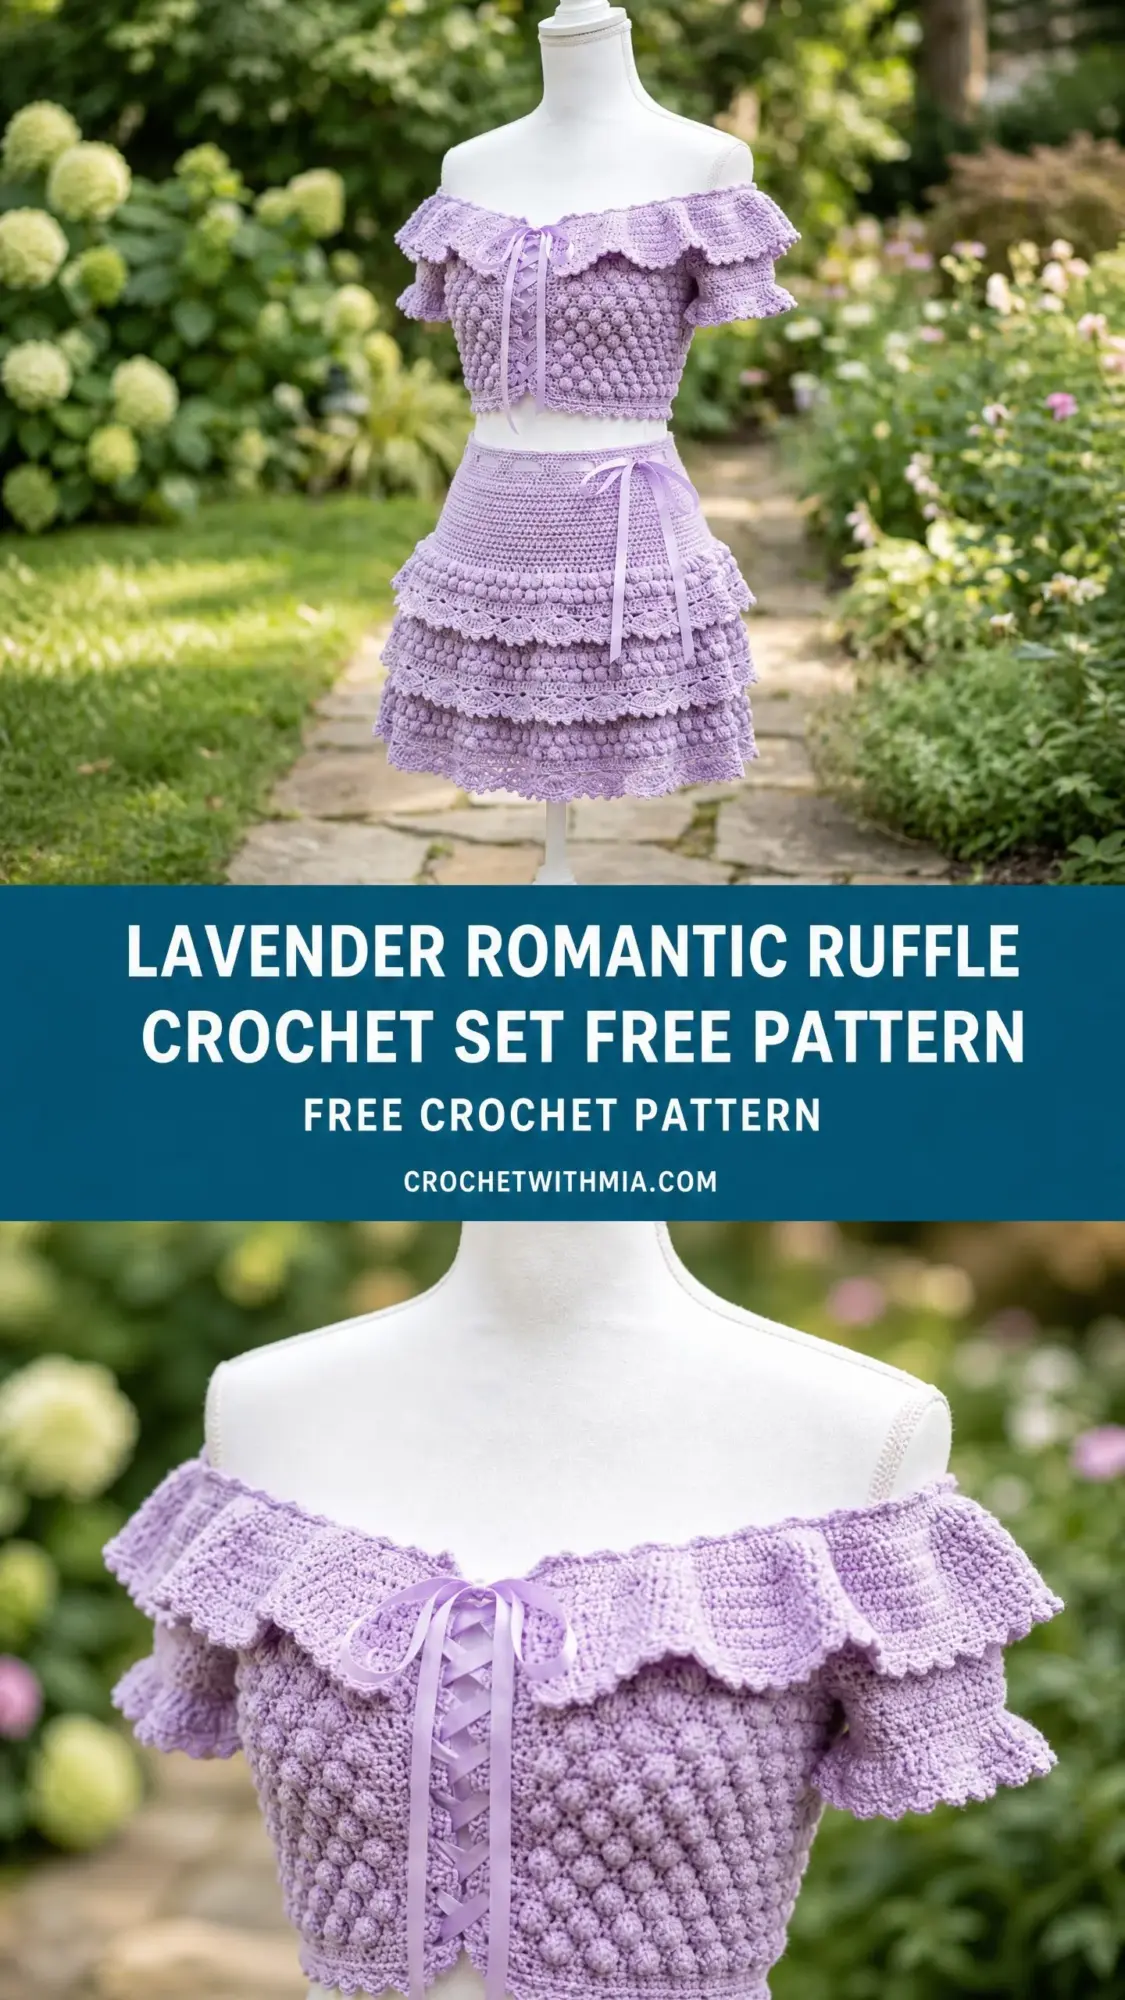
Both pieces use primarily single crochet (sc), bobble stitches, and shell stitches worked in the round. This makes it accessible for confident beginners while still offering enough texture and detail to keep intermediate crocheters engaged. The construction is straightforward once you understand the tier system for the skirt and the front loop ruffle technique.
Whether you are making this for yourself, gifting it to a friend, or even creating pieces for a boutique, this lavender romantic ruffle crochet set works up in approximately 27 to 40 hours total. The soft cotton yarn drapes beautifully and the satin ribbon accents add that perfect romantic finishing touch.
About This Crochet Pattern
This coordinating set consists of two pieces that can be worn together or separately. The crop top is worked in joined rounds from the hem upward. You will create a bobble textured body, then add the dramatic off the shoulder ruffle by working into the front loops of the top edge. The tiered skirt is worked from the waistband down, with each ruffle tier created by working into unused front loops and doubling your stitch count for that gorgeous cascading effect.
The bobble stitch creates the raised dot texture you see covering both the crop top body and the ruffle sections of the skirt. Each bobble is made by working four incomplete double crochets into the same stitch, then pulling through all loops at once. This pushes the bobble to the right side of your work, creating that satisfying puffy texture.
The scallop edging on each tier uses a combination of chains and double crochets to create the wavy decorative border visible in the finished piece.
Skill Level
Advanced Beginner to Intermediate. You should be comfortable with basic stitches (single crochet, double crochet), working in the round, and following multi step instructions. The bobble stitch may be new to some, but it is explained in detail below. The hardest part is keeping accurate stitch counts through the ruffle transitions.
Time Estimate
Take your time with this one. The finished result is absolutely worth the investment.
Finished Measurements
This pattern is written for Size Small (US 4 to 6).
Crop Top
Tiered Skirt
Size customization tips are included at the end of this pattern.
Materials Needed
Yarn
Approximately 900 to 1100 yards / 823 to 1006 meters of DK weight yarn (CYCA 3). 100% cotton or cotton blend is recommended for the best drape and stitch definition.
Yarn Suggestions
Option 1: Lion Brand 24/7 Cotton in Lavender
DK weight, 100% mercerized cotton, 186 yards per 3.5 oz skein. Excellent stitch definition, machine washable, widely available. You will need approximately 5 skeins for the full set.
Option 2: Paintbox Yarns Cotton DK in Wisteria Purple
DK weight, 100% cotton, 137 yards per 1.76 oz skein. Beautiful matte finish with soft drape perfect for ruffles. You will need approximately 7 skeins for the full set.
Option 3: WeCrochet Dishie in Thistle
DK weight, 100% cotton, 190 yards per 3.5 oz skein. Slightly lighter hand makes the ruffles flutter beautifully. You will need approximately 5 skeins for the full set.
Substitution Note: Choose a DK weight cotton or cotton blend with good stitch definition. Avoid overly stretchy or fuzzy yarns as they will obscure the bobble texture. Acrylic can be substituted but will not block as well and may not have the same drape.
Hooks
Notions
Gauge
With US E-4 / 3.5 mm hook in single crochet:
20 stitches x 22 rows = 4 in / 10 cm (blocked)
With US E-4 / 3.5 mm hook in bobble stitch pattern:
16 bobbles x 10 rows = 4 in / 10 cm
Gauge is critical for a fitted garment. Please make a swatch and adjust your hook size as needed before beginning.
Abbreviations
Before we dive into the step by step instructions, here are all the abbreviations used in this crochet pattern:
Special Stitches
Bobble Stitch (bob)
The bobble stitch creates a raised, puffy dot on the right side of your fabric. Here is how to work it:
1. Yarn over, insert hook into stitch, yarn over and pull up a loop, yarn over and pull through 2 loops. (One half completed dc remains on hook.)
2. Yarn over, insert hook into the same stitch, yarn over and pull up a loop, yarn over and pull through 2 loops. (Two half completed dc on hook.)
3. Yarn over, insert hook into the same stitch, yarn over and pull up a loop, yarn over and pull through 2 loops. (Three half completed dc on hook.)
4. Yarn over, insert hook into the same stitch, yarn over and pull up a loop, yarn over and pull through 2 loops. (Four half completed dc on hook.)
5. Yarn over and pull through all 5 loops on hook.
The bobble is complete and sits on the RS of the work. When working in rounds with the RS always facing, bobbles will pop toward you. When working flat, work bobbles on RS rows only and work sc on WS rows so bobbles pop to the correct side.
Shell Stitch (shell)
Work 5 dc all into the same stitch or space. This counts as 5 stitches when measuring but is worked into a single base stitch.
Scallop Edging
Sl st into first st, ch 1, (sc, ch 2, 3 dc) into same st, sk 2 sts, sc into next st, sk 2 sts, rep from ( to end, join with sl st to first sc.
Ruffle Foundation Row
Working into the front loops of a designated row, work 2 sc into every front loop across or around. This doubles the stitch count and creates the base flare for each ruffle tier.
Pattern Notes
1. The crop top is worked in joined rounds from the hem upward through the bobble body section, then the off the shoulder ruffle is added at the top edge.
2. The skirt is worked in joined rounds from the waistband downward. Each tier is begun by working into the front loops of the previous tier’s last round, doubling the stitch count to create the ruffle flare.
3. Bobble stitches are worked on RS rounds. The RS faces outward at all times when working in rounds.
4. To achieve the off the shoulder look, the neckline ruffle is worked around the top edge of the bodice. It rests off the shoulder due to the stitch structure.
5. Ribbon is threaded through designated chain spaces at the center front of the crop top for the corset lace up closure. A separate ribbon is threaded through eyelet holes at the skirt waistband.
6. All turning chains count as the first stitch unless noted otherwise.
7. Place stitch markers at the beginning of each round for easy counting. Move markers up as you progress.
8. Block both pieces before final assembly and ribbon threading for best results.
9. Stitch count after each round appears in parentheses at the end of that instruction.
Crop Top Instructions
The crop top is worked in the round from the hem upward. The bodice uses a bobble stitch texture. An off the shoulder ruffle is added at the top edge after the body is complete.
Crop Top Body
Foundation: Ch 161, taking care not to twist the chain. Sl st to first ch to form a ring.
Rnd 1 (RS): Ch 1, sc in each ch around, sl st to first sc to join. (160 sc)
Rnd 2: Ch 1, sc in each st around, sl st to join. (160 sc)
Rnd 3: Ch 1, sc in each st around, sl st to join. (160 sc)
This creates the hem band. You should now have a 3 round band of single crochet approximately 0.5 in / 1.3 cm tall.
Begin Bobble Section
Rnd 4 (RS, Bobble Rnd): Ch 1, sc in first st, bob in next st, (sc in next st, bob in next st) rep around, sl st to join. (80 sc and 80 bob, 160 sts total)
Rnd 5: Ch 1, sc in each st around, sl st to join. (160 sc)
Rnd 6: Ch 1, bob in first st, sc in next st, (bob in next st, sc in next st) rep around, sl st to join. (80 bob and 80 sc, 160 sts total)
Rnd 7: Ch 1, sc in each st around, sl st to join. (160 sc)
Rnd 8: Rep Rnd 4. (160 sts)
Rnd 9: Ch 1, sc in each st around, sl st to join. (160 sc)
Rnd 10: Rep Rnd 6. (160 sts)
Rnd 11: Ch 1, sc in each st around, sl st to join. (160 sc)
Rnd 12: Rep Rnd 4. (160 sts)
Rnd 13: Ch 1, sc in each st around, sl st to join. (160 sc)
Rnd 14: Rep Rnd 6. (160 sts)
Rnd 15: Ch 1, sc in each st around, sl st to join. (160 sc)
Checkpoint: After Rnd 15 the bobble body section should measure approximately 5.5 in / 14 cm from the foundation chain. The alternating bobble pattern creates a dense textured fabric.
Begin Top Edge Shaping
Rnd 16: Ch 1, sc in each st around, sl st to join. (160 sc)
Rnd 17: Ch 1, (sc in next 8 sts, sc2tog) rep around. (144 sc)
Rnd 18: Ch 1, sc in each st around, sl st to join. (144 sc)
Rnd 19: Ch 1, (sc in next 7 sts, sc2tog) rep around. (128 sc)
Rnd 20: Ch 1, sc in each st around, sl st to join. (128 sc)
Note: Rounds 17 through 20 gently taper the top of the bodice so the ruffle sits smoothly. The bodice is now ready for the ribbon channel and ruffle.
Ribbon Eyelet Channel
Rnd 21: Ch 1, sc in first 64 sts, (ch 1, sk 1 st, sc in next st) 4 times at center front for corset eyelets, sc in rem 60 sts, sl st to join. (128 sts including ch-1 spaces)
Note: The 4 eyelet pairs are positioned at the center front. They are worked as 4 ch-1 sp separated by sc sts, spanning 8 sts total at center front. Adjust placement if your center front falls on a different stitch.
Rnd 22: Ch 1, sc in each st and each ch-sp around, sl st to join. (128 sc)
Crop Top Body is complete.
Checkpoint: The completed crop top body before the ruffle should measure approximately 7 in / 18 cm tall from foundation to top of Rnd 22 and approximately 32 in / 81 cm in circumference at the widest point (Rnds 4 to 15).
Crop Top Ruffle
The ruffle is worked along the top edge of the completed bodice body, worked into the front loops of Rnd 22. This creates the off the shoulder ruffle effect.
Ruffle Base
Working into the front loops of Rnd 22 only, join yarn to any st.
Ruffle Rnd 1: Ch 1, 2 sc in fl of each st around, sl st to join. (256 sc)
Ruffle Rnd 2: Ch 1, sc in each st around, sl st to join. (256 sc)
Ruffle Rnd 3: Ch 1, 2 sc in each st around, sl st to join. (512 sc)
Note: This second doubling creates the full cascading ruffle volume visible at the neckline.
Ruffle Rnd 4: Ch 3 (counts as dc), dc in same st, ch 1, sk 1, (2 dc in next st, ch 1, sk 1) rep around, sl st to top of ch-3 to join. (256 dc groups, 256 ch-1 sps)
Ruffle Rnd 5 (Scallop Edge): With smaller hook (US D-3 / 3.25 mm), sl st in first st, ch 1, sc in same st, ch 2, 3 dc in next ch-sp, sc in next st, (sc in next dc, ch 2, 3 dc in next ch-sp, sc in next st) rep around, sl st to first sc to join. Fasten off.
Checkpoint: The ruffle should extend approximately 2 to 2.5 in / 5 to 6.5 cm above the top of the bodice. When laid flat, it will frill and cascade as the pictured off the shoulder ruffle.
Fasten off and weave in ends.
Skirt Instructions
The skirt is worked in the round from the waistband downward. The waistband is worked first as a band of single crochet with ribbon eyelets. Each tier is then worked off the front loops of the previous tier’s base round, with the stitch count doubling at each tier transition to create the ruffled cascade.
Skirt Waistband
Foundation: Ch 141, sl st to first ch to form a ring, being careful not to twist.
Rnd 1: Ch 1, sc in each ch around, sl st to join. (140 sc)
Rnd 2: Ch 1, sc in each st around, sl st to join. (140 sc)
Rnd 3 (Eyelet Rnd): Ch 1, (sc in next 3 sts, ch 1, sk 1) rep around, sl st to join. (105 sc, 35 ch-1 sp, 140 sts total)
Rnd 4: Ch 1, sc in each st and each ch-sp around, sl st to join. (140 sc)
Rnd 5: Ch 1, sc in each st around, sl st to join. (140 sc)
Rnd 6: Ch 1, sc in each st around, sl st to join. (140 sc)
Checkpoint: The waistband measures approximately 1.25 in / 3 cm tall. Thread the 36 in / 91 cm satin ribbon through the eyelet holes of Rnd 3 after blocking, tying at center front or side.
Skirt Tier 1
Tier 1 is the topmost skirt tier, directly below the waistband. It is worked into the back loops of Rnd 6 (so the front loops remain available for the Tier 2 ruffle).
Rnd 7: Ch 1, working in bl of each st of Rnd 6, sc in each st around, sl st to join. (140 sc)
Rnd 8: Ch 1, sc in each st around, sl st to join. (140 sc)
Rnd 9: Ch 1, sc in each st around, sl st to join. (140 sc)
Rnd 10: Ch 1, sc in each st around, sl st to join. (140 sc)
Rnd 11: Ch 1, sc in each st around, sl st to join. (140 sc)
Rnd 12: Ch 1, sc in each st around, sl st to join. (140 sc)
Rnd 13: Ch 1, sc in each st around, sl st to join. (140 sc)
Checkpoint: Tier 1 body (Rnds 7 to 13) should measure approximately 1.5 in / 4 cm tall.
Tier 1 to Tier 2 Ruffle Transition
This ruffle is worked into the front loops of Rnd 6 (which were left unworked earlier) and expands outward and downward to form the first ruffle frill.
Join yarn to any front loop of Rnd 6.
Tier 1 Ruffle Rnd A: Ch 1, 2 sc in fl of each st around, sl st to join. (280 sc)
Tier 1 Ruffle Rnd B: Ch 1, sc in each st around, sl st to join. (280 sc)
Tier 1 Ruffle Rnd C (Bobble Rnd): Ch 1, sc in first st, bob in next st, (sc in next st, bob in next st) rep around, sl st to join. (140 sc, 140 bob, 280 sts)
Tier 1 Ruffle Rnd D: Ch 1, sc in each st around, sl st to join. (280 sc)
Tier 1 Ruffle Rnd E (Scallop Edge): With smaller hook, sl st in first st, ch 1, sc in same st, ch 2, sk 1, (3 dc in next st, ch 2, sk 1, sc in next st, ch 2, sk 1) rep around to last 3 sts, 3 dc in next st, ch 2, sk 1, sl st to first sc. Fasten off.
Note: For the scallop to work evenly, the stitch count must be divisible by 4. 280 divided by 4 equals 70 repeats. This is correct.
Checkpoint: After the first ruffle transition, the hem of that ruffle hangs approximately 3.5 to 4 in / 9 to 10 cm below the waistband.
Skirt Tier 2
Tier 2 is worked from the back loops of Rnd 13.
Join yarn to any back loop of Rnd 13.
Rnd 14: Ch 1, working in bl of Rnd 13, sc in each st around, sl st to join. (140 sc)
Rnd 15: Ch 1, sc in each st around, sl st to join. (140 sc)
Rnd 16: Ch 1, sc in each st around, sl st to join. (140 sc)
Rnd 17: Ch 1, sc in each st around, sl st to join. (140 sc)
Rnd 18: Ch 1, sc in each st around, sl st to join. (140 sc)
Checkpoint: Tier 2 body (Rnds 14 to 18) should measure approximately 1 in / 2.5 cm tall below the previous tier.
Tier 2 to Tier 3 Ruffle Transition
Worked into the front loops of Rnd 13.
Join yarn to any front loop of Rnd 13.
Tier 2 Ruffle Rnd A: Ch 1, 2 sc in fl of each st around, sl st to join. (280 sc)
Tier 2 Ruffle Rnd B: Ch 1, sc in each st around, sl st to join. (280 sc)
Tier 2 Ruffle Rnd C (Bobble Rnd): Ch 1, sc in first st, bob in next st, (sc in next st, bob in next st) rep around, sl st to join. (280 sts)
Tier 2 Ruffle Rnd D: Ch 1, sc in each st around, sl st to join. (280 sc)
Tier 2 Ruffle Rnd E (Scallop Edge): With smaller hook, work same as Tier 1 Ruffle Rnd E. Fasten off. (70 scallop repeats)
Skirt Tier 3
Tier 3 is worked from the back loops of Rnd 18.
Join yarn to any back loop of Rnd 18.
Rnd 19: Ch 1, working in bl of Rnd 18, sc in each st around, sl st to join. (140 sc)
Rnd 20: Ch 1, sc in each st around, sl st to join. (140 sc)
Rnd 21: Ch 1, sc in each st around, sl st to join. (140 sc)
Rnd 22: Ch 1, sc in each st around, sl st to join. (140 sc)
Rnd 23: Ch 1, sc in each st around, sl st to join. (140 sc)
Checkpoint: Tier 3 body should measure approximately 1 in / 2.5 cm tall.
Tier 3 to Tier 4 Ruffle Transition
Worked into the front loops of Rnd 18.
Join yarn to any front loop of Rnd 18.
Tier 3 Ruffle Rnd A: Ch 1, 2 sc in fl of each st around, sl st to join. (280 sc)
Tier 3 Ruffle Rnd B: Ch 1, sc in each st around, sl st to join. (280 sc)
Tier 3 Ruffle Rnd C (Bobble Rnd): Ch 1, sc in first st, bob in next st, (sc in next st, bob in next st) rep around, sl st to join. (280 sts)
Tier 3 Ruffle Rnd D: Ch 1, sc in each st around, sl st to join. (280 sc)
Tier 3 Ruffle Rnd E (Scallop Edge): With smaller hook, work same as Tier 1 Ruffle Rnd E. Fasten off. (70 scallop repeats)
Skirt Tier 4 (Bottom Tier)
Tier 4 is the final tier and is the largest and lowest, giving the bottom hem its full ruffle volume.
Worked from the back loops of Rnd 23.
Join yarn to any back loop of Rnd 23.
Rnd 24: Ch 1, working in bl of Rnd 23, sc in each st around, sl st to join. (140 sc)
Rnd 25: Ch 1, sc in each st around, sl st to join. (140 sc)
Rnd 26: Ch 1, sc in each st around, sl st to join. (140 sc)
Rnd 27: Ch 1, sc in each st around, sl st to join. (140 sc)
Tier 4 Bottom Ruffle
Worked into the front loops of Rnd 23.
Join yarn to any front loop of Rnd 23.
Bottom Ruffle Rnd A: Ch 1, 2 sc in fl of each st around, sl st to join. (280 sc)
Bottom Ruffle Rnd B: Ch 1, sc in each st around, sl st to join. (280 sc)
Bottom Ruffle Rnd C: Ch 1, 2 sc in each st around, sl st to join. (560 sc)
Note: This second doubling gives the bottom tier extra fullness and visual weight to ground the hem.
Bottom Ruffle Rnd D (Bobble Rnd): Ch 1, sc in first st, bob in next st, (sc in next st, bob in next st) rep around, sl st to join. (280 sc, 280 bob, 560 sts)
Bottom Ruffle Rnd E: Ch 1, sc in each st around, sl st to join. (560 sc)
Bottom Ruffle Rnd F (Scallop Edge): With smaller hook. Note: 560 divided by 4 equals 140 repeats. Sl st in first st, ch 1, sc in same st, ch 2, sk 1, (3 dc in next st, ch 2, sk 1, sc in next st, ch 2, sk 1) rep around, sl st to first sc. Fasten off.
Final skirt length from waistband to bottom scallop edge: approximately 12 in / 30.5 cm.
Checkpoint: The completed skirt should have 4 visible ruffle layers cascading downward, each with a bobble row and scallop edge. The waistband is tidy and the ribbon channel eyelets are evenly spaced.
Finishing Instructions
Crop Top
1. Weave in all ends securely on the WS.
2. Block by wet blocking: soak in cool water with a small amount of gentle soap for 15 minutes, squeeze out excess water gently (do not wring), lay flat or shape onto a blocking board, pin to measurements, allow to dry fully.
3. Thread the 24 in / 61 cm ribbon through the 4 eyelet pairs at center front from bottom to top, creating the lace up corset look. Tie in a bow at the top.
Skirt
1. Weave in all ends securely.
2. Block same as crop top.
3. Thread the 36 in / 91 cm ribbon through the eyelet row at the waistband (Rnd 3), feeding it in and out of every 4th eyelet hole. Pull ends to draw waist to desired size and tie in a bow at center front or either side.
Size Customization Tips
To adjust width of the crop top: Add or subtract stitches from the foundation chain in multiples of 2 so the bobble pattern (which works over 2 stitch repeats: 1 sc, 1 bob) remains even. For each additional inch of circumference needed, add approximately 5 stitches. For each inch to remove, subtract approximately 5 stitches.
To adjust crop top length: Add or remove pairs of bobble rounds (Rnds 4 and 5 together, or Rnds 6 and 7 together) to maintain the alternating bobble pattern. Each pair of rounds adds approximately 0.5 in / 1.3 cm.
To adjust skirt waist: Add or subtract stitches from the foundation chain in multiples of 4 so the eyelet pattern (which works over 4 stitch repeats: sc, sc, sc, ch-1 sk) divides evenly. Each 4 stitch addition adds approximately 0.8 in / 2 cm of circumference.
To adjust skirt length: Add rounds to any of the tier body sections (Rnds 7 to 13, Rnds 14 to 18, Rnds 19 to 23, Rnds 24 to 27) before working the corresponding ruffle transitions.
To size up to Medium or Large: For Medium, begin the crop top with a 181 stitch foundation and the skirt with a 161 stitch foundation. For Large, use 201 stitches for the crop top and 181 stitches for the skirt. Verify that all repeat based rounds still divide evenly before proceeding.
Care Instructions
Machine wash cold on gentle cycle if using a superwash or mercerized cotton yarn. Hand wash in cool water with mild soap if in doubt. Do not tumble dry. Lay flat to dry away from direct sunlight to prevent color fading. Do not iron directly. If pressing is needed, use a pressing cloth and low steam setting. Remove ribbon ties before washing and re thread after. Store folded flat, not on a hanger, to preserve the ruffle shapes.
Helpful Tips for Success
Count your stitches. I cannot stress this enough. With the tier system and the front loop/back loop work, losing track of your count can cause major headaches. Use stitch markers liberally.
Practice the bobble stitch first. If you have never made a bobble before, work a small swatch of 20 stitches for 10 rows using the bobble pattern before starting the actual project. This will help you understand how the stitch behaves and ensure your gauge is accurate.
Do not skip blocking. Cotton yarn especially benefits from a good wet block. The stitches will even out, the ruffles will cascade properly, and the overall drape will improve dramatically.
Mark your center front. When working the crop top, place a stitch marker at what will be your center front stitch before you begin Rnd 21. This ensures the eyelet ribbon channel is positioned correctly.
Take breaks. This is a 27