
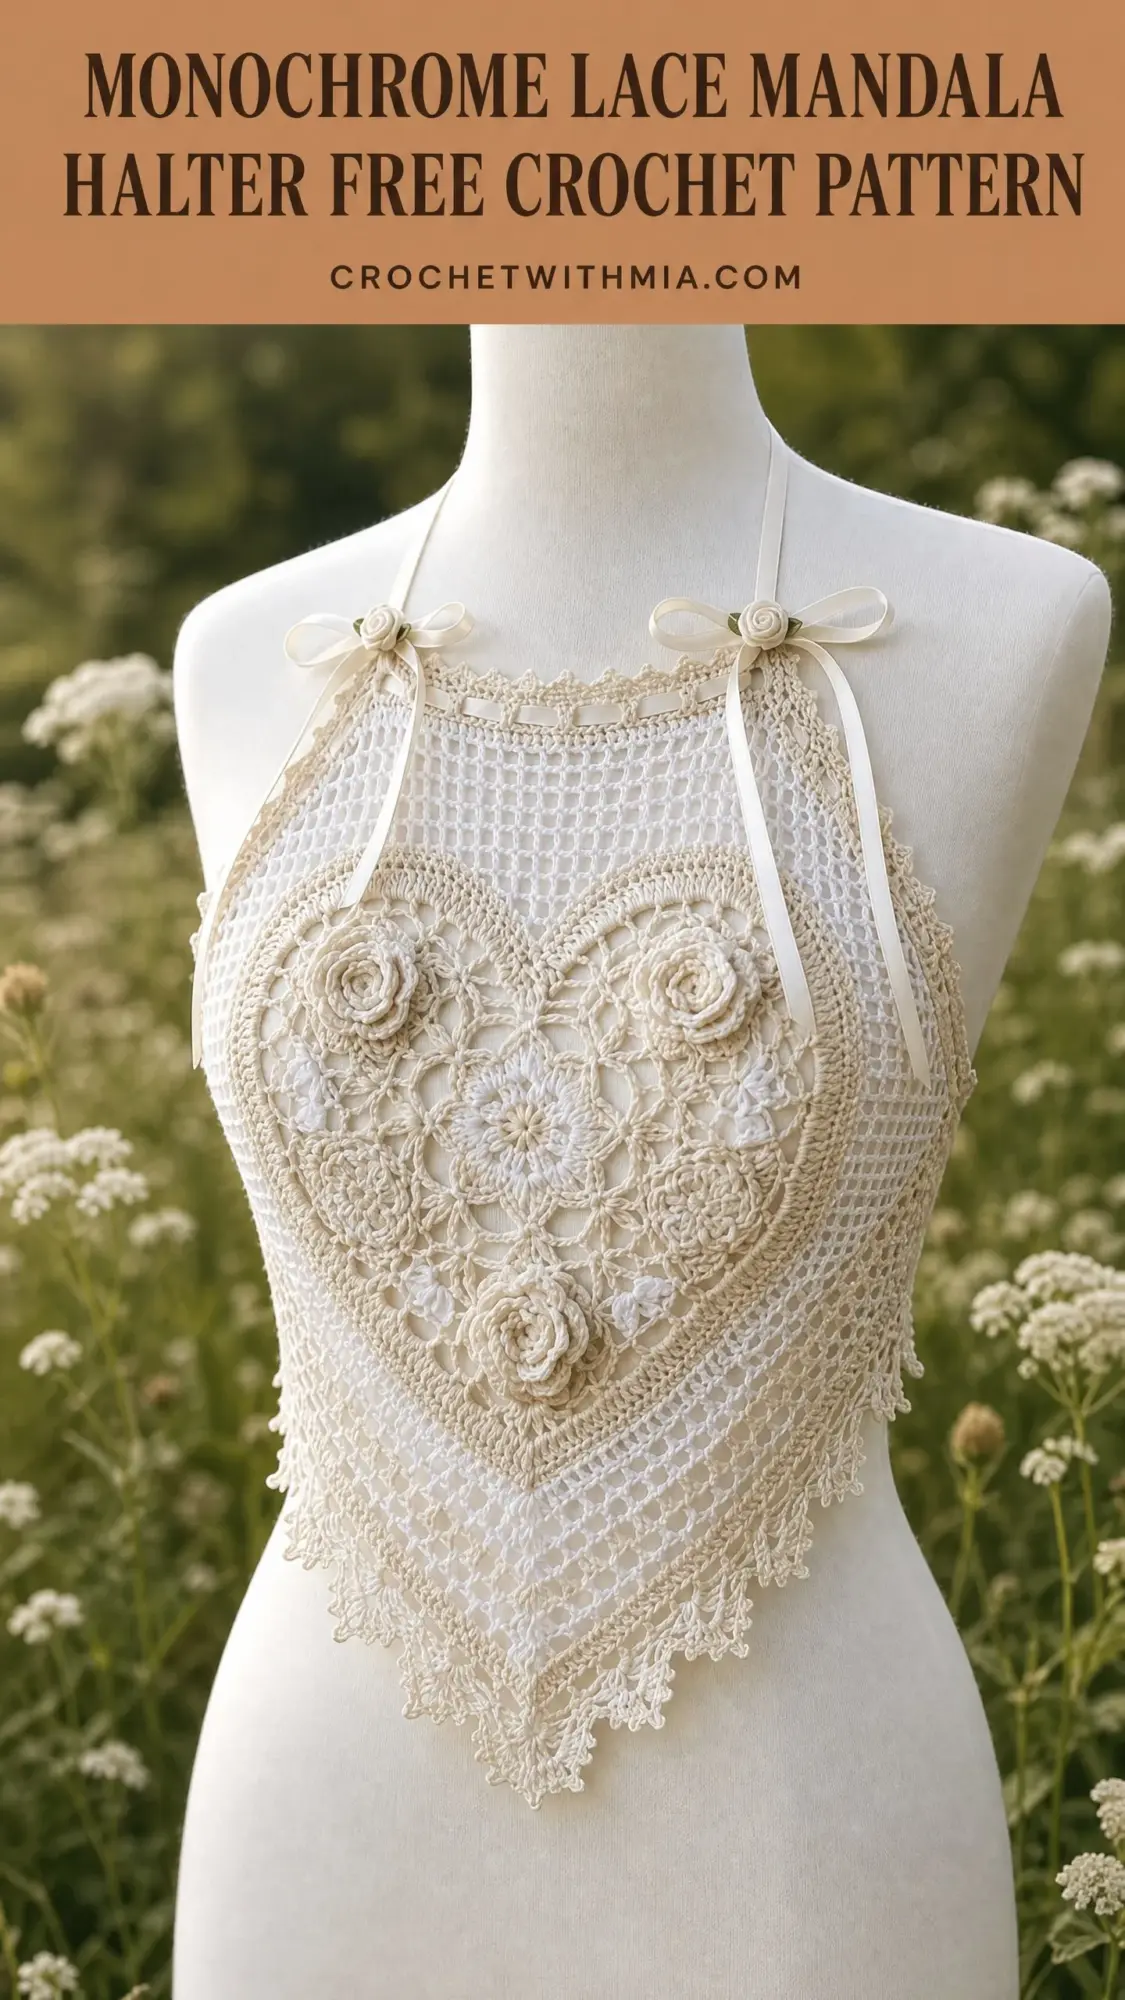
I’ve been looking for the perfect romantic summer top pattern for ages, and this monochrome lace mandala halter is hands down my favourite find. The layered construction, the delicate roses, the heart-shaped mandala overlay. It checks every box for a statement piece that feels both vintage and fresh.

If you love heirloom-quality crochet with serious wow factor, this is the one to bookmark. Yes, it takes time. Yes, it requires focus. But the finished piece looks like something you’d find in a high-end bohemian boutique, not something you made with your own two hands.
Let me walk you through everything you need to bring this stunning halter to life.
About This Lace Mandala Halter Crochet Pattern
This halter top is a two-layer construction that creates incredible depth and texture. You’ll work a simple mesh net bodice as your foundation, then create a show-stopping heart-shaped mandala panel that sits on top. Three dimensional crocheted roses get appliquéd at the upper corners and center bottom, giving the piece that romantic, bridal quality.
The bodice is worked flat from the neckline down, shaping into a trapezoidal silhouette with a pointed center front hem. The mandala panel is worked in the round from the center outward. After blocking both pieces separately, you’ll layer them together and tack them in place with invisible stitches.
The neckline features a picot edge with ribbon threaded through for adjustable ties. The back is completely open, which makes this perfect for warm weather or layering over a bandeau or bralette.
Skill Level: Advanced. You’ll need comfort with working in the round from a magic ring, executing multi-step special stitches like pineapple clusters and shell stitches, crocheting 3D rose appliques, and seaming two distinct fabric layers together cleanly. If you’ve completed at least two intermediate lace projects and one garment, you can absolutely tackle this with careful attention to the stitch counts.
Time Estimate: 35 to 50 hours total. The mesh bodice takes about 6 to 8 hours, the mandala panel runs 18 to 22 hours, the three roses need 4 to 5 hours, and finishing work takes another 5 to 8 hours. Blocking adds a couple more hours of active time, plus overnight drying.
Finished Measurements
Materials Needed
Yarn A (mesh bodice and edging): Size 10 crochet thread, approximately 400 yards / 366 m, in bright white or natural white
Yarn B (mandala panel and roses): Size 10 crochet thread, approximately 650 yards / 595 m, in ecru or natural cream
Hooks:
Additional Materials:
Yarn Suggestions
Option 1: Aunt Lydia’s Classic Crochet Thread Size 10 (400 yards per ball, 100% mercerized cotton). Use color White (1) for yarn A and Natural (226) or Ecru (424) for yarn B. This thread is widely available, affordable, and blocks beautifully.
Option 2: Lizbeth 100% Egyptian Cotton Crochet Thread Size 10 (400 yards per ball). Use Bright White for yarn A and Antique White or Cream for yarn B. Lizbeth has a tighter twist and creates very crisp lace definition.
Option 3: DMC Traditions Crochet Thread Size 10 (400 yards per ball, 100% mercerized cotton). Use Ecru or White for both yarns if you prefer a fully tonal look.
Important: Avoid acrylic or blended threads for this project. Cotton accepts blocking and holds lace structure properly. You’ll need approximately 2 balls of yarn B and 1 ball of yarn A.
Gauge
Mesh bodice gauge (yarn A, 2.25 mm hook):
7 mesh squares x 7 mesh rows = 2 inches / 5 cm square
Mandala panel gauge (yarn B, 1.65 mm hook):
Rounds 1 through 5 = approximately 2.5 inches / 6.4 cm in diameter
Full mandala panel after round 24 = approximately 12 inches / 30.5 cm across at widest point and approximately 11 inches / 28 cm tall
Take time to check your gauge. The mandala panel must fit within the mesh bodice front panel area. If your mandala runs large, switch to the 1.65 mm hook or a slightly tighter thread. If it runs small, increase hook size to 1.75 mm.
Abbreviations
Special Stitches for This Crochet Pattern
Mesh Square: Chain 2, skip 2 stitches or chain spaces, single crochet into next stitch. This creates one open square unit of the net bodice fabric.
Shell Stitch: Work 5 double crochet into the same stitch or chain space. This creates a fan of 5 stitches fanned from one point.
V-Stitch: Work (double crochet, chain 2, double crochet) all into the same stitch or chain space.
Picot: Chain 3, slip stitch into the first chain of the 3 just made. Creates a small decorative knot.
Picot-3: Chain 3, slip stitch into the first chain. Same as picot above, used in edging for clarity.
Picot-5: Chain 5, slip stitch into the first chain of the 5 just made. Creates a larger decorative loop used at hem points.
3-DC Cluster (cl): Yarn over, insert hook into designated stitch or space, yarn over and pull up a loop, yarn over and draw through 2 loops (2 loops on hook). Yarn over, insert hook into the same stitch or space, yarn over and pull up a loop, yarn over and draw through 2 loops (3 loops on hook). Yarn over, insert hook into the same stitch or space, yarn over and pull up a loop, yarn over and draw through 2 loops (4 loops on hook). Yarn over and draw through all 4 loops on hook. One 3-dc cluster complete.
5-DC Cluster (5cl): Work as above but repeat the partial dc step 5 times total into the same stitch or space before drawing through all 6 loops.
Pineapple Base Shell: Into one chain space work (3 dc, chain 1, 3 dc).
Joining Picot: Chain 1, slip stitch into corresponding picot on adjacent motif or edge, chain 1, slip stitch back into first chain.
How to Make the Crocheted Rose (make 3)
Using yarn B and 1.65 mm hook:
Foundation: Chain 36.
Row 1 (RS): Single crochet in second chain from hook and in each chain across. (35 sc)
Row 2: Chain 3, turn. Work 2 dc in same first stitch, work 3 dc in each stitch across. (105 dc) Fasten off, leaving a 12-inch tail.
To assemble: Roll the strip tightly from one end, with row 2 (the petal row) on the outside. As you roll, use the tail and tapestry needle to tack the base of the rose together with a few whip stitches through the bottom edge. The dc stitches will naturally spiral and fan into a rose shape. Adjust petal spread as desired. Secure and hide tail.
Pattern Notes Before You Begin
The halter is worked in two separate pieces: the mesh bodice and the mandala panel. The mesh bodice is worked flat from the top down. The mandala panel is worked in the round from the center out. After both pieces are complete and blocked, the mandala panel is placed on top of the mesh bodice and tacked in place with invisible stitches.
The back of the top is open. Only the front bodice has the full length; the back section is shorter and connects at the underarm side seams with a simple crochet join.
Read through the entire pattern before beginning. Block the mandala panel and the mesh bodice separately before joining.
Turning chains in the mesh bodice count as the first mesh stitch of each row unless otherwise noted.
Stitch counts in parentheses at the end of each row or round reflect the total working stitches in that row or round.
When instructed to work into a ch-sp, insert hook under the chain arch, not into individual chain stitches.
Step by Step Instructions
Part One: Mesh Bodice
The mesh bodice is worked flat in rows, starting from the neckline edge and working downward. It begins narrow at the top and widens toward the underarm level, then the front section continues to a V-point at the hem while the back section is shorter and rectangular.
Bodice Front Panel
Foundation chain: Using yarn A and 2.25 mm hook, chain 62.
Row 1 (RS): Single crochet in 4th chain from hook (counts as ch-2 sp plus sc), (ch 2, skip 2 ch, sc in next ch) across to end of chain. Turn. (20 mesh squares)
Row 2: Chain 3 (counts as first dc here and throughout), sc in first ch-2 sp, (ch 2, sc in next ch-2 sp) across, dc in last sc. Turn. (20 mesh squares)
Row 3: Chain 5 (counts as dc plus ch 2), sc in first ch-2 sp, (ch 2, sc in next ch-2 sp) 19 times, ch 2, dc in top of tch. Turn. (21 mesh squares)
Note on increases: To increase 1 mesh square at the beginning of a row, chain 5 and turn. To increase 1 mesh square at the end of a row, work ch 2, dc into the tch or turning-chain space at the end of the row.
Row 4: Ch 5, sc in first ch-2 sp, (ch 2, sc in next ch-2 sp) 20 times, ch 2, dc into tch sp. Turn. (22 mesh squares)
Row 5: Ch 3, sc in first ch-2 sp, (ch 2, sc in next ch-2 sp) 21 times, dc in tch. Turn. (22 mesh squares)
Row 6: Ch 5, sc in first ch-2 sp, (ch 2, sc in next ch-2 sp) 21 times, ch 2, dc in tch sp. Turn. (23 mesh squares)
Row 7: Ch 5, sc in first ch-2 sp, (ch 2, sc in next ch-2 sp) 22 times, ch 2, dc in tch sp. Turn. (24 mesh squares)
Row 8: Ch 3, sc in first ch-2 sp, (ch 2, sc in next ch-2 sp) 23 times, dc in tch. Turn. (24 mesh squares)
Row 9: Ch 5, sc in first ch-2 sp, (ch 2, sc in next ch-2 sp) 23 times, ch 2, dc in tch sp. Turn. (25 mesh squares)
Row 10: Ch 5, sc in first ch-2 sp, (ch 2, sc in next ch-2 sp) 24 times, ch 2, dc in tch sp. Turn. (26 mesh squares)
Row 11: Ch 3, sc in first ch-2 sp, (ch 2, sc in next ch-2 sp) 25 times, dc in tch. Turn. (26 mesh squares)
Row 12: Ch 5, sc in first ch-2 sp, (ch 2, sc in next ch-2 sp) 25 times, ch 2, dc in tch sp. Turn. (27 mesh squares)
Row 13: Ch 5, sc in first ch-2 sp, (ch 2, sc in next ch-2 sp) 26 times, ch 2, dc in tch sp. Turn. (28 mesh squares)
Row 14: Ch 3, sc in first ch-2 sp, (ch 2, sc in next ch-2 sp) 27 times, dc in tch. Turn. (28 mesh squares)
Row 15: Ch 5, sc in first ch-2 sp, (ch 2, sc in next ch-2 sp) 27 times, ch 2, dc in tch sp. Turn. (29 mesh squares)
Row 16: Ch 5, sc in first ch-2 sp, (ch 2, sc in next ch-2 sp) 28 times, ch 2, dc in tch sp. Turn. (30 mesh squares)
Rows 17 through 22: Work even without increasing, repeating: Ch 3, sc in first ch-2 sp, (ch 2, sc in next ch-2 sp) 29 times, dc in tch. Turn. (30 mesh squares each row)
This is the widest point of the bodice, corresponding to the underarm/bust line. Place a stitch marker at both ends of row 22.
Checkpoint: After row 22, your piece should measure approximately 6.25 inches / 16 cm tall from foundation chain to current row, and approximately 17.5 inches / 44.5 cm wide laid flat.
Now begin shaping for the V-point hem. You will decrease 1 mesh square at each side edge every other row.
Row 23 (decrease row): Ch 3, skip first ch-2 sp entirely, sc in next ch-2 sp, (ch 2, sc in next ch-2 sp) across until 1 ch-2 sp remains, dc in last sc. Turn. (28 mesh squares)
Row 24 (even row): Ch 3, sc in first ch-2 sp, (ch 2, sc in next ch-2 sp) 27 times, dc in tch. Turn. (28 mesh squares)
Row 25 (decrease row): Ch 3, skip first ch-2 sp, sc in next ch-2 sp, (ch 2, sc in next ch-2 sp) across until 1 ch-2 sp remains, dc in last sc. Turn. (26 mesh squares)
Row 26 (even row): Ch 3, sc in first ch-2 sp, (ch 2, sc in next ch-2 sp) 25 times, dc in tch. Turn. (26 mesh squares)
Continue the decrease pattern as established:
Row 27: Decrease. (24 mesh squares)
Row 28: Work even. (24 mesh squares)
Row 29: Decrease. (22 mesh squares)
Row 30: Work even. (22 mesh squares)
Row 31: Decrease. (20 mesh squares)
Row 32: Work even. (20 mesh squares)
Row 33: Decrease. (18 mesh squares)
Row 34: Work even. (18 mesh squares)
Row 35: Decrease. (16 mesh squares)
Row 36: Work even. (16 mesh squares)
Row 37: Decrease. (14 mesh squares)
Row 38: Work even. (14 mesh squares)
Row 39: Decrease. (12 mesh squares)
Row 40: Work even. (12 mesh squares)
Row 41: Decrease. (10 mesh squares)
Row 42: Work even. (10 mesh squares)
Row 43: Decrease. (8 mesh squares)
Row 44: Work even. (8 mesh squares)
Row 45: Decrease. (6 mesh squares)
Row 46: Work even. (6 mesh squares)
Row 47: Decrease. (4 mesh squares)
Row 48: Work even. (4 mesh squares)
Row 49: Ch 3, skip first ch-2 sp, sc in next ch-2 sp, ch 2, sc in next ch-2 sp, dc in last sc. Turn. (2 mesh squares)
Row 50: Ch 3, sc in first ch-2 sp, ch 2, sc in next ch-2 sp, dc in tch. Turn. (2 mesh squares)
Row 51: Ch 3, skip first ch-2 sp, sc in only remaining ch-2 sp, dc in last sc. Turn. (1 mesh square)
Fasten off. Weave in ends.
Checkpoint: The front bodice panel should now measure approximately 14 inches / 35.5 cm tall from top edge to the V-point at the hem.
Bodice Back Panel
Foundation chain: Using yarn A and 2.25 mm hook, chain 62.
Row 1 (RS): Single crochet in 4th chain from hook, (ch 2, skip 2 ch, sc in next ch) across. Turn. (20 mesh squares)
Rows 2 through 14: Work even without increasing or decreasing. Ch 3, sc in first ch-2 sp, (ch 2, sc in next ch-2 sp) 19 times, dc in tch. Turn. (20 mesh squares each row)
Fasten off. Weave in ends.
Checkpoint: The back panel should measure approximately 4 inches / 10 cm tall and approximately 17.5 inches / 44.5 cm wide.
Joining Front and Back Panels at Sides
Hold the front panel and back panel with right sides facing. The top edges (foundation chains) should both be at the top. Align the side edges of the back panel with the side edges of the front panel at the underarm level. The back panel’s full height aligns with rows 1 through 14 of the front panel.
Using yarn A and 1.65 mm hook, work a slip stitch seam through both layers along each side edge, joining the side edges of the back panel to the corresponding rows on the front panel. Fasten off. The result is a tube with an open back and a V-front.
Part Two: Neckline Picot Ribbon Edge
Worked along the top foundation chain edge of the bodice.
Using yarn A and 1.65 mm hook, join with sl st at one back corner of the neckline edge.
Round 1: Ch 1, sc evenly across the top edge of the back panel, continue across the top edge of the front panel, working sc across the entire neckline opening. At each corner junction, work 3 sc in the corner stitch to turn. Join with sl st to first sc. (approximately 86 sc total around the neckline)
Round 2 (ribbon channel): Ch 3 (counts as dc), skip 1, dc in next, (ch 1, skip 1, dc in next, ch 1, skip 1, dc in next) around, join with sl st to top of ch-3.
Round 3 (picot edging): Sl st into first ch-1 sp, ch 1, (sc in ch-1 sp, picot-3, sc in next ch-1 sp) around, join with sl st to first sc. Fasten off.
Thread the ribbon through the ch-1 spaces of round 2, starting and ending at center front. Pull ends to back of neck and tie in a bow.
Part Three: The Mandala Panel
The mandala panel is worked in the round from the center outward using yarn B and 1.65 mm hook. It is shaped into a heart silhouette by working directional rounds after the circular center is established.
Center Medallion (Rounds 1 through 8)
Round 1: Make a magic ring. Chain 4 (counts as dc plus ch 1), (dc in ring, ch 1) 11 times, join with sl st to 3rd ch of beg ch-4. Pull ring closed. (12 dc, 12 ch-1 sps)
Round 2: Sl st into first ch-1 sp, ch 3 (counts as dc), 2 dc in same sp, ch 1, (3 dc in next ch-1 sp, ch 1) 11 times, join with sl st to top of beg ch-3. (12 groups of 3 dc, 12 ch-1 sps)
Round 3: Sl st across to first ch-1 sp, ch 1, sc in same sp, ch 5, (sc in next ch-1 sp, ch 5) 11 times, join with sl st to first sc. (12 sc, 12 ch-5 loops)
Round 4: Sl st into first ch-5 sp, ch 3, 4 dc in same sp, ch 2, (5 dc in next ch-5 sp, ch 2) 11 times, join with sl st to top of beg ch-3. (12 shells of 5 dc, 12 ch-2 sps)
Round 5: Ch 1, sc in same st, sc in next 4 dc, (2 sc in ch-2 sp, sc in next 5 dc) 11 times, 2 sc in last ch-2 sp, join with sl st to first sc. (84 sc)
Round 6: Ch 5 (counts as dc plus ch 2), skip 2, dc in next, (ch 2, skip 2, dc in next) around, join with sl st to 3rd ch of beg ch-5. (28 dc, 28 ch-2 sps)
Round 7: Sl st into first ch-2 sp, ch 3, 2 dc in same sp, ch 1, (3 dc in next ch-2 sp, ch 1) 27 times, join with sl st to top of beg ch-3. (28 groups of 3 dc, 28 ch-1 sps)
Round 8: Sl st into first ch-1 sp, ch 1, sc in same sp, ch 4, (sc in next ch-1 sp, ch 4) 27 times, join with sl st to first sc. (28 sc, 28 ch-4 loops)
Petal Ring (Rounds 9 through 12)
Round 9: Sl st into first ch-4 sp, ch 3, 4 dc in same sp, ch 2, (5 dc in next ch-4 sp, ch 2) 27 times, join with sl st to top of beg ch-3. (28 shells of 5 dc, 28 ch-2 sps)
Round 10: Sl st into next 2 dc to reach center dc of first shell, ch 1, sc in center dc, ch 5, sc in ch-2 sp, ch 5, (sc in center dc of next shell, ch 5, sc in next ch-2 sp, ch 5) 27 times, join with sl st to first sc. (56 sc, 56 ch-5 loops)
Round 11: Sl st into first ch-5 sp, ch 3, 6 dc in same sp (7 dc shell), ch 2, sc in next ch-5 sp, ch 2, (7 dc in next ch-5 sp, ch 2, sc in next ch-5 sp, ch 2) 27 times, join with sl st to top of beg ch-3. (28 large shells of 7 dc, 28 sc, 56 ch-2 sps)
Round 12: Ch 1, sc in same st, sc in next 6 dc, 3 sc in ch-2 sp, sc in sc, 3 sc in next ch-2 sp, (sc in next 7 dc, 3 sc in ch-2 sp, sc in sc, 3 sc in next ch-2 sp) 27 times, join with sl st to first sc. (392 sc)
Secondary Lace Ring (Rounds 13 through 16)
Round 13: Ch 5 (counts as dc plus ch 2), skip 2, dc in next, (ch 2, skip 2, dc in next) around, join with sl st to 3rd ch of beg ch-5. (132 ch-2 sps, 132 dc)
Round 14: Sl st into first ch-2 sp, ch 1, sc in same sp, ch 3, (sc in next ch-2 sp, ch 3) 131 times, join with sl st to first sc. (132 sc, 132 ch-3 loops)
Round 15: Sl st into first ch-3 sp, ch 3, 2 dc in same sp, ch 2, (3 dc in next ch-3 sp, ch 2) 131 times, join with sl st to top of beg ch-3. (132 groups of 3 dc, 132 ch-2 sps)
Round 16: Sl st into first ch-2 sp, ch 1, sc in same sp, ch 4, (sc in next ch-2 sp, ch 4) 131 times, join with sl st to first sc. (132 sc, 132 ch-4 loops)
Continue working the outer pineapple ring and final edging rounds following the established stitch patterns in the mandala. The heart shaping develops naturally through the petal formations.
Final Assembly
1. Block both the mesh bodice and mandala panel separately using rust-proof pins. Wet block or spray block according to your preference. Allow to dry completely overnight.
2. Position the blocked mandala panel centered on the front of the mesh bodice. The heart point should align with the V-point of the bodice hem.
3. Using yarn B and tapestry needle, tack the mandala panel in place with small, invisible whip stitches around the outer edges. Work through the back of the mandala only so stitches don’t show on the front.
4. Attach the three crocheted roses at the upper left, upper right, and center bottom of the mandala panel. Use the remaining tails to sew securely in place.
5. If using the optional satin roses, attach them at the ribbon tie points on the shoulders.
Tips for Success
Take your gauge swatch seriously. With fine thread work, even a small gauge difference compounds over hundreds of stitches. Your mandala needs to fit properly on your bodice.
Use good lighting. Size 10 thread is fine work. Natural light or a bright daylight lamp will save your eyes.
Count your stitches frequently. The mesh bodice increases and decreases follow a specific pattern. Losing track means your shaping won’t work.
Block generously. Cotton lace truly transforms with blocking. Don’t skip this step. Your finished piece will look completely different after proper blocking.
Mark your rounds. The mandala has many rounds that look similar. Place a stitch marker at the beginning of each round and move it up as you go.
Thank you so much for choosing this pattern for your next project. I truly hope you love making this beautiful halter as much as I loved designing it. If you make one, I would absolutely love to see it! Tag me on Instagram or share a photo in my Facebook group.
If this pattern caught your eye, go ahead and save it to your Pinterest boards so you can find it when you’re ready to start. And please drop a comment below if you make one. I read every single comment and it makes my whole day to see your finished projects!