
I don’t know about you, but I have a weakness for a gorgeous everyday bag. Something roomy enough for farmers market hauls, sturdy enough for beach days, and pretty enough that I actually want to carry it everywhere.
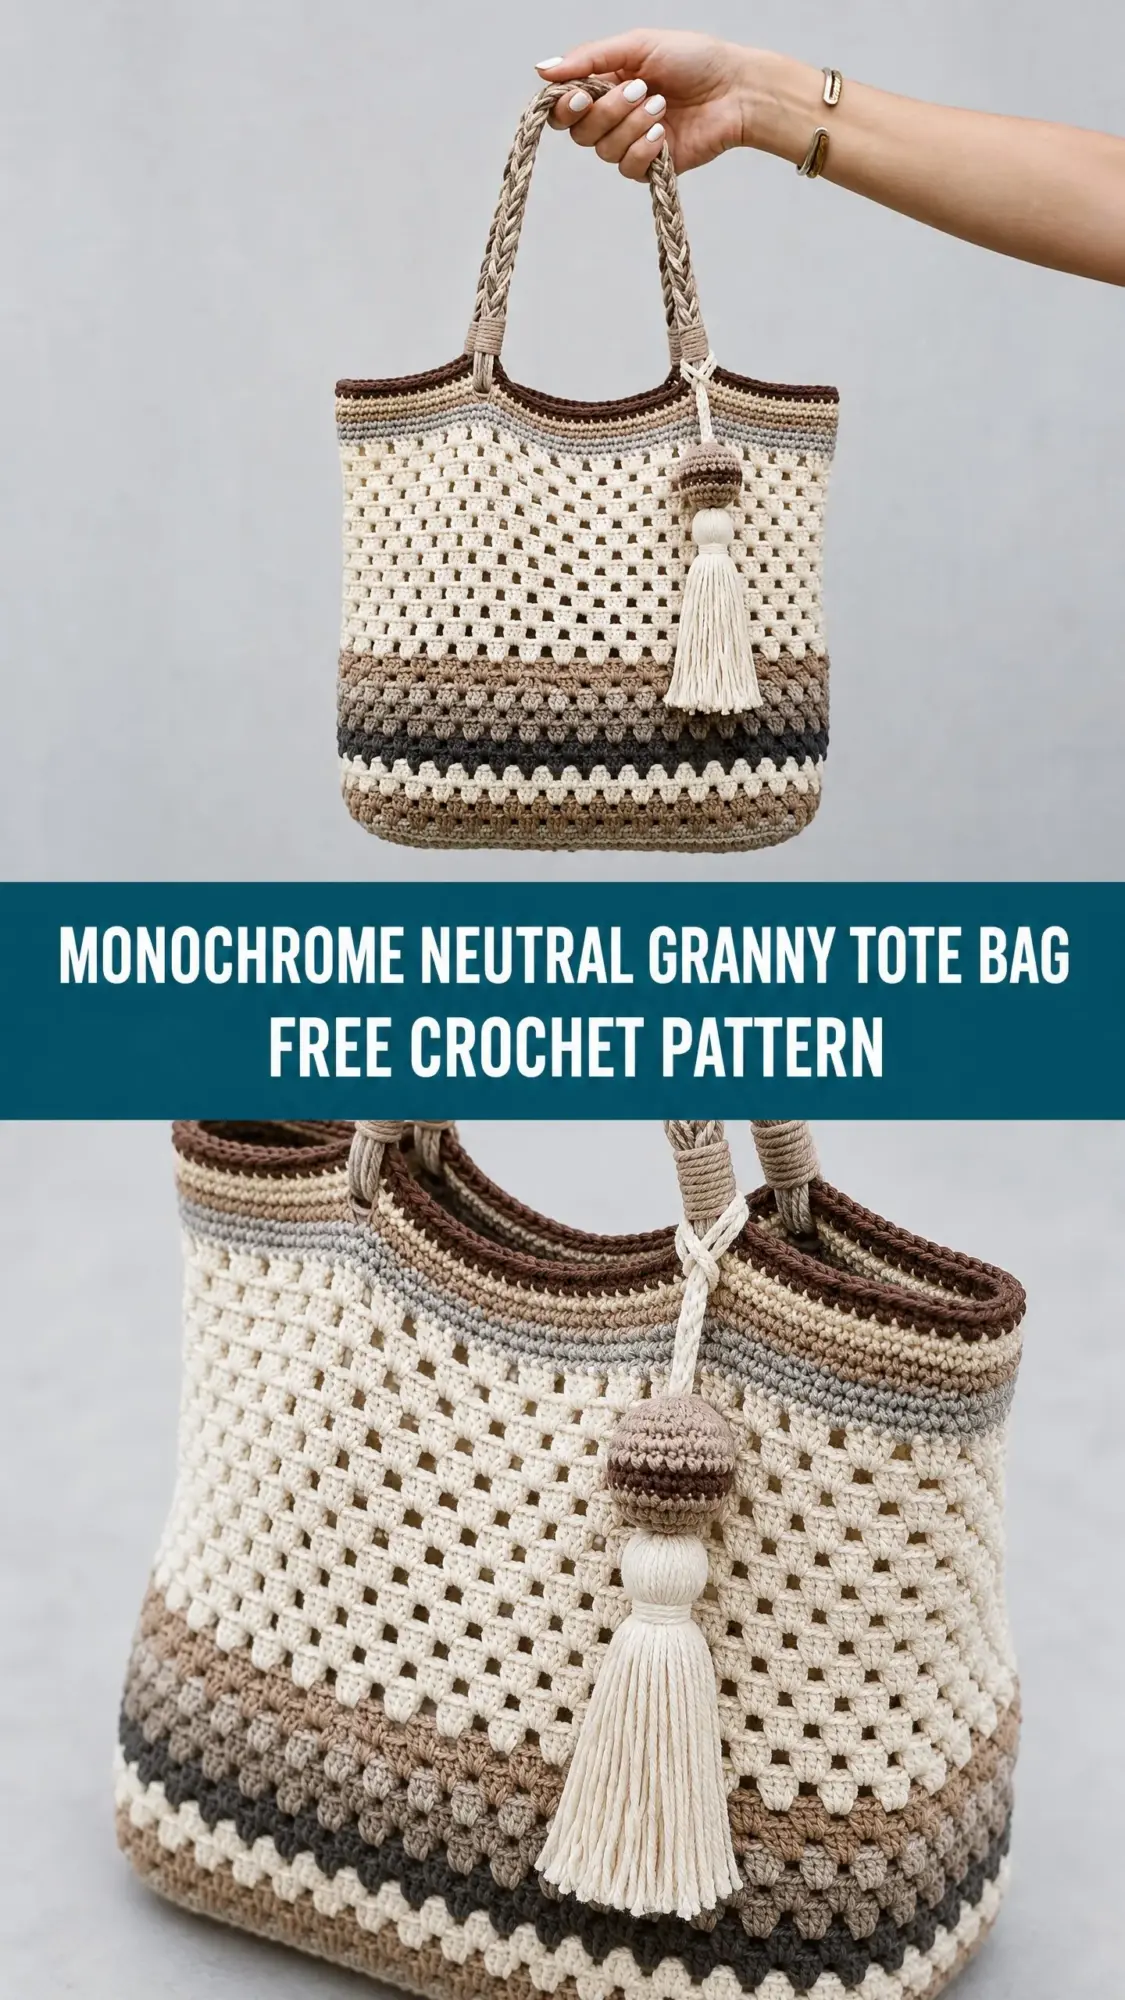
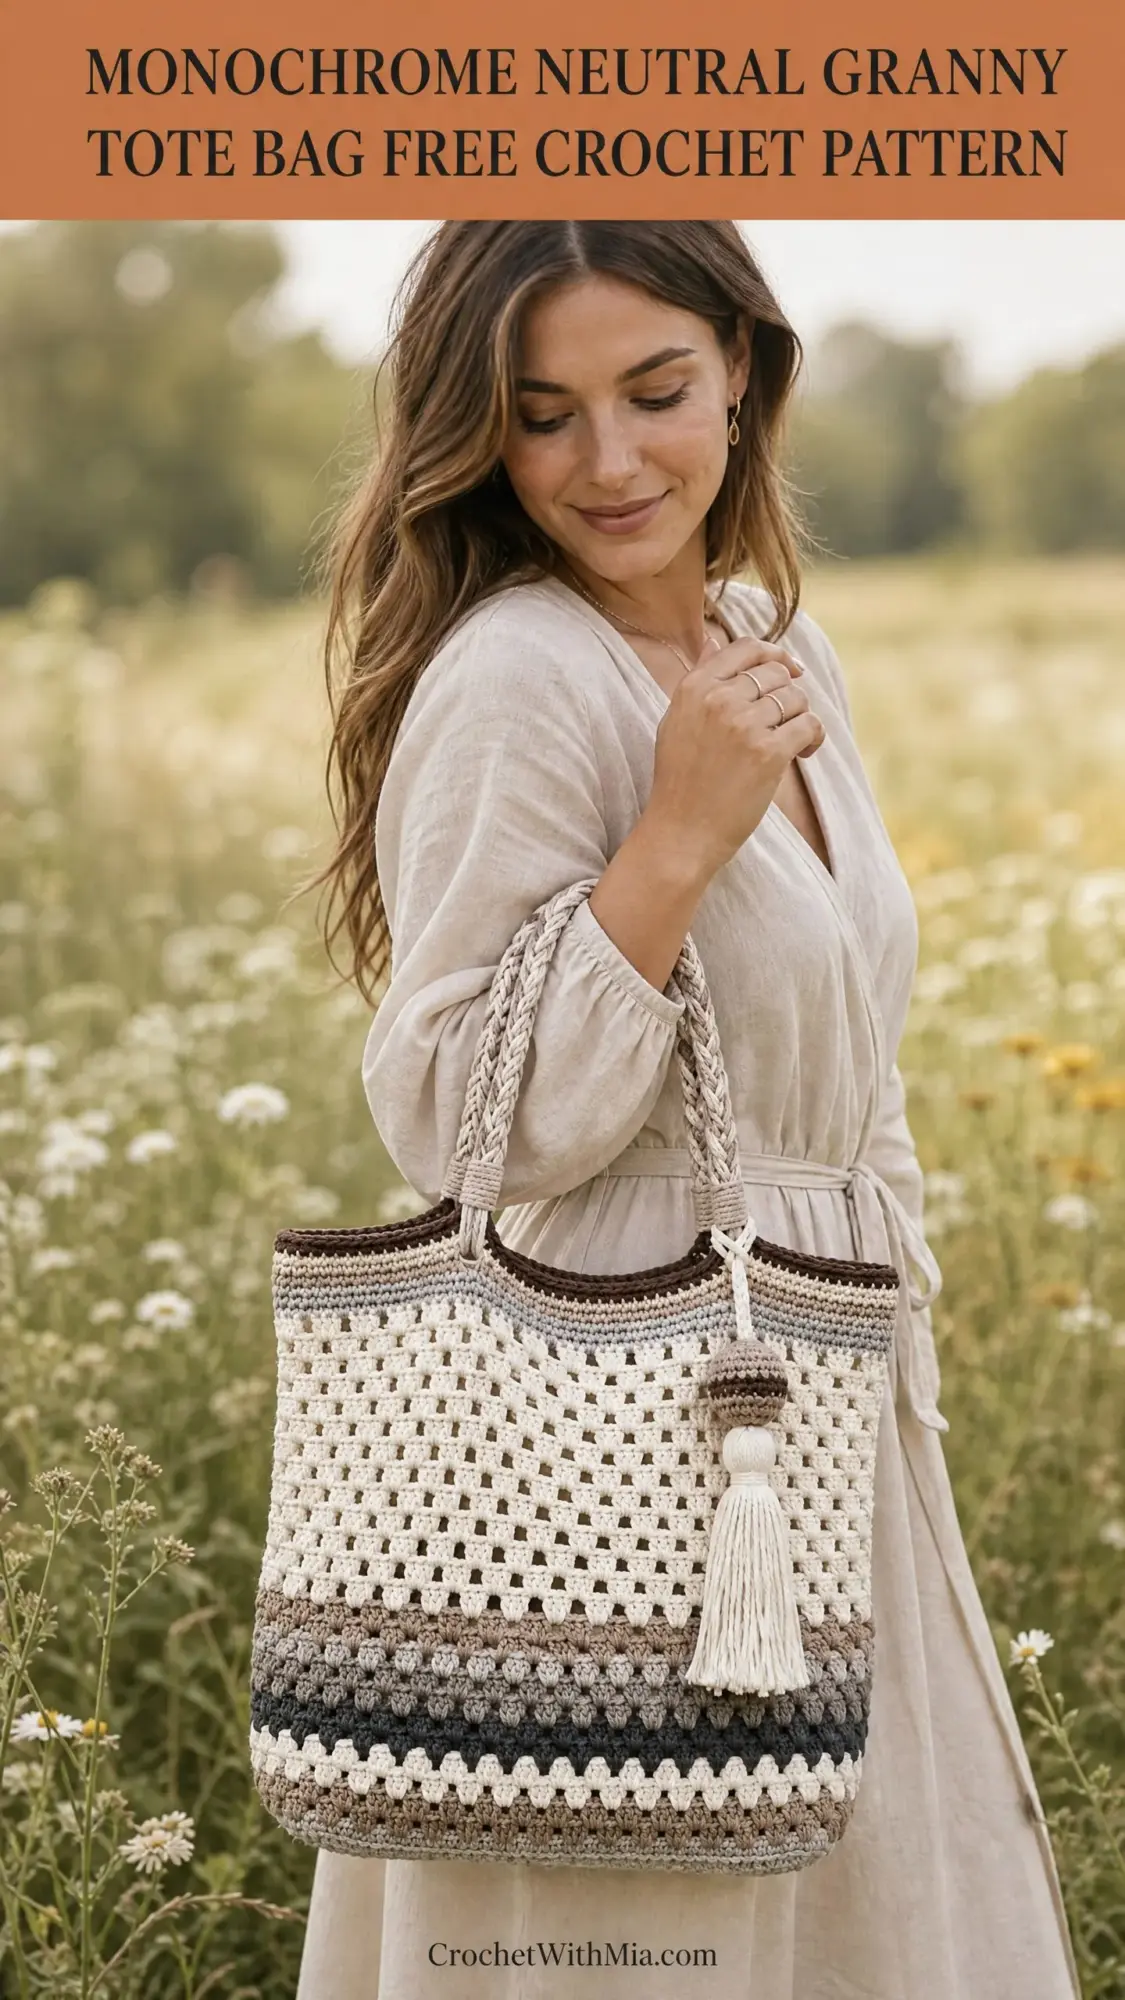
This granny tote checks every single box. The neutral color palette goes with literally everything in my closet, the open mesh keeps it lightweight, and the dense cluster section at the bottom means your keys won’t fall through. All the style with none of the stress.
If you’ve been eyeing those beautiful handmade market bags but felt intimidated by the construction, this pattern breaks it down into manageable sections. You’ve got this.
About This Crochet Pattern
This structured tote bag is worked in the round from the bottom up using a modified granny stitch construction. The design features a flat rectangular base, vertical side panels, and a decorative striped body that combines an open granny mesh section at the upper portion with a dense granny cluster section at the lower portion.
The color palette draws entirely from warm neutrals. Think cream, taupe, tan, warm gray, charcoal, and chocolate brown. These shades work together beautifully and give the bag that effortlessly chic boho vibe you see in high-end boutiques.
The handles are braided cords attached at the upper rim. The finishing touch is a layered tassel charm clipped to one handle attachment point. The top edge gets reinforced with several rounds of single crochet and slip stitch in a dark brown edging for durability and polish.
This bag is sized generously as an everyday tote suitable for market trips, beach outings, or general daily carry.
Skill Level
This pattern is rated intermediate. You should be comfortable with working in continuous rounds, joining colors cleanly, working granny clusters, maintaining stitch count across color changes, and constructing a flat rectangular base using turning chains.
That said, if you’re a confident beginner who has tackled basic stitches and color changes before, you can absolutely complete this project with a little patience. The instructions are detailed and the construction is logical once you understand the flow.
Time Estimate
An experienced crocheter can expect to spend approximately 15 to 22 hours on this project. If this is your first time making a bag like this and you’re working at a moderate pace, budget 25 to 30 hours. This does not include blocking or handle construction time.
Finished Dimensions
Width: approximately 14 inches / 35.5 cm measured across the front panel at the widest point
Height: approximately 13 inches / 33 cm from base to top rim, not including handles
Depth: approximately 5 inches / 12.5 cm side to side
Handle drop: approximately 10 inches / 25.5 cm from top of bag rim to top of handle arch
Materials Needed
Yarn
You will need worsted weight (Category 4) 100% cotton yarn in 6 colors:
Color A (Cream / natural white): approximately 320 yards / 293 meters
Color B (Warm taupe / light tan): approximately 150 yards / 137 meters
Color C (Warm medium gray / silver): approximately 80 yards / 73 meters
Color D (Warm dark taupe / mushroom): approximately 100 yards / 91 meters
Color E (Charcoal gray): approximately 80 yards / 73 meters
Color F (Chocolate brown / dark brown): approximately 80 yards / 73 meters
Yarn Suggestions
Option 1: Lion Brand 24/7 Cotton in Ecru (Color A), Linen (Color B), Silver (Color C), Taupe (Color D), Charcoal (Color E), and Coffee (Color F). This yarn is smooth, durable, machine washable, and holds stitch definition beautifully in granny clusters.
Option 2: WeCrochet Dishie in Cream (Color A), Driftwood (Color B), Ash (Color C), Almond (Color D), Coal (Color E), and Espresso (Color F). Dishie has a slightly softer hand and excellent stitch clarity for open mesh sections.
Option 3: Paintbox Yarns Simply DK Cotton held double, using equivalent neutral shades. Holding DK double approximates worsted weight and gives a slightly more plush drape while maintaining the crisp look of the original.
Substitution note: Any smooth, tightly spun 100% cotton worsted weight yarn will work well. Avoid fluffy, hairy, or loosely spun yarns as they will obscure the open granny mesh squares and the textural cluster sections. Cotton is strongly preferred over acrylic for this bag because it holds its shape and provides structure without needing a bag liner.
Hooks
US size H-8 / 5.0 mm crochet hook for bag body
US size G-6 / 4.0 mm crochet hook for base and tight foundation rounds
Notions
Gauge
With US H-8 / 5.0 mm hook and worsted weight cotton:
1 granny cluster group (3 dc, ch 1) = approximately 1 inch / 2.5 cm wide
4 rounds of granny mesh = approximately 2.5 inches / 6.4 cm tall
14 sc x 16 rows = 4 inches / 10 cm in single crochet
For the base worked in sc on G-6 / 4.0 mm hook:
16 sc x 18 rows = 4 inches / 10 cm
Gauge matters here. The open mesh section is sensitive to tension, and getting the right gauge ensures your bag matches the stated finished dimensions. Work a gauge swatch before beginning the body.
Abbreviations
ch: chain (wrap yarn over hook and pull through the loop on your hook)
sl st: slip stitch (insert hook, yarn over, pull through both loops at once)
sc: single crochet (insert hook, yarn over, pull up a loop, yarn over, pull through both loops)
dc: double crochet (yarn over, insert hook, yarn over, pull up a loop, yarn over, pull through 2 loops, yarn over, pull through remaining 2 loops)
hdc: half double crochet
sp: space
ch-sp: chain space (the gap created by a chain in the previous row/round)
rep: repeat
beg: beginning
sk: skip
st: stitch
sts: stitches
RS: right side
WS: wrong side
PM: place marker
rnd: round
rem: remaining
yo: yarn over
tog: together
approx: approximately
cont: continue
granny cl: granny cluster (see Special Stitches below)
join: join with slip stitch unless otherwise stated
Special Stitches
Granny Cluster (granny cl)
This is the star of the show. A granny cluster is essentially 3 double crochets worked into the same stitch or space and joined at the top.
Step 1: Yarn over, insert hook into indicated stitch or space.
Step 2: Yarn over, pull up a loop. Yarn over, pull through 2 loops on hook. (One half-finished dc.)
Step 3: Yarn over, insert hook into the SAME stitch or space.
Step 4: Yarn over, pull up a loop. Yarn over, pull through 2 loops on hook. (Two half-finished dc on hook.)
Step 5: Yarn over, insert hook into the SAME stitch or space a third time.
Step 6: Yarn over, pull up a loop. Yarn over, pull through 2 loops on hook. (Three half-finished dc on hook.)
Step 7: Yarn over, pull through all 4 loops on hook. (Granny cl made.)
Each granny cl counts as one cluster unit. In open mesh rounds, clusters are separated by ch-1 or ch-2 spaces. In dense cluster rounds, clusters sit directly side by side with only a ch-1 between pairs.
Standing Double Crochet
This technique lets you join a new color at the start of a round without a slip stitch join. It creates a cleaner look.
Step 1: Make a slip knot with new yarn. Place on hook.
Step 2: Yarn over, insert hook into indicated stitch or space.
Step 3: Yarn over, pull up a loop, yarn over, pull through 2 loops, yarn over, pull through remaining 2 loops.
This counts as the first dc of the round.
Braided Handle Cord
Six strands of Color B and Color D yarn are cut to 60 inches / 152 cm each (3 strands B, 3 strands D, or all one color if preferred). Fold at midpoint and secure the fold at the bag rim. Braid all 6 strands in a standard 3-strand braid (pair strands as groups of 2) to the desired handle length, then secure. Full instructions are included in the finishing section.
Pattern Notes Before You Begin
1. The bag base is worked flat in rows of sc, then joined at the end of the base section to work in the round for the body.
2. The body is worked in continuous rounds. Do not turn unless instructed.
3. Color changes are made at the end of the last stitch before the new color begins. To change color: work the last stitch of the current color until 2 loops remain on hook, then draw new color yarn through to complete the stitch.
4. Carry colors not in use loosely along the interior of the bag or cut and rejoin as preferred. Because the bag has a structured interior, carried yarn on the inside is acceptable and speeds up construction.
5. The granny mesh section (upper half of the body) uses open granny squares worked in rounds, each round forming one tier of the mesh.
6. The dense cluster section (lower body, just above the base) uses closely spaced granny clusters in a bobble-like arrangement.
7. Stitch counts in the body rounds refer to cluster groups, not individual dc. One cluster group = 1 granny cl + ch-1. Where the count refers to individual stitches, it will be labeled as (sc) or (dc) specifically.
8. The top edging is worked in sc and sl st in Color F (dark brown) and Color B (taupe) to create the visible striped rim seen at the top of the bag.
9. The tassel charm is attached to a short loop of Color A at one handle base. Instructions are included in the finishing section.
10. If working with a yarn that splits easily, consider using a blunt hook tip or bamboo hook for the cluster sections.
Step by Step Instructions
Section 1: Base
The base is worked flat in rows of sc and forms a rectangle approximately 14 inches / 35.5 cm long by 5 inches / 12.5 cm wide.
Use Color A (cream) and H-8 / 5.0 mm hook throughout the base.
Foundation chain: Ch 57.
Row 1 (RS): Sc in 2nd ch from hook and in each ch across. Turn. (56 sc)
Row 2: Ch 1, sc in each st across. Turn. (56 sc)
Rows 3 through 18: Rep Row 2. Turn after each row. (56 sc each row)
After Row 18 the base should measure approximately 5 inches / 12.5 cm wide (short dimension) and 14 inches / 35.5 cm long (long dimension).
Do not fasten off.
Checkpoint: After Row 18, the base rectangle should measure 14 in / 35.5 cm long and 5 in / 12.5 cm wide.
Section 2: Joining Round and Body Foundation
The joining round picks up stitches along all four edges of the base to create a continuous oval working loop for the body rounds. This is the critical round that sets the stitch count for all body rounds.
After Row 18 of the base, do not turn. Rotate your work to begin picking up along the long edge.
Joining Round: Ch 1.
Along the right long edge (18 row-end edges): sc evenly, working 1 sc in each row end. (18 sc)
Along the starting chain (foundation edge): sc in each of the 56 foundation chain loops. (56 sc)
Along the left long edge (18 row-end edges): sc in each row end. (18 sc)
Along the top of Row 18 (working sts): sc in each of the 56 sts. (56 sc)
Join with sl st to first sc. Do not turn. PM to mark beginning of round.
Total stitches in joining round: 18 + 56 + 18 + 56 = (148 sc)
This number must be divisible by 4 to support the granny cluster repeat. 148 divided by 4 = 37 groups. This is confirmed correct.
Checkpoint: After the joining round, you have 148 sc in a continuous oval.
Section 3: Lower Body Dense Cluster Stripe Section
The lower body consists of 7 rounds of dense granny cluster work creating a textured, close-set cluster band. This section appears in the lower third of the bag and uses a sequence of neutral colors.
The 148 sc base translates to 37 cluster groups of (granny cl, ch 1) per round. Each cluster is worked into every 4th stitch of the sc round beneath, or into the ch-1 spaces of the round beneath in subsequent cluster rounds.
Round 1 (Color B, Taupe): Join Color B in any sc. (Granny cl in same st, ch 1, sk 3 sts) rep 37 times. Join to top of first granny cl with sl st. (37 clusters, 37 ch-1 sps)
Note: 37 groups x 4 sts = 148 sts consumed. Math confirmed.
Round 2 (Color E, Charcoal): Join Color E. Ch 3 (counts as first dc), 2 dc in same ch-1 sp (completes first granny cl), ch 1. (Granny cl in next ch-1 sp, ch 1) rep 36 times. Join to top of beg ch-3 with sl st. (37 clusters, 37 ch-1 sps)
Round 3 (Color A, Cream): Join Color A. Rep Round 2. (37 clusters, 37 ch-1 sps)
Round 4 (Color D, Mushroom Taupe): Join Color D. Rep Round 2. (37 clusters, 37 ch-1 sps)
Round 5 (Color E, Charcoal): Join Color E. Rep Round 2. (37 clusters, 37 ch-1 sps)
Round 6 (Color B, Taupe): Join Color B. Rep Round 2. (37 clusters, 37 ch-1 sps)
Round 7 (Color A, Cream): Join Color A. Rep Round 2. (37 clusters, 37 ch-1 sps)
Checkpoint: After Round 7, the dense cluster band should measure approximately 3.5 to 4 inches / 9 to 10 cm tall above the base.
Section 4: Lower Body Transition Rounds
Two rounds of sc worked into the ch-1 spaces of the cluster section re-establish a flat sc foundation to transition into the granny mesh section.
Transition Round 1 (Color A, Cream): Work 2 sc in each of 37 cluster tops, 2 sc in each of 37 ch-1 sps alternating, placing 1 extra sc at each of 4 corner areas (the two short-side centers and two long-side centers). Target: 148 sc evenly distributed. (148 sc)
Transition Round 2 (Color B, Taupe): Ch 1. Sc in each sc around. Join. (148 sc)
Checkpoint: After the two transition rounds, you are back to 148 sc and the lower body should measure approximately 5 inches / 12.5 cm tall from the base.
Section 5: Upper Body Open Granny Mesh Section
The upper body consists of 10 rounds of open granny mesh giving the characteristic see-through lattice pattern seen across the upper two-thirds of the bag. This section is worked primarily in Color A (cream) with single accent rounds in Color C (gray) and Color B (taupe).
In the open mesh, each group is: (granny cl, ch 2). Each group occupies one ch-2 sp from the round below. The foundation row converts the 148 sc into 37 granny mesh groups.
Mesh Foundation Round:
Round 1 (Color A, Cream): Sk first sc, (granny cl in next sc, ch 2, sk 3 sts) rep 37 times. Join to top of first cluster. (37 clusters, 37 ch-2 sps)
Verification: 37 x 4 = 148. Correct.
Round 2 (Color A, Cream): Sl st into ch-2 sp. Ch 3, 2 dc in same sp, ch 2. (Granny cl in next ch-2 sp, ch 2) rep 36 times. Join to top of ch-3. (37 clusters, 37 ch-2 sps)
Round 3 (Color C, Gray): Join Color C. Rep Round 2. (37 clusters, 37 ch-2 sps)
Round 4 (Color A, Cream): Rep Round 2. (37 clusters, 37 ch-2 sps)
Round 5 (Color A, Cream): Rep Round 2. (37 clusters, 37 ch-2 sps)
Round 6 (Color B, Taupe): Join Color B. Rep Round 2. (37 clusters, 37 ch-2 sps)
Round 7 (Color A, Cream): Rep Round 2. (37 clusters, 37 ch-2 sps)
Round 8 (Color A, Cream): Rep Round 2. (37 clusters, 37 ch-2 sps)
Round 9 (Color C, Gray): Join Color C. Rep Round 2. (37 clusters, 37 ch-2 sps)
Round 10 (Color A, Cream): Rep Round 2. (37 clusters, 37 ch-2 sps)
Checkpoint: After Round 10 of the mesh section, the open mesh band should measure approximately 6.5 to 7 inches / 16.5 to 18 cm tall. Total bag height at this stage should be approximately 11 to 12 inches / 28 to 30.5 cm from the base.
Section 6: Top Edging
The top edging creates the dark striped rim visible at the top of the bag. It uses Color F (chocolate brown) and Color B (taupe) in alternating rounds of sc and sl st.
Prep Round (Color A, Cream): Sc in each cluster top and in each ch-2 sp. (37 + 37 = 74 sc)
Edging Round 1 (Color F, Chocolate Brown): Ch 1. Sc in each sc around. Join. (74 sc)
Edging Round 2 (Color F, Chocolate Brown): Ch 1. Sc in each sc around. Join. (74 sc)
Edging Round 3 (Color B, Taupe): Ch 1. Sc in each sc around. Join. (74 sc)
Edging Round 4 (Color F, Chocolate Brown): Sl st in each sc around. Join. Fasten off. (74 sl sts)
The edging should measure approximately 0.75 to 1 inch / 2 to 2.5 cm tall.
Checkpoint: The finished bag body before handles should measure approximately 13 inches / 33 cm from base to top rim.
Section 7: Handles Braided Cord Construction
The bag uses two braided handles attached at the top rim, positioned on the front and back walls centered on each long side.
Each handle is created from 12 strands of yarn cut to 80 inches / 203 cm each.
Color arrangement per handle: 4 strands Color B, 4 strands Color D, 4 strands Color A (or substitute macrame cord as noted in materials).
Marking handle placement:
Front long side: Count 37 sc along the front top edge. Mark center 12 sts. The left handle base attaches at st 10 from left edge of front panel, right handle base attaches at st 10 from right edge of front panel, creating a handle spanning approximately 4.5 inches / 11.5 cm between attachment points.
Repeat identical placement on back panel.
Attaching handle strands:
Step 1: Hold all 12 strands together and fold at midpoint to create 24 working ends.
Step 2: Pull fold through the designated top edging stitch from front to back using crochet hook or yarn needle.
Step 3: Pull all 24 ends through the fold loop to create a larks head mount.
Step 4: Divide 24 strands into 3 groups of 8.
Step 5: Braid the three groups in a standard 3-strand braid for 10 inches / 25.5 cm.
Step 6: Attach the braid end to the corresponding second attachment point on the same side using another larks head mount, threading the ends through the designated stitch and securing with a tight overhand knot on the inside of the bag.
Step 7: Trim ends to 0.5 inch / 1.3 cm and tuck inside the bag rim. Secure with a few stitches using yarn needle.
Step 8: Repeat for the second handle on the back panel.
Section 8: Tassel Charm
The tassel is attached to one side of the front left handle base using a short loop.
Materials for tassel:
Pom top construction:
Wind Color D around 3 fingers approximately 40 times. Slide off fingers. Tie tightly at center with a 12-inch / 30.5 cm strand. Cut loops. Trim to a round shape approximately 1 inch / 2.5 cm in diameter.
Tassel construction:
Step 1: Hold all 40 strands of Color A and 10 strands of Color D together. Fold at midpoint.
Step 2: Using Color F, wrap tightly around all strands approximately 0.75 inch / 2 cm down from the fold to create the tassel neck.
Step 3: Knot wrap yarn securely. Thread the wrap ends up through the center of the tassel top and trim.
Step 4: Trim all tassel strands evenly to desired length (approximately 4 inches / 10 cm from neck to bottom).
Assembly:
Step 1: Thread the pom ball tie ends through the loop at the top of the tassel fold. Knot securely so pom sits directly above tassel neck.
Step 2: Attach swivel clip or lobster clasp to a 4-inch / 10 cm ch loop made in Color A. Tie or sew ch loop to the pom-tassel top.
Step 3: Clip swivel to handle attachment point at front left handle base.
Section 9: Interior (Optional)
The bag does not require a liner for structural integrity due to the cotton density at the base and lower body. However, for a fully finished look or to prevent small items from falling through the open mesh section, you can add a fabric liner.
Cut a fabric liner from medium-weight cotton or linen in a matching neutral. Cut two pieces 15 x 14 inches / 38 x 35.5 cm (front and back), two pieces 6 x 14 inches / 15 x 35.5 cm (sides), and one piece 15 x 6 inches / 38 x 15 cm (base panel). Sew into a box shape with 0.5 inch / 1.3 cm seams. Insert into bag, fold the top edge over the top rim, and whipstitch the liner to the inside of the top edging round using coordinating thread.
Size Customization Tips
To make the bag wider: Work a longer foundation chain in multiples of 4. Each additional 4 chains adds approximately 1 inch / 2.5 cm to the long dimension of the base, and proportionally increases the circumference of the body rounds by 8 sts (4 sts mirrored on both long sides). Recalculate cluster groups by dividing total sc count in joining round by 4. Always aim for a multiple of 4 in the joining round total.
To make the bag taller: Add additional rounds to the granny mesh section in Rounds 4 to 8 (the solid cream area) without changing color stripe sequence. Each additional mesh round adds approximately 0.6 inch / 1.5 cm in height.
To make the bag deeper (thicker side-to-side): Work more rows in the base before joining. Each 2 additional rows adds approximately 0.5 inch / 1.3 cm of depth and adds 4 more sc to the joining round total (2 per long edge). Maintain divisibility by 4.
To make a mini version: Work a 9-inch / 23 cm base with 12 rows, giving a joining round of approximately 104 sc, which yields 26 cluster groups. Work 5 rounds of dense cluster and 6 rounds of mesh. Reduce handle length to 7 inches / 18 cm braid.
Finishing and Blocking
Wet blocking is strongly recommended for the open granny mesh section to open up the lattice fully and produce the clean, geometric grid visible on the finished bag.
Step 1: Submerge the completed bag in cool water with a small amount of no-rinse wool wash or gentle soap. Allow to soak for 20 minutes.
Step 2: Gently press (do not wring) to remove excess water. Roll in a clean dry towel and press again.
Step 3: Shape the bag over a box, thick book stack, or bag form approximately 14 x 5 inches / 35.5 x 12.5 cm to maintain the boxy shape.
Step 4: Pin or stretch the mesh section outward at the corners to open the ch-2 spaces uniformly.
Step 5: Allow to dry completely (12 to 24 hours) before removing from form.
Weave all ends securely on the interior using a yarn needle, weaving in at least 2 directions for at least 1 inch / 2.5 cm. Trim ends close. Cotton ends can be secured with a tiny drop of fabric glue on the inside if desired for extra security.
Care Instructions
Machine wash on gentle or delicate cycle in cool water. Use a mesh laundry bag to protect the handles and tassel.
Do not tumble dry. Reshape and air dry flat or over a bag form.
Do not iron directly. Steam lightly from a distance if needed to relax the mesh after washing.
Do not bleach.
Store stuffed with tissue paper or a small pillow form to maintain the boxy shape between uses.
Final Thoughts on This Granny Tote Bag Crochet Pattern
This monochrome neutral granny tote bag is the kind of project that feels impressive to carry but is totally achievable to make. The combination of dense clusters at the bottom and airy mesh at the top creates visual interest without overwhelming complexity. And those braided handles? Chef’s kiss.
I hope you love making this crochet tote bag pattern as much as I do. The neutral palette means it pairs with everything, and the sturdy cotton construction means it’ll last for years of market runs and beach trips.
Thank you so much for choosing this pattern. I truly appreciate you being here.
If you make this bag, I would absolutely love to see it! Tag me on Instagram or share a photo on Facebook. Seeing your finished projects genuinely makes my day.
Don’t forget to save this pattern to your Pinterest boards so you can find it easily when you’re ready to start. And if you have any questions or just want to share your progress, drop a comment below. I love hearing from you!