
I don’t know about you, but I have always been drawn to jewelry that feels like a little piece of art. Something that makes people do a double take and ask, "Wait, did you make that?" This ear cuff is exactly that kind of project.
Get the Ad-Free PDF Pattern
You can find the free pattern below, or you can purchase the ad-free printable PDF from my shop.
Get the Printable PDF →
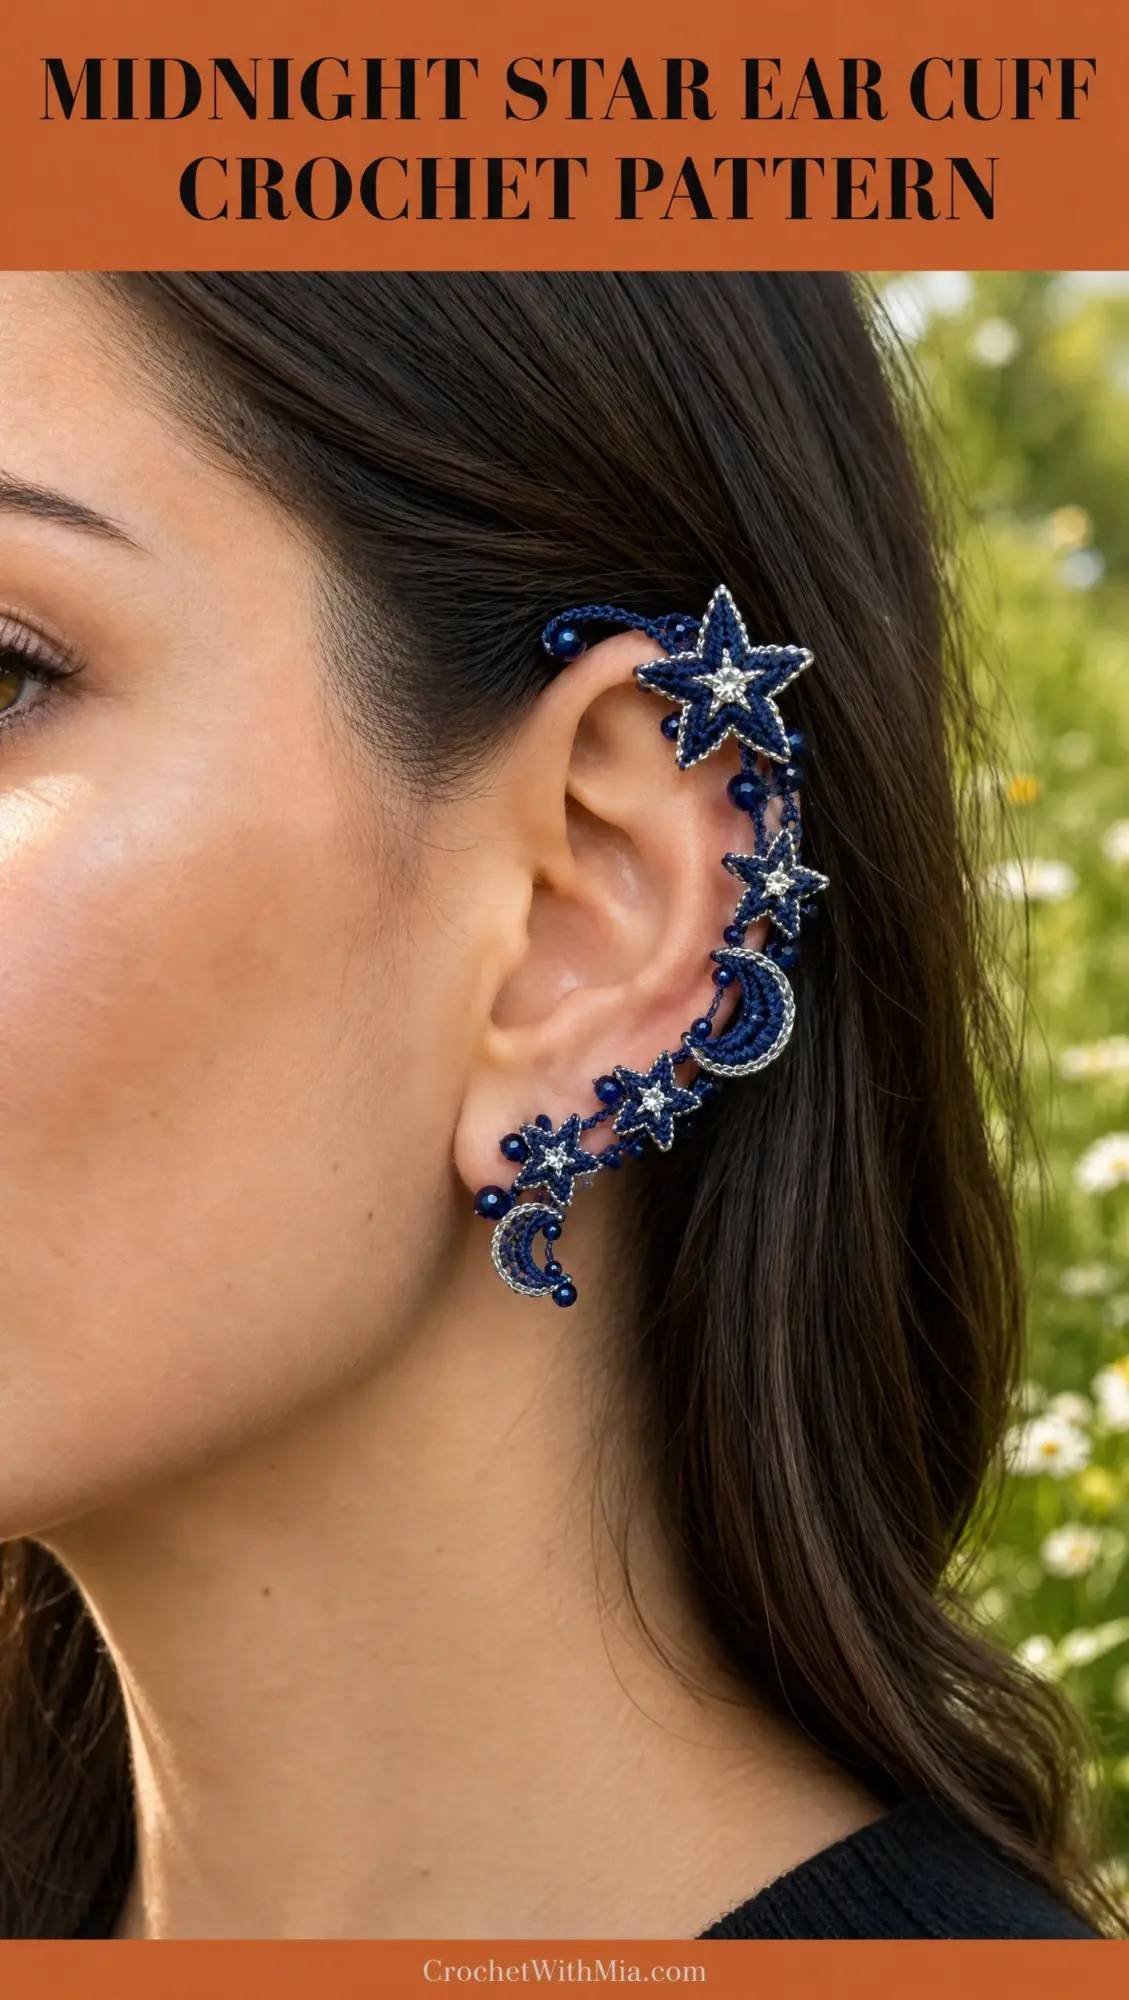
The Midnight Star Ear Cuff combines thread crochet with beadwork to create a stunning celestial accessory that wraps around your ear like a tiny constellation. Five pointed stars, two delicate crescents, cobalt seed beads, and silver accents all come together on a wrapped support frame. It looks incredibly intricate, but I promise the construction is more approachable than it appears.
If you have been wanting to try jewelry-scale crochet or level up your thread work skills, this is the perfect project to dive into. Let me walk you through everything you need to know.
About This Ear Cuff Pattern
This sculptural ear cuff is built around a discreet C-shaped support that gets completely wrapped in midnight blue crochet thread. The motifs, which include one large star, four small stars, and two slim crescents, are crocheted separately and then joined to the frame with airy beaded chain bridges.
The finished piece follows the outside curve of your ear while keeping the inner ear completely open and unobstructed. It is lightweight despite looking substantial, and the combination of deep navy thread with silver metallic accents gives it a really elegant celestial vibe.
Skill level: Intermediate. You should be comfortable with thread crochet, working small motifs, crocheting around a support, joining motifs together, and adding beads as you work.
Finished Measurements
Here are the target dimensions for an adult-size statement ear cuff:
| Measurement | Target Size |
|---|---|
| Overall cuff height | Approximately 90 to 105 mm from upper helix to below lobe |
| Outer width | Approximately 28 to 35 mm at the widest star |
| Inner opening | Approximately 52 to 62 mm high |
| Large star | Approximately 22 to 25 mm point to point |
| Small stars | Approximately 12 to 16 mm point to point |
| Crescents | Approximately 14 to 18 mm tall |
The inner opening measurement is important. You want to keep the ear canal fully unobstructed for comfort and safety.
Materials You Will Need
Gather these supplies before you begin:
Thread:
Hook:
Support:
Beads and Crystals:
Tools:
Thread, Gauge, and Firmness Notes
For jewelry-scale crochet, exact gauge matters less than stiffness and proportion. You want to work firmly enough that your star points hold their shape without needing wire inside the motifs themselves.
A useful test: 12 single crochet (sc) stitches should measure about 20 to 23 mm. If your stitches are loose or floppy, move down a hook size.
Important fit note: The cuff should rest along the outer ear and behind the lobe without squeezing. The support should never enter the ear canal. Smooth every wire end and bead attachment thoroughly before wearing.
Abbreviations
Let me define all the stitches and terms used in this pattern:
Construction Overview
The order of construction matters here and gives you the cleanest fit. You will:
1. Form and wrap the C-shaped support
2. Crochet the large star
3. Crochet the four small stars
4. Crochet the two crescent motifs
5. Add silver outlines and crystals to all motifs
6. Prepare beaded chain bridges
7. Attach the large star to the support
8. Arrange and join all remaining motifs
9. Add the upper tip bead
10. Final shaping and finishing
Working in this order makes it easy to fine-tune spacing as you go.
Step 1: Form and Wrap the C-Shaped Support
If using wire: Cut roughly 120 to 135 mm. With round-nose pliers, turn a tiny closed loop at each end so no sharp tip remains. Shape into a gentle C that follows the outer ear from above the helix to just below the lobe.
Wrapping the support:
1. With midnight blue thread, leave a 15 cm tail. Tie the thread securely around the upper end loop.
2. Work tightly packed sc directly around the support from top to bottom. Push stitches together as you go so no metal is visible.
3. At the lower end, work 2 extra sc around the end loop, then sl st into the previous sc. Fasten off and weave the tail back through 15 to 20 wrapped stitches. Trim only after checking security.
4. Test the frame against your ear or a paper ear template. The curve should sit outside the ear opening. Make small adjustments before attaching motifs.
Step 2: Large Five-Pointed Star (Make 1)
Use midnight blue thread and work firmly. The star is built from a dense center ring with five repeated points radiating outward.
Round 1: MR, ch 1, work 10 sc into ring. Pull ring closed. Join with sl st to first sc. (10 sc)
Round 2, Point 1: Sl st in next sc, ch 6. Starting in 2nd ch from hook: sl st, sc, hdc, dc, tr. Skip 1 sc of Round 1 and sl st in next sc.
Repeat the sequence in asterisks 4 more times, spacing the five points evenly around the 10 sc center. Join at base of first point. (5 points total)
Tip for sharper points: Place one extra sl st into the tip chain before working back down. If the star curls, gently steam block without flattening the texture.
Silver outline: Join silver thread at the valley between any two points. Sl st loosely along the outer edge of every star point, placing 1 extra sl st at each tip. Join and fasten off on the back.
Crystal center: Sew one 3 mm clear crystal through the dense center ring. Pass through the crochet several times. Knot on the back and bury the tail under the center stitches.
Step 3: Small Stars (Make 4)
These use the same construction method with shorter points.
Round 1: MR, ch 1, 10 sc in ring. Join. (10 sc)
Points: Sl st in next sc, ch 4. Starting in 2nd ch from hook: sl st, sc, hdc. Skip 1 center sc, sl st in next sc. Repeat 5 times total. (5 points)
Outline each star with silver sl sts exactly as for the large star.
Sew one clear crystal to each center. Keep all knots and thread tails on the back.
Step 4: Slim Crescent Motifs (Make 2)
The crescent is a curved, tapered strip. Work tightly so it keeps a slim moon shape rather than becoming a semicircle.
Row 1: Ch 12. Starting in 2nd ch from hook work: sl st, sc, hdc, dc, 3 tr, dc, hdc, sc, sl st. This naturally creates a curved strip.
Row 2: Ch 1, rotate the work and crochet back along the unused side of the foundation chain: sl st, sc, hdc, dc, 3 tr, dc, hdc, sc, sl st.
Shaping: Pin into a crescent while damp. Bring the two tips slightly toward one another and let the fuller tr stitch section form the outer belly. Dry completely.
Silver accent: With silver thread, surface sl st only along the outer curved edge. Leave the inner curved edge navy so the motif reads clearly as a crescent.
Step 5: Prepare Beaded Chain Bridges
Pre-string 18 to 26 cobalt beads onto the midnight thread before starting the joins. Slide beads down only when needed.
A practical rhythm is one bead every 3 to 5 chain stitches, with slightly denser beading around the lower half of the cuff.
How to work a beaded chain: Ch 2, slide 1 bead close to the hook, ch 1 tightly to trap the bead, ch 2 to 4 more as needed. Use short connectors so motifs stay close to the rim and do not swing into the ear.
Step 6: Attach the Large Star
1. Place the large star just above the helix, tilted slightly outward. Its lower-left valley should touch or nearly touch the wrapped support.
2. With midnight thread, sew the star to the support at two points: one near the lower-left valley and one near the lower point. Use 4 to 5 firm passes at each anchor.
3. Add a short beaded chain from the upper side of the star to the support, creating an airy triangle rather than sewing the entire motif flat.
Step 7: Arrange the Remaining Motifs
Position your motifs as follows:
Important: Pin or tack every motif in place before making permanent joins. Check that the five stars and two crescents read as a balanced constellation and that no motif touches the ear canal.
Step 8: Join Motifs with Open Chainwork
1. Attach midnight thread to the wrapped rim behind the large star. Ch 3 to 6 to the nearest motif valley. Sl st through a back loop or edge stitch.
2. Continue from motif to motif with short chain bridges. Add a cobalt bead to selected bridges by sliding the bead into position before the locking chain.
3. Create one or two triangular open spaces by joining a bridge to both the rim and a neighboring motif. Avoid filling the entire area with chains. The accessory should stay airy.
4. At stress points near the top and lower lobe, reinforce the final sl st by passing through the same stitch twice, then weave the tail back along the chain.
Step 9: Add the Upper Tip Bead
1. At the forward upper end of the C-shaped rim, bring a reinforced thread loop through the wrapped end.
2. String the 4 to 5 mm deep blue bead. Pass through the bead twice if the hole allows.
3. Anchor back into the wrapped support 2 to 3 stitches below the tip. Repeat the anchoring path at least three times.
4. Bury the tail under the wrapped rim stitches and trim close.
Step 10: Final Shaping and Finishing
1. Mist the crochet motifs lightly with water. Pin stars so all five points are symmetrical and pin crescents into clean curves. Keep the wrapped support dry if its core can corrode.
2. Allow to dry completely. Do not iron metallic thread, beads, or crystals.
3. Inspect the back. Every knot should be buried, every bead should be secure, and no thread tail should rub the skin.
4. Check the support curve again. The cuff should rest lightly along the outside of the ear, with the lower crescent below the lobe and the center of the ear remaining open.
Optional stabilizing finish: If your stars are softer than desired, brush a very small amount of diluted fabric stiffener onto the back of the points only, avoiding beads and metallic thread. Let dry while pinned. The front should still look like natural cotton crochet rather than coated fabric.
Fit Adjustments and Troubleshooting
| Issue | Adjustment |
|---|---|
| Cuff slides downward | Tighten the upper curve slightly and add one extra hidden anchor between the large star and rim |
| Motifs touch inner ear | Shorten inner-facing chain bridges or rotate motifs outward before resecuring |
| Stars curl | Use a smaller hook, firmer tension, or light blocking and stiffening on the back |
| Frame feels heavy | Reduce bead count and shorten the lower crescent connector |
| Wire end can be felt | Remove from use until the end is fully looped, cushioned, and rewrapped |
Assembly Checklist
Before you call this project complete, run through this checklist:
Care Instructions
Store your ear cuff flat in a small box so star points do not bend. Spot clean with a barely damp cloth. Do not soak if the core is metal.
Keep perfume, hairspray, and cosmetics away from metallic thread and crystals. Recheck bead and crystal stitching periodically to catch any loosening before it becomes a problem.
Pattern Notes for Customization
For a subtler cuff: Omit one lower star and use 12 to 16 beads instead of the full count.
For a more dramatic constellation: Keep the same five star and two crescent count but increase connector chains by only 1 to 2 stitches so the motifs spread outward without sagging.
For an all-textile version: Use a rigid nylon or memory cord support instead of metal, provided all ends are safely enclosed.
Final Thoughts on the Midnight Star Ear Cuff Pattern
This Midnight Star Ear Cuff is one of those projects that looks impossibly intricate but breaks down into very manageable steps. Each star and crescent is just a small, quick motif. The magic happens when you bring them all together on that wrapped frame.
Take your time with the fit adjustments. Test the support against your ear before you attach motifs. And do not skip the final inspection of the back. A well-finished piece will be comfortable to wear for hours.
I hope you love making this as much as I enjoyed putting this pattern together. Thank you so much for choosing this project. If you make one, I would absolutely love to see it! Share your photos on Instagram or in our Facebook group. Seeing your finished pieces is honestly the best part of my day.
If this Midnight Star Ear Cuff is calling to you, go ahead and save this pattern to your Pinterest boards so you can find it easily when you are ready to start. And please drop a comment below if you make one. I would love to hear how it turns out for you!
Want a Quick & Easy Printable Version?
Get a clean, beautifully formatted PDF of this pattern — easy to follow step by step, ready to print or save on any device. No scrolling, no distractions, just the pattern.
Get the Printable PDF →