You know that gorgeous skein of cotton yarn sitting in your stash? The one you’ve been saving for "something special"? This is the project. The Coastal Blue Crochet Bralette combines airy mesh cups, decorative silver ring lacing, and handmade tassels for a piece that looks far more complicated than it actually is. Fair warning: this pattern sits at a confident intermediate level. You’ll work shaped triangles, open mesh stitches, and some finishing details that require patience. But if you’ve got a few projects under your belt and you’re ready to level up, grab that beautiful yarn and let’s make something stunning.
Get the Ad-Free PDF Pattern
You can find the free pattern below, or you can purchase the ad-free printable PDF from my shop.
Get the Printable PDF →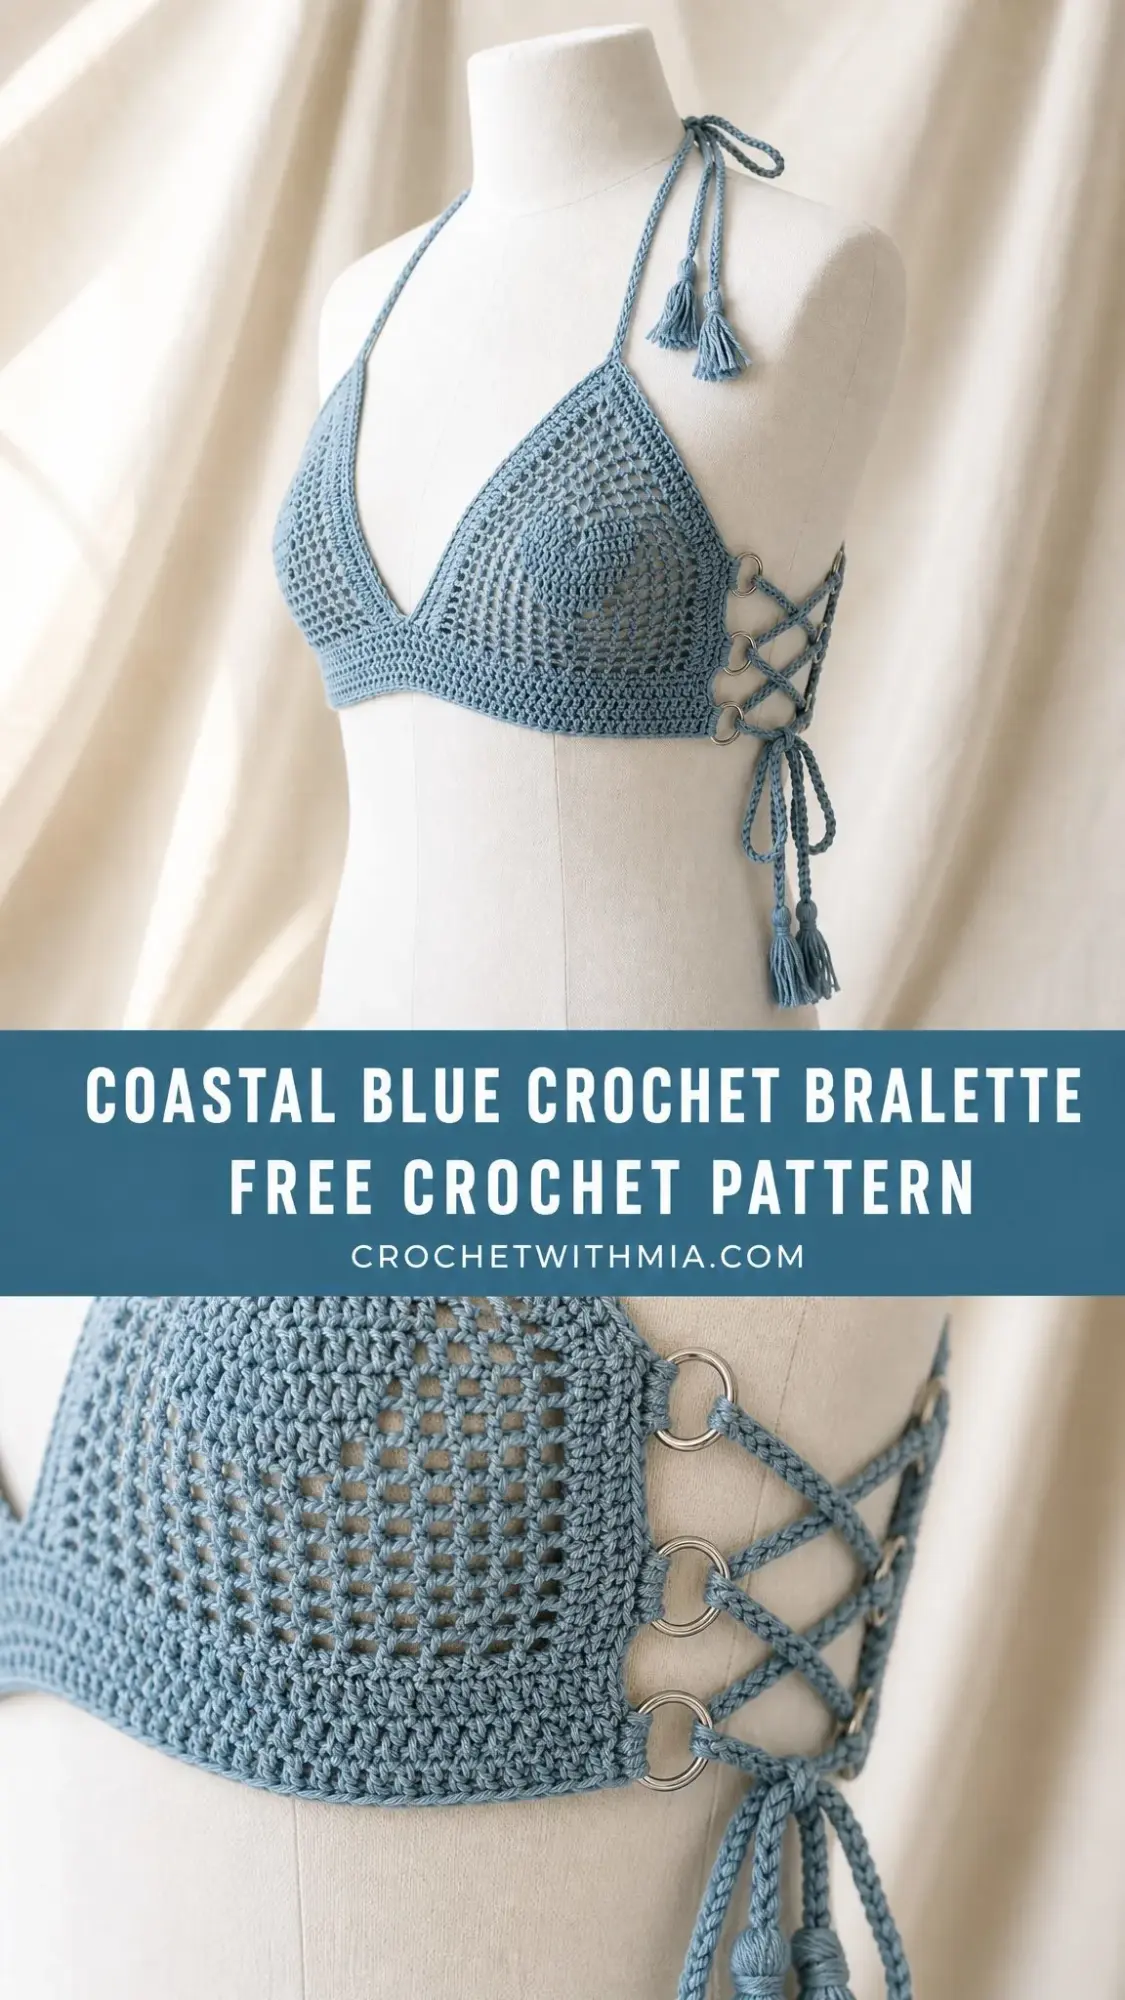
About This Crochet Bralette Pattern
This lace-up halter bralette features two triangular mesh cups joined at the center, a firm underbust band, silver ring details on each side, braided tie cords, and soft tassels at the ends. The construction is straightforward once you understand the flow: you’ll make both cups first, working from the top point downward. Then you’ll join them with an underbust band, add the decorative rings along each side, and finish with corded ties and tassels.
The adjustable tie closures mean this pattern fits a range of sizes. As written, it’s designed as an S/M bralette with an adjustable underbust fit of approximately 30 to 36 inches (76 to 91.5 cm), depending on how tightly you lace the sides. The cup base measures about 7.25 inches (18.5 cm) each, and the cup height after edging is approximately 6.5 inches (16.5 cm).
Time estimate: Plan for 6 to 8 relaxed hours of crocheting, plus blocking and drying time.
Materials You’ll Need
Before you start, gather everything so you can work without interruption:
Yarn Suggestions
The pattern works beautifully with smooth cotton or cotton-blend DK yarn. Here are some excellent options:
Substitution tip: Choose a yarn that holds mesh stitches clearly and doesn’t grow excessively when blocked. Avoid very stretchy yarns unless you swatch carefully first.
Gauge Information
Gauge is mandatory for this pattern. If you skip this step, your cups may end up too large, too small, or misshapen.
Single crochet (sc) gauge: 18 sc x 20 rows = 4 inches (10 cm) after light blocking
Mesh gauge: 6 mesh windows x 10 rows = 4 inches (10 cm)
Make a swatch, block it lightly, and measure. Match both stitch and row gauge before starting. If your gauge is off, adjust your hook size up or down.
Abbreviations and Stitch Definitions
This pattern uses US crochet terms. If you’re working from UK terms, remember that US single crochet (sc) equals UK double crochet (dc), and US double crochet (dc) equals UK treble.
Special Stitches and Techniques
These techniques appear throughout the pattern. Read through them before you begin so nothing catches you off guard.
Mesh Increase Row
Chain 1, work 2 single crochet (sc) in the first stitch, work mesh across the row, chain 1 and skip the stitch before the last stitch, then work 2 sc in the last stitch. Each mesh increase row adds 2 stitches to your total count.
Corded Chain
Chain the stated length. Working back along the chain, slip stitch (sl st) in the back bump of each chain. Fasten off, leaving tails for tassels. This creates a firm, rope-like cord.
Ring Join
Insert your hook through the metal ring and the next crochet edge stitch at the same time. Pull up a loop, yarn over, and pull through both loops. This anchors the ring with one sc and keeps it secure.
Tassel
Wrap yarn 14 times around a 3-inch (7.5 cm) piece of cardboard or similar object. Tie the top tightly, cut the lower loops, wrap a "neck" about 0.5 inch (1.25 cm) below the top, and trim the ends even.
Left-handed note: Work the same instructions. Your cups and lacing will mirror naturally. Place the first side ring set on whichever side feels most comfortable to you, then repeat on the opposite side.
Cup Instructions (Make 2)
Each cup is worked from the upper point downward. The chain 1 at the beginning of rows does not count as a stitch. Keep your first and last 2 stitches firm so the cup edges don’t flare outward.
| Row | Instruction | Count |
|---|---|---|
| 1 | Ch 2, 3 sc in 2nd ch from hook. Turn. | 3 sc |
| 2 | Ch 1, 2 sc in first st, sc in next st, 2 sc in last st. Turn. | 5 sc |
| 3 | Mesh increase row across. Turn. | 7 sts |
| 4 | Ch 1, 2 sc in first st, sc across to last st, 2 sc in last st. Turn. | 9 sc |
| 5 | Mesh increase row across. Turn. | 11 sts |
| 6 | Solid increase row as Row 4. Turn. | 13 sc |
| 7 | Mesh increase row across. Turn. | 15 sts |
| 8 | Solid increase row as Row 4. Turn. | 17 sc |
| 9 | Mesh increase row across. Turn. | 19 sts |
| 10 | Solid increase row as Row 4. Turn. | 21 sc |
| 11 | Mesh increase row across. Turn. | 23 sts |
| 12 | Solid increase row as Row 4. Turn. | 25 sc |
| 13 | Mesh increase row across. Turn. | 27 sts |
| 14 | Solid increase row as Row 4. Turn. | 29 sc |
| 15 | Mesh increase row across. Turn. | 31 sts |
| 16 | Solid increase row as Row 4. Do not fasten off after second cup. | 33 sc |
Cup Checkpoint
After Row 16, each cup should measure approximately 7 inches (18 cm) across the lower edge and 6.25 inches (16 cm) from the top point to the lower center before edging. If your measurements are significantly different, check your gauge.
Cup Edging and Center Join
Work this edging around each cup before joining the band.
1. With the right side (RS) facing, sc evenly along the first side edge: work 2 sc around each row-end sc for 30 sc total.
2. At the top point: ch 3, sl st into the first ch to form a tiny tie loop, then work 1 sc in the same point.
3. Sc evenly down the second side edge: 30 sc total.
4. Work 33 sc across the lower edge, placing 1 sc in each Row 16 stitch. Join with a sl st to the first edging sc. Fasten off the first cup only.
Edging count per cup: 30 side sc + top loop + 30 side sc + 33 lower sc = 93 sc (not counting the ch-3 loop).
Place both cups side by side with lower edges aligned and top points leaning outward. The inner lower corners should touch at the center front.
Underbust Band
With the right side facing, join yarn at the outer lower corner of the left cup.
| Step | Instruction | Count |
|---|---|---|
| Band Row 1 | Sc in each of 33 lower-edge sts across left cup, ch 2 for center bridge, sc in each of 33 lower-edge sts across right cup. Turn. | 68 sts |
| Band Row 2 | Ch 1, sc in each st and ch across. Turn. | 68 sc |
| Band Rows 3-6 | Ch 1, sc in each st across. Turn after Rows 3-5 only. | 68 sc each row |
| Bottom edge | Ch 1, reverse sc or standard sc across the lower edge for a firm finish. Fasten off. | 68 sts |
Band Checkpoint
The band should measure approximately 15 inches (38 cm) wide and 1.2 inches (3 cm) tall. The center bridge should sit flat without pulling the cups inward.
Side Ring Panels
This is where those silver rings come into play. They create the decorative lace-up detail on each side.
1. Mark three ring positions on each side edge: lower band corner, midpoint, and upper side cup edge.
2. For each ring: work a ring join over 3 adjacent edge stitches, ch 1, turn, and sc 3 back toward the body. Fasten off and weave in ends.
3. Repeat until there are 3 rings on each side, aligned vertically for cross lacing.
Cords, Lacing, and Tassels
Halter Tie
Make one corded chain 46 inches (117 cm) long. Thread it through both top loops and tie behind the neck. Add one tassel to each end.
Side Laces
Make two corded chains, each 30 inches (76 cm) long. Starting at the lower ring, weave each cord upward in a crisscross pattern through the three rings on one side. Tie a bow at the lower or middle ring. Add tassels to both ends.
Finishing Your Bralette
Almost done! Take your time with these final steps for a polished result.
Care Instructions
Your handmade bralette deserves gentle care:
Size Customization Tips
Want to adjust the fit? Here’s how:
Troubleshooting Common Issues
| Issue | Fix |
|---|---|
| Cup ruffles at edges | Use a smaller hook on edging or work fewer sc along row ends |
| Cup feels too shallow | Add 2 more rows before edging; keep the same increase logic |
| Mesh looks stretched | Use cotton with less drape, or tighten side lacing less aggressively |
| Band curls | Add one more bottom-edge sc row, then block flat |
| Rings twist | Secure each ring join with a small hidden stitch after blocking |
Final Thoughts on This Crochet Bralette Pattern
This Coastal Blue Crochet Bralette is the kind of project that feels incredibly satisfying to complete. The combination of mesh texture, silver ring details, and handmade tassels creates a piece that looks like it came from a boutique. Wear it as a summer top, layer it under a cardigan, or pair it with high-waisted jeans for a festival-ready look. However you style it, you made this with your own hands, and that’s something special.
Thank you so much for choosing this pattern. I genuinely hope you love making it as much as I loved designing it. When you finish yours, I’d love to see it! Share your photos on Instagram or Facebook and tag me so I can admire your work.
If this pattern caught your eye, go ahead and save it to your Pinterest boards so you can find it when you’re ready to cast on. And if you make this bralette, please drop a comment below. I love hearing about your yarn choices, any modifications you made, and how the finished piece turned out. Happy crocheting!
Want a Quick & Easy Printable Version?
Get a clean, beautifully formatted PDF of this pattern — easy to follow step by step, ready to print or save on any device. No scrolling, no distractions, just the pattern.
Get the Printable PDF →