
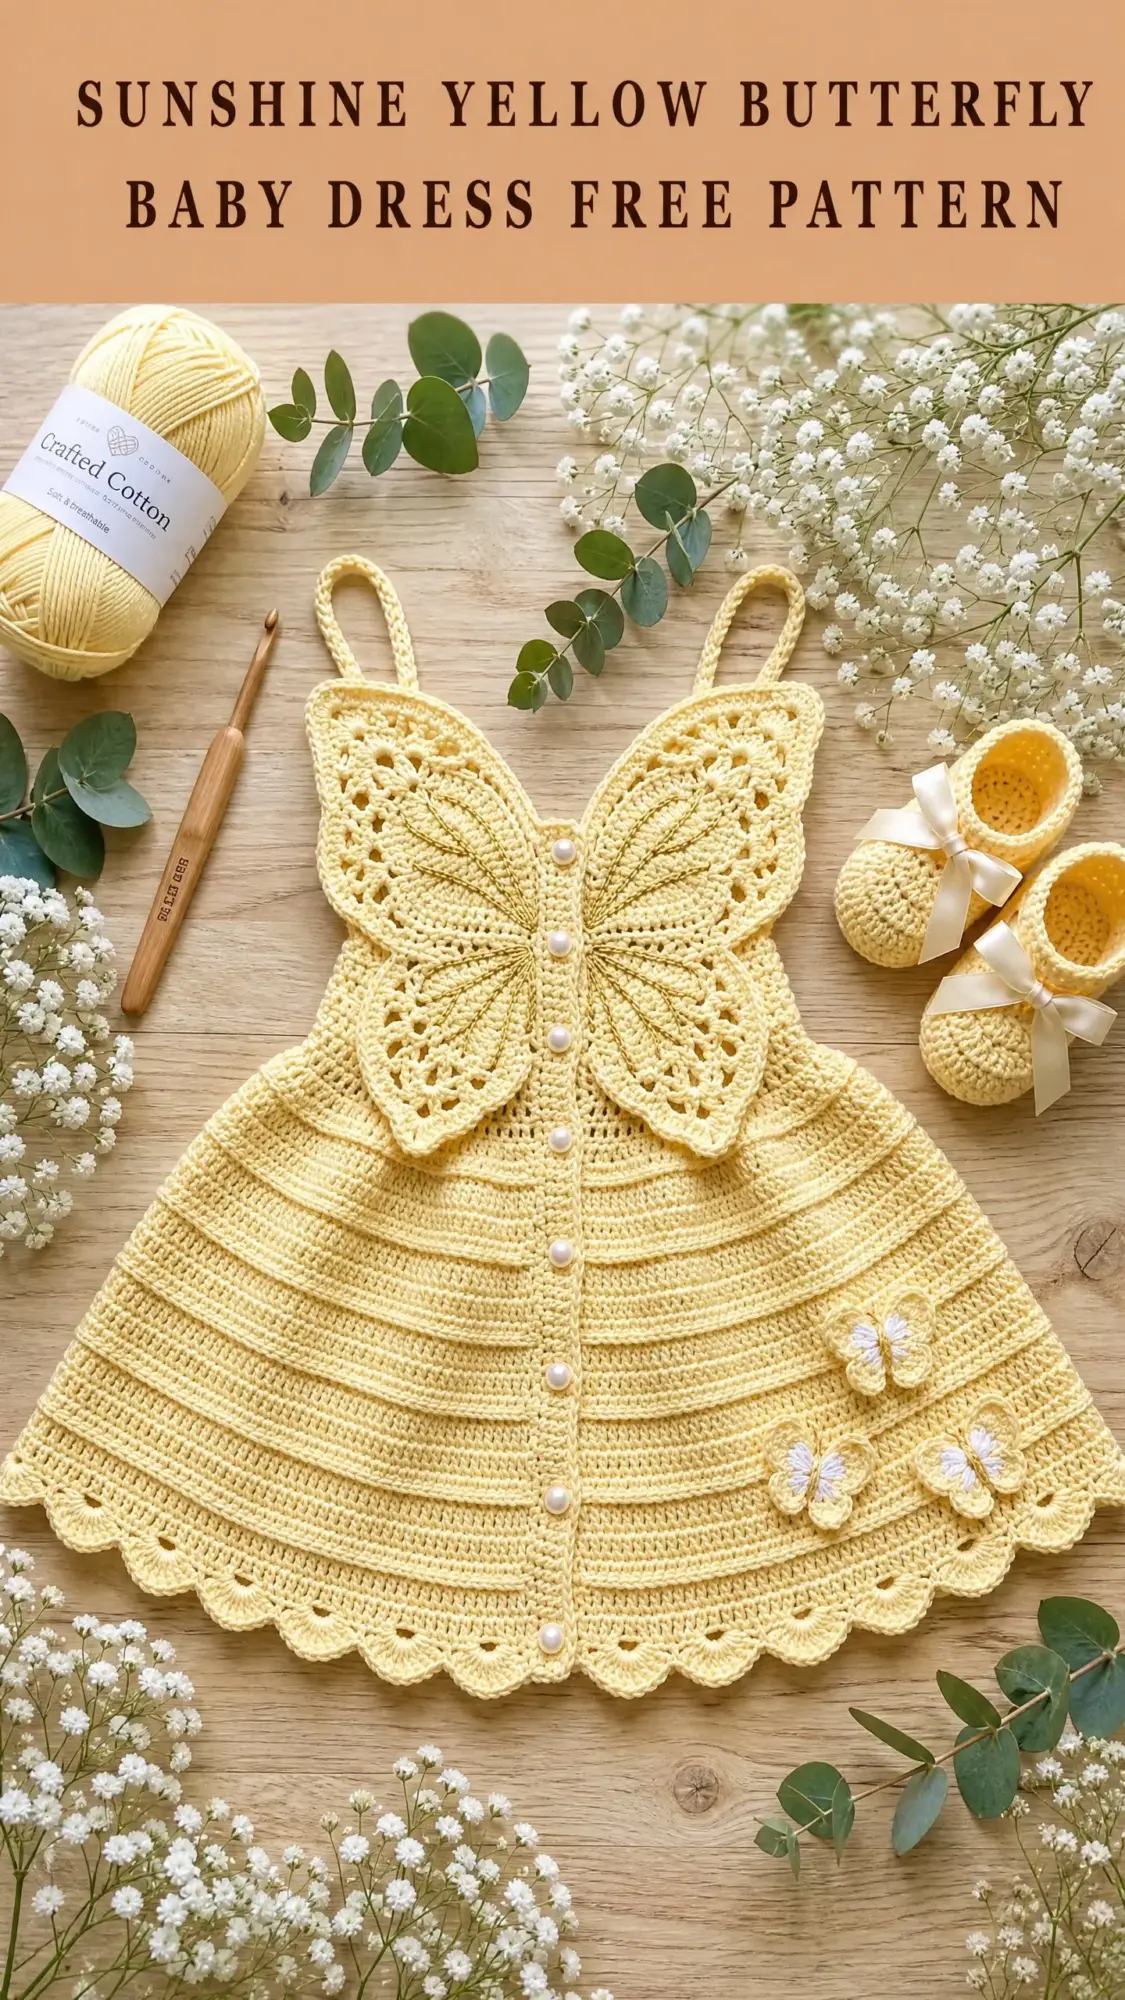
Looking for a show-stopping handmade gift for a new baby? This butterfly baby dress delivers on every level. The dramatic butterfly bodice forms the front bib and shoulder straps all in one piece, while the tiered skirt flows beautifully with a scalloped shell border at the hem.
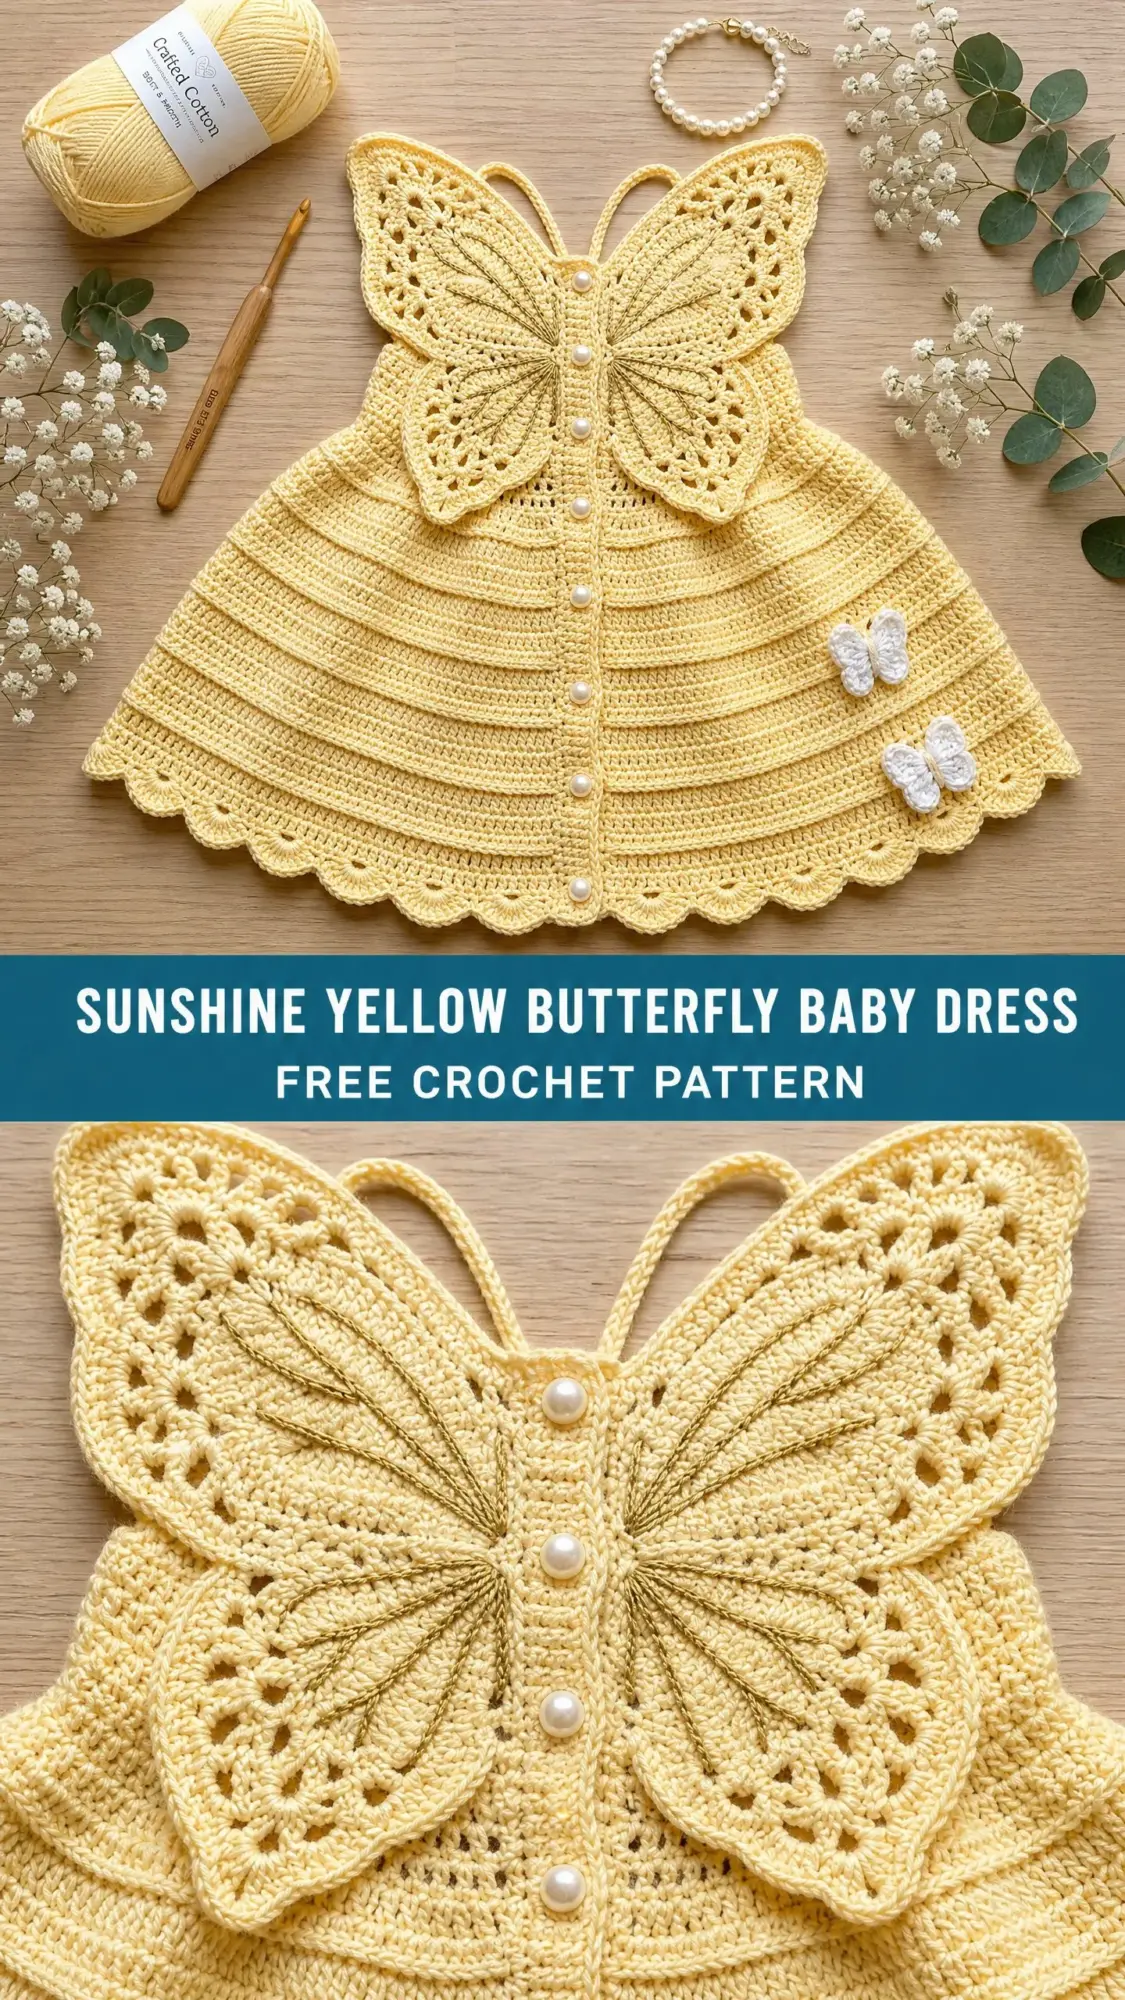
This pattern uses double crochet, single crochet, and basic lace techniques to create something truly special. The construction moves from the butterfly medallion at the top down through the skirt, making it easier to try on as you go. Matching booties with ribbon bows complete the set perfectly.
Whether you are making this for a baby shower, a christening, or a special first birthday, this dress works up in about 13 to 20 hours total. It sits at an advanced beginner to intermediate skill level. If you have completed at least one lace motif or medallion before, you will handle this project beautifully.
Why This Butterfly Baby Dress Pattern Works
The genius of this design is how the large butterfly serves double duty. It creates that stunning visual centerpiece while also forming the practical bodice structure. The wings spread out to cover the chest, and the body of the butterfly anchors right at the waist where the skirt begins.
The skirt uses a tiered construction with alternating texture rows. Those back loop only rows create subtle ridges that catch the light and add visual interest without complicated stitch work. Pearl buttons run down the center back opening, making diaper changes manageable while looking absolutely elegant.
Small applique butterflies on the lower skirt echo the large bodice butterfly, creating a cohesive design that looks professionally made. The whole effect is heirloom quality, the kind of dress that gets passed down through generations.
Skill Level and Time Investment
I want to be honest with you about what this pattern requires. The skirt itself is straightforward. Basic stitches, simple increases, nothing tricky. The butterfly bodice is where you will need to focus.
Working from a center ring outward in a medallion style takes concentration. You will be reading lace motifs with chain spaces and shaping wings symmetrically. If that sounds intimidating, take a breath. The pattern walks you through every single step with clear stitch counts at the end of each row.
Time breakdown:
Plan for a weekend project if you have solid chunks of time, or spread it across a week or two of evening sessions.
Finished Measurements
This pattern is written for three sizes:
Newborn to 3 months: chest 14 inches (35.5 cm), length bodice to hem 11 inches (28 cm)
3 to 6 months: chest 16 inches (40.5 cm), length 12.5 inches (31.75 cm)
6 to 12 months: chest 18 inches (45.75 cm), length 14 inches (35.5 cm)
The written instructions follow size 3 to 6 months throughout, with adjustments for other sizes noted in parentheses where they differ: (newborn/3M, 3-6M, 6-12M).
Booty foot length measures 3.5 inches (9 cm) for all sizes.
Materials Needed for This Crochet Baby Dress
Yarn: Size 3 light DK or light worsted weight cotton yarn, approximately 350 (300, 400) yards or 320 (275, 365) meters in pale yellow. You will also need about 20 yards (18 meters) of white for the applique butterfly detail lines.
Hooks:
Notions:
Recommended Yarn Options
Lion Brand 24/7 Cotton in Buttercup: This 100 percent mercerized cotton at DK weight gives excellent stitch definition for the lace butterfly wings. Machine washable. Two skeins cover the dress, one skein covers the booties with yarn to spare.
Paintbox Yarns Simply DK in Banana Cream: A 100 percent premium acrylic at 137 yards per skein. Very soft against baby skin, colorfast, machine washable and dryable. Three skeins for the dress set.
Drops Safran in color 07 (yellow): A cotton-polyamide blend at DK weight, 175 yards per skein. The polyamide adds durability and a slight sheen appropriate for a special occasion dress.
Substitution note: Choose a smooth, tightly plied yarn with good stitch definition so the butterfly wing lace reads clearly. Avoid fuzzy or bouclé yarns. Your yarn must be 100 percent cotton or a cotton blend of at least 60 percent cotton for the drape this skirt requires.
Gauge Information
Getting gauge right matters more than usual here because the butterfly bodice size determines how the entire dress fits.
Bodice hook E-4 (3.5 mm):
18 single crochet (sc) x 20 rows = 4 inches x 4 inches (10 cm x 10 cm) in single crochet
Skirt hook F-5 (3.75 mm):
16 sc x 18 rows = 4 inches x 4 inches (10 cm x 10 cm) in single crochet
One 6-dc shell over 6 stitches = approximately 1.5 inches (3.8 cm) wide
Take time to swatch. Even a small gauge deviation significantly affects the butterfly bodice size.
Abbreviations and Stitch Definitions
Let me walk you through every abbreviation you will encounter. I define each one with a plain English explanation so you never feel lost.
beg = beginning
BLO = back loop only (insert your hook through only the back loop of the stitch, leaving the front loop unworked)
bo = bobble (see Special Stitches below)
ch = chain
ch-sp = chain space (the gap created by a chain in the previous row)
dc = double crochet (yarn over, insert hook, pull up loop, yarn over, pull through 2 loops, yarn over, pull through remaining 2 loops)
dc2tog = double crochet two together, a decrease that joins two stitches into one
hdc = half double crochet
inc = increase (2 sc in the same stitch)
lp(s) = loop(s)
MC = main color (pale yellow)
pm = place marker
rep = repeat
rnd = round
RS = right side
sc = single crochet (insert hook, pull up loop, yarn over, pull through both loops)
sc2tog = single crochet two together, a decrease
sk = skip
sl st = slip stitch
sm = slip marker
sp = space
st(s) = stitch(es)
tch = turning chain
tr = treble crochet
WS = wrong side
yo = yarn over
Special Stitches for This Pattern
Shell: Work 6 dc all in the same stitch or space. This forms one shell unit used in the hem border.
Picot: Ch 3, sl st in first ch made. Used in butterfly wing edging to create those delicate points.
3-dc Bobble (bo): Yo, insert hook in indicated st, yo, pull up a loop, yo, pull through 2 loops (2 loops remain on hook). Yo, insert hook in same st, yo, pull up a loop, yo, pull through 2 loops (3 loops on hook). Yo, insert hook in same st, yo, pull up a loop, yo, pull through 2 loops (4 loops on hook). Yo, pull through all 4 loops. One bobble made.
V-stitch (V-st): Work (dc, ch 2, dc) all in the same stitch or space.
Foundation single crochet (FSC): This technique creates a row of sc with a built-in foundation chain, eliminating the stiff starting chain common in cotton garments. Make a slip knot and place on hook. Ch 2. Insert hook in 2nd ch from hook, yo and pull up a loop (2 lps on hook), yo and pull through 1 lp (chain made), yo and pull through both lps (sc made). For each subsequent FSC: insert hook under the 2 strands of the chain bottom of the previous st, yo and pull up a loop, yo and pull through 1 loop, yo and pull through both loops.
Pattern Notes Before You Begin
Read these notes carefully. They will save you confusion later.
1. The butterfly bodice is worked flat as a medallion beginning from a magic ring. Upper wings are worked first, then lower wings are shaped from the same center. Antennae are crocheted chains attached at the center top.
2. The skirt is worked in joined rounds from the bodice waist edge downward. The back center remains open for button closure and is worked back and forth in rows after establishing the round.
3. All turning chains in sc rows count as 0 stitches (do not count as a stitch). All turning chains in dc rows count as 1 dc.
4. Pearl buttons are sewn to the left back band (as worn). Button loops are formed by ch-3 spaces built into the right back band during finishing.
5. Stitch counts in parentheses at the end of each row or round reflect the total number of working stitches in that row or round, not counting turning chains.
6. The bodice butterfly works best if blocked flat before attaching to the skirt. Pin to measurements and mist with water, or wet block for cotton. Allow to dry fully.
7. The two small applique butterflies for the skirt hem are worked identically to the large bodice butterfly but stopping after Round 5 of the wing sequence.
8. Right side and wrong side matter for this garment. Mark the right side of the butterfly with a locking stitch marker on Round 1.
9. Size adjustments for the skirt: add or subtract 6 stitches per tier for each size step, and add or subtract one full tier row for length.
Crochet Pattern Instructions
Section 1: Large Butterfly Bodice
The bodice butterfly serves as both the decorative front bib and the shoulder straps. Work with hook E-4 (3.5 mm) and MC throughout this section.
Starting at center body of butterfly:
Rnd 1 (RS): Make a magic ring. Ch 3 (counts as dc), 11 dc in ring, sl st to top of beg ch-3 to join. Pull ring closed. (12 dc)
Rnd 2: Ch 3 (counts as dc), dc in same st, 2 dc in each st around, sl st to join. (24 dc)
Rnd 3: Ch 3 (counts as dc), dc in same st, dc in next st, (2 dc in next st, dc in next st) rep around, sl st to join. (36 dc)
Rnd 4: Ch 1 (does not count as st), sc in same st, (ch 3, sk 2 sts, sc in next st) rep around, end ch 3, sl st to first sc to join. (12 ch-3 spaces)
Rnd 5: Sl st into first ch-3 sp, ch 3 (counts as dc), 4 dc in same sp, ch 1, (5 dc in next ch-3 sp, ch 1) rep around, sl st to top of beg ch-3 to join. (12 groups of 5 dc with ch-1 between, total 60 dc plus 12 ch-1 sps)
Rnd 6: Sl st to center (3rd) dc of first 5-dc group, ch 1, sc in same st, (ch 5, sc in center dc of next 5-dc group) rep around, ch 5, sl st to first sc to join. (12 sc and 12 ch-5 loops)
This completes the center butterfly body medallion. Do not fasten off.
Wing Orientation Guide
Hold the medallion with the magic ring tail at bottom. Number the 12 ch-5 loops clockwise beginning at the top: loops 1 through 12.
Upper Right Wing
Attach yarn with sl st to the sc between loop 12 and loop 1.
Row 1 (RS): Ch 4 (counts as tr), work (tr, ch 2, 2 tr) in same sc junction point (this is the wing inner point), ch 3, sc in loop 1, ch 3, sc in loop 2, ch 3, turn. (2 anchor sc, ch-3 bridges)
Row 2 (WS): Ch 1, sc in first sc, ch 3, sc in next sc, ch 3, (2 tr, ch 2, 2 tr) in ch-2 sp (shell tip), ch 3, sc in same junction sc as Row 1 base, ch 1, turn. (expanding lace frame)
Row 3 (RS): Sc in first sc, ch 3, (sc, ch 3, sc) in ch-2 sp, ch 3, sc in next sc, ch 3, sc in next sc, ch 3, sc in last sc, turn. (5 ch-3 arches)
Row 4 (WS): Ch 1, (sc in sc, ch 3) rep across to ch-2 arch, (2 dc, ch 2, 2 dc) in ch-2 arch sp (wingtip shell grows), (ch 3, sc) rep to end, turn. (6 ch-3 arches plus wingtip)
Row 5 (RS): Ch 4 (counts as tr), tr in same sc, ch 3, sc in next ch-3 sp, (ch 3, sc in next sp) 3 times, ch 3, (tr, ch 3, tr, ch 3, tr) in ch-2 sp (upper wingtip spread), ch 3, sc in next sp, ch 3, sc in next sp, ch 3, (2 tr) in end sc, turn. (widest wing row)
Row 6 (WS): Ch 1, sc between the 2 tr, ch 3, sc in next sp, ch 3, sc in next sp, ch 3, sk 1 tr, (sc, picot, sc) in next tr, ch 3, sk 1 tr, sc in next sp, ch 3, sc in next sp, ch 3, sc in next sp, ch 3, sc between 2 tr, turn. (7 ch-3 arches plus 1 picot at tip)
Row 7 (RS): Ch 1, sc in sc, (ch 3, sc in next sp) twice, ch 3, sc in next sp, ch 3, sc before picot, (sc, picot, sc) in picot sp, sc after picot, (ch 3, sc) rep 4 times, sc in last sc. Fasten off. (wing complete, picot at top outer curve)
Upper Left Wing
Work Rows 1 through 7 as mirror of upper right wing, beginning at the sc between loop 12 and loop 11. All left/right references reversed. Where Row 1 worked into loops 1 and 2, now work into loops 12 and 11. Fasten off.
Lower Right Wing
The lower wings are slightly smaller and more rounded than the upper wings.
Attach yarn to sc between loops 6 and 7 on the medallion.
Row 1 (RS): Ch 3 (counts as dc), (dc, ch 2, 2 dc) in same sc junction, ch 3, sc in loop 7, ch 3, sc in loop 8, ch 3, turn.
Row 2 (WS): Ch 1, sc in first sc, ch 3, sc in next sc, ch 3, (2 dc, ch 2, 2 dc) in ch-2 sp, ch 1, turn.
Row 3 (RS): Sc in sc, ch 3, (sc, ch 3, sc) in ch-2 sp, ch 3, sc in next sc, ch 3, sc in last sc, turn. (4 ch-3 arches)
Row 4 (WS): Ch 1, sc in sc, ch 3, sc in next sp, ch 3, (2 dc, ch 2, 2 dc) in ch-2 sp, ch 3, sc in next sp, ch 3, sc in last sc, turn.
Row 5 (RS): Ch 3 (counts as dc), dc in same sc, ch 3, sc in sp, ch 3, (sc, picot, sc) in ch-2 sp, ch 3, sc in sp, ch 3, 2 dc in last sc. Fasten off. (lower right wing complete with picot tip)
Lower Left Wing
Work as mirror of lower right wing using loops 9 and 10. Fasten off.
Antennae
Attach yarn to the top of the center between the two upper wings at the junction sc. Ch 18, sl st back down ch to form first antenna, ch 18, sl st back down to form second antenna. Fasten off. Curl tips slightly and tack with a small knot.
Bodice Butterfly Waist Edge
The bottom of the butterfly medallion (loops 3, 4, 5, 6 on the right, and their mirror on the left) form the waist joining edge.
With RS facing, attach yarn at loop 3 bottom.
Waist Row 1: Ch 1, work 3 sc in each of loops 3, 4, 5, 6, 9, 10, 11, 12 (the 8 lower bridge loops), sc evenly across any junction sc between loops, aiming for a total of 72 (66, 72, 78) sc across the waist edge, turn. (72 sc for 3-6M)
Waist Row 2: Ch 1, sc in each sc across, turn. (72 sc)
Waist Row 3: Ch 1, sc in each sc across. Do not fasten off. Set butterfly aside.
Checkpoint 1: The butterfly bodice should measure approximately 7 inches (17.75 cm) wide at the widest wing span and approximately 5 inches (12.75 cm) tall from the antenna tips to the waist edge. Block the butterfly now and allow to dry before continuing.
Section 2: Shoulder Straps
Each strap is formed by a narrow length of sc rows attached to the upper inner corners of the upper wings.
Right Strap:
With RS facing, attach yarn at the inner junction point of the upper right wing (where wing meets body, near loop 1).
Row 1: Ch 1, sc in each of next 4 sts along wing inner edge, turn. (4 sc)
Rows 2 through 14: Ch 1, sc across, turn. (4 sc each row)
After Row 14, the strap should measure approximately 3 inches (7.5 cm). Adjust length by adding or subtracting rows of 4 sc each.
Row 15 (button loop): Ch 1, sc in first sc, ch 2, sk 2 sc, sc in last sc, turn. (creates button loop)
Row 16: Ch 1, sc in sc, 2 sc in ch-2 sp, sc in sc. Fasten off. (4 sc)
Left Strap: Work identically to right strap on left wing inner junction, omitting button loop (left strap attaches smoothly to back, buttons on right strap meet button loops on back band).
Checkpoint 2: Each strap should measure 3 inches (7.5 cm) long and 0.75 inches (2 cm) wide.
Section 3: Skirt Body
Switch to hook F-5 (3.75 mm). The skirt is worked back and forth in rows to maintain the center back opening for buttons.
Pick up along the waist edge of the butterfly bodice. With RS facing, join yarn at right back edge of waist.
Tier 1 (Waist and Upper Skirt)
Foundation Row: Ch 1, sc across all 72 (66, 72, 78) waist sts. (72 sc)
Row 1 (increase row): Ch 1, (sc in next 3 sc, 2 sc in next sc) rep across, end sc in rem sc. For 72 sc: 18 increases spaced evenly. (90 sc)
Row 2: Ch 1, sc in BLO of each sc across. (90 sc)
Row 3: Ch 3 (counts as dc), dc in each st across. (90 dc)
Row 4: Ch 3 (counts as dc), dc in each dc across. (90 dc)
Row 5 (texture ridge): Ch 1, sc in BLO of each dc across. (90 sc)
Row 6: Ch 1, sc in each sc across. (90 sc)
Row 7 (increase row): Ch 1, (sc in next 4 sc, 2 sc in next sc) rep across, end with any rem sc. 18 increases. (108 sc)
Row 8: Ch 1, sc in BLO of each sc across. (108 sc)
Row 9: Ch 3, dc in each st across. (108 dc)
Row 10: Ch 3, dc in each dc across. (108 dc)
Row 11 (texture ridge): Ch 1, sc in BLO of each dc across. (108 sc)
Row 12: Ch 1, sc in each sc across. (108 sc)
Checkpoint 3: After Tier 1, the skirt from waist to current row should measure approximately 3 inches (7.5 cm) deep. Width should be approximately 22 inches (56 cm) across the 108 sc when flat.
Tier 2
Row 13 (increase row): Ch 1, (sc in next 5 sc, 2 sc in next sc) rep across. 18 increases. (126 sc)
Row 14: Ch 1, sc in BLO of each sc across. (126 sc)
Row 15: Ch 3, dc in each st across. (126 dc)
Row 16: Ch 3, dc in each dc across. (126 dc)
Row 17 (texture ridge): Ch 1, sc in BLO of each dc across. (126 sc)
Row 18: Ch 1, sc in each sc across. (126 sc)
Row 19 (increase row): Ch 1, (sc in next 5 sc, 2 sc in next sc) rep across. 21 increases. (147 sc)
Row 20: Ch 1, sc in BLO of each sc across. (147 sc)
Row 21: Ch 3, dc in each st across. (147 dc)
Row 22: Ch 3, dc in each dc across. (147 dc)
Row 23 (texture ridge): Ch 1, sc in BLO of each dc across. (147 sc)
Row 24: Ch 1, sc in each sc across. (147 sc)
Checkpoint 4: After Tier 2, skirt depth should measure approximately 6 inches (15 cm) from waist. Width across flat piece approximately 29 inches (73.5 cm).
Tier 3 (Lower Skirt, Pre-Border)
Row 25 (increase row): Ch 1, (sc in next 6 sc, 2 sc in next sc) rep across. 21 increases. (168 sc)
Row 26: Ch 1, sc in BLO of each sc across. (168 sc)
Row 27: Ch 3, dc in each st across. (168 dc)
Row 28: Ch 3, dc in each dc across. (168 dc)
Row 29 (texture ridge): Ch 1, sc in BLO of each dc across. (168 sc)
Row 30: Ch 1, sc in each sc across. (168 sc)
Row 31 (increase row): Ch 1, (sc in next 6 sc, 2 sc in next sc) rep across. 24 increases. (192 sc)
Row 32: Ch 1, sc in BLO of each sc across. (192 sc)
Row 33: Ch 3, dc in each st across. (192 dc)
Row 34: Ch 3, dc in each dc across. (192 dc)
Row 35 (texture ridge): Ch 1, sc in BLO of each dc across. (192 sc)
Row 36: Ch 1, sc in each sc across. (192 sc)
Checkpoint 5: Total skirt depth at this point should measure approximately 9.5 inches (24 cm) from waist. Width across flat piece approximately 38 inches (96.5 cm).
Scallop Hem Border
The hem border uses a shell pattern. 192 sts divides evenly by 6, giving 32 shell repeats.
Row 37 (shell setup row): Ch 1, (sc in first sc, ch 2, sk 2 sc, shell in next sc, ch 2, sk 2 sc) rep across, end sc in last sc. 32 shells. (32 shells plus 33 sc)
Row 38 (scallop picot row): Ch 1, sc in first sc, ch 2, (sc in first dc of shell, dc in next dc, (dc, ch 2, dc) in center dc of shell, dc in next dc, sc in last dc of shell, ch 2, sc between shells) rep across. End ch 2, sc in final sc. Fasten off.
Checkpoint 6: Total dress length from butterfly waist to hem tip of scallops should measure 12.5 inches (31.75 cm) for size 3 to 6 months.
Section 4: Back Band and Button Closure
Right Back Band:
With RS facing, attach yarn at top right back corner of skirt opening.
Row 1: Ch 1, sc evenly down right back edge, approximately 1 sc per row of sc rows and 1 sc per dc row, total approximately 48 sc down the back edge. Turn. (48 sc)
Row 2: Ch 1, sc in each sc across. Fasten off.
Left Back Band (button loop band):
Row 1: With RS facing, attach yarn at bottom left back corner. Ch 1, sc evenly up left back edge to match, approximately 48 sc. Turn. (48 sc)
Row 2 (button loops): Ch 1, sc in first 3 sc, (ch 3, sk 2 sc, sc in next 5 sc) rep 7 times, ch 3, sk 2 sc, sc in last sc. Turn. (8 ch-3 button loops)
Row 3: Ch 1, sc in each sc and 3 sc in each ch-3 sp across. Fasten off. (72 sc approximate)
Sew 8 pearl buttons to right back band at positions corresponding to button loops. Space buttons evenly, beginning 1 inch (2.5 cm) from top and ending 1 inch (2.5 cm) from hem. Additional pearl buttons (2 to 4) are sewn decoratively down the center front of the butterfly body for embellishment only.
Section 5: Small Applique Butterflies (Make 2)
Work identically to the large butterfly bodice medallion Rounds 1 through 5 for the body. Then work the upper and lower wings through Row 3 only (stopping before the wingtip spread rows) for a compact butterfly approximately 2 inches (5 cm) wide.
With white yarn and tapestry needle, embroider simple radiating lines on the wings to suggest wing veining, matching the large butterfly bodice.
Attach one small butterfly applique to the lower right skirt area, approximately 3 inches (7.5 cm) up from the hem and 3 inches (7.5 cm) from center front. Attach second small butterfly 1.5 inches (3.8 cm) below and 0.75 inches (2 cm) to the right of the first, creating a flight cascade effect.
Section 6: Booties (Make 2)
Use hook F-5 (3.75 mm) and MC.
Sole
Work FSC: make 10 FSC. (10 sc)
Rnd 1: Work in the round around the FSC strip. 3 sc in first FSC (toe), sc in next 8 FSC, 3 sc in last FSC (heel), sc in next 8 FSC along opposite side of foundation. Sl st to join. (22 sc)
Rnd 2: Ch 1, 2 sc in first sc, 2 sc in next sc, 2 sc in next sc (3 increases at toe), sc in next 8 sc, 2 sc in each of next 3 sc (3 increases at heel), sc in next 8 sc, sl st to join. (28 sc)
Rnd 3: Ch 1, sc in each sc around, sl st to join. (28 sc)
Upper Foot
Rnd 4: Ch 3 (counts as dc), dc in each sc around, sl st to top of ch-3 to join. (28 dc)
Rnd 5: Ch 1, sc in each dc around, sl st to join. (28 sc)
Toe Shaping
Rnd 6: Ch 1, sc in first 10 sc, (sc2tog) 4 times across center toe 8 sts, sc in last 10 sc, sl st to join. (24 sc)
Rnd 7: Ch 1, sc in first 10 sc, (sc2tog) twice across center 4 sts, sc in last 10 sc, sl st to join. (22 sc)
Ankle Cuff
Rnd 8: Ch 3, dc in each sc around, sl st to join. (22 dc)
Rnd 9: Ch 1, sc in each dc around, sl st to join. (22 sc)
Rnd 10: Ch 3, (dc, ch 1, sk 1 sc, dc in next sc) rep around, sl st to join. (11 dc-ch-1 groups plus 11 dc, total 22 dc)
Rnd 11 (scallop cuff): Ch 1, (sc in dc, sc in ch-1 sp, sc in dc, shell in next dc) rep around, sl st to join. This row creates 5 to 6 small scallops around the ankle opening. Fasten off.
Weave ribbon through the ch-1 spaces of Rnd 10, beginning and ending at center front, and tie