
I don’t know about you, but I absolutely melt when I see a tiny crocheted dress with delicate lace details. There’s just something about a handmade baby garment that store-bought clothes can never replicate.

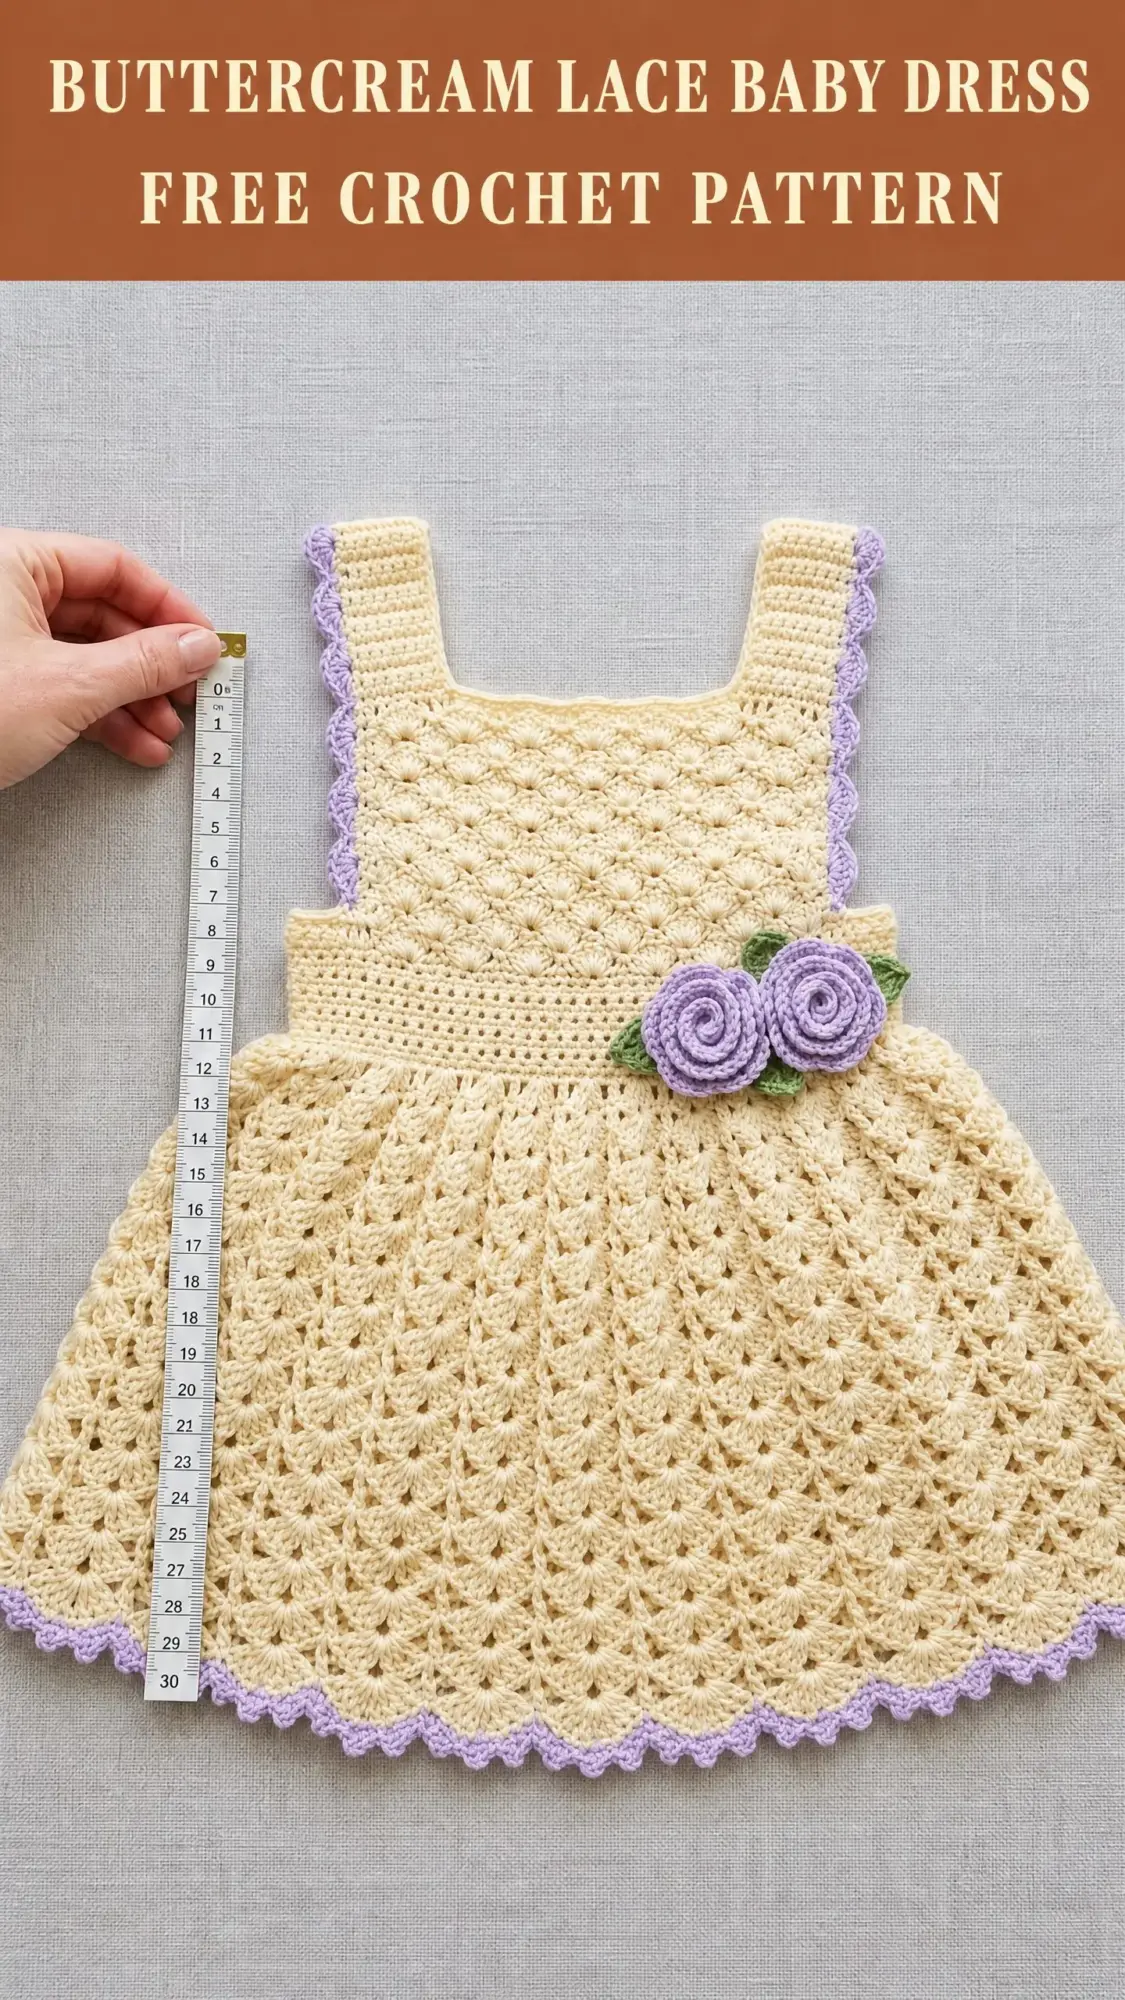
This buttercream lace baby dress captures that vintage, heirloom quality we all dream about creating. The soft cream-yellow paired with lavender edging and those sweet little roses at the waist? Pure perfection for a special occasion or photo session.
If you’ve been wanting to try garment construction but felt intimidated, this is your sign to go for it. I’ll walk you through every single step, from the fitted bodice to the flared lace skirt, with plenty of checkpoints along the way to make sure you’re on track.
About This Crochet Pattern
This gorgeous baby dress features a fitted bodice worked in a small shell stitch pattern, a gathered A-line skirt worked in an elegant fan stitch, and wide straps with delicate picot edging in a contrasting lavender color. Two adorable crocheted spiral roses with leaves sit at the waist as the perfect finishing touch.
The construction method is top-down, which means you work the bodice panels first, join them at the sides, then work the skirt in the round from the waist downward. This approach lets you try the dress on your little one (or a similar-sized doll) as you go to check the fit.
Skill Level: Intermediate. You should be comfortable working flat rows, joining pieces, working in the round, and following stitch pattern repeats. If you’ve completed at least two garment projects before, you’ll do great with this one.
Time Estimate: Plan for about 10 to 16 hours of work, depending on your speed and how long the finishing details take you.
Finished Measurements
This pattern is written for a 3 to 6 month infant with approximate body measurements of 16 inches chest circumference and 12 inches from shoulder to desired hem length.
Your finished dress will measure:
Materials Needed
Yarn:
Yarn Suggestions:
Hook: US size E-4 (3.5 mm) crochet hook
Notions:
Gauge
Getting gauge right is critical for this garment to fit properly. Please take time to swatch before you begin.
In Small Shell Stitch pattern (bodice):
16 stitches and 10 rows = 4 inches / 10 cm
In Fan Stitch pattern (skirt):
One complete fan repeat (11 stitches) = 2.75 inches / 7 cm
6 rows = 2.5 inches / 6.35 cm
If your stitches are too big, try going down a hook size. If they’re too small, go up a hook size. Keep swatching until you match.
Abbreviations and Stitch Definitions
Let me break down every abbreviation you’ll see in this pattern:
Special Stitches
Small Shell (used in bodice)
Work (2 dc, ch 1, 2 dc) all into the same stitch or chain space. This creates a small shell of 4 double crochet stitches with a chain-1 space at the center. Think of it as a little fan shape.
Fan Stitch (used in skirt)
Work (dc, ch 1, dc, ch 1, dc, ch 1, dc, ch 1, dc) all into the same stitch or chain space. This is a 5-dc fan with ch-1 spaces between each double crochet. The result is a beautiful scalloped lace effect.
Picot Edging
Work 1 sc into the indicated stitch. Chain 3. Work 1 sl st into the first of those 3 chains (back into the base of the ch-3). This creates a small decorative bump. Continue along the edge as directed.
Spiral Rose
With CC, chain 36. Starting in the 2nd chain from hook, work (sc, hdc, 2 dc) into each of the first 3 chains. Then work (sc, hdc, 2 dc) into every group of 4 chains across. Leave a long tail. Roll the strip tightly from one end to the other, coiling it into a spiral rose shape. Use the tail to stitch through the base of the coil several times to secure.
Leaf
With green yarn, chain 10. Sl st into the 2nd chain from hook. Sc into the next chain. Hdc into the next chain. Dc into the next 3 chains. Hdc into the next chain. Sc into the next chain. Sl st into the last chain. Do not turn. Working back along the opposite side of the starting chain: Sl st into the first ch. Sc into the next ch. Hdc into the next ch. Dc into the next 3 ch. Hdc into the next ch. Sc into the next ch. Sl st into the last ch. Fasten off with a tail for sewing.
Step-by-Step Instructions
Bodice Front Panel
The bodice front is worked as a flat rectangle with the small shell stitch.
Foundation: With MC, chain 50.
Row 1 (WS): Starting in the 3rd chain from hook (this counts as 1 dc), work 1 dc into the same chain. (Skip 2 chains, work small shell into the next chain) repeat across to last 3 chains. Skip 2 chains. Work 2 dc into the last chain. Turn. (11 shells plus 2 half-shells at each edge)
Row 2 (RS): Ch 3, turn. Work 1 dc into the ch-1 sp of the first shell. (Work small shell into the ch-1 sp of the next shell) repeat 9 times. Work 1 dc into the ch-1 sp of the last shell. Work 1 dc into the top of the turning chain. Turn. (11 shells)
Row 3: Ch 3, turn. Work 1 dc into the first dc. (Work small shell into the ch-1 sp of each shell across) 11 times. Work 1 dc into the top of the turning chain. Turn. (11 shells)
Rows 4 through 8: Alternate between Row 2 and Row 3 patterns, ending with Row 2. (11 shells maintained throughout)
Checkpoint: After Row 8, your bodice front panel should measure approximately 8.5 inches wide by 4.5 inches tall.
Fasten off MC. Set aside.
Bodice Back Panel
Work the bodice back panel identically to the bodice front panel, Rows 1 through 8.
Fasten off MC. Set aside.
Joining Side Seams
Lay the front and back panels with right sides facing each other. Align the side edges. Using MC and a yarn needle or a slip stitch seam with a hook, join the right side seam first. Starting from the waist (foundation chain edge), work through both layers with 8 slip stitches up the seam. Fasten off.
Repeat to join the left side seam.
Checkpoint: After seaming, the bodice tube should measure approximately 17 inches in circumference and 4.5 inches tall.
Waist Band
Round 1 (Waist Band): With RS facing, join MC to the bottom edge of the joined bodice at the right side seam. Ch 1 (does not count as a stitch). Work 1 sc into each foundation chain stitch around the entire bottom opening. Join with sl st to the first sc. (96 sc)
Round 2 (Waist Increase Round): Ch 1, do not turn. (Work 2 sc into 1 sc, then 1 sc into each of the next 7 sc) repeat 12 times. Join with sl st to the first sc. (108 sc)
Skirt
The skirt is worked in the round with RS always facing.
Skirt Round 1 (Mesh Foundation): With MC, ch 3 (counts as 1 dc). Sk the next 2 sc. Work (dc, ch 5, dc) into the next sc. Sk the next 2 sc. Work 1 dc into the next sc. Sk the next 2 sc. (Work (dc, ch 5, dc) into the next sc. Sk the next 2 sc. Work 1 dc into the next sc. Sk the next 2 sc.) repeat around. Join with sl st to the top of the beginning ch-3. (12 arches established)
Skirt Round 2 (Fan Round): Sl st across the top of the next dc and into the ch-5 arch space. Ch 3 (counts as 1 dc). Work (ch 1, dc) 4 times into the same ch-5 arch. Ch 2. Work sc into the top of the next dc post. Ch 2. (Work fan of 5 dc with ch-1 between each dc into the next ch-5 arch. Ch 2. Sc into the next dc post. Ch 2.) repeat around. Join with sl st to the top of the beginning ch-3. (12 fans, 12 sc connectors)
Skirt Round 3 (Mesh Round): Ch 4 (counts as dc plus ch 1). Dc into the 2nd dc of the fan below. (Ch 1, dc into the next dc of the same fan) 3 times. Ch 1. Dc into the sc connector. Ch 1. (Dc into the first dc of the next fan. (Ch 1, dc into each subsequent dc of the fan) 4 times. Ch 1. Dc into the sc connector. Ch 1.) repeat around. Join with sl st to the 3rd chain of beginning ch-4.
Skirt Round 4 (Second Fan Round): Sl st into the first ch-1 sp. Ch 3 (counts as 1 dc). Into the same ch-1 sp work (ch 1, dc). Work (ch 1, dc) into each of the next 3 ch-1 sps. Ch 2. Sc into the dc connector. Ch 2. (Work 5-dc fan across the next 4 ch-1 sps. Ch 2. Sc into the dc connector. Ch 2.) repeat around. Join with sl st. (12 fans, 12 sc connectors)
Skirt Round 5 (Expansion Mesh Round): Ch 1 (does not count as a stitch). Sc into the same st. Ch 5. Sk the next 2 ch-1 sps of the fan. Sc into the center ch-1 sp. Ch 5. Sk the remaining 2 ch-1 sps. Sc into the ch-2 sp before the sc connector. Ch 2. Sc into the sc connector. Ch 2. Sc into the ch-2 sp after the sc connector. Ch 5. (Sc into the center ch-1 sp of the next fan. Ch 5. Sc into the ch-2 sp before the next sc connector. Ch 2. Sc into the sc connector. Ch 2. Sc into the ch-2 sp after the sc connector. Ch 5.) repeat around. Join with sl st. (24 ch-5 arches)
Skirt Round 6 (Expanded Fan Round): Sl st into the first ch-5 arch. Ch 3. Work (ch 1, dc) 4 times into the same arch. Ch 2. Sc into the next ch-2 sp. Ch 1. Sc into the sc connector. Ch 1. Sc into the next ch-2 sp. Ch 2. (Work 5-dc fan into the next ch-5 arch. Ch 2. Sc into the ch-2 sp. Ch 1. Sc into the sc connector. Ch 1. Sc into the next ch-2 sp. Ch 2.) repeat around. Join with sl st. (24 fans)
Checkpoint: After Round 6, the skirt should measure approximately 3.5 inches from the waist band.
Skirt Rounds 7 and 8: Continue the mesh and fan pattern as established with 24 fan repeats.
Skirt Rounds 9 and 10: Work expansion rounds to create 48 fans for the final round.
Final Checkpoint: After Round 10, the skirt should measure approximately 5.5 inches from the waist band.
Straps
Each strap covers 3 shells on the outer edge of each panel.
Right Strap Row 1 (RS): With RS facing, join MC to the top edge of the front panel at the right edge. Ch 3 (counts as dc). Work small shell into the ch-1 sp of the 1st shell. Work small shell into the ch-1 sp of the 2nd shell. Work small shell into the ch-1 sp of the 3rd shell. Work 1 dc into the last dc. Turn. (3 shells)
Right Strap Rows 2 through 5: Continue working in the small shell pattern, maintaining 3 shells per row.
After Row 5, fold the strap to the back panel and join with a slip stitch seam to the corresponding 3-shell section of the back panel.
Repeat for the left strap.
Finishing
Picot Edging
Neckline and Strap Edging: Join CC to the outer corner of the right strap at the front top. Work (sc, ch 3, sl st into first ch) as a picot into approximately every 2 stitches along flat sections and every stitch at corners. Continue around both straps and the neckline opening.
Hem Edging: Join CC to any point on Round 10 of the skirt. Work (sc, picot) into each dc and ch-1 sp of every fan, with 1 sc into each sc connector between fans. Join with sl st and fasten off.
Roses and Leaves
Make 2 spiral roses with CC and 2 leaves with green yarn following the special stitch instructions above.
Position the roses side by side at the center-left waist, just above where the skirt begins. Tuck the leaves behind the roses so the tips extend outward. Stitch everything securely in place.
Blocking
Wet blocking is strongly recommended. Submerge the dress in cool water, gently press out excess moisture, and pin flat to a blocking mat. Open and shape each fan stitch to its maximum width. Allow to dry completely before unpinning.
Size Customization Tips
Newborn (0-3 months): Reduce the foundation chain to 44 chains, giving 9 full shells per panel. Adjust the waist band to 90 sc.
6-12 months: Increase the foundation chain to 56 chains, giving 13 full shells per panel. Work the waist band to 117 sc and add 2 extra skirt rounds.
12-18 months: Increase the foundation chain to 62 chains, giving 15 full shells per panel. Work the waist band to 135 sc and add 4 extra skirt rounds.
Care Instructions
For acrylic yarn: Machine wash gentle cycle in cold water. Tumble dry on low or lay flat to dry.
For natural or blended fibers: Hand wash in cool water with wool wash. Press out water in a towel and lay flat to dry.
Store the finished dress folded flat to prevent stretching.
This buttercream lace baby dress crochet pattern creates such a stunning heirloom piece that will be treasured for years. Whether you’re making it for your own little one, a baby shower gift, or a special photo session, the delicate lace details and vintage styling make it truly unforgettable.
Thank you so much for choosing this pattern for your next project! I would absolutely love to see your finished dress, so please tag me on Instagram or share in our Facebook group when you complete yours.
If this pattern caught your eye, go ahead and save it to your Pinterest boards so you can find it when you’re ready to start. And please drop a comment below if you make this sweet little dress. I read every single one and it truly makes my day to see your beautiful creations!