
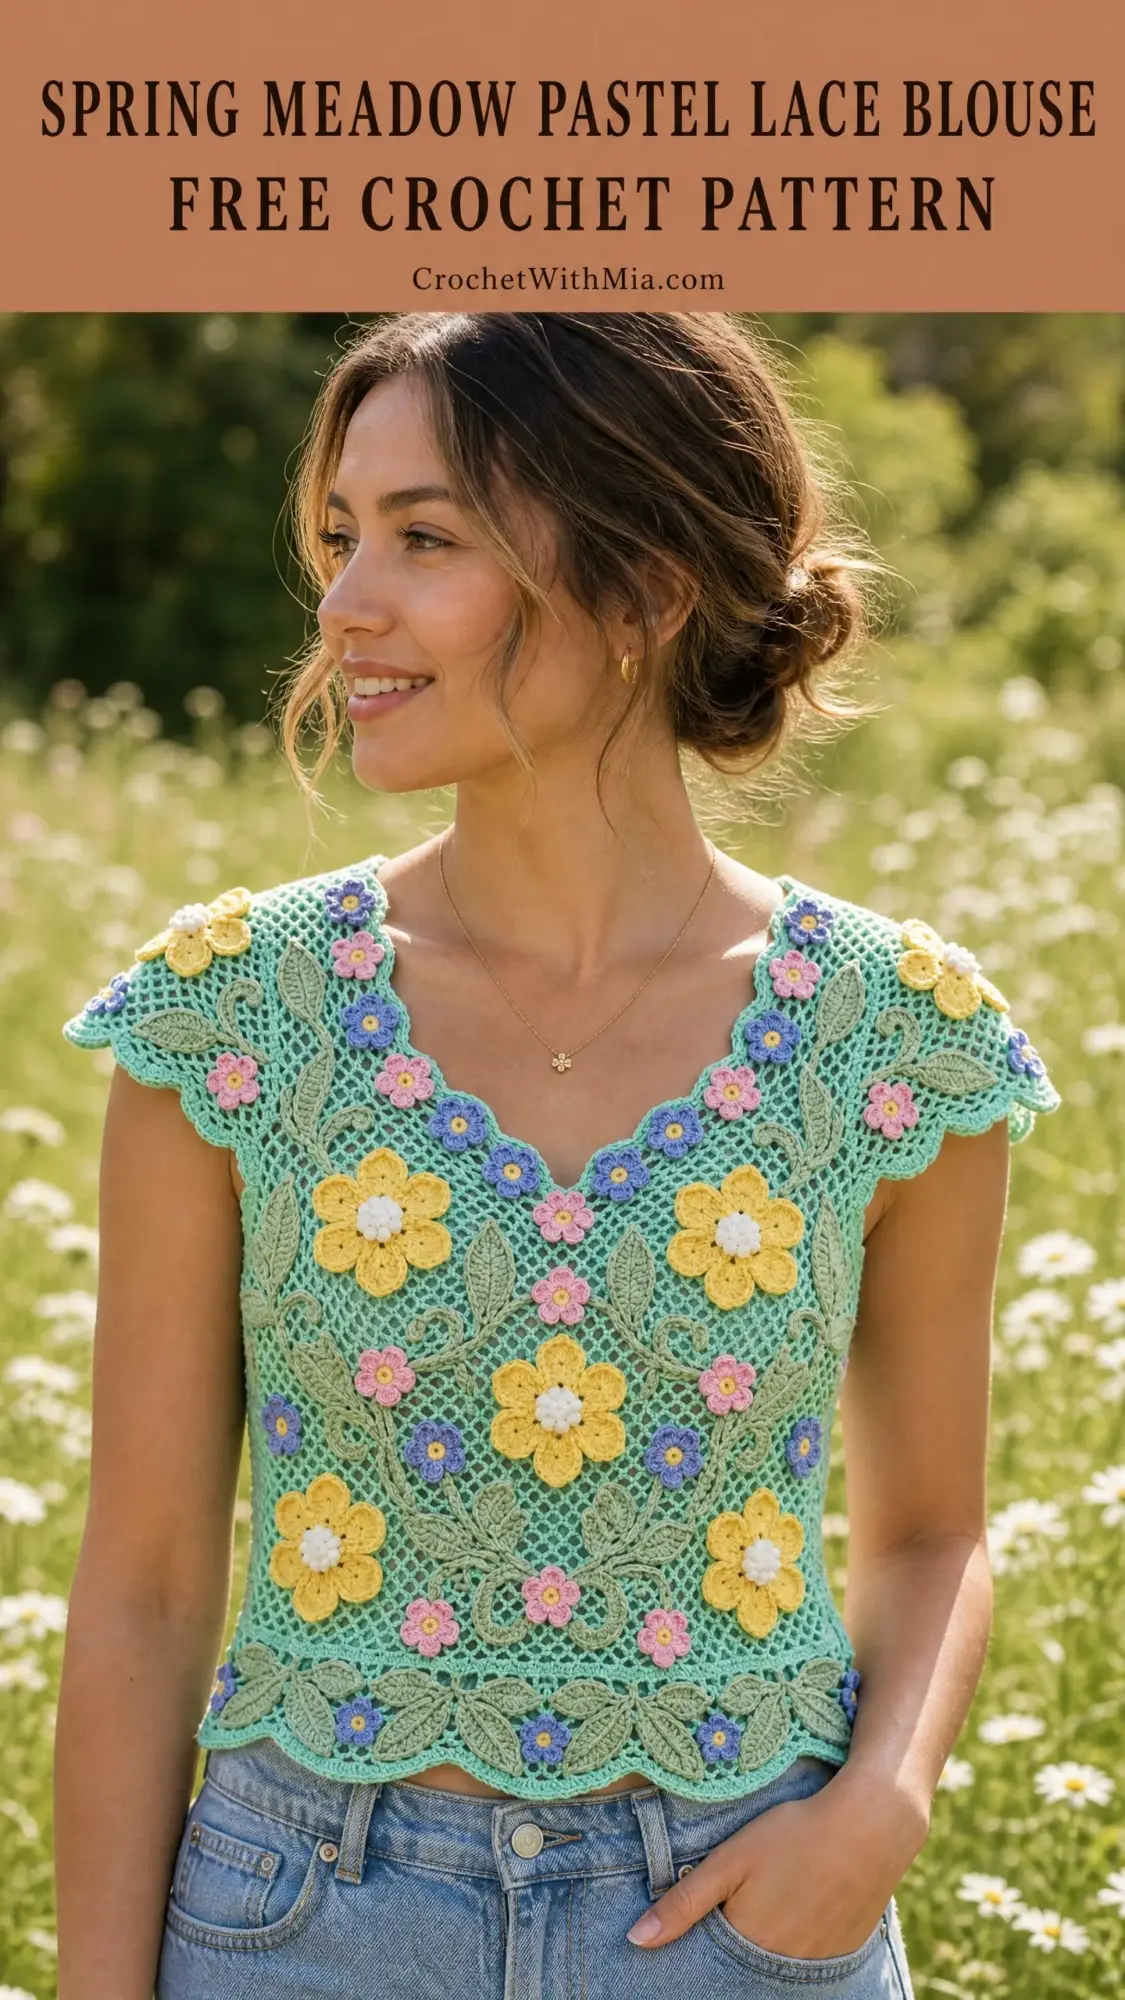
This is a fitted lace blouse with cap sleeves, a deep V-neckline, and dimensional floral appliques on a mint mesh ground. It uses filet mesh construction, Irish crochet inspired motifs, and sport-weight cotton yarn. The skill level is advanced.
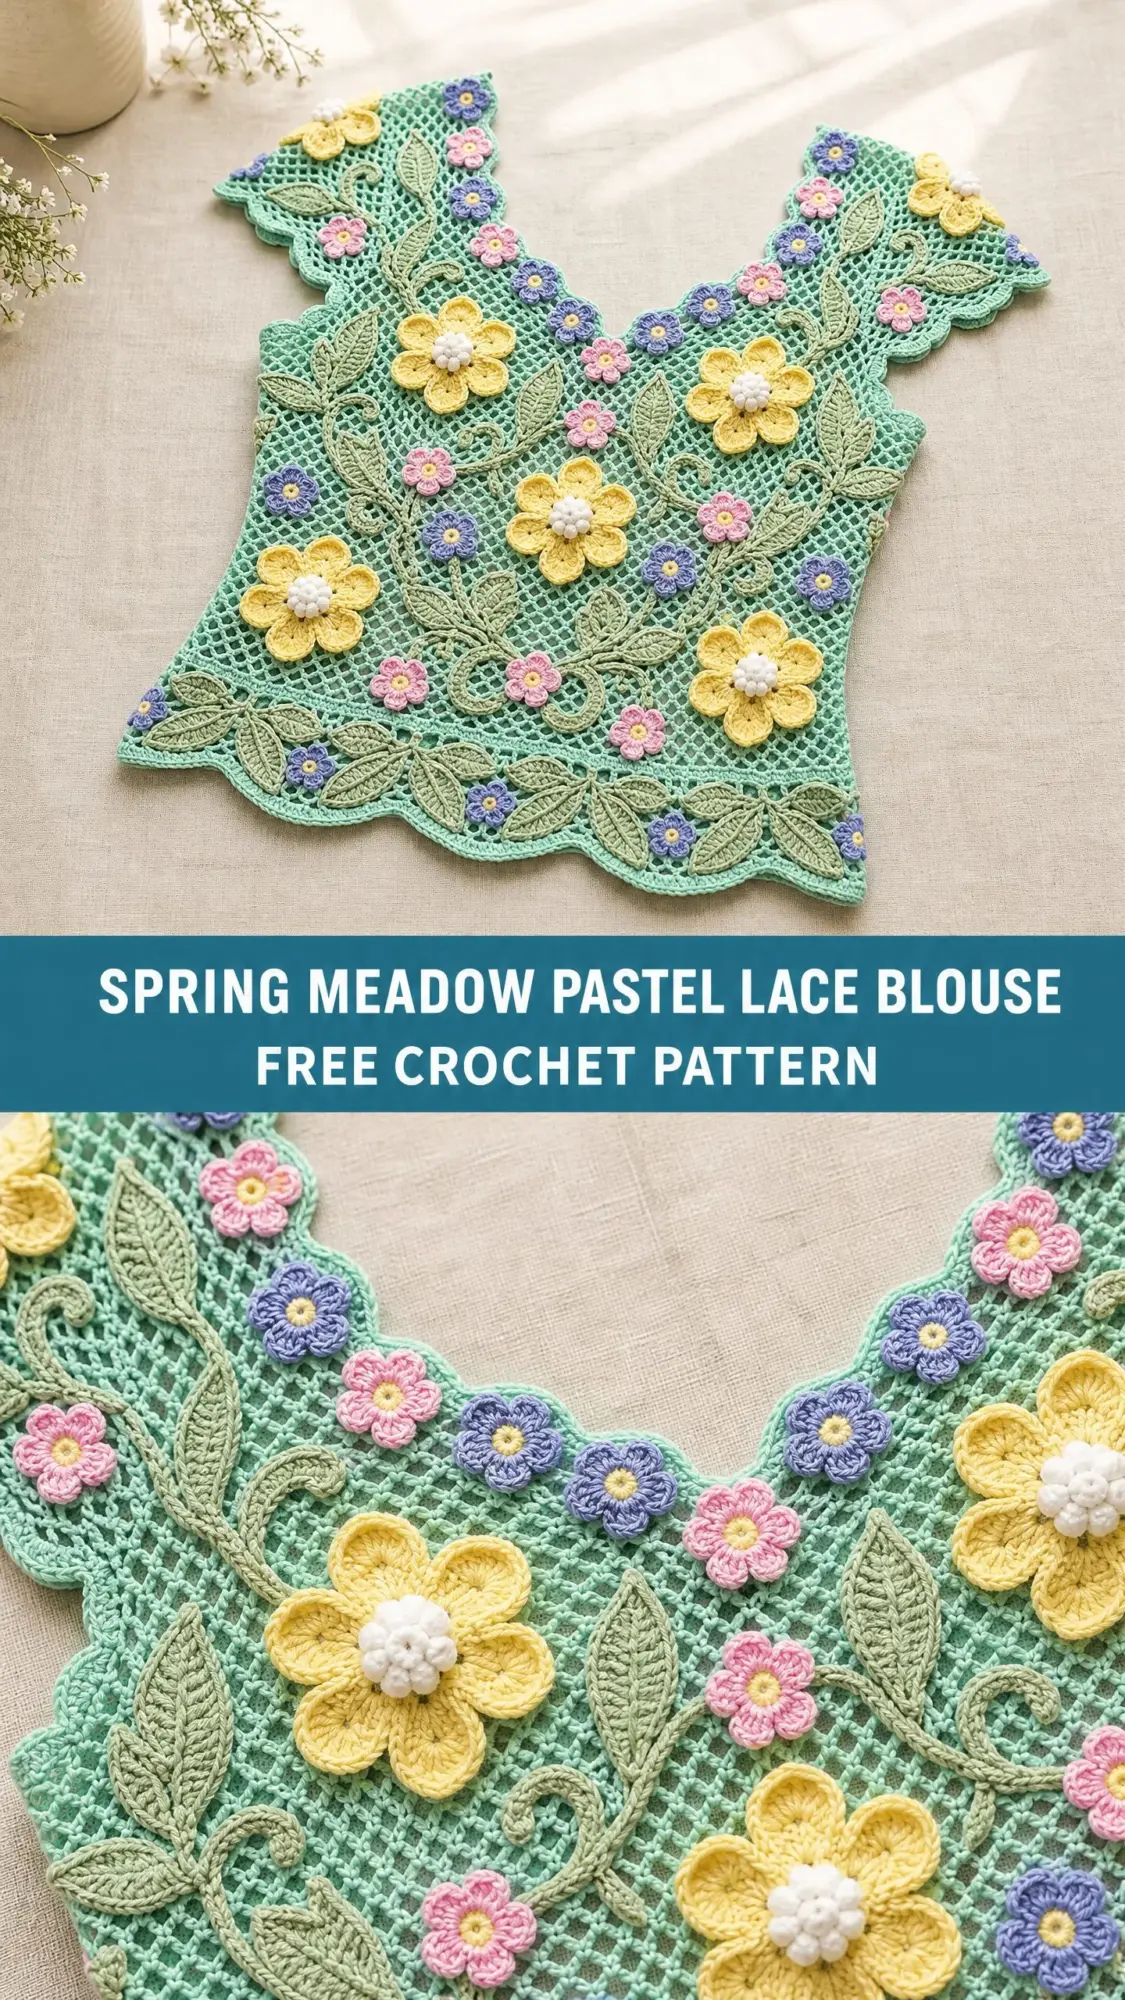
I want to be upfront with you. This Spring Meadow Pastel Lace Blouse is not a weekend project. It requires 60 to 90 hours of focused work. You will make the mesh body panels first, then shape armholes and necklines, then create dozens of separate flowers and leaves, then attach everything by hand.
But here is the thing. Every single technique in this pattern is something you already know if you have been crocheting for a while. Chain spaces. Double crochet. Working in the round. Sewing pieces together. The complexity comes from combining these familiar skills into one stunning garment. If you are ready for that challenge, let me walk you through every step.
Why This Lace Blouse Pattern Works
The construction method makes this blouse achievable even though it looks impossibly intricate. You work two flat rectangular panels in basic filet mesh. That is just double crochet stitches separated by chain two spaces forming an open grid. Nothing fancy about the base fabric at all.
The magic happens with the appliques. You make large yellow flowers with white bobble centers, small pink and lavender accent flowers, and sage green leaves in three sizes. Then you surface slip stitch curving vine lines onto the mesh and sew all those motifs in place. The dimensional effect comes from layering, not from complicated stitchwork.
The scalloped borders at the neckline, armholes, and hem add polish without difficulty. You simply work single crochet around the edges, then add a picot chain to every few stitches. Clean and professional looking every time.
Materials You Will Need
Yarn for the Main Color (Mint):
Approximately 900 yards of sport weight yarn (CYCA 2) in soft mint green. This makes the entire mesh body of both panels.
Yarn for Color A (Sage Leaf):
Approximately 300 yards of sport weight yarn in sage or dusty green. This covers all leaves and the surface slip stitch vine lines.
Yarn for Color B (Yellow):
Approximately 100 yards of sport weight yarn in pastel yellow for the large focal flowers.
Yarn for Color C (Pink):
Approximately 80 yards of sport weight yarn in soft pink for small accent flowers.
Yarn for Color D (Lavender):
Approximately 80 yards of sport weight yarn in soft lavender or periwinkle for small accent flowers.
Yarn for Color E (White):
Approximately 40 yards of sport weight yarn in white or cream for the bobble centers of the large yellow flowers.
Hooks:
US Size C-2 / 2.75 mm for the mesh body and borders. US Size B-1 / 2.25 mm for flowers and small leaf appliques.
Notions:
Tapestry needle, at least 10 stitch markers, rust proof pins for blocking, blocking mats and wires, scissors. Optional sewing thread in coordinating colors for extra security when attaching motifs.
Yarn Suggestions:
Scheepjes Catona in 100% Egyptian cotton works beautifully. Try color 397 Cyan or 385 Crystalline for the mint, and 395 Willow for the sage. Paintbox Yarns Cotton DK on the smaller hook also works well. Drops Safran in cotton linen blend gives a slight sheen and excellent drape for summer wear.
Choose a smooth, tightly plied cotton or cotton blend. Avoid fuzzy or textured fibers. The mesh pattern and dimensional motifs need clear stitch definition to look their best.
Gauge
Work a 4 inch square swatch in the filet mesh pattern using the main color and C-2 hook, then block it.
20 mesh squares = 4 inches in width
20 mesh rows = 4 inches in height
That equals 5 mesh squares per inch or 2 squares per centimeter.
Gauge matters a lot for a fitted garment. If your swatch is too big, go down a hook size. Too small, go up. Do not skip this step.
Finished Measurements
This pattern is written for size Small/Medium with a bust measurement of 34 to 36 inches (86 to 91 cm).
Finished bust at underarm, seamed: 36 inches / 91 cm
Finished length from shoulder to hem: 20 inches / 51 cm
Armhole depth: 7 inches / 18 cm
Cap sleeve width: 3 inches / 7.5 cm
Back neck width: 6 inches / 15 cm
Size customization guidance is provided at the end of the pattern.
Abbreviations and Definitions
ch = chain. Wrap yarn over hook and pull through loop on hook.
ch-sp = chain space. The open space created by a chain, where you insert your hook in later rows.
dc = double crochet. Yarn over, insert hook, yarn over and pull up loop, yarn over and pull through 2 loops, yarn over and pull through remaining 2 loops.
hdc = half double crochet. Yarn over, insert hook, yarn over and pull up loop, yarn over and pull through all 3 loops at once.
sc = single crochet. Insert hook, yarn over and pull up loop, yarn over and pull through both loops.
sl st = slip stitch. Insert hook, yarn over and pull through both the stitch and the loop on hook in one motion.
tr = treble crochet. Yarn over twice, insert hook, yarn over and pull up loop, then yarn over and pull through 2 loops three times.
sk = skip. Pass over the indicated stitch without working into it.
t-ch = turning chain. The chain worked at the beginning of a row to bring your hook to the correct height.
RS = right side. The side of the fabric that faces outward when worn.
WS = wrong side. The side of the fabric that faces your body when worn.
st(s) = stitch(es)
sp(s) = space(s)
rep = repeat
rem = remaining
beg = beginning
MC = main color
Special Stitches Explained
Filet Mesh Square (Open Square)
Chain 2, skip 2 stitches or one chain-2 space, double crochet in the next stitch. Each open square consists of one double crochet, two chains, and a double crochet anchor.
Filet Mesh Row Setup
The mesh foundation chain is a multiple of 3 plus 4. Row 1 establishes the grid. Each row after that: chain 5 (which counts as double crochet plus chain 2), turn, double crochet in first mesh anchor, then chain 2 and double crochet in next anchor across the entire row.
Scallop-Picot Border
Join yarn in corner stitch. Work single crochet in stitch, chain 3, slip stitch in first chain of the chain-3 just made (this creates the picot), single crochet in next stitch, skip 1 stitch. Repeat across. Each scallop unit uses 3 stitches.
Surface Slip Stitch (for Vine Lines)
Hold yarn at back of fabric. Insert hook through a chain space from front to back, draw up a loop. Insert hook through next space, draw up loop and pull through loop on hook. Continue across. This creates a raised chain line on the right side.
Five-Petal Large Flower (Yellow Flowers)
Round 1: Work 5 single crochet into a magic ring. Pull ring closed. (5 sc)
Round 2: Chain 1, work 2 single crochet in each single crochet around. (10 sc)
Round 3: Slip stitch in next single crochet, chain 1, work 5 double crochet in next single crochet, chain 1, slip stitch in next single crochet. Repeat this sequence 5 times to create 5 petals. Join with slip stitch.
Round 4 (back petal layer for dimension): Working behind Round 3 petals into the Round 2 single crochet stitches: slip stitch in single crochet, chain 1, work 7 treble crochet in next single crochet, chain 1, slip stitch. Repeat 5 times.
Round 5 (center bobble): With white yarn, join in magic ring center, pull through to right side. Yarn over, insert hook in center, yarn over, pull up loop, yarn over, pull through 2 loops. Repeat from yarn over three more times. Yarn over and pull through all 5 loops. Chain 1 to close. This forms the white bobble center.
Small Five-Petal Flower (Pink and Lavender Flowers)
Round 1: Work 5 single crochet into magic ring. (5 sc)
Round 2: Work 2 single crochet in each single crochet. (10 sc)
Round 3: Slip stitch, chain 1, work 3 double crochet, chain 1, slip stitch. Repeat 5 times into every 2 single crochet. This creates 5 petals.
Center: With contrasting color (yellow for pink flowers, blue for lavender), work 1 bobble of 3 double crochet into center ring.
Tiny Three-Petal Accent Flower
Work 6 single crochet into magic ring. Slip stitch, chain 1, work 2 double crochet, chain 1, slip stitch in next 2 single crochet. Repeat this sequence 3 times to create 3 petals. Join and fasten off.
Leaf Motif (Worked Lengthwise)
Chain 10.
Row 1: Single crochet in 2nd chain from hook, half double crochet in next, double crochet in next 3, half double crochet in next, single crochet in next 2, work 3 single crochet in last chain (this is the leaf tip). Working back along opposite side of foundation chain: single crochet in next 2, half double crochet in next, double crochet in next 3, half double crochet in next, single crochet in last. Join with slip stitch to first single crochet. Fasten off leaving a long tail for sewing. (20 stitches around)
This leaf is approximately 1.25 inches long. For a small leaf, chain 7 (15 stitches around). For a large leaf, chain 14 (28 stitches around).
Front Panel Instructions
Foundation Chain
Using the main color and C-2 hook, chain 196.
Row 1 (RS): Double crochet in 8th chain from hook (this counts as first mesh square plus turning chain). Chain 2, skip 2 chains, double crochet in next chain. Repeat across. Turn. (64 mesh squares)
Row 2: Chain 5 (counts as double crochet plus chain 2), turn. Skip first chain-2 space, double crochet in next double crochet. Chain 2, double crochet in next double crochet. Repeat across, ending double crochet in 3rd chain of turning chain. Turn. (64 mesh squares)
Rows 3 through 52: Repeat Row 2. Work even in mesh pattern until piece measures approximately 10 inches from foundation chain. (64 mesh squares each row)
Waist Shaping (Rows 53 through 62)
Row 53: Chain 5, turn. Work in mesh across first 60 squares, leave last 4 squares unworked. Turn. (60 mesh squares)
Row 54: Slip stitch across first mesh square and into the 2nd double crochet anchor. Chain 5, work across to last square, leave last square unworked. Turn. (58 mesh squares)
Row 55: Chain 5, work across. Turn. (58 mesh squares)
Row 56: Slip stitch across first square and into 2nd double crochet anchor. Chain 5, work across to last square, leave unworked. Turn. (56 mesh squares)
Rows 57 to 59: Work even. (56 mesh squares)
Row 60 (Increase Row): Chain 5, turn. Work double crochet and chain 2 in first double crochet to create 1 new square at right edge, work across, chain 2 and double crochet in turning chain to create 1 new square at left edge. Turn. (58 mesh squares)
Row 61: Increase row same as Row 60. (60 mesh squares)
Row 62: Increase row same as Row 60. (62 mesh squares)
Bust Section (Rows 63 through 75)
Work even in mesh pattern for 13 rows. (62 mesh squares each row)
Armhole Shaping (Row 76)
Row 76: Slip stitch across first 4 mesh squares (slip stitch in each double crochet and chain of first 4 squares, ending with slip stitch in 5th double crochet anchor). Chain 5, work across next 54 squares. Leave last 4 squares unworked. Turn. (54 mesh squares)
Row 77: Slip stitch across first 2 squares. Chain 5, work across next 51 squares. Leave last square unworked. Turn. (50 mesh squares)
Row 78: Slip stitch across first square. Chain 5, work across next 48 squares. Leave last square unworked. Turn. (48 mesh squares)
Row 79: Chain 5, work across even. Turn. (48 mesh squares)
Row 80: Chain 5, work across even. Turn. (48 mesh squares)
V-Neck Shaping and Shoulder Sections
At Row 81, divide work at center for V-neck. The 48 squares split into two groups of 24 squares each for left and right front. Mark center between squares 24 and 25.
Right Front (as worn, worked from armhole edge toward center)
Row 81: Chain 5, turn. Work across first 24 squares only. Turn. (24 mesh squares)
Row 82: Work across first 23 squares, leave last square unworked (neckline decrease). Turn. (23 mesh squares)
Row 83: Slip stitch across first square (neckline decrease), chain 5, work across. Turn. (22 mesh squares)
Row 84: Work across first 21 squares, leave last unworked. Turn. (21 mesh squares)
Row 85: Slip stitch across first square, chain 5, work across. Turn. (20 mesh squares)
Row 86: Work even. Turn. (20 mesh squares)
Row 87: Work across first 19 squares, leave last unworked. Turn. (19 mesh squares)
Row 88: Slip stitch across first square, chain 5, work across. Turn. (18 mesh squares)
Row 89: Work even. Turn. (18 mesh squares)
Row 90: Work across first 17 squares, leave last unworked. Turn. (17 mesh squares)
Row 91: Slip stitch across first square, chain 5, work across. Turn. (16 mesh squares)
Rows 92 through 100: Work even on 16 squares. (16 mesh squares each row)
Fasten off.
Left Front (as worn, worked from center toward armhole edge)
Rejoin main color at center, working toward the left armhole edge.
Row 81: Attach main color in 25th double crochet anchor (center), chain 5, work across remaining 24 squares to armhole edge. Turn. (24 mesh squares)
Row 82: Slip stitch across first square. Chain 5, work across remaining 23 squares. Turn. (23 mesh squares)
Row 83: Work across first 22 squares, leave last unworked. Turn. (22 mesh squares)
Row 84: Slip stitch across first square, chain 5, work across. Turn. (21 mesh squares)
Row 85: Work across first 20 squares, leave last unworked. Turn. (20 mesh squares)
Row 86: Work even. Turn. (20 mesh squares)
Row 87: Slip stitch across first square, chain 5, work across. Turn. (19 mesh squares)
Row 88: Work across first 18 squares, leave last unworked. Turn. (18 mesh squares)
Row 89: Work even. Turn. (18 mesh squares)
Row 90: Slip stitch across first square, chain 5, work across. Turn. (17 mesh squares)
Row 91: Work across first 16 squares, leave last unworked. Turn. (16 mesh squares)
Rows 92 through 100: Work even on 16 squares. (16 mesh squares each row)
Fasten off.
Back Panel Instructions
Work exactly as Front Panel through Row 80 (armhole shaping complete). You will have 48 mesh squares at Row 80.
Rows 81 through 88: Work even on 48 squares. (48 mesh squares each row)
The back neck begins later and is shallower than the front. At Row 89, divide at center with 24 squares each side for back V-neck.
Right Back
Row 89: Chain 5, turn. Work across first 24 squares. Turn. (24 mesh squares)
Row 90: Work across first 23 squares, leave last unworked. Turn. (23 mesh squares)
Row 91: Slip stitch across first square, chain 5, work across. Turn. (22 mesh squares)
Row 92: Work across first 21 squares, leave last unworked. Turn. (21 mesh squares)
Row 93: Slip stitch across first square, chain 5, work across. Turn. (20 mesh squares)
Row 94: Work even. Turn. (20 mesh squares)
Row 95: Work across first 19 squares, leave last unworked. Turn. (19 mesh squares)
Row 96: Slip stitch across first square, chain 5, work across. Turn. (18 mesh squares)
Row 97: Work across first 17 squares, leave last unworked. Turn. (17 mesh squares)
Row 98: Slip stitch across first square, chain 5, work across. Turn. (16 mesh squares)
Rows 99 through 100: Work even. (16 mesh squares)
Fasten off.
Left Back
Mirror all Right Back shaping. You will have 16 mesh squares at shoulder. Fasten off.
Blocking
Wet block both panels before assembly. Soak in cool water for 20 minutes, press out excess water gently, and pin to measurements on blocking mats.
Front and Back each:
Width at hem: 12.8 inches pinned (yields approximately 18 inches after relaxation)
Width at waist: 11.2 inches pinned
Width at bust: 12.4 inches pinned
Total length: 20 inches
Allow to dry completely. Cotton can take 24 to 48 hours.
Assembly
After blocking, join front and back at shoulders using a flat slip stitch seam. Hold pieces right sides together, join main color, slip stitch through both layers working across 16 mesh squares of each shoulder. Fasten off. Repeat for second shoulder.
Join side seams with right sides together. Join main color at underarm. Slip stitch along side edge working down through row ends, matching row for row, from underarm to hem. Fasten off. Repeat second side seam.
Cap Sleeve and Armhole Border
Join main color at underarm seam.
Round 1: Chain 1. Work single crochet evenly around armhole opening, placing 1 single crochet per row-end double crochet post and 2 single crochet per mesh row end open side for a total of approximately 70 single crochet around each armhole. Adjust to 69 single crochet for a clean scallop repeat (multiple of 3). Join with slip stitch to first single crochet. (69 sc)
Round 2: Work scallop-picot border around. Single crochet in single crochet, chain 3, slip stitch in first chain of chain-3 just made, single crochet in next single crochet, skip 1 single crochet. Repeat around. This creates 23 scallop units. Join and fasten off.
Neckline Border
Join main color at center back V-neck point.
Round 1: Chain 1. Work single crochet evenly around entire neckline (both front V and back V and across shoulder tops). Target count: 120 single crochet total, adjusted to nearest multiple of 3. (120 sc)
Round 2: Work scallop-picot border around. This creates 40 scallop units. Join and fasten off.
Hem Leaf-Band Border
Work along bottom of front panel, joining main color at right side seam at hem.
Row 1: Chain 1. Work 192 single crochet evenly across bottom of front panel working into chain loops of foundation chain. Turn. (192 sc)
Row 2: Chain 3 (counts as double crochet), turn. Double crochet in each single crochet across. Turn. (192 dc)
Row 3: Chain 1, turn. Single crochet in each double crochet across. Turn. (192 sc)
Row 4 (Leaf Peaks): Chain 1, turn. Slip stitch in first single crochet, chain 8, single crochet in 2nd chain from hook, half double crochet in next chain, double crochet in next 3 chains, half double crochet in next chain, single crochet in last chain, slip stitch back into same base single crochet, slip stitch in next 2 single crochet. Repeat across. This creates approximately 64 leaf peaks.
Row 5 (Scallop-Picot at Lower Edge): Turn work to access the cast-on chain edge of Row 1. Join main color at corner. Single crochet in chain, chain 3, slip stitch in first chain of chain-3, single crochet in next chain, skip 1. Repeat across. Fasten off.
Repeat Hem Leaf-Band Border for back panel.
Applique Motifs
Make all motifs listed below. Block them flat, arrange on the garment following the layout, and sew in place.
Motif Quantities:
Large Yellow Flowers with white bobble center: Make 8
Small Pink Flowers with yellow center: Make 12
Small Lavender Flowers with yellow center: Make 10
Tiny Accent Flowers in lavender: Make 8
Tiny Accent Flowers in pink: Make 8
Large Leaves (chain 14): Make 24
Medium Leaves (chain 10): Make 30
Small Leaves (chain 7): Make 20
Vine Lines
Using Color A and the surface slip stitch technique, work curving vine lines across both panels. On the front panel:
Vine 1: Begin at right hem area, curve upward toward left bust, branching at mid-chest.
Vine 2: Begin at left hem area, mirror Vine 1.
Vine 3: Along neckline V on both sides, following the V-shape approximately 1 inch inside the scallop border.
Vine 4 and 5: Two shorter vines on either side of center bust, curling inward symmetrically.
Repeat vine placement on back panel to match.
Motif Placement
The arrangement is symmetrical left to right on both panels.
Large Yellow Flowers: One at lower left front and one at lower right front (approximately 3 inches up from hem and 4 inches from side seam). One at mid-bust left and one at mid-bust right (approximately 10 inches from hem). One at center chest just below V-neck split. One on each shoulder area just inside the sleeve border. Place the 8th flower at center back mid-panel.
Small Pink Flowers: Scatter evenly along vine lines, approximately 6 on front panel and 6 on back panel, spacing 2 to 3 inches apart.
Small Lavender Flowers: Scatter similarly along vine lines, 5 on front and 5 on back.
Tiny Accent Flowers: Fill smaller gaps along vine lines and at neckline border interior. Distribute 8 of each color between front and back.
Leaves: Arrange in clusters of 2 to 4 around large flowers and along vine lines. Place small leaves at vine tips and large leaves at vine bases.
Sew all motifs using tapestry needle and matching yarn tails. Stitch through multiple points of each motif to secure flat against mesh. Do not pull tight. The mesh needs to retain drape.
Size Customization
To size up (Large, bust 38 to 40 inches): Work the foundation chain as chain 214 (68 mesh squares per panel). Add 4 extra even rows to the waist section. All shaping rows remain the same count of squares decreased or increased. Shoulder width increases to 18 squares.
To size down (XS, bust 32 inches): Work foundation chain as chain 178 (58 mesh squares). Reduce waist shaping by 2 squares per side. Shoulder remains at 14 squares.
To lengthen or shorten the body: Each 2 rows of filet mesh equals approximately 0.4 inches in height. Add or remove even rows between the checkpoint after Row 52 and the waist shaping section, or between waist shaping and the underarm section.
To deepen or shallow the V-neck: Begin the neck split 2 to 4 rows earlier or later than stated. Each 2 rows earlier deepens the V by approximately 0.4 inches.
Finishing
After all motifs are attached, weave in all yarn ends securely using a tapestry needle. Weave each end through at least 1 inch of stitches in two directions for security. Trim ends close.
Give the finished blouse a final light wet block or steam block to even out the motif placement and relax any puckering around sewn-on appliques. Pin gently to shape and allow to dry flat.
Care Instructions
Hand wash in cool water with a gentle wool-wash or delicate detergent. Do not wring. Press out water gently by rolling in a clean towel. Lay flat to dry away from direct sunlight to prevent color fading in the pastel yarns. Do not machine wash, tumble dry, or iron directly. Store folded flat or rolled, not hung, to prevent the lace mesh from stretching under its own weight.
You Made It!
Thank you so much for choosing this Spring Meadow Pastel Lace Blouse crochet pattern. This is truly a labor of love project, and I hope you enjoy every hour spent creating it. The finished blouse is the kind of garment that makes people stop and ask where you bought it, and you get to say you made it yourself.
If you have any questions along the way, do not hesitate to reach out. I am always happy to help troubleshoot tricky sections. And please, when you finish your blouse, share a photo on Instagram or Facebook and tag me. I would love to see your color choices and how you arranged your flowers.
If you loved this pattern, save it to your Pinterest boards so you can find it easily when you are ready to start. And leave a comment below if you make one. I read every single comment and it truly makes my day to see your finished projects.