
Last summer, I spotted a woman at a farmer’s market wearing the most incredible crocheted dress. I actually stopped mid-sentence, mid-conversation with my husband, just to stare. It was this gorgeous flowing thing made entirely of granny squares in sunset colors, and she looked like she had stepped out of a 1970s dream. I went home that day and started sketching.
It took me nearly six months of swatching, frogging, and starting over to get this design right. The transition from a circular medallion center to a square border drove me absolutely crazy for weeks. But now that it is done, I cannot stop wearing it. And I cannot stop thinking about making another one in blues and greens.
This Dusty Rose Granny Square Maxi Dress crochet pattern is a labor of love, and I will not sugarcoat it. This is a substantial project that will take you somewhere between 120 and 180 hours to complete. But every single one of those hours is worth it when you slip this dress over your head and feel like the main character in your own vintage romance film.
What Makes This Crochet Dress Pattern Special
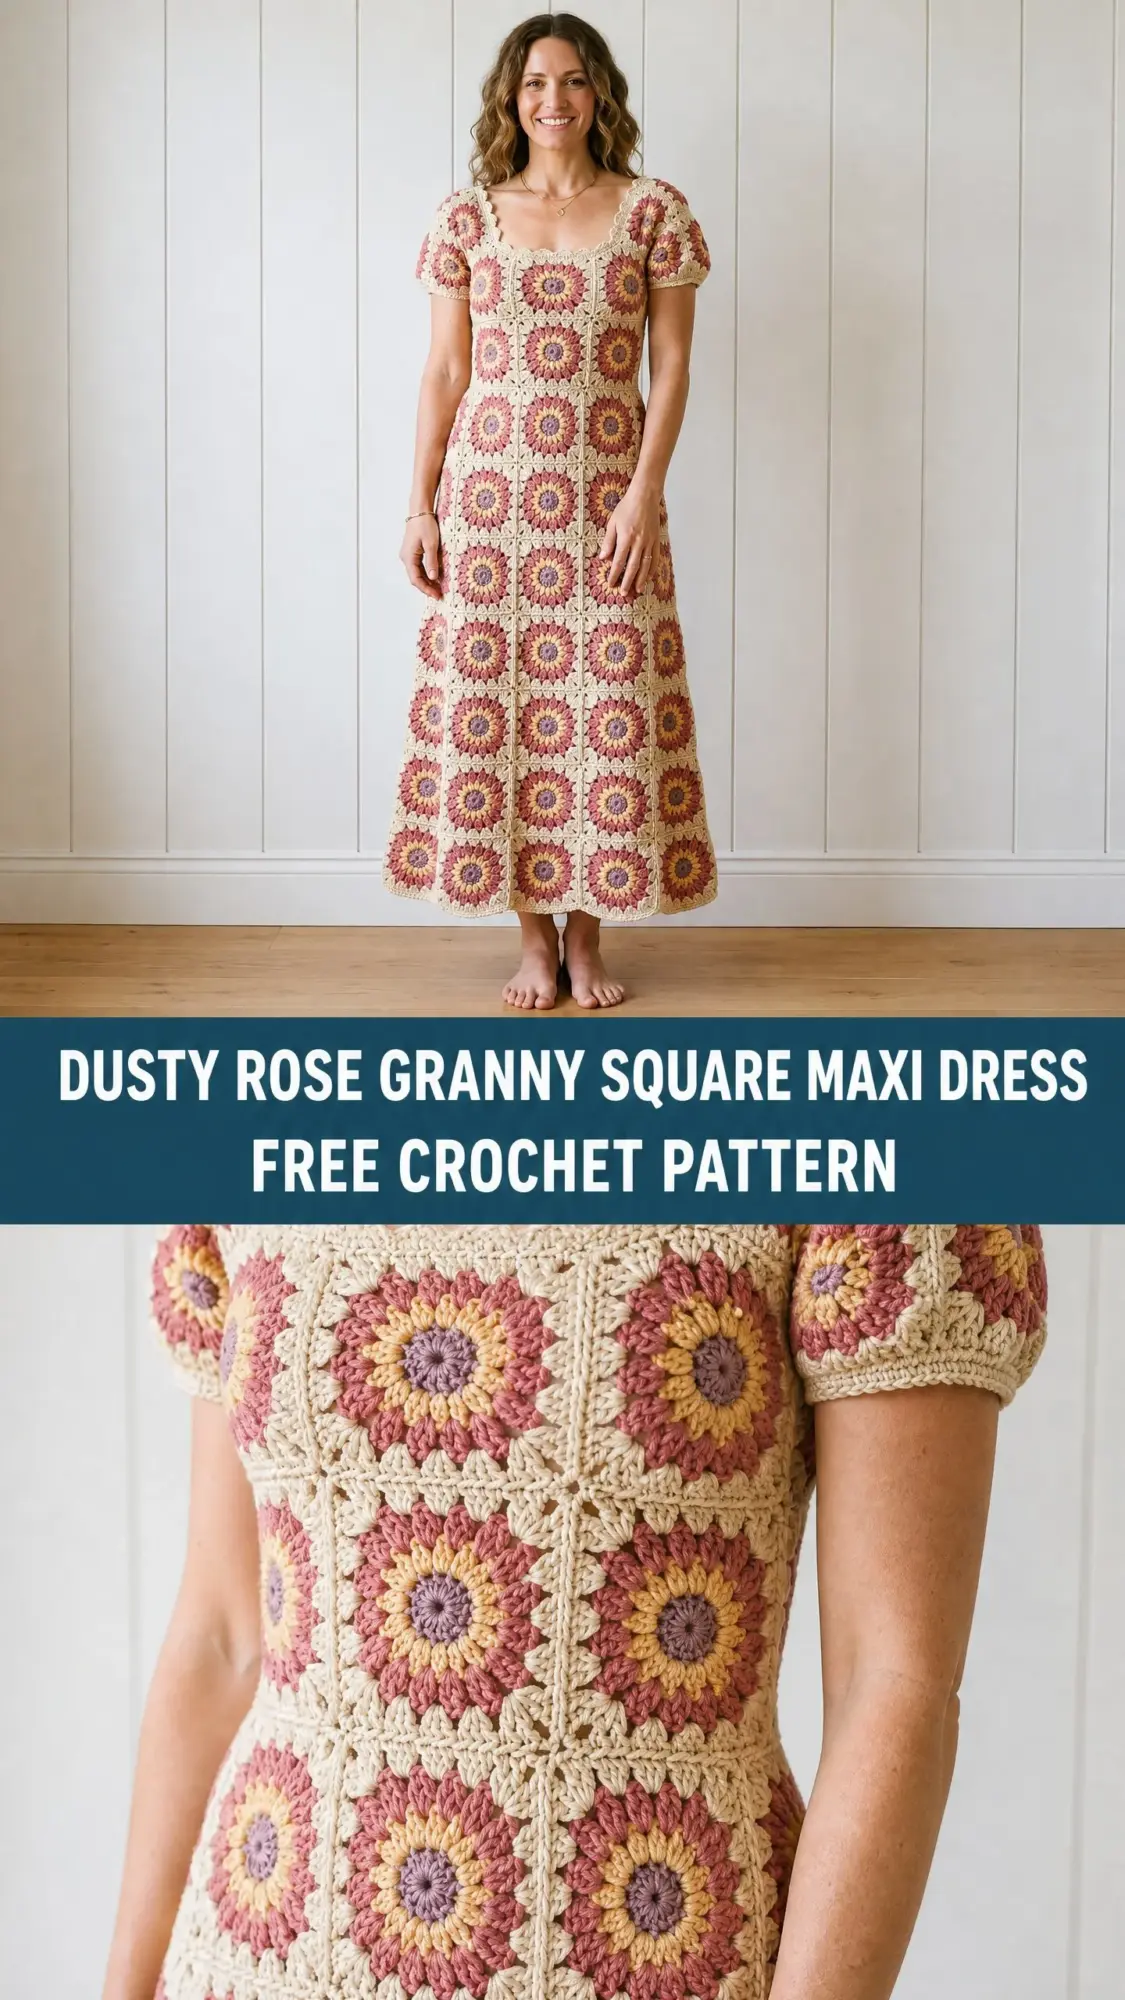
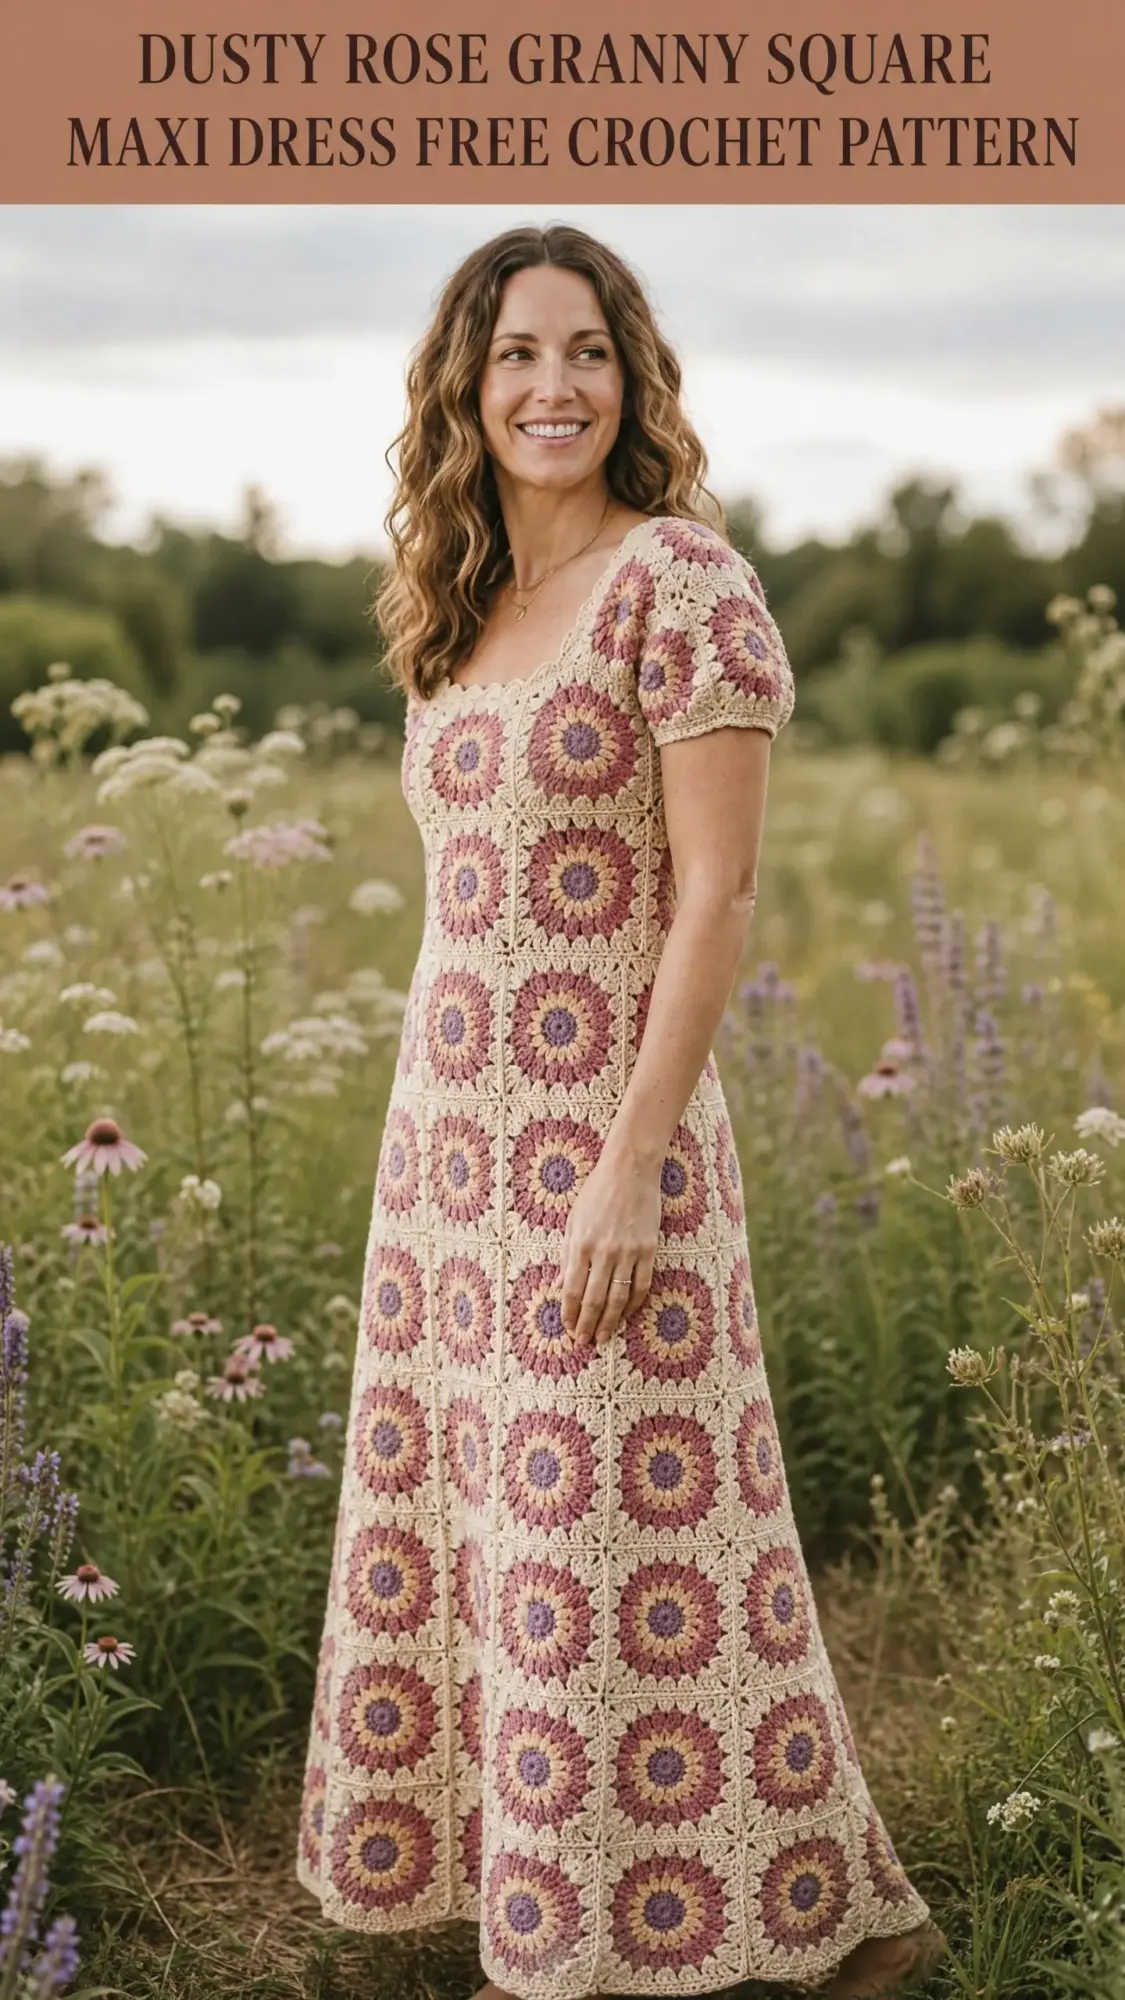
This floor-length maxi dress is constructed entirely from large floral granny squares. Each square features a sunflower-style medallion center worked in dusty rose, mauve, golden yellow, and soft lavender against a warm cream background. The squares are joined as you go, creating a seamless fabric with no bulky seams on the right side.
The silhouette is romantic and vintage-inspired with a fitted bodice and gently flared skirt. Short puff sleeves add a feminine touch without overwhelming the design. A delicate scallop edging finishes the neckline, sleeve hems, and dress hem beautifully.
Construction method: You will crochet individual squares, then join them using the flat slip-stitch join method on the final round of each square. This creates panels that are seamed at the sides. The bodice panel narrows relative to the skirt panel for shaping. No complicated increasing or decreasing required.
Skill Level
Advanced Intermediate. This crochet tutorial requires comfort with several techniques:
No advanced lacework is involved. However, attention to tension and join consistency is essential for a professional finish. If you have made a granny square blanket before, you already have most of the skills you need. The main difference here is precision. Every square must measure exactly the same for the dress to fit properly.
Finished Measurements
This pattern is written for size Small/Medium as shown.
Size customization guidance is provided at the end of the pattern.
Materials Needed
Yarn
Worsted weight yarn (CYC 4), approximately 2,800 yards (2,560 m) total, divided by color:
Yarn Suggestions
Option 1: Lion Brand Heartland (100% acrylic, 251 yards per 5 oz skein). Excellent stitch definition, easy care, wide color range. You will need approximately 5 skeins of Color A, 3 skeins of Color B, 2 skeins of Color C, 2 skeins of Color D, and 1 skein of Color E.
Option 2: Paintbox Yarns Simply Worsted (100% acrylic, 218 yards per 3.5 oz ball). Clean stitch definition, excellent value, and reliable color consistency across dye lots.
Option 3: Cascade 220 (100% Peruvian Highland Wool, 220 yards per 3.5 oz skein). Produces a beautifully drapey, slightly rustic fabric with excellent stitch definition. Requires careful hand-washing and blocking but gives the most heirloom result.
Substitution note: Any smooth worsted weight yarn with good stitch definition works for this pattern. Avoid highly variegated yarns for Colors B through E because the medallion petal effect will be lost.
Hooks
Notions
Gauge
Using US J-10 / 6.0 mm hook and worsted weight yarn:
One completed 7-round granny square measures exactly 5 inches by 5 inches (12.7 cm by 12.7 cm) after light blocking.
This gauge is non-negotiable for garment sizing. A difference of even one-quarter inch per square multiplies across 20 squares in a row and will change the finished bust measurement by 5 inches. Make at least two gauge squares before beginning the dress. Block them as you will block the finished garment. Measure from the center of a corner cluster to the center of the opposite corner cluster. Adjust hook size up or down as needed.
Abbreviations (US Terms)
Before diving into the step by step instructions, let me define every abbreviation you will encounter:
Special Stitches
Granny Cluster (3-dc cluster)
This is the building block of every granny square.
1. Yarn over, insert hook into indicated chain space or stitch.
2. Yarn over, pull up a loop. Yarn over, pull through 2 loops. (2 loops remain on hook)
3. Yarn over, insert hook into the same space again.
4. Yarn over, pull up a loop. Yarn over, pull through 2 loops. (3 loops remain on hook)
5. Yarn over, insert hook into the same space a third time.
6. Yarn over, pull up a loop. Yarn over, pull through 2 loops. (4 loops remain on hook)
7. Yarn over, pull through all 4 loops on hook.
This completes one Granny Cluster. It counts as 1 motif unit occupying one chain space.
Petal Stitch (used in Round 3)
1. Insert hook into indicated stitch, pull up a loop, do not complete a stitch.
2. Chain 3.
3. Work 4 treble crochets into the same stitch.
4. Chain 3.
5. Slip stitch into the same stitch to close the petal.
Each Petal Stitch creates one raised petal that sits in front of the main fabric.
Scallop Edging
1. Join Color A with a slip stitch in any corner or foundation chain space.
2. Chain 3 (counts as 1 dc).
3. Work 4 dc into the same space or stitch (5 dc total in the space).
4. Slip stitch into the next stitch or space to close the scallop.
5. Slip stitch into the next stitch.
6. Repeat from step 2 across the edge, working one 5-dc scallop into every other stitch or joining space.
JAYG Flat Slip Stitch Join
When joining the final round of a new square to a completed adjacent square:
1. Work to the point where a corner ch-2 space would normally be made.
2. Chain 1, then slip stitch into the corresponding corner ch-2 space of the adjacent square. Chain 1. This creates a joined corner space.
3. On the side edges between corners, work the Granny Cluster, then instead of ch-1, slip stitch into the corresponding ch-1 side space of the adjacent square.
This creates a flat, reversible join with no seam bulk on the right side of the fabric.
Pattern Notes Before You Begin
Note 1: The dress is constructed in modular panels. The Back Bodice Panel, Front Bodice Panel, Back Skirt Panel, and Front Skirt Panel are each made separately by joining squares as you go. The panels are then seamed together. The Puff Sleeves are made from small square clusters and attached last. Edging is worked after all panels are seamed.
Note 2: Count your squares before beginning. The complete dress requires 108 full squares and 16 half-triangles. The half-triangles are made by working only the first 4 rounds of the square, then working only across one diagonal half to create a right-triangle fill piece for the side shaping.
Note 3: All squares are worked in rounds from the center outward with the right side always facing you. There is no turning. After each round, join with slip stitch to the top of the beginning ch-3 unless otherwise noted.
Note 4: Color changes occur at the beginning of each round. To change color cleanly, complete the final slip stitch join of the previous round in the new color. Pull the new color through the last 2 loops of the final slip stitch that closes the round. Cut the old color and leave a 6-inch tail for weaving.
Note 5: When working JAYG on large panels, work all squares in one row before moving to the next row. Join squares horizontally within a row first, then join the completed row to the previous row as you work the final round of each square in the new row.
Note 6: The back center seam includes an opening from the neckline to the natural waist (approximately the top 18 inches of the back panel) for the zipper or button loop closure. Seam the remainder of the back center closed.
Note 7: Blocking is essential. Wet-block every panel before seaming. The squares will relax and even out considerably. Pin each square to exactly 5 x 5 inches on blocking mats.
Square and Panel Layout
Here is your complete square count at a glance:
Total: 108 full squares, 16 half-triangles. Recount before beginning seaming.
Granny Square Instructions (Make 108)
All rounds are worked with the right side facing. Join each round with slip stitch to top of beginning ch-3 unless otherwise specified.
Round 1 (Color D, Soft Lavender)
Make a magic ring (or ch-4, join with sl st to form ring).
Ch 3 (counts as first dc here and throughout).
Work 11 more dc into the ring. Join with sl st to top of beg ch-3. Tug ring tail to close center hole.
(12 dc)
Round 2 (Color C, Golden Yellow)
Join Color C in any dc.
Ch 1 (does not count as st).
[Sc in dc, ch 3] 12 times. Sl st to beg sc.
(12 sc, 12 ch-3 spaces)
Round 3 (Color B, Dusty Rose, Petal Round)
Sl st into first ch-3 sp.
In each ch-3 sp work: [sc, hdc, 3 dc, hdc, sc].
Sl st to beg sc.
(12 petals, each using 7 sts)
Round 4 (Color C, Golden Yellow, Behind Petals)
Working into the Round 2 sc stitches behind the petals.
Join Color C to any Round-2 sc. Ch 3. Dc in same sc. Ch 1.
[2 dc in next Round-2 sc, ch 1] 11 times.
Sl st to top of beg ch-3.
(24 dc in 12 pairs, 12 ch-1 spaces)
Round 5 (Color E, Deep Rose, Outer Petal Round)
Join Color E in any ch-1 sp from Round 4.
[Sc in ch-1 sp, ch 3, 5 tr in same sp, ch 3, sl st in same sp] in each ch-1 sp (12 times).
Sl st to beg sc.
(12 outer petals)
Round 6 (Color B, Dusty Rose, Granny Transition)
Working into the dc pairs of Round 4 behind Round 5 petals.
Join Color B to any Round-4 dc (top of any dc in a 2-dc pair).
Ch 3. 2 dc in same st (3-dc cluster started). Ch 2.
[3 dc cluster in top of next 2-dc pair’s first dc, ch 2] 11 times.
Sl st to top of beg ch-3.
(12 clusters, 12 ch-2 spaces)
Round 7 (Color A, Cream, Final Square-Forming Round)
This round transforms your circular medallion into a square. Join Color A in any ch-2 sp.
Corner 1: Ch 3 (counts as dc). 2 dc in same ch-2 sp. Ch 2. 3 dc in same ch-2 sp.
Ch 1. 3 dc in next ch-2 sp. Ch 1. 3 dc in next ch-2 sp. Ch 1. (Two side clusters)
Corner 2: [3 dc, ch 2, 3 dc] in next ch-2 sp.
Ch 1. 3 dc in next ch-2 sp. Ch 1. 3 dc in next ch-2 sp. Ch 1. (Two side clusters)
Corner 3: [3 dc, ch 2, 3 dc] in next ch-2 sp.
Ch 1. 3 dc in next ch-2 sp. Ch 1. 3 dc in next ch-2 sp. Ch 1. (Two side clusters)
Corner 4: [3 dc, ch 2, 3 dc] in next ch-2 sp.
Ch 1. 3 dc in next ch-2 sp. Ch 1. 3 dc in next ch-2 sp. Ch 1. (Two side clusters)
Join with sl st to top of beg ch-3.
(4 corner double-clusters, 8 side clusters, 4 ch-2 corner spaces, 12 ch-1 side spaces)
Fasten off and weave in ends.
Your completed square should measure 5 inches by 5 inches after blocking.
Assembly Instructions
Panel Construction
Work your squares according to the layout described above. For the first square in each panel, complete all 7 rounds normally. For subsequent squares, work rounds 1 through 6 normally, then use the JAYG Flat Slip Stitch Join method on round 7 to attach to adjacent completed squares.
Join order: Work all squares in one horizontal row before moving to the next row. Join squares horizontally within a row first. Then join the completed row to the previous row as you work the final round of each square in the new row.
Bodice Construction
The Front Bodice Panel is 4 squares wide by 3 squares tall (12 squares).
The Back Bodice Panel is 4 squares wide by 3 squares tall (12 squares), worked in two halves of 2 squares wide by 3 squares tall with a center opening for the zipper.
Skirt Construction
The Front Skirt Panel is 5 squares wide by 7 squares tall (35 squares) with shaping triangles at the lower hem corners.
The Back Skirt Panel is 5 squares wide by 7 squares tall (35 squares) with shaping triangles at the lower hem corners and a center back opening along the top 3 rows.
Joining Bodice to Skirt
Seam the bottom edge of the bodice panels to the top edge of the skirt panels using the flat slip-stitch join or mattress stitch.
Side Seams
Using your yarn needle and Color A, seam the side edges of the front and back panels together using mattress stitch for an invisible seam.
Sleeve Construction
Each puff sleeve consists of 2 full squares plus 2 half-triangles for shaping. Join the squares into a short tube. Gather the top edge slightly to create the puff effect. Attach to the armhole opening using slip stitch or whip stitch.
Finishing
Scallop Edging
Work the scallop edging around the neckline, both sleeve hems, and the dress hem.
Join Color A at any point along the edge. Work the 5-dc scallop into every other stitch or joining space, adjusting spacing as needed to keep scallops even and lying flat.
Zipper or Button Closure
Install the invisible zipper along the center back opening from neckline to waist, or create button loops along one side and sew buttons to the other side.
Blocking
Wet-block the entire finished dress. Lay flat on blocking mats and pin to measurements. Allow to dry completely before wearing.
Tips for Success
Make gauge swatches. I cannot stress this enough. The difference between a dress that fits and a dress that does not comes down to gauge. Make two full squares before committing to the project.
Count your squares frequently. Before you start seaming, lay out all your squares and count them. It is much easier to make a missing square now than after you have started joining.
Block as you go. Consider blocking your squares in batches of 10 to 20. This makes the joining process much easier because the squares will be consistent in size.
Weave ends as you work. With 108 squares, you will have hundreds of ends to weave. Do not save them all for the end. Weave them in after every few squares.
Take photos of your layout. Before seaming, photograph your square arrangement from above. This helps if you get interrupted and need to remember where everything goes.
A Note on Time Investment
Yes, this project will take you 120 to 180 hours. That sounds like a lot because it is a lot. But think of it this way: if you crochet for one hour each evening while watching television, you will finish in about four to six months. If you dedicate a few weekend afternoons to crochet sessions, you could finish in three months.
The square-making phase (80 to 120 hours) is perfect for portable projects. Toss a few balls of yarn in a bag and work on squares during lunch breaks, waiting rooms, or car rides. The joining, seaming, and finishing phases (40 to 60 hours) require more focus and a flat surface, so save those for home.
Every single square you complete is progress. Celebrate the milestones. Ten squares. Twenty-five squares. Fifty squares. Before you know it, you will be laying out panels and marveling at what your hands have created.
Final Thoughts
This Dusty Rose Granny Square Maxi Dress pattern is genuinely one of the most rewarding projects I have ever designed. There is something deeply satisfying about watching a pile of individual squares transform into a wearable garment. Every time I wear this dress, someone stops me to ask about it. And every time, I get to say those magic words: I made it myself.
If you have been wanting to try garment crochet but felt intimidated by shaping and sizing, this modular approach is perfect for you. The squares do the work. You just need patience, consistency, and a willingness to block properly.
I hope you love making this dress as much as I loved designing it. Thank you for trusting me with your time and your yarn stash. I truly appreciate every single one of you who tries my patterns.
If this pattern has inspired you to start your own granny square dress journey, I would love for you to save it to your Pinterest boards so you can find it when you are ready to begin. And please, when you finish yours, leave a comment below or tag me on social media. Seeing your creations is the absolute best part of sharing patterns, and I cannot wait to see your color combinations.