
Last summer I found myself standing in front of my closet, staring at the same rotation of basic tank tops and feeling completely uninspired. I wanted something that would make me feel put together but still effortlessly cool. Something that looked like I spent way more time on my outfit than I actually did. That’s when I decided to finally tackle the pineapple lace technique I’d been avoiding for years.
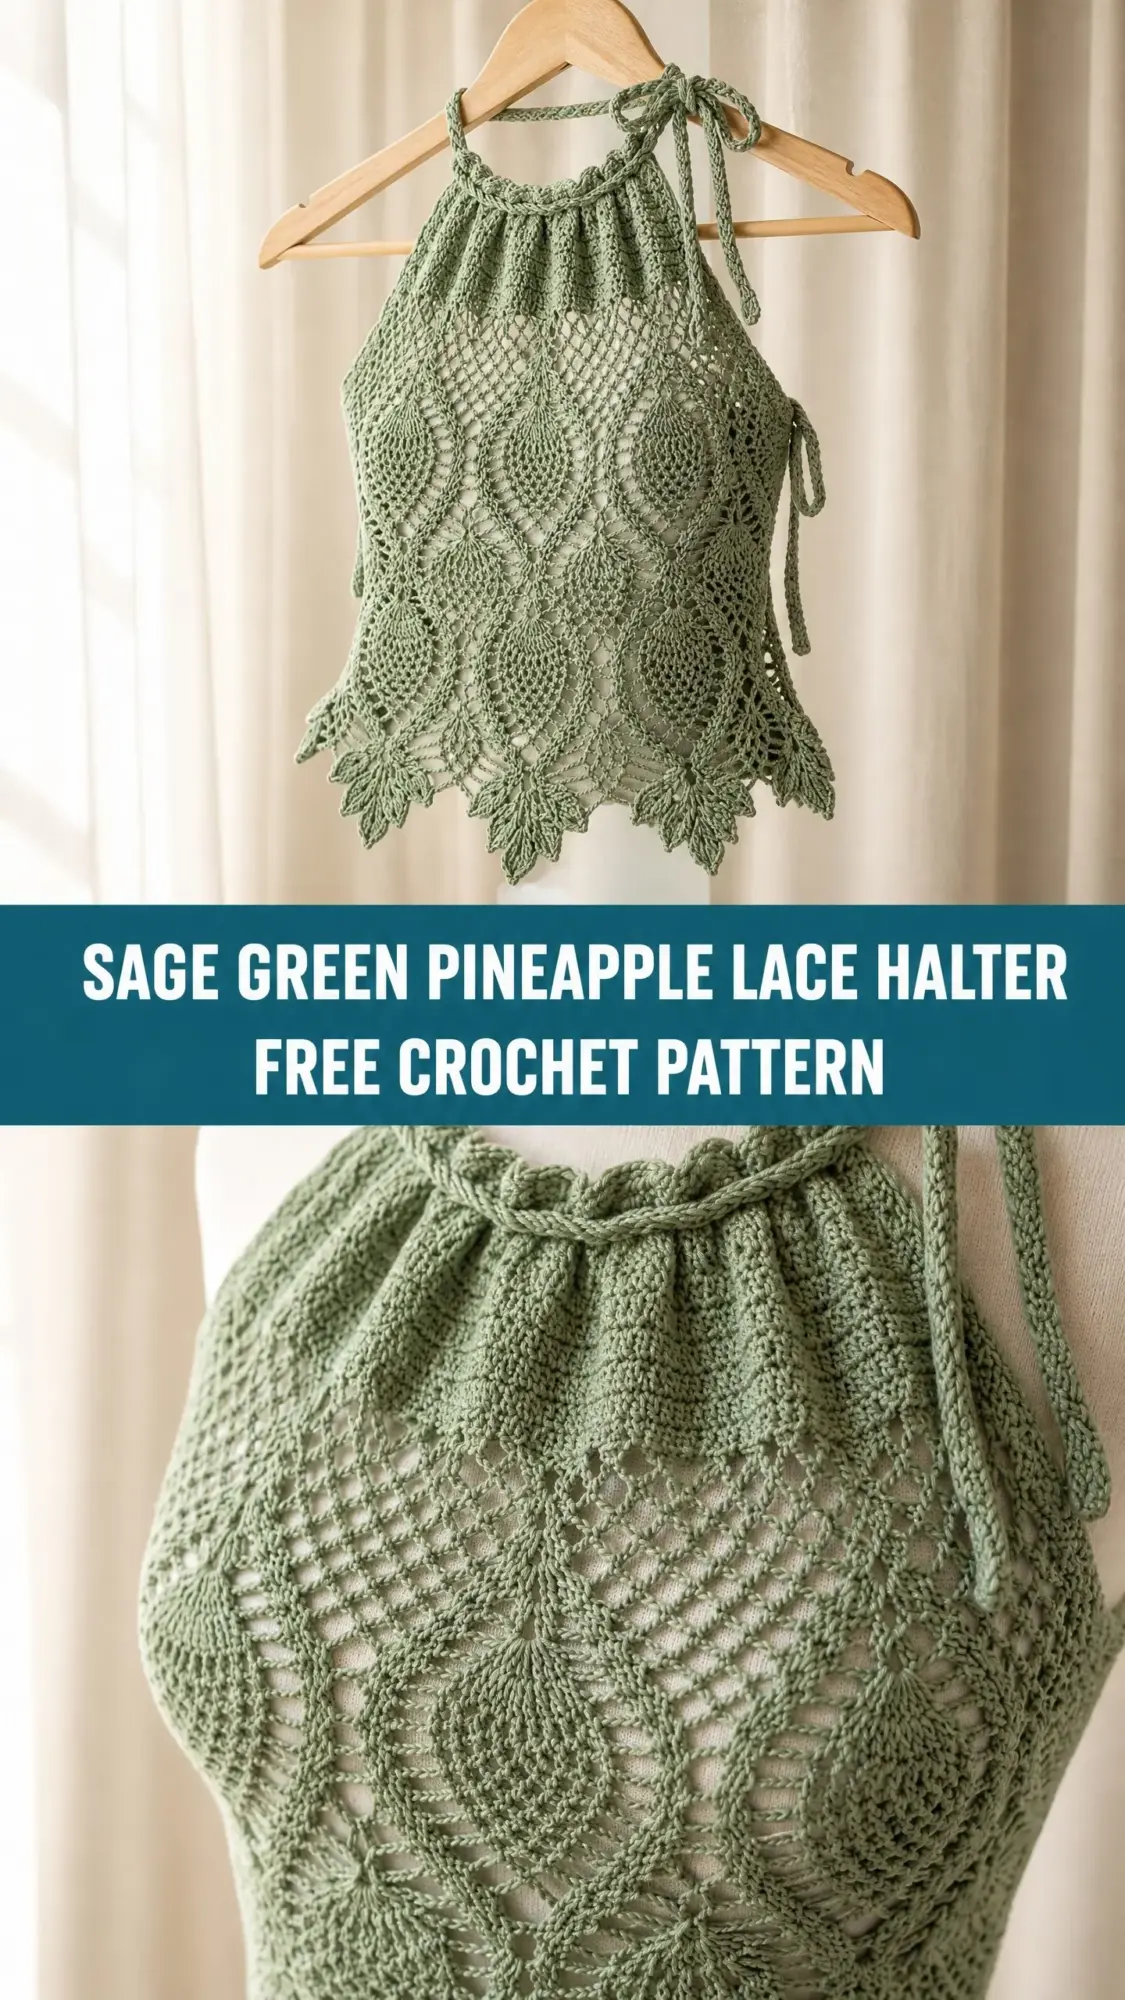
I won’t lie to you. I procrastinated on this project for months because pineapple crochet always seemed intimidating. All those yarn overs, the counting, the way the fans narrow so precisely. But once I actually sat down and worked through it row by row, I realized it was just a rhythm. A very satisfying, meditative rhythm that produced the most gorgeous fabric I’ve ever made with my own hands.
This sage green pineapple lace halter top is now my absolute favorite summer piece. Every time I wear it, someone asks where I bought it. The look on their faces when I say I made it? Priceless. If you’ve been eyeing pineapple lace and wondering if you can pull it off, this is your sign. Let me walk you through every single step.
Why This Crochet Pattern Works
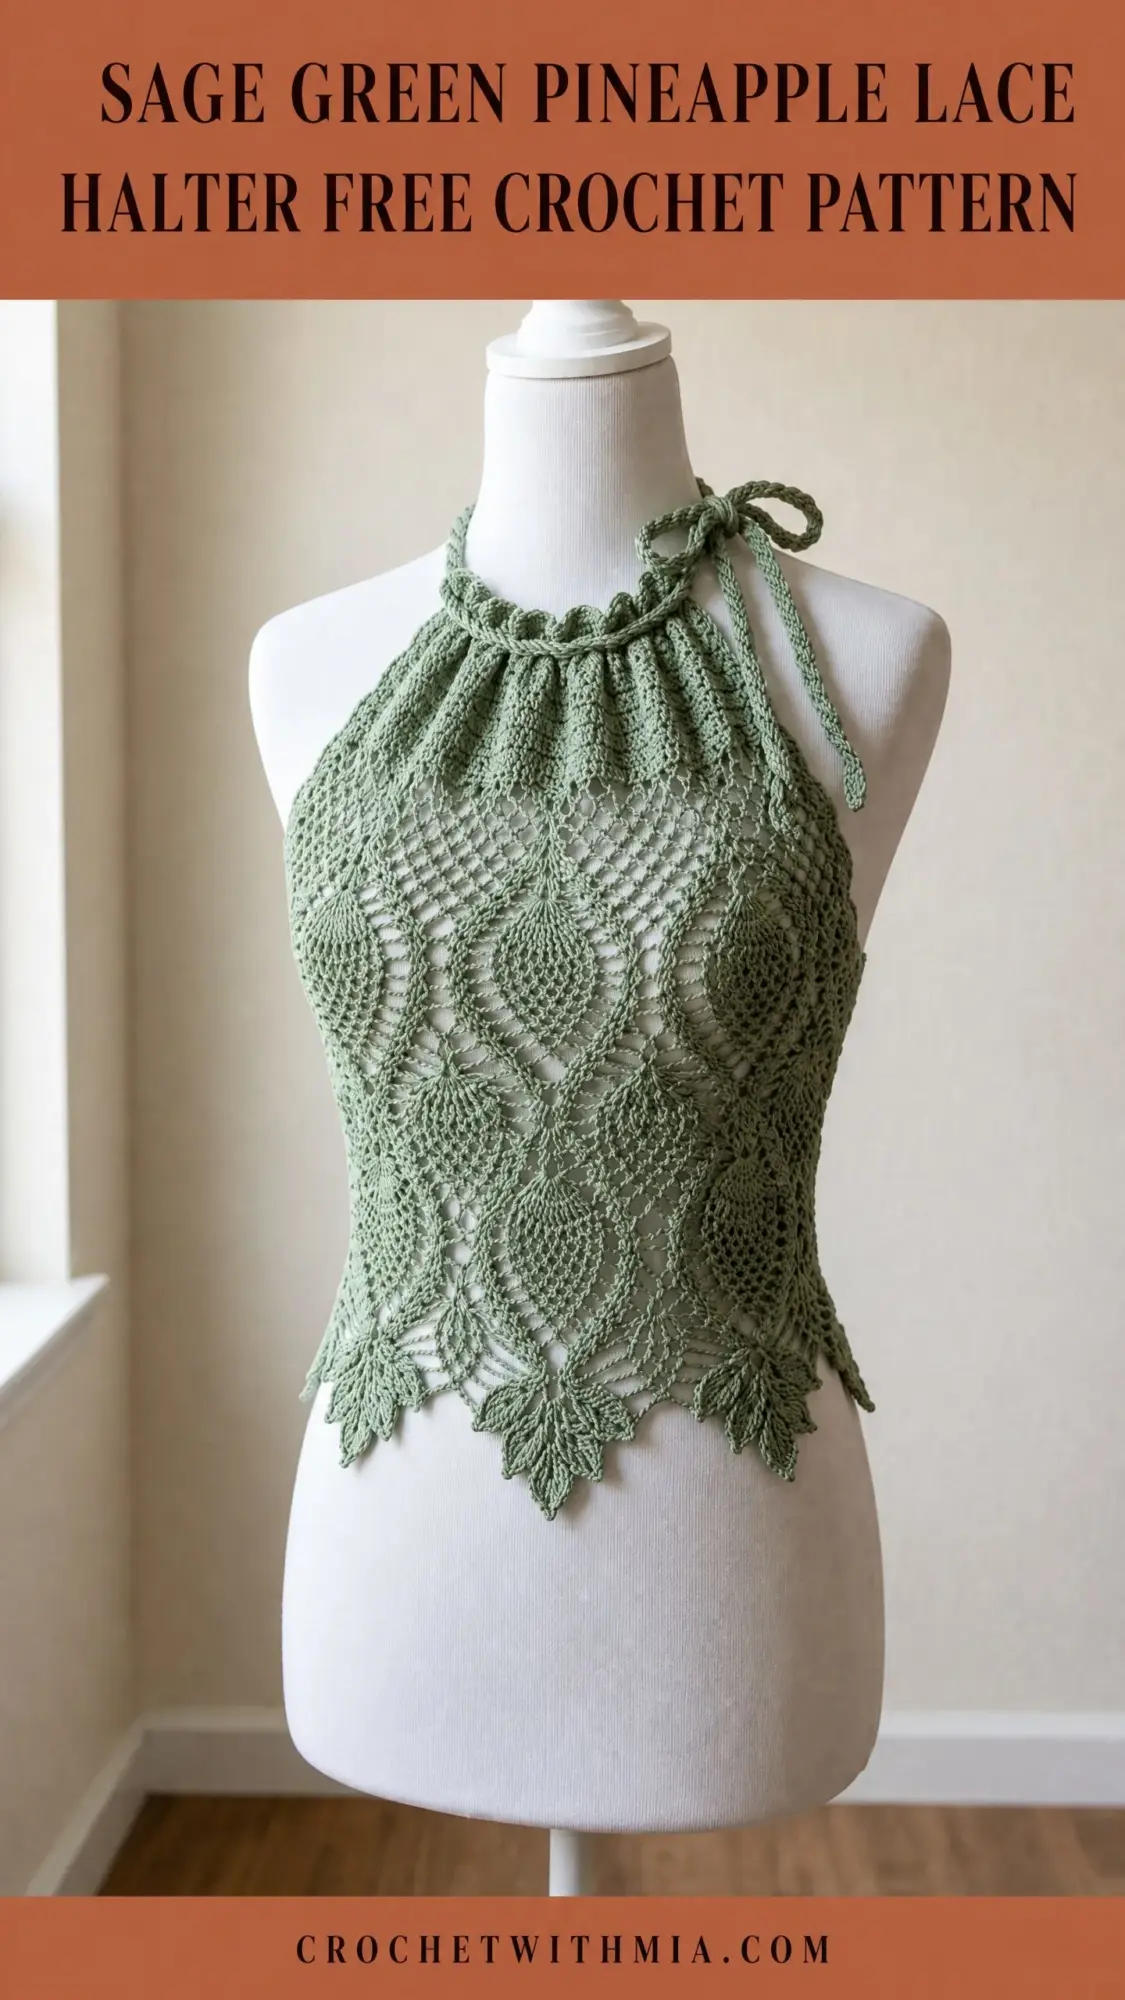
The pineapple stitch creates those iconic triangular fan shapes that have been a staple of vintage crochet for generations. In this halter top design, three full pineapple clusters sit across the front panel, with half pineapples at each side edge creating a perfectly fitted silhouette. The motifs stack in offset tiers, meaning each new layer of pineapples sits in the spaces between the ones below. This creates that beautiful interleaved look you can see in the finished piece.
The construction is surprisingly straightforward once you understand the logic. You work flat panels from the bottom up, starting at the scalloped hem and ending at the gathered neckline. A braided cord threads through the top edge and ties at the back of your neck. The open back keeps everything breezy and comfortable for warm weather.
Skill level is advanced, so I want to be honest about that upfront. But advanced doesn’t mean impossible. It means you should be comfortable reading written instructions, managing multiple yarn overs in a row, and working decreases while maintaining a lace pattern. If you’ve made doilies or lace shawls before, you have all the skills you need.
Materials You Will Need
Yarn: Approximately 800 yards (730 meters) for size Small, 900 yards (823 meters) for size Medium, or 1000 yards (914 meters) for size Large. You want fingering weight yarn or size 10 crochet cotton thread. Choose a smooth, tightly spun plant fiber for the crispest stitch definition.
Some excellent options include Paintbox Yarns Cotton Fresh DK worked at fingering tension, Drops Safran in Pistachio Green, or Lion Brand 24/7 Cotton in Sage. Avoid fuzzy or woolen spun yarns because they obscure the delicate lace structure.
Hook: US Steel 7 (1.65 mm) for thread, or US B-1 (2.25 mm) for fingering weight yarn. Use whichever size gives you the correct gauge.
Notions:
Finished Measurements
This pattern includes three sizes. The design uses negative ease, meaning you choose a size 1 to 2 inches smaller than your actual bust measurement for that snug lace fit.
Finished bust circumference:
Finished length from shoulder to hem at center front:
Gauge Information
Gauge is mandatory for a fitted garment. Please do not skip this step.
One complete pineapple motif measures 4 inches (10 cm) wide and 5 inches (12.5 cm) tall after blocking.
In single crochet (sc), which means inserting your hook, yarning over, pulling up a loop, yarning over, and pulling through both loops: 24 stitches and 28 rows equals a 4 inch (10 cm) square after blocking.
To check your gauge, chain 36 and work 20 rows following the pattern. Block your swatch before measuring. If your swatch is too big, try a smaller hook. If it’s too small, try a larger hook.
Abbreviations and Stitch Definitions
Let me walk you through every abbreviation you’ll encounter. I’m defining each one with a plain English explanation so nothing feels mysterious.
beg = beginning
ch = chain, which means yarning over and pulling through the loop on your hook
ch-sp = chain space, the gap created by chains in a previous row
dc = double crochet, which means yarning over, inserting your hook, pulling up a loop (3 loops on hook), yarning over and pulling through 2 loops (2 loops remain), yarning over and pulling through the last 2 loops
hdc = half double crochet
lp(s) = loop or loops
rem = remaining
rep = repeat
RS = right side, the side that faces outward when worn
sc = single crochet, inserting your hook, pulling up a loop, yarning over and pulling through both loops
sk = skip
sl st = slip stitch, inserting your hook and pulling the yarn directly through both the stitch and the loop on your hook
sp = space
st(s) = stitch or stitches
t-ch = turning chain
tr = treble crochet
WS = wrong side
yo = yarn over
Special Stitches for This Pattern
Pineapple Shell (PS): In the designated chain space, work yarn over, insert hook, yarn over, pull up loop, yarn over, pull through 2 loops. Repeat this 9 times into the same space. Then yarn over and pull through all 10 loops on your hook. This creates a closed cluster that forms the tip of each pineapple.
Fan Shell (FS): Work 7 double crochets into the same chain space or stitch. This creates the wide base where each pineapple begins.
Picot: Chain 3, then slip stitch into the first chain you made. This creates the small decorative bumps along the hem edge.
V-stitch (V-st): Work (double crochet, chain 2, double crochet) all into the same stitch or space.
Shell: 5 double crochets into the same stitch or space.
Sc2tog: Insert your hook into the next stitch and pull up a loop. Insert your hook into the following stitch and pull up a loop. Yarn over and pull through all 3 loops. You’ve decreased by one stitch.
Dc2tog: Yarn over, insert hook into the next stitch, yarn over, pull up a loop, yarn over, pull through 2 loops. Repeat in the next stitch. Yarn over and pull through all 3 loops remaining. Another decrease method.
Braided Cord: Cut 9 strands of yarn each 60 inches (152 cm) long. Fold in half and divide into 3 groups of 6 strands each. Braid tightly for about 20 inches (51 cm) and tie each end with an overhand knot.
Pattern Notes Before You Begin
The top is worked in two flat panels: front and back. Each panel starts at the bottom hem and works upward.
The pineapple motifs are worked over a 12 row repeat. Each pineapple begins wide at the base with a 7 double crochet fan and narrows to a single cluster at the top.
For size Small, the front panel contains 3 full pineapple repeats across the center plus 1 half pineapple at each side edge. Size Medium adds 1 additional full repeat (5 total). Size Large adds 2 additional full repeats (6 total).
All turning chains work as follows: a turning chain of 3 counts as 1 double crochet. A turning chain of 4 counts as 1 treble. A turning chain of 1 does not count as a stitch.
Block aggressively. Pineapple lace absolutely must be wet blocked and pinned to achieve the open, defined look you see in the photos.
Front Panel Instructions
The front panel is worked flat, beginning at the lower hem and working upward to the neckline.
Foundation chain for size Small: Chain 109.
Foundation chain for size Medium: Chain 127.
Foundation chain for size Large: Chain 145.
The following instructions are written for size Small. Adjustments for Medium and Large appear in brackets.
Setup Row (WS): Single crochet into the 2nd chain from hook and into each chain across. Turn. (108 sc) [M: 126 sc] [L: 144 sc]
Your foundation row should measure approximately 18 inches (46 cm) wide for size Small. If your measurement is significantly off, check your gauge and adjust your hook size.
Row 1 (RS, Hem Setup): Chain 1, single crochet into the first stitch, chain 3, skip 2 stitches, single crochet into the next stitch. Repeat (chain 3, skip 2 stitches, single crochet into the next stitch) across, ending with single crochet in the last stitch. Turn. (36 ch-3 spaces) [M: 42 ch-3 spaces] [L: 48 ch-3 spaces]
Row 2 (WS): Chain 4 (counts as double crochet plus chain 1), double crochet into the first chain 3 space, chain 1. Repeat (double crochet into the next single crochet, chain 1, double crochet into the next chain 3 space, chain 1) across, ending with double crochet into the last single crochet. Turn. (73 dc) [M: 85 dc] [L: 97 dc]
Row 3 (RS, Pineapple Base Row): Chain 3 (counts as double crochet), work 3 double crochets into the first chain 1 space (this is your half fan at the edge). Chain 1, skip the next double crochet. In the next chain 1 space, work a Fan Shell (7 double crochets). Chain 1, skip the next double crochet. Continue working (double crochet into the next double crochet, chain 1, 7 double crochets into the next chain 1 space, chain 1) across. Place your last 4 double crochets into the final chain 1 space as the closing half fan. Turn. (80 dc, 18 ch-1 spaces) [M: 94 dc, 21 ch-1 spaces] [L: 108 dc, 24 ch-1 spaces]
Row 4 (WS, Pineapple Build Row 1): Chain 3 (counts as double crochet). Work dc2tog over the first 2 double crochets to begin narrowing the half fan. Chain 1. Into the space above each fan shell from the previous row, work (double crochet into dc 1, chain 1, double crochet into dc 2, chain 1, double crochet into dc 3, chain 1, double crochet into dc 4, chain 1, double crochet into dc 5, chain 1, double crochet into dc 6, chain 1, double crochet into dc 7). That gives you 7 double crochets with 6 chain 1 spaces between them. Chain 1. Repeat across each fan, working dc2tog at each joining point to create the mesh diamonds between pineapples. End with dc2tog over the last 2 double crochets of the final half fan, then double crochet into the turning chain. Turn. (76 dc)
Row 5 (RS, Pineapple Build Row 2): Chain 3 (counts as double crochet). Skip the first double crochet. Double crochet into the next double crochet, chain 2. Work across each pineapple column: (single crochet into the first double crochet of the pineapple column, chain 1, single crochet into the next double crochet, chain 1) repeat across all 7 double crochets with chain 1 between each single crochet. That gives you 7 single crochets per pineapple with 6 chain 1 spaces. Chain 2, double crochet into the double crochet between pineapples, chain 2. Repeat across. End with double crochet in the turning chain. Turn. (11 dc, 63 sc)
Row 6 (WS, Pineapple Narrow Row 1): Chain 3. Double crochet into the first space. Work (chain 1, skip single crochet, single crochet into the chain 1 space between single crochets) repeat across each pineapple column. Reduce from 7 single crochets to 6 single crochets per column by working sc2tog over the last 2 single crochets of each column. Work double crochet between pineapples as established. Turn. (6 sc per pineapple x 9 fans = 54 sc)
Row 7 (RS): Chain 1. Single crochet into the double crochet, chain 3. Across each pineapple column, work (single crochet into the chain space between single crochets) across each column, reducing to 5 single crochets per column. Chain 3, single crochet into the double crochet between pineapples. Repeat across. Turn. (5 sc per pineapple x 9 fans = 45 sc)
Row 8 (WS): Chain 3. In each chain 3 space work a V-stitch (double crochet, chain 2, double crochet). Across each pineapple column, work single crochet into each chain space between single crochets, reducing to 4 single crochets per column. Turn. (4 sc per pineapple x 9 fans = 36 sc)
Row 9 (RS): Chain 1. Work single crochet into the first V-stitch chain 2 space. Across each pineapple column, work single crochet into each chain space, reducing to 3 single crochets per column. Single crochet into each V-stitch space between pineapples. Turn. (3 sc per pineapple x 9 fans = 27 sc)
Row 10 (WS): Chain 3. Double crochet into the single crochet. Chain 1. Across each pineapple column, work single crochet into each chain space, reducing to 2 single crochets per column. Chain 1, double crochet between pineapples. Turn. (2 sc per pineapple x 9 fans = 18 sc)
Row 11 (RS): Work across, reducing each pineapple column to 1 single crochet. (1 sc per pineapple x 9 fans = 9 sc)
Row 12 (WS, Pineapple Tip Row): Work a Pineapple Shell (PS) over each single remaining single crochet: chain 3, PS into the chain space below the single crochet, chain 3. Slip stitch into the next double crochet between pineapple columns. Repeat across. This closes all 9 pineapple tips. Turn. (9 PS clusters)
Checkpoint: Your first tier of pineapple motifs is complete. The panel should measure approximately 5 inches (12.5 cm) from the foundation row and approximately 18 inches (46 cm) wide for size Small.
Second Pineapple Tier
Row 13 (RS, Tier 2 Mesh Foundation): Chain 5 (counts as double crochet plus chain 2). Double crochet into the same stitch. Chain 2, single crochet into the top of the next Pineapple Shell, chain 2. Work (V-stitch into the slip stitch between PS clusters, chain 2, single crochet into the next PS, chain 2) repeat across, ending with a V-stitch into the last stitch. Turn. (10 V-stitches, 9 sc)
Row 14 (WS, Tier 2 Fan Base): Chain 3 (counts as double crochet), 3 double crochets into the first chain 2 space (half fan). Chain 1. Work a Fan Shell into the next chain 2 space (before the single crochet). Chain 1, skip the single crochet. Work a Fan Shell into the chain 2 space after the single crochet. Chain 1. Repeat (double crochet into the V-stitch space, chain 1, Fan Shell into the next chain 2 space, chain 1, skip single crochet, Fan Shell into the chain 2 space after single crochet, chain 1) across. End with 4 double crochets into the final chain 2 space. Turn.
In this second tier, the pineapple fans are staggered half a unit from the first tier. This creates the offset interleaved arrangement you see in the finished piece.
Rows 15 through 24: Repeat Rows 4 through 12 of the first tier instructions. The stitch counts follow the same progression, with each pineapple narrowing from 7 single crochets down to 1 single crochet and closing with a Pineapple Shell.
Checkpoint: Two complete tiers of pineapple lace are finished. The panel should measure approximately 10 inches (25 cm) from the foundation.
Waist Shaping
Row 25 (RS, Waist Decrease Row 1): Slip stitch across the first 3 stitches. Chain 3 (now counts as the first double crochet at the narrowed edge). Work across in the established mesh pattern to the last 3 stitches. Leave the last 3 stitches unworked. Turn. (6 stitches decreased total)
Row 26 (WS): Slip stitch across the first 2 stitches. Chain 3. Work across to the last 2 stitches. Leave unworked. Turn. (4 more stitches decreased)
Row 27 (RS): Slip stitch across the first stitch. Chain 3. Work across to the last stitch. Leave unworked. Turn. (2 more stitches decreased)
Total waist reduction: 12 stitches removed (6 each side), narrowing the panel by approximately 4 inches (10 cm) in circumference.
Third Pineapple Tier (Bust)
Row 28 (WS, Tier 3 Mesh Foundation): Same as Row 13, but worked over the reduced stitch count. For size Small, the narrowed panel accommodates 2 full pineapple fans across the center bust.
Rows 29 through 38: Work the equivalent of Rows 14 through 22 for the third pineapple tier. Size Small works 2 full pineapples at the bust. Size Medium and Large work 3 pineapples.
Row 38 (RS, Bust Shaping Increase Row): At each side edge, work (double crochet, chain 2, double crochet, chain 2, double crochet) into the edge chain space to add 2 double crochets each side. (4 dc added)
Row 39 (WS): Continue mesh and pineapple tip closing as established.
Row 40 (RS): At each side edge, add 2 double crochets as in Row 38. Continue pineapple tips and mesh across center. (4 dc added)
Neckline Gathering Row
Row 41 (RS): Chain 1. Work single crochet evenly across the top edge of the front panel. Work 2 single crochets in every other stitch or space to create a gently gathered edge. Total: approximately 60 sc for size Small, 72 sc for size Medium, 84 sc for size Large. Do not turn. Fasten off. Leave a 24 inch (61 cm) yarn tail for seaming.
Hem Edging
Work this before seaming while the panel is still flat.
With the right side facing, attach yarn at the bottom right corner of the foundation chain.
Edging Row 1: Chain 1. Work single crochet into each foundation chain across. Turn. (108 sc for Small)
Edging Row 2: Chain 1. Single crochet into the first single crochet. Chain 3, skip 2 single crochets, single crochet into the next single crochet. Repeat across. Turn. (36 ch-3 spaces)
Edging Row 3 (Leaf Points): Into each chain 3 space, work the following leaf point: (double crochet, chain 1, double crochet, chain 1, double crochet, chain 1, double crochet). That’s 4 double crochets with 3 chain 1 spaces. Slip stitch into the single crochet between spaces. Repeat across. Fasten off.
Edging Row 4 (Picot Caps): Attach yarn at the tip of the first leaf point. Work (single crochet into chain 1 space, Picot, single crochet into chain 1 space, chain 2, single crochet into slip stitch base, chain 2) repeat across all leaf points. Fasten off.
Back Panel Instructions
Work the foundation chain the same as the front panel: 109 chains for Small, 127 for Medium, 145 for Large.
Rows 1 through 27: Work exactly as the front panel. At the end of Row 27, the back and front panels are identical.
Back Panel Split
Count the stitches across Row 27 and mark the center stitch with a stitch marker.
Right Back Half:
Row 28-R (RS): Attach yarn at the center marker. Chain 3. Work in established mesh across to the right edge. Turn.
Continue working the right half in mesh pattern only (no pineapple fans above the waist on the back). Work even in (double crochet, chain 2) mesh for 12 more rows.
Row 40-R: Single crochet evenly across the top of the right back half. Approximately 30 single crochets for size Small. Fasten off.
Left Back Half:
Row 28-L (RS): Attach yarn at the center marker on the opposite side. Work identically to the right half in mirror image. Fasten off after the equivalent of Row 40.
Work the hem edging on the back panel the same as the front panel.
Assembly and Finishing
Side Seaming
Hold the front panel and back panel with right sides together. Using your tapestry needle and yarn, whipstitch or slip stitch seam along each side edge from the hem to the armhole opening. Leave the top 5 inches (12.5 cm) of each side unsewn. This creates the open armholes. Turn right side out.
Neckline Cord
Cut yarn into 18 lengths, each measuring 60 inches (152 cm). Divide into 3 groups of 6 strands each. Braid the three groups together tightly for approximately 20 inches (51 cm). Tie each end with an overhand knot and trim the tails neatly.
Thread the finished cord through the gathering row of the front panel neckline, entering at the right side and exiting at the left side. Pull to gather the neckline to approximately 12 to 14 inches (30 to 36 cm) across for size Small. The cord ends tie in a bow or knot at the back of your neck.
Blocking Your Pineapple Lace Halter
Step 1: Weave in all yarn ends with a tapestry needle, running each tail through at least 2 inches (5 cm) of stitches on the wrong side before trimming.
Step 2: Fill a basin with cool water. Submerge the finished top completely and let it soak for 15 to 20 minutes. Do not wring or twist.
Step 3: Remove from water and press gently between two clean towels to remove excess water.
Step 4: Lay flat on blocking mats. Stretch the panel to its final measurements: 18 inches (46 cm) wide at the hem for size Small, 15.5 inches (39 cm) wide at the bust, 16 inches (41 cm) tall at center front.
Step 5: Pin along each pineapple tip and leaf hem point using rust proof blocking pins. For each pineapple fan, pin the two outer edges wide apart and pin the tip upward to emphasize the triangular shape.
Step 6: Allow to dry completely, which takes 12 to 24 hours. Do not apply heat.
Step 7: Remove pins once fully dry. Your lace will hold its beautiful open shape.
Care Instructions
Machine wash on the delicate cycle in a mesh laundry bag using cold water and mild detergent. Alternatively, hand wash in cool water.
Do not tumble dry. Lay flat on a clean towel, reshaping gently as it dries.
Do not iron directly. Steam from a distance of 2 inches (5 cm) to refresh the lace if needed.
Store flat or rolled. Never hang, as plant fiber lace will stretch under its own weight over time.
Final Thoughts on This Crochet Tutorial
Making this sage green pineapple lace halter crochet pattern was genuinely one of the most rewarding projects I’ve completed. Yes, it takes time. Yes, you need to pay attention. But watching those pineapple fans emerge row by row is absolutely magical. And wearing the finished piece feels like a creative accomplishment you can literally put on your body.
If you’re intimidated by pineapple lace, start with a swatch. Work through just one full pineapple motif and see how the rhythm clicks. Once you feel that click, the rest flows naturally. Trust yourself. You can absolutely do this.
I would love nothing more than to see your finished halter tops on Instagram or in our Facebook group. Tag me so I can celebrate with you. Happy crocheting, friend.
If this pattern caught your eye, go ahead and pin it to your crochet board so you can find it when you’re ready to start. And if you make one, please drop a comment below. I genuinely love hearing how your projects turn out!