
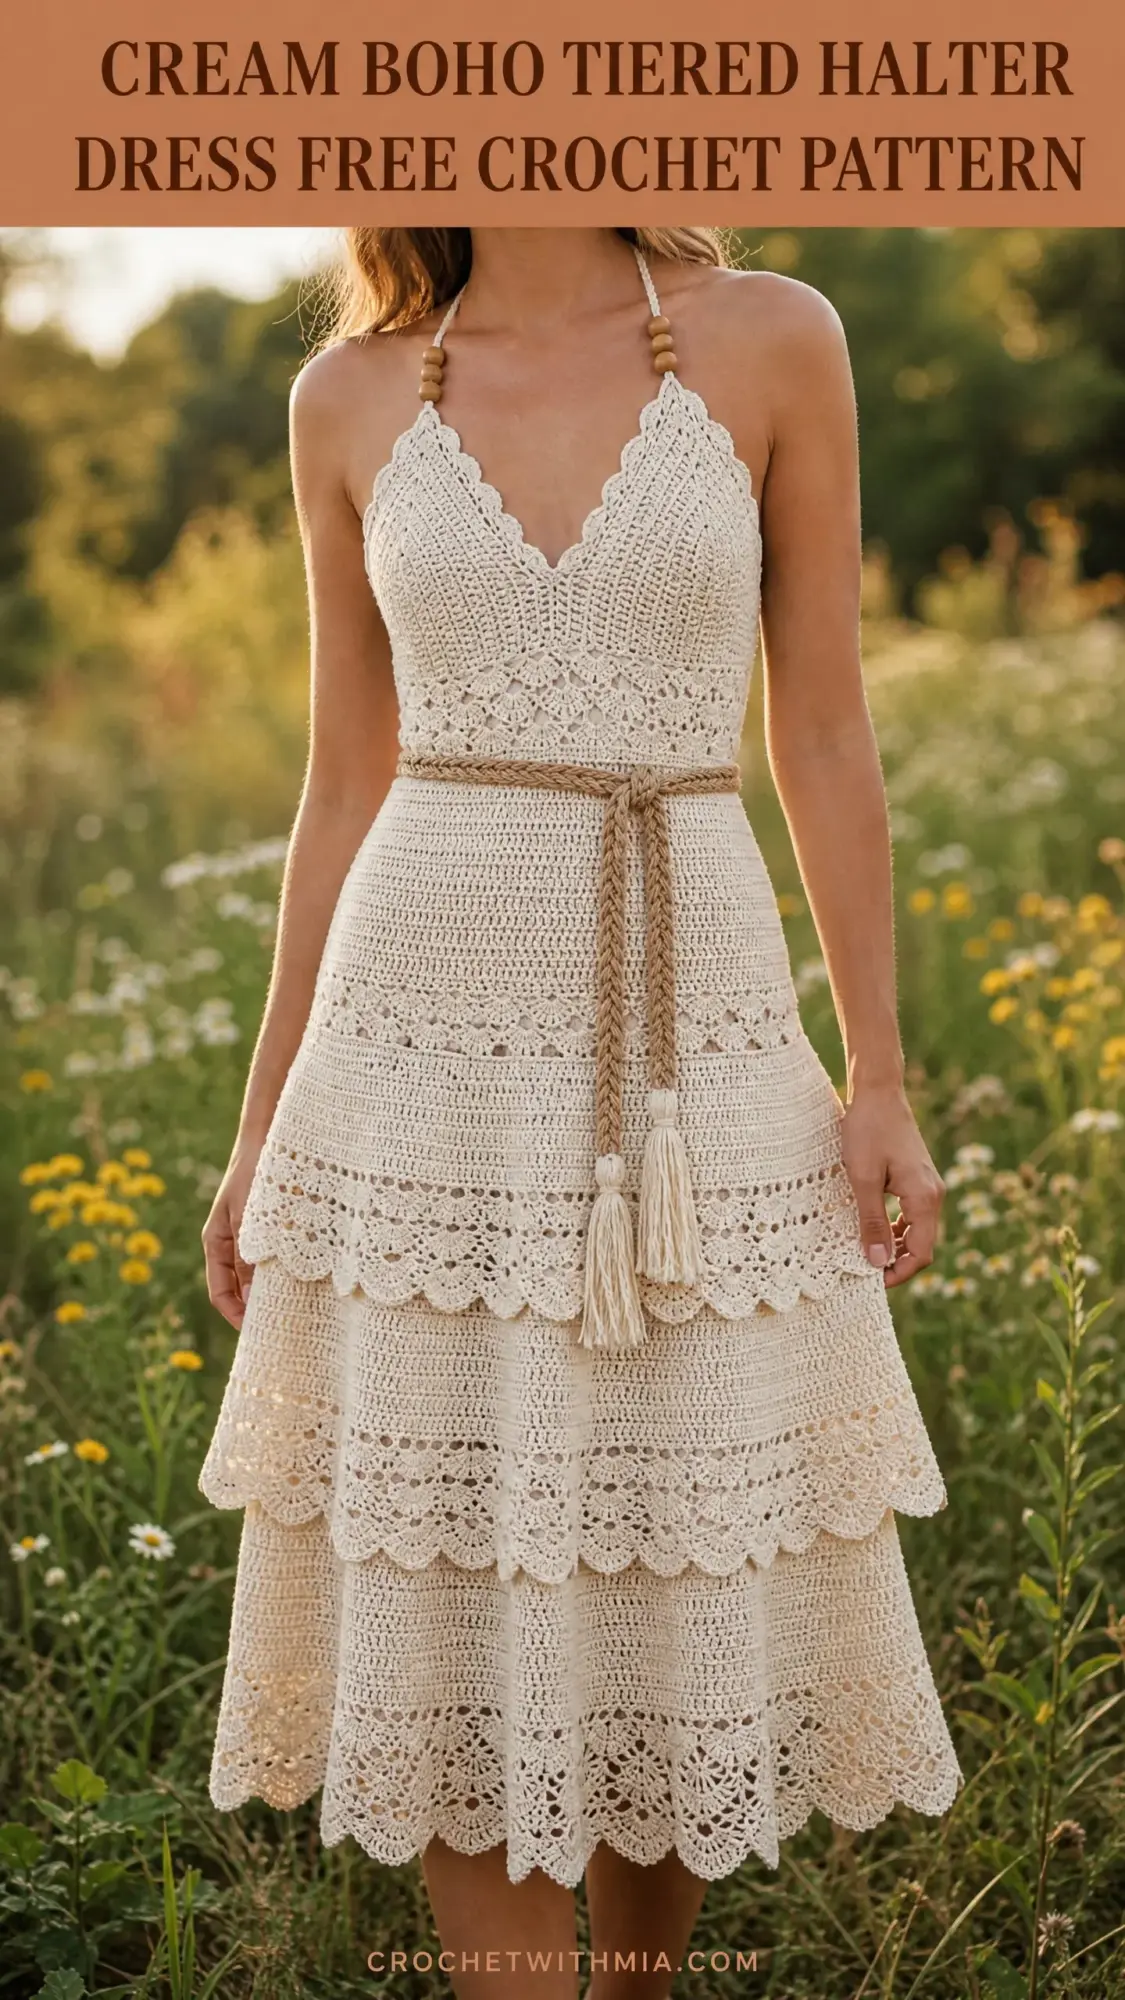
This is a midi-length halter dress with a fitted V-neck bodice, three cascading tiered skirt layers, and scalloped lace edging. You will need DK weight cotton yarn, two hook sizes, and experience with V-stitch and shell motifs. The construction works top-down with the bodice cups worked flat, joined at center front, then the waistband and skirt tiers worked in the round.
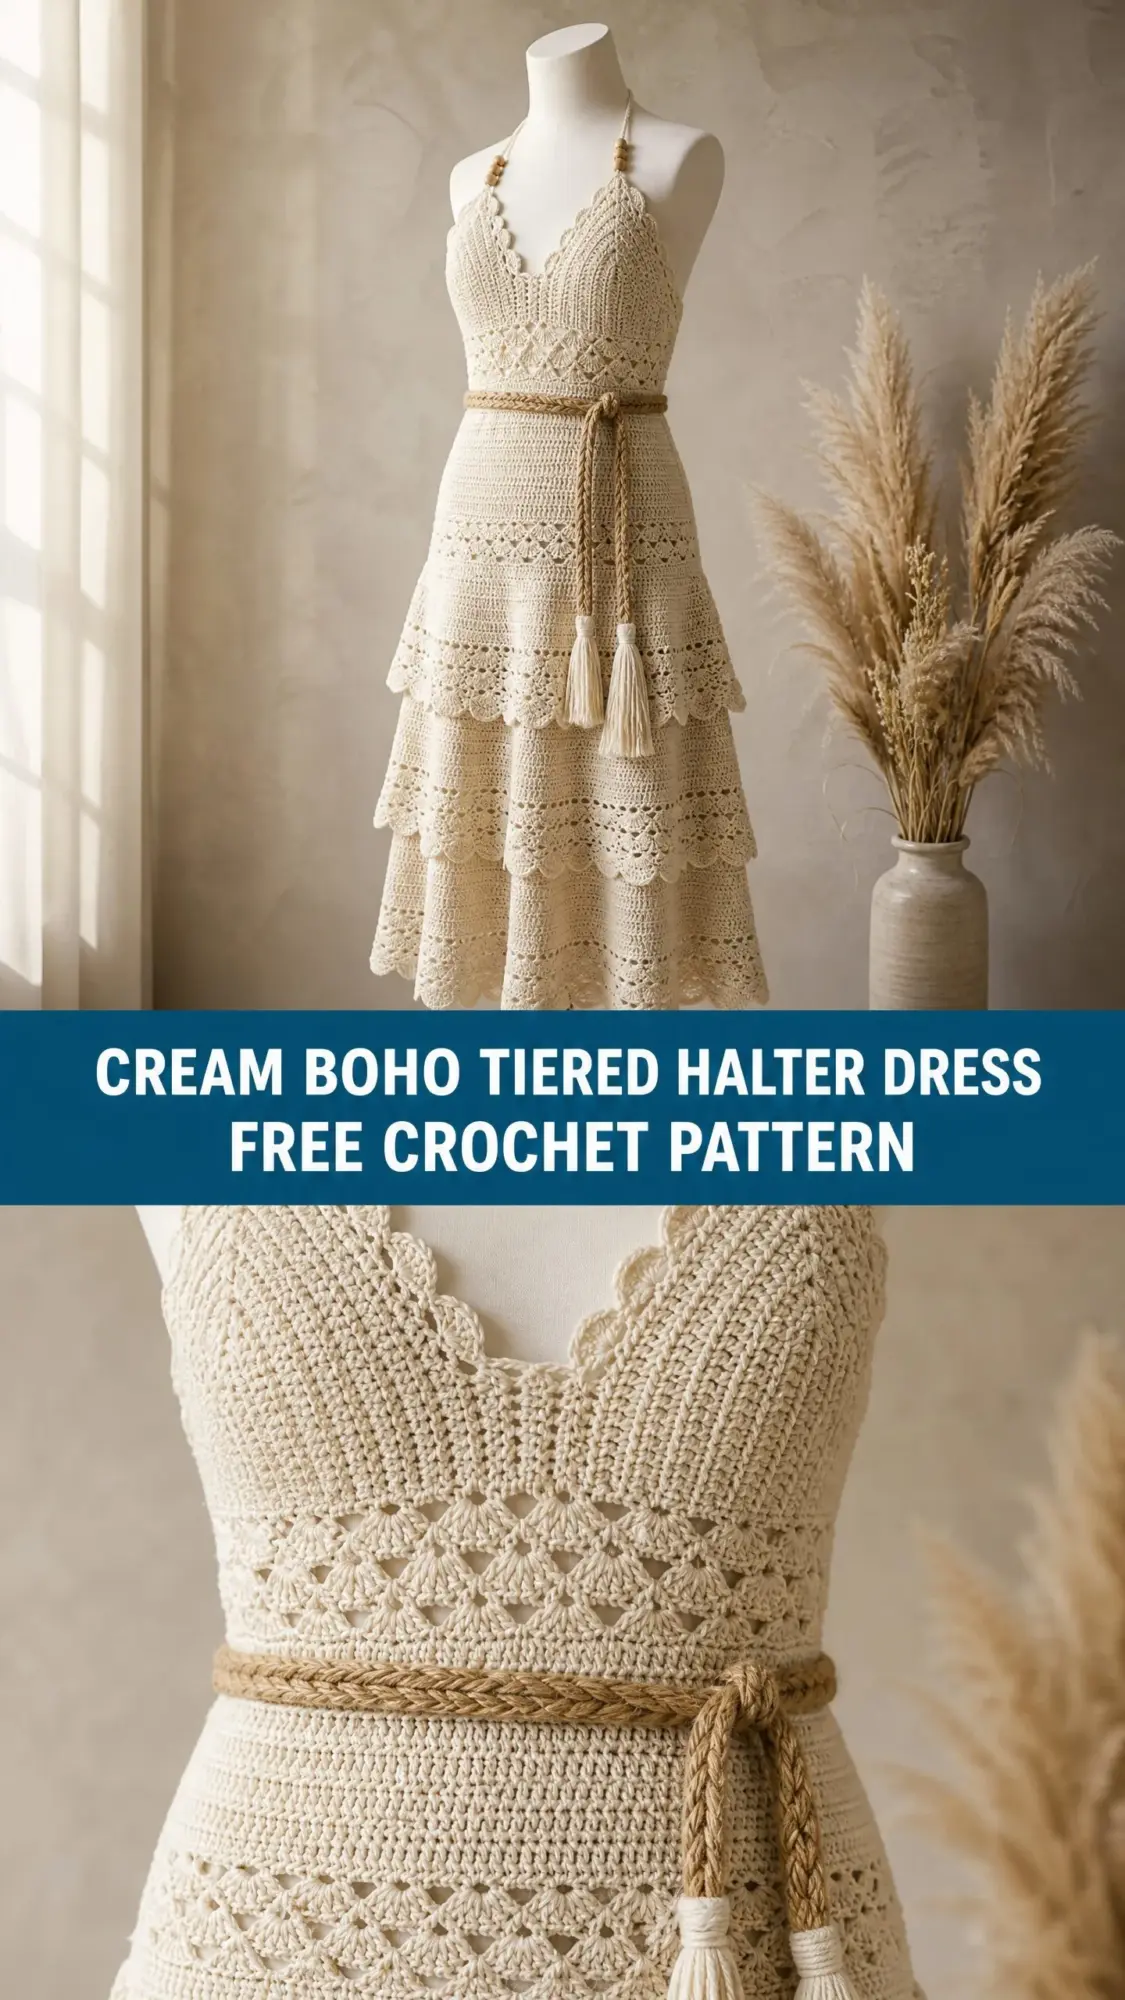
The open back design gives this dress a breezy, romantic feel perfect for summer events or beach days. A braided belt with tassel ends cinches the waist, and wooden beads thread onto the halter ties for that boho finishing touch.
This is an advanced intermediate project requiring 60 to 80 hours for size Medium. If you can read multi-stitch lace repeats and work basic garment shaping, you are ready to tackle this stunning piece.
Materials You Will Need
Before you begin, gather everything on this list. Having all your supplies ready makes the process smoother and helps you avoid frustrating mid-project stops.
Yarn: 1,400 yards (1,500, 1,650, 1,800, 1,950 yards) of DK weight (CYCA 3) 100% cotton yarn in cream or natural ecru for sizes XS through XL respectively
Recommended Yarn Options:
Hooks:
Notions:
A quick note on yarn substitution: choose a smooth, plied DK cotton with minimal fuzz. The lace stitch patterns require clear stitch definition, so avoid fluffy or textured yarns. Always swatch before substituting.
Finished Sizes
All instructions are written for size Medium (M). Changes for XS, S, L, XL appear in parentheses in this order: XS, S, M, L, XL.
The bodice is designed with zero ease for a close fit. The skirt tiers have approximately 2 inches of ease at the hip to allow drape and movement.
Gauge for This Crochet Pattern
With smaller hook (E-4 / 3.5 mm) in single crochet (sc):
20 stitches x 24 rows = 4 in / 10 cm, blocked
With larger hook (F-5 / 3.75 mm) in V-stitch lace pattern:
One 6-stitch V-stitch repeat = 1.5 in wide, 4 rows = 2 in tall, blocked
Gauge is critical for fit. Please take the time to swatch and adjust your hook size if needed. I know swatching feels tedious, but with a fitted garment like this, it truly makes the difference between a dress that fits beautifully and one that needs major alterations.
Abbreviations and Special Stitches
Let me walk you through every abbreviation and special stitch you will encounter. If you are newer to garment construction, bookmark this section for quick reference.
Standard Abbreviations:
Special Stitches Explained:
V-stitch (V-st): Work [dc, ch 1, dc] all into the same stitch or space. This creates the lace column used throughout the skirt tiers. Think of it as a little "V" shape with a chain in the middle.
Shell stitch (shell): Work 5 dc all into the same stitch or space. This creates the fan or shell motif used at lace border edges.
Scallop edging: Into the same stitch, work [sl st, ch 3, 4 dc, ch 3, sl st]. Skip the next 2 stitches and repeat. This creates the curved scallop hem at the bottom of each tier.
sc2tog (single crochet two together): Insert hook into next stitch, yo, pull up a loop (2 loops on hook). Insert hook into following stitch, yo, pull up a loop (3 loops on hook). Yo and pull through all 3 loops. You have decreased one stitch.
Important Pattern Notes
Read through these notes before starting. They will save you confusion later.
1. The bodice is worked in two mirrored flat pieces (left cup and right cup), each beginning at the lower point of the V-neckline.
2. The waistband is worked in the round directly onto the bottom edge of the joined bodice.
3. Each skirt tier is worked in the round, increasing in circumference from top to bottom for the cascading ruffle effect.
4. The back is fully open from neckline to waist. This is intentional for the breezy silhouette.
5. Right side always faces you when working in the round. Turn pieces when working flat.
6. Block all pieces before seaming. Blocking opens the lace significantly.
Step by Step Instructions for the Tiered Halter Dress
Bodice: Right Cup
The right cup is worked flat, beginning at the lower center V point. Use your smaller hook (E-4 / 3.5 mm).
Ch 4. Join with sl st to first ch to form a small ring.
Row 1 (RS): Ch 3 (counts as first dc throughout bodice), work 3 dc into ring. Turn. (4 dc)
Row 2 (WS): Ch 3, dc into first st (increase made), dc across to last st, 2 dc into last st (increase made). Turn. (6 dc)
Row 3: Ch 3, dc into first st (increase), dc across to last st, 2 dc into last st. Turn. (8 dc)
Row 4: Ch 3, dc into first st, dc across to last st, 2 dc into last st. Turn. (10 dc)
Row 5: Ch 3, dc into first st, dc across to last st, 2 dc into last st. Turn. (12 dc)
Row 6: Ch 3, dc into first st, dc across to last st, 2 dc into last st. Turn. (14 dc)
Row 7: Ch 1, sc across. Turn. (14 sc)
Row 8: Ch 1, sc across. Turn. (14 sc)
Rows 9 through 12: Continue in sc without shaping. Turn at end of each row. (14 sc)
Row 13: Ch 1, sc2tog, sc to end. Turn. (13 sc)
Row 14: Ch 1, sc to last 2 sts, sc2tog. Turn. (12 sc)
Row 15: Ch 1, sc2tog, sc to end. Turn. (11 sc)
Row 16: Ch 1, sc to last 2 sts, sc2tog. Turn. (10 sc)
Row 17: Ch 1, sc across. Turn. (10 sc)
Row 18: Ch 1, sc across. Turn. (10 sc)
Fasten off and leave a long tail for seaming.
Size adjustments: For sizes XS and S, work only through Row 15 (9 sc). For sizes L and XL, work 2 additional plain sc rows after Row 16, adding 1 sc at the armhole edge only in each of those rows. Size XL final stitch count: 12 sc.
Checkpoint: The piece should measure approximately 5 in tall and 2 in wide at the widest point for size M.
Bodice: Left Cup
Work the left cup as a mirror image of the right cup using the smaller hook.
Ch 4. Join with sl st to first ch to form a small ring.
Row 1 (RS): Ch 3, work 3 dc into ring. Turn. (4 dc)
Rows 2 through 6: Ch 3, 2 dc into first st, dc across to last st, 2 dc into last st. Turn. Increase 2 sts each row. (6, 8, 10, 12, 14 dc)
Rows 7 through 12: Ch 1, sc across. Turn. (14 sc)
Row 13: Ch 1, sc to last 2 sts, sc2tog. Turn. (13 sc)
Row 14: Ch 1, sc2tog, sc to end. Turn. (12 sc)
Row 15: Ch 1, sc to last 2 sts, sc2tog. Turn. (11 sc)
Row 16: Ch 1, sc2tog, sc to end. Turn. (10 sc)
Rows 17 and 18: Ch 1, sc across. Turn. (10 sc)
Fasten off and leave a long tail for seaming.
Joining the Bodice Cups
Lay right cup and left cup with right sides together, V-points touching at center front. Using yarn and tapestry needle, whip stitch the two center-front V edges together from the bottom point upward for 1.5 in. This creates the center front V seam. Do not seam the sides yet.
Bodice Lace Yoke Panel
This section adds the decorative lace pattern visible across the upper bodice. It is worked flat across the joined top edges of both cups.
With RS facing, attach yarn at the top left armhole edge of the left cup.
Row 1 (RS): Ch 4 (counts as dc plus ch 1), sk first st, [dc in next st, ch 1, sk 1 st] across both cups. Turn. (20 dc plus 9 ch-1 spaces for size M)
Row 2 (WS): Ch 3, [V-st into next ch-1 sp] across. End with dc into last st. Turn. (11 V-sts plus 2 edge dc)
Row 3: Ch 4, [dc into ch-1 sp of V-st, ch 1] across, dc into last st. Turn. (13 dc plus 12 ch-1 spaces)
Row 4: Ch 3, [V-st into each ch-1 sp] across, dc into last st. Turn. (12 V-sts plus 2 edge dc)
Row 5: Ch 4, [dc into ch-1 sp, ch 1] across, dc into last st. Turn. (14 dc plus 13 ch-1 spaces)
Row 6: Ch 3, [V-st into each ch-1 sp] across, dc into last st. Turn. (13 V-sts plus 2 edge dc)
Row 7: Ch 1, sc across all sts including into each dc and each ch-1 sp of V-sts. Turn. (40 sc)
Row 8: Ch 1, sc across. Turn. (40 sc)
Fasten off.
Checkpoint: The bodice front with lace yoke should measure approximately 7 in tall at center and 17 in wide across the top for size M.
Back Strap Edge
The back is fully open. Work a simple edging row along each side edge of the bodice front.
With RS facing, attach yarn at top left corner. Ch 1, sc evenly down the left side edge (approximately 30 sc for size M), continuing down and around the bottom edge. Fasten off.
Repeat for the right side.
Waistband
The waistband joins the front bodice and bridges across the open back. Use the smaller hook.
Total waistband circumference for size M: 30 in / 150 sc around. (XS: 140 sc, S: 145 sc, L: 160 sc, XL: 170 sc)
With RS facing, attach yarn at lower right side of bodice front. Work sc evenly across the bottom edge of the bodice front. Then chain stitches to bridge the open back. Join with sl st to form a round.
For size M: Work 75 sc across front bottom edge, ch 75, join. (150 sts)
Rnd 1: Ch 1, sc in each st and each ch around. Join with sl st. (150 sc)
Rnds 2 through 6: Ch 1, sc in each st around. Join. (150 sc)
Belt Channel
Rnd 7: Ch 1, sc in first 25 sts, ch 2 (skip 2 sts for belt slot), sc in next 96 sts, ch 2 (skip 2 sts), sc in last 25 sts. Join. (146 sc plus 4 ch)
Rnd 8: Ch 1, sc around, working 2 sc into each ch-2 sp. Join. (150 sc)
Rnd 9: Ch 1, sc in each st around. Join. (150 sc)
Fasten off.
Checkpoint: The waistband should measure 30 in around and approximately 1.75 in tall for size M.
Skirt Tier 1 (Uppermost Tier)
Switch to your larger hook (F-5 / 3.75 mm) for all skirt sections.
Rnd 1 (increase): With RS facing, attach yarn to any st on the bottom round of the waistband. Ch 3, dc in same st, [dc in next st, 2 dc in next st] 73 times, dc in last 2 sts. Join. (224 dc for size M)
Rnd 2: Ch 4 (counts as dc, ch 1), sk first st, [V-st in next st, sk 1 st] 111 times, dc in last st, ch 1. Join with sl st to 3rd ch of beg ch-4. (112 V-sts)
Rnds 3 through 6: Sl st into first ch-1 sp of first V-st, ch 4, [V-st in ch-1 sp of next V-st, ch 1] 111 times, join. (112 V-sts)
Rnd 7: Ch 1, sc into each dc and each ch-1 sp of V-sts around. Join. (336 sc)
Tier 1 Lace Border:
Rnd 8: Ch 4, sk 2 sc, [V-st in next sc, sk 2 sc] 111 times, join. (112 V-sts)
Rnd 9: [5 dc in ch-1 sp of V-st, ch 1] around. Join. (112 shells)
Rnd 10 (Scallop edging): Sl st to 3rd dc of first shell. [Ch 3, 4 dc into same dc, ch 3, sl st into 3rd dc of next shell] around. Fasten off.
Checkpoint: Tier 1 should measure approximately 8 in from waistband top to scallop edging bottom.
Skirt Tier 2 (Middle Tier)
Attach yarn approximately 4 rounds up from the bottom of the waistband.
Rnd 1 (increase): Ch 3, dc in same st, distribute increases evenly to reach 300 dc. Join. (300 dc for size M)
Rnd 2: Ch 4, sk first st, [V-st in next st, sk 1 st] 149 times, join. (150 V-sts)
Rnds 3 through 7: Sl st to ch-1 sp, ch 4, [V-st in next ch-1 sp] 149 times, join. (150 V-sts)
Rnd 8: Ch 1, sc into each dc and ch-1 sp around. Join. (450 sc)
Tier 2 Lace Border:
Rnd 9: Ch 4, sk 2 sc, [V-st in next sc, sk 2 sc] 149 times, join. (150 V-sts)
Rnd 10: [5 dc in ch-1 sp of V-st, ch 1] 150 times around. Join. (150 shells)
Rnd 11 (Scallop edging): [Ch 3, 4 dc into 3rd dc of shell, ch 3, sl st into 3rd dc of next shell] around. Fasten off.
Checkpoint: Tier 2 should measure approximately 10 in tall including lace border.
Skirt Tier 3 (Lowest Tier)
Attach yarn at the lowest edge of the waistband.
Rnd 1 (increase): Work [2 dc in each st] around the waistband base for 150 stitches (300 dc), then continue working into those new dc: [dc in next 4 dc, 2 dc in next dc] 60 times. Join to first dc. (360 dc for size M)
Rnd 2: Ch 4, sk 1 st, [V-st in next st, sk 1 st] 179 times. Join. (180 V-sts)
Rnds 3 through 9: Sl st to ch-1 sp, ch 4, [V-st in ch-1 sp] 179 times. Join. (180 V-sts)
Rnd 10: Ch 1, sc into each dc and ch-1 sp around. Join. (540 sc)
Tier 3 Lace Border:
Rnd 11: Ch 4, sk 2 sc, [V-st in next sc, sk 2 sc] 179 times. Join. (180 V-sts)
Rnd 12: [5 dc in ch-1 sp, ch 1] 180 times around. Join. (180 shells)
Rnd 13 (Scallop edging): [Ch 3, 4 dc into 3rd dc of shell, ch 3, sl st into 3rd dc of next shell] around. Fasten off.
Finishing Your Boho Tiered Dress
Halter Straps
Using your smaller hook, ch 100. Thread 10 to 12 wooden beads onto each chain, spacing them evenly. Attach one end to the top corner of each bodice cup. The straps tie at the back of the neck.
Braided Belt
Cut three lengths of jute cord, each approximately 1 yard long. Braid them together, leaving 3 inches unbraided at each end. Wrap the ends with embroidery floss and add tassels by cutting additional yarn, folding it, and wrapping the fold to secure.
Thread the belt through the belt channel openings created in the waistband.
Blocking
Wet block all pieces on blocking mats. Pin the scallop edging to open the lace fully. Allow to dry completely before wearing.
Tips for Success with This Crochet Tutorial
Take your time with the bodice cups. Getting them identical ensures a symmetrical finished piece.
Count your stitches at the end of every round during the skirt tiers. The lace patterns can be tricky to track, and catching a mistake early saves hours of frogging.
If you find the V-stitch rounds confusing, place a stitch marker in every 10th V-stitch. This helps you keep your place.
Block aggressively. Cotton relaxes beautifully with water, and the lace will really open up and show its full beauty after blocking.
I hope you absolutely love making this beautiful boho dress. It is a showstopper, and all those hours are worth it when you see the finished piece on the dress form or, better yet, on yourself.
If you want to save this crochet pattern for later, go ahead and pin it to your favorite Pinterest board so you can find it when you are ready to start. And please drop a comment below if you make this dress. I would love to hear how it turns out for you!